
Most modules need a parameter table that can only consist of one record. The values in the table specify general options for the module. They typically consist of the number sequences needed for the module and default values that are used throughout the module.
In the following example, we will create a parameter table for the Car Rental module. The following are the steps:
- First off, we will create a table in the same way that we did in Chapter 3, Storing Data, name the table
CarRentalParameters, and set the label of the table to beCar rental parameters. - We then add a field to the parameter table that will work as the key for the parameter table, ensuring that at maximum only one record can exist in the table. In order to do this, we open an additional AOT window and browse to the extended data type named
ParametersKey. Then, we drag-and-drop it onto the Fields node of our newly created parameter table and change the name of the field in the table toKey. We also change some of the properties of theKeyfield in the parameter table as follows:- AllowEditOnChange:
No - AllowEdit:
No - Visible:
No
- AllowEditOnChange:
- We also create an index that consists of this field only, call the
KeyIdxindex and set the parameterAllow DuplicatestoNo. - Then, we add a field that will be used to hold the default file location to import and export data in the module. This field is used in the example at the end of this section. We name this field
DefaultFilepathand make it extend the extended data typeFilename. - Then, we change some of the parameters of the
CarRentalParametertable as follows:- TableContents:
Base + default data - MaxAccessNode:
Edit - CacheLookup:
Found - TableGroup:
Parameter - PrimaryIndex:
KeyIdx - ClusterIndex:
KeyIdx - ModifyDateTime:
Yes - ModifyBy:
Yes
- TableContents:
- We will also create a
findmethod for the table, which will look something like this:client server static CarRentalParameters find(boolean _forupdate = false), { CarRentalParameters parameter; // Try/catch added because of issues that // might occur during upgrade try { if (_forupdate) parameter.selectForUpdate(_forupdate); // Find the one and only record in // the table if any select firstonly parameter index KeyIdx where parameter.Key == 0; // If the record doesn't exist and // the table buffer used has not been // set as temporary, then create the record. if (!parameter && !parameter.isTmp()) Company::createParameter(parameter); } catch (Exception::DuplicateKeyException,parameter) { retry; } return parameter; }
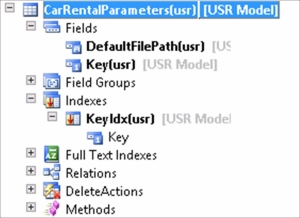
The CarRentalParameter table should now look like this in AOT:
We can now use the parameter table in the ImpExpFileDialog class that we created in Chapter 7, Integrating Data. We will modify the dialog method and add the code between the NEW comments, as shown in the following code:
public Object dialog()
{
  // Create a new object of the DialogRunbase class
  dialog = new DialogRunbase("Import data from file", this);
  // +++ NEW +++
  // Find the default filepath if it has been set
  // in the parameter table if the fileName variable
  // is empty (no value fetched while unpacking).
  if (!fileName)
  fileName = CarRentalParameters::find().DefaultFilepath;
  // --- NEW ---
  // Add the fields to the dialog and
  // set the initial value to be equal to
  // the value selected last time.
  dialogReadWrite = dialog.addFieldValue(typeid(ReadWrite), readWrite);
  dialogFileName = dialog.addFieldValue(typeid(FileName), fileName);
  dialogFileType = dialog.addFieldValue(typeid(FileType), fileType);
  dialogEntity = dialog.addFieldValue(typeid(FileEntity), entity);
  return dialog;
}
As we haven't created a form for the parameter table yet, we will have to use the table browser to change the parameter in order to test the import/export classes. Remember to delete the usage data after implementing the changes done in the preceding code. If you don't, you will get the previous selected file location and filename instead of the file location from the parameter table.
Also, add the following methods to the parameter table. This method will be used to get the number sequence reference:
Public server static NumberSequenceReference numRefRentalId ()
{
  // scope definition
  NumberSeqScopeFactory::CreateDataAreaScope(selectableDataArea _dataArea = curext());
  return NumberSeqReference::findReference(extendedtypenum (RentalId));
}In the first section of this chapter, you learned how to set up a number sequence reference by adding a new class. Now, you have to create a number sequence and to link it to the number sequence reference.
The first thing that we need to do is initialize the number sequence by calling the LoadAll method on the class NumberSequenceModuleSetup. Create a job that can call the LoadAll function.
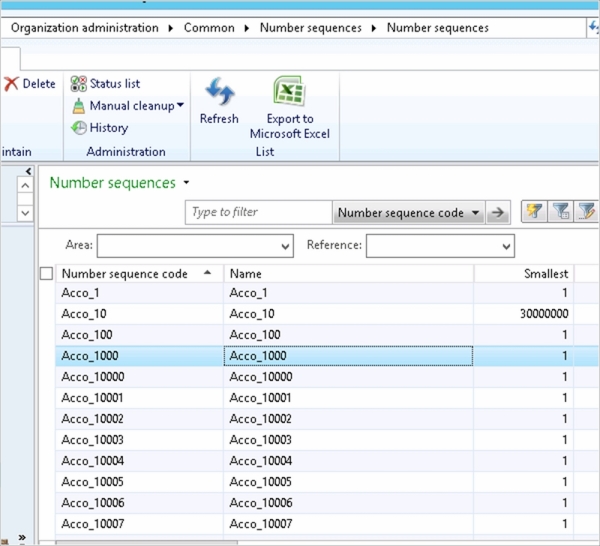
Next, go to the Number sequence form and set up the number sequence by navigating to Organization administration | Common | Number sequences | Number sequences.
It is also common to be able to do this from the page in the last tab in the parameter form for the module where it is relevant to set up the number sequence. The following screenshot shows a Number Sequence form:
There are a few steps you have to perform in order to use the number sequence as well, and I will try to demonstrate how to use the number sequence for the RentalId value in the RentalTable form. The steps are as follows:
- First of all, we add a global variable in the
RentalTableform to hold an object of theNumberSeqFormHandlerclass:public class FormRun extends ObjectRun { NumberSeqFormHandler numberSeqFormHandler; } - Then, add a global method that creates and holds the reference to the
numberSeqFormHandlerobject:NumberSeqFormHandler numberSeqFormHandler() { if (!numberSeqFormHandler) { // Create a new object of the NumberSeqFormHandler // class by using the static method newForm numberSeqFormHandler = NumberSeqFormHandler::newForm(CarRentalParameters::numRefRentalId().NumberSequenceId,element, RentalTable_DS, fieldnum(RentalTable, RentalId)); } return numberSeqFormHandler; } - You also need to override the following methods in the
RentalTabledata source, as shown in the following code:public void create(boolean _append = false) { element.numberSeqFormHandler().formMethodDataSourceCreatePre(); super(_append); element.numberSeqFormHandler().formMethodDataSourceCreate(); } public void delete() { element.numberSeqFormHandler().formMethodDataSourceDelete(); super(); } public void write() { super(); element.numberSeqFormHandler().formMethodDataSourceWrite(); } - Opening the
RentalTableform now and creating a new record should create a new value for theRentalId.