Video
In this chapter:
– Displaying recorded video
– Creating a software mirror
– Computer vision basics: how to use a video camera as a sensor
16-1 Live video 101
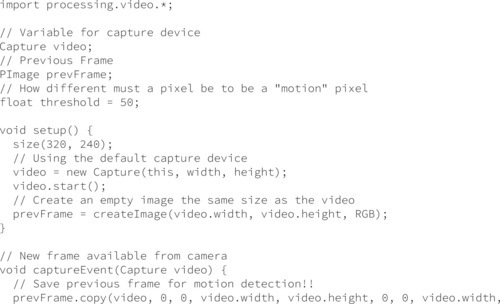
Now that you’ve explored static images in Processing, you are ready to move on to moving images, specifically from a live camera (and later, from a recorded movie). I’ll begin by walking through the basic steps of importing the video library and using the Capture class to display live video.
Step 1. Import the Processing video library.
If you skipped Chapter 12 on Processing libraries, you might want to go back and review the details. Although the video library is developed and maintained by the Processing Foundation, due to its size, it must still be downloaded separately through the contributions manager. Full instructions are provided in Section 12-3 on page 226.
Once you’ve got the library installed, the next step is to import the library in your code. This is done by selecting the menu option Sketch → Import Library → Video, or by typing the following line of code (which should go at the very top of your sketch):
import processing.video.*;
Using the “Import Library” menu option does nothing other than automatically insert that line into your code, so manual typing is entirely equivalent.
Step 2. Declare a Capture object.
You’ve recently seen how to create objects from classes built into the Processing language such as PShape and PImage. Both of these classes, it should be noted, are part of the processing.core library and, therefore, no import statement were required. The processing.video library has two useful classes inside of it — Capture, for live video, and Movie, for recorded video. In this step, I’ll be declaring a Capture object.
Capture video;
Step 3. Initialize the Capture object.
The Capture object “video” is just like any other object. As you learned in Chapter 8, to construct an object, you use the new operator followed by the constructor. With a Capture object, this code typically appears in setup().
video = new Capture();
The above line of code is missing the appropriate arguments for the constructor. Remember, this is not a class you wrote yourself so there is no way to know what is required between the parentheses without consulting the online reference (http://www.processing.org/reference/libraries/video/Capture.html).
The reference will show there are several ways to call the Capture constructor (see overloading in Chapter 23 about multiple constructors). A typical way to call the constructor is with three arguments:
void setup() {
video = new Capture(this, 320, 240);
}
Let’s walk through the arguments used in the Capture constructor.
• this — If you’re confused by what this means, you are not alone. This is the first reference to this in any of the examples in this book so far. Technically speaking, this refers to the instance of a class in which the word this appears. Unfortunately, such a definition is likely to induce head spinning. A nicer way to think of it is as a self-referential statement. After all, what if you needed to refer to your Processing program within your own code? You might try to say “me” or “I.” Well, these words are not available in Java, so instead you say this. The reason you pass this into the Capture object is you are telling it: “Hey listen, I want to do video capture and when the camera has a new image I want you to alert this sketch.”
• 320 — Fortunately, the first argument, this, is the only confusing one. 320 refers to the width of the video captured by the camera.
• 240 — The height of the video.
There are some cases, however, where the above will not do. For example, what if you have multiple cameras attached to your computer. How do you select the one you want to capture? In addition, in some rare cases, you might also want to specify a frame rate from the camera. For these cases, Processing will give you a list of all possible camera configurations via Capture.list(). You can display these in your message console, for example, by saying:

You can use the text of these configurations to create a Capture object. On a Mac with a built-in camera, for example, this might look like:
video = new Capture(this, "name=FaceTime HD Camera (Built-in),size=320×240,fps=30");
Capture.list() actually gives you an array so you can also simply refer to the index of the configuration you want.
video = new Capture(this, Capture.list()[0]);
Step 4. Start the capture process.
Once the camera is ready, it’s up to you to tell Processing to start capturing images.
void setup() {
video = new Capture(this, 320, 240);
video.start();
}
In almost every case you want to begin capturing right in setup(). Nevertheless, start() is its own method, and you do have the option of, say, not starting capturing until some other time (such as when a button is pressed, etc.)
Step 5. Read the image from the camera.
There are two strategies for reading frames from the camera. I will briefly look at both and choose one for the remainder of the examples in this chapter. Both strategies, however, operate under the same fundamental principle: I only want to read an image from the camera when a new frame is available to be read.
In order to check if an image is available, you use the function available(), which returns true or false depending on whether something is there. If it is there, the function read() is called and the frame from the camera is read into memory. You can do this over and over again in the draw() loop, always checking to see if a new image is free to be read.
void draw() {
if (video.available()) {
video.read();
}
}
The second strategy, the “event” approach, requires a function that executes any time a certain event — in this case a camera event — occurs. If you recall from Chapter 3, the function mousePressed() is executed whenever the mouse is pressed. With video, you have the option to implement the function captureEvent(), which is invoked any time a capture event occurs, that is, a new frame is available from the camera. These event functions (mousePressed(), keyPressed(), captureEvent(), etc.) are sometimes referred to as a “callback.” And as a brief aside, if you’re following closely, this is where this fits in. The Capture object, video, knows to notify this sketch by invoking captureEvent() because you passed it a reference to this sketch when creating the Capture object video.
captureEvent() is a function and therefore needs to live in its own block, outside of setup() and draw().
void captureEvent(Capture video) {
video.read();
}
You might notice something odd about captureEvent(). It includes an argument of type Capture in its definition. This might seem redundant to you; after all, in this example I already have a global variable video. Nevertheless in the case where you might have more than one capture device, the same event function can be used for both and the video library will make sure that the correct Capture object is passed in to captureEvent().
To summarize, I want to call the function read() whenever there is something to read, and I can do so by either checking manually using available() within draw() or allowing a callback to handle it for you — captureEvent(). Many other libraries that I will explore in later chapters (such as Chapter 19) will work exactly the same way.
For the examples in this book, I’ll use captureEvent(). This allows sketches to operate more efficiently by separating out the logic for reading from the camera from the main animation loop.
Step 6. Display the video image.
This is, without a doubt, the easiest part. You can think of a Capture object as a PImage that changes over time, and, in fact, a Capture object can be utilized in an identical manner as a PImage object.
image(video, 0, 0);
All of this is put together in Example 16-1.


Figure 16-1
Again, anything you can do with a PImage (resize, tint, move, etc.) you can do with a Capture object. As long as you read() from that object, the video image will update as you manipulate it. See Example 16-2.
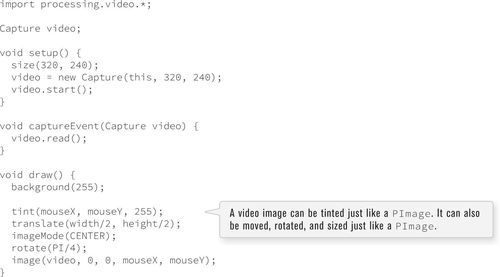

Figure 16-2
Every single image example from Chapter 15 can be recreated with video. Following is the “adjusting brightness” example with a video image.

16-2 Recorded video
Displaying recorded video follows much of the same structure as live video. Processing’s video library accepts most video file formats; for specifics, visit the Movie reference (https://www.processing.org/reference/libraries/video/Movie.html).
Step 1. Instead of a Capture object, declare a Movie object.
Movie movie;
Step 2. Initialize Movie object.
movie = new Movie(this, "testmovie.mov");
The only necessary arguments are this and the movie’s filename enclosed in quotes. The movie file should be stored in the sketch’s data directory.
Step 3. Start movie playing.
There are two options, play(), which plays the movie once, or loop(), which loops it continuously.
movie.loop();
Step 4. Read frame from movie.
Again, this is identical to capture. You can either check to see if a new frame is available, or use a callback function.
void draw() {
if (movie.available()) {
movie.read();
}
}
Or:
void movieEvent(Movie movie) {
movie.read();
}
Step 5. Display the movie.
image(movie, 0, 0);
Example 16-4 shows the program all put together.

Although Processing is by no means the most sophisticated environment for displaying and manipulating recorded video, there are some more advanced features available in the video library. There are functions for obtaining the duration (length measured in seconds) of a video, for speeding it up and slowing it down, and for jumping to a specific point in the video (among others). If you find that performance is sluggish and the video playback is choppy, I would suggest trying the P2D or P3D renderers as described in Section 14-2 on page 271.
Following is an example that makes use of jump() (jump to a specific point in the video) and duration() (returns the length of movie in seconds).

 Exercise 16-2: Using the speed() method in the Movie class, write a program where the user can control the playback speed of a movie with the mouse. Note speed() takes one argument and multiplies the movie playback rate by that value. Multiplying by 0.5 will cause the movie to play half as fast, by 2, twice as fast, by −2, twice as fast in reverse, and so on. Note that not all video formats support backward playback so reversing may only work for some video files. Details are provided in the Processing reference (https://processing.org/reference/libraries/video/Movie_speed_.html).
16-3 Software mirrors
With small video cameras attached to more and more personal computers, developing software that manipulates an image in real-time is becoming increasingly popular. These types of applications are sometimes referred to as “mirrors,” as they provide a digital reflection of a viewer’s image. Processing’s extensive library of functions for graphics and its ability to capture from a camera in real-time make it an excellent environment for prototyping and experimenting with software mirrors.
As I showed in this chapter, you can apply basic image processing techniques to video images, reading and replacing the pixels one by one. Taking this idea one step further, you can read the pixels and apply the colors to shapes drawn onscreen.
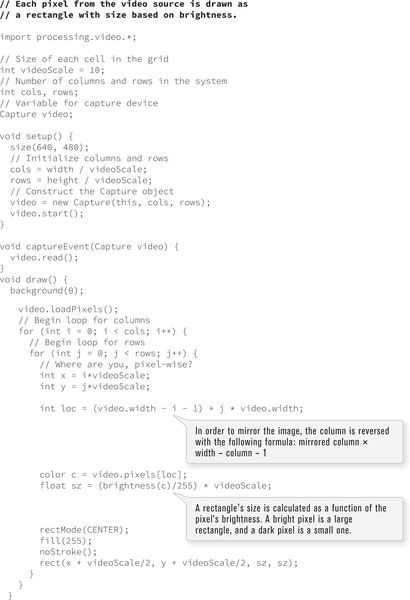
I will begin with an example that captures a video at 80 × 60 pixels and renders it on a 640 × 480 window. For each pixel in the video, I will draw a rectangle eight pixels wide and eight pixels tall.
Let’s first write the program that displays the grid of rectangles. See Figure 16-4.

Figure 16-4

Knowing that I want to have squares eight pixels wide by eight pixels high, I can calculate the number of columns as the width divided by eight and the number of rows as the height divided by eight.
• 480/8 = 60 rows
I can now capture a video image that is 80 × 60. This is useful because capturing a 640 × 480 video from a camera can be slow compared to 80 × 60. I only want to capture the color information at the resolution required for the sketch.
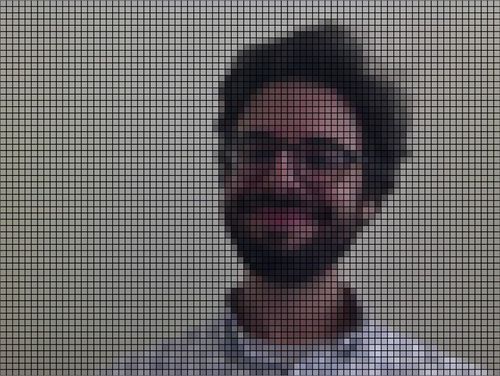
Figure 16-5
For every square at column i and row j, I look up the color at pixel (i, j) in the video image and color it accordingly. See Example 16-7 (new parts in bold).

As you can see, expanding the simple grid system to include colors from video only requires a few additions. I have to declare and initialize the Capture object, read from it, and pull colors from the pixel array.
Less literal mappings of pixel colors to shapes in the grid can also be applied. In the following example, only the colors black and white are used. Squares are larger where brighter pixels in the video appear, and smaller for darker pixels. See Figure 16-6.
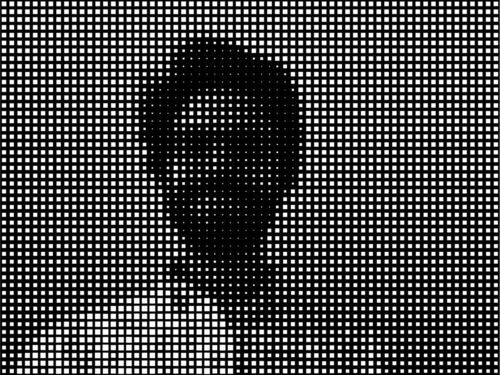
Figure 16-6
It’s often useful to think of developing software mirrors in two steps. This will also help you think beyond the more obvious mapping of pixels to shapes on a grid.
Step 1. Develop an interesting pattern that covers an entire window.
Step 2. Use a video’s pixels as a look-up table for coloring that pattern.
Say for Step 1, I write a program that scribbles a random line around the window. Here is my algorithm, written in pseudocode.
• Start with an (x,y) position at the center of the screen.
• Repeat forever the following:
— Pick a new (x,y), staying within the window.
— Draw a line from the old (x,y) to the new (x,y).
— Save the new (x,y).

Figure 16-7
Now that I have finished the pattern generating sketch, I can change stroke() to set a color according to the video image. Note again the new lines of code added in bold in Example 16-10.


Figure 16-8
Exercise 16-3: Create your own software mirror using the methodology from Example 16-9 and Example 16-10. Create your system without the video first and then incorporate using the video’s pixels to determine colors, behaviors, and so on.

16-4 Video as sensor, computer vision
Every example in this chapter has treated the video camera as a data source for digital imagery displayed onscreen. This section will provide a simple introduction to things you can do with a video camera when you do not display the image, that is, “computer vision.” Computer vision is a scientific field of research dedicated to machines that see, using the camera as a sensor.
In order to better understand the inner workings of computer vision algorithms, I will write all of the code on a pixel-by-pixel level. However, to explore these topics further, you might consider downloading some of the third-party computer vision libraries that are available for Processing. Many of these libraries have advanced features beyond what will be covered in this chapter. A brief overview of the libraries will be offered at the end of this section.
Let’s begin with a simple example.
The video camera is your friend because it provides a ton of information. A 320 × 240 image is 76,800 pixels! What if you were to boil down all of those pixels into one number: the overall brightness of a room? This could be accomplished with a one-dollar light sensor (or “photocell”), but as an exercise I will make a webcam do it.
You have seen in other examples that the brightness value of an individual pixel can be retrieved with the brightness() function, which returns a floating point number between 0 and 255. The following line of code retrieves the brightness for the first pixel in the video image.
float brightness = brightness(video.pixels[0]);
I can then compute the overall (i.e., average) brightness by adding up all the brightness values and dividing by the total number of pixels.

Before you start to cheer too enthusiastically from this accomplishment, while this example is an excellent demonstration of an algorithm that analyzes data provided by a video source, it does not begin to harness the power of what one can “see” with a video camera. After all, a video image is not just a collection of colors, but it is a also collection of spatially oriented colors. By developing algorithms that search through the pixels and recognize patterns, you can start to develop more advanced computer vision applications.
Tracking the brightest color is a good first step. Imagine a dark room with a single moving light source. With the techniques you will learn, that light source could replace the mouse as a form of interaction. Yes, you are on your way to playing Pong with a flashlight.
First, I will examine how to search through an image and find the (x,y) location of the brightest pixel. The strategy I will employ is to loop through all the pixels, looking for the “world record” brightest pixel (using the brightness() function). Initially, the world record will be held by the first pixel. As other pixels beat that record, they will become the world record holder. At the end of the loop, whichever pixel is the current record holder gets the “Brightest Pixel of the Image” award.
Here is the code:

A natural extension of this example would be to track a specific color, rather than simply the brightest. For example, I could look for the most “red” or the most “blue” in a video image. In order to perform this type of analysis, I will need to develop a methodology for comparing colors. Let’s create two colors, c1 and c2.
color c1 = color(255, 100, 50);
color c2 = color(150, 255, 0);
Colors can only be compared in terms of their red, green, and blue components, so I must first separate out these values.
float r1 = red(c1);
float g1 = green(c1);
float b1 = blue(c1);
float r2 = red(c2);
float g2 = green(c2);
float b2 = blue(c2);
Now, I am ready to compare the colors. One strategy is to take the sum of the absolute value of the differences. That is a mouthful, but it’s really fairly simple. Take r1 minus r2. Since I only care about the magnitude of the difference, not whether it is positive or negative, take the absolute value (the positive version of the number). Do this for green and blue, and add them all together.
float diff = abs(r1 − r2) + abs(g1 − g2) + abs(b1 − b2);
While this is perfectly adequate (and a fast calculation at that), a more accurate way to compute the difference between colors is to take the “distance” between colors. OK, so you may be thinking: “Um, seriously? How can a color be far away or close to another color?” Well, you know the distance between two points is calculated via the Pythagorean Theorem. You can think of color as a point in three-dimensional space, only instead of (x,y,z), you have (r,g,b). If two colors are near each other in this color space, they are similar; if they are far, they are different.
float diff = dist(r1, g1, b1, r2, g2, b2);
Looking for the most red pixel in an image, for example, is therefore looking for the color closest to red — (255,0,0).
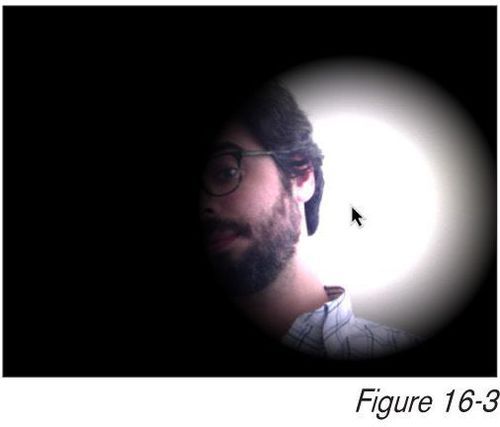
By adjusting the brightness tracking code to look for the closest pixel to any given color (rather than the brightest), I can put together a color tracking sketch. In the following example, the user can click the mouse on a color in the image to be tracked. A black circle will appear at the location that most closely matches that color. See Figure 16-9.

Figure 16-9

Exercise 16-4
Although more accurate, because dist() involves a square root in its calculation, it’s slower than the absolute value of the difference methodology. One way around this is to write your own color distance function without the square root. Rewrite Example 16-11 using the new method below. How do you need to adjust the threshold given the lack of square root?
float colorDiff(float r1, float g1, float b1, ________________) {
return (r1−r2)*(r1−r2) + (g1−g2)*(g1−g2) + (b1−b2)*(b1−2);
}
Exercise 16-5
Take any Processing sketch you’ve previously created that involves mouse interaction and replace the mouse with color tracking. Create an environment for the camera that is simple and high contrast. For example, point the camera at a black (or white) tabletop with a small white (or black) object. (If you don’t have a solid color tabletop, try covering with something like a white T-shirt.) Control your sketch with the object’s location. The picture shown illustrates the example that controls the “snake” from Example 9-8 with a tracked bottlecap.

16-5 Background removal
The distance comparison for color proves useful in other computer vision algorithms as well, such as background removal. Let’s say you wanted to show a video of you dancing the hula, only you did not want to be dancing in your office where you happen to be, but at the beach with waves crashing behind you. Background removal is a technique that allows you to remove the background of an image (your office) and replace it with any pixels you like (the beach), while leaving the foreground (you dancing) intact.
• Memorize a background image.
• Check every pixel in the current video frame. If it’s very different from the corresponding pixel in the background image, it is a foreground pixel. If not, it is a background pixel. Display only foreground pixels.
To demonstrate the above algorithm, let’s create a reverse green screen. The sketch will remove the background from an image and replace it with green pixels.
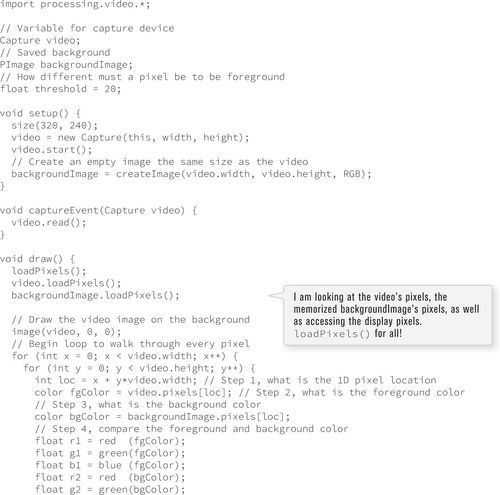
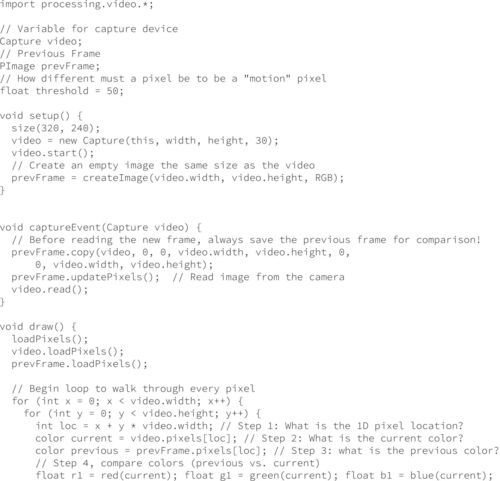
Step one is “memorizing” the background. The background is essentially a snapshot from the video. Since the video image changes over time, I must save a copy of a frame of video in a separate PImage object.
PImage backgroundImage;
void setup() {
backgroundImage = createImage(video.width, video.height, RGB);
}
When backgroundImage is created, it’s a blank image, with the same dimensions as the video. It’s not particularly useful in this form, so I need to copy an image from the camera into the background image when I want to memorize the background. Let’s do this when the mouse is pressed.
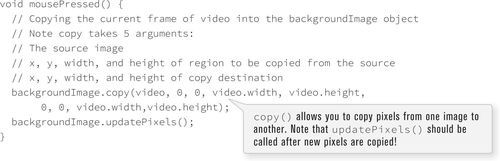
Once I have the background image saved, I can loop through all the pixels in the current frame and compare them to the background using the distance calculation. For any given pixel (x,y), I use the following code:
int loc = x + y * video.width; // Step 1: what is the 1D pixel location?
color fgColor = video.pixels[loc]; // Step 2: the foreground color
color bgColor = backgroundImage.pixels[loc]; // Step 3: the background color
// Step 4: Compare the foreground and background color
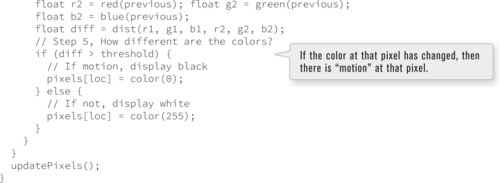
float r1 = red(fgColor); float g1 = green(fgColor); float b1 = blue(fgColor);
float r2 = red(bgColor); float g2 = green(bgColor); float b2 = blue(bgColor);
float diff = dist(r1, g1, b1, r2, g2, b2);
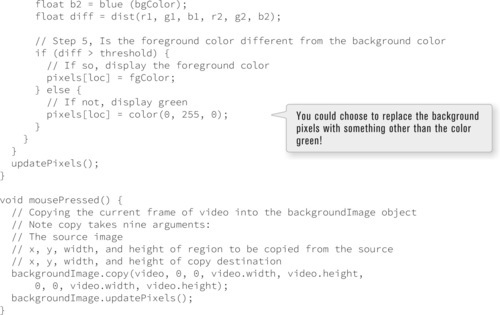
// Step 5: Is the foreground color different from the background color
if (diff > threshold) {
// If so, display the foreground color
pixels[loc] = fgColor;
} else {
// If not, display green
pixels[loc] = color(0, 255, 0);
}
The above code assumes a variable named threshold. The lower the threshold, the easier it is for a pixel to be in the foreground. It does not have to be very different from the background pixel. Here is the full example with threshold as a global variable.
When you get to running this example, step out of the frame, click the mouse to memorize the background without you in it, and then step back into the frame; you will see the result as seen in Figure 16-10.
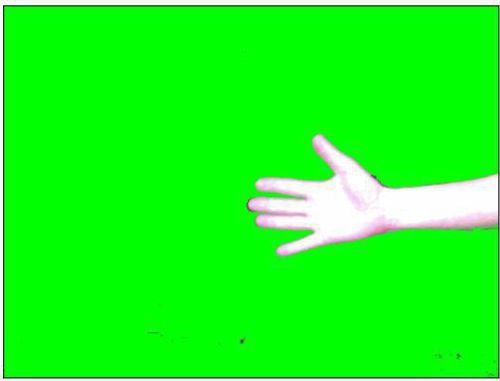
Figure 16-10
If this sketch does not seem to work for you at all, check and see what “automatic” features are enabled on your camera. For example, if your camera is set to automatically adjust brightness or white balance, you have a problem. Even though the background image is memorized, once the entire image becomes brighter or changes hue, this sketch will think all the pixels have changed and are therefore part of the foreground! For best results, disable all automatic features on your camera.
Exercise 16-6: Instead of replacing the background with green pixels, replace it with another image. What values work well for threshold and what values do not work at all? Try controlling the threshold variable with the mouse.
16-6 Motion detection
Today is a happy day. Why? Because all of the work you did to learn how to remove the background from a video gets you motion detection for free. In the background removal example, I examined each pixel’s relationship to a stored background image. Motion in a video image occurs when a pixel color differs greatly from what it used to be one frame earlier. In other words, motion detection is exactly the same algorithm, only instead of saving a background image once, you save the previous frame of video constantly!
The following example is identical to the background removal example with only one important change — the previous frame of video is always saved whenever a new frame is available.
void captureEvent(Capture video) {
// Before reading the new frame, always save the previous frame for comparison!
prevFrame.copy(video, 0, 0, video.width, video.height,
0, 0, video.width, video.height);
prevFrame.updatePixels();
video.read();
}
(The colors displayed are also changed to black and white and some of the variable names are different, but these are trivial changes.)

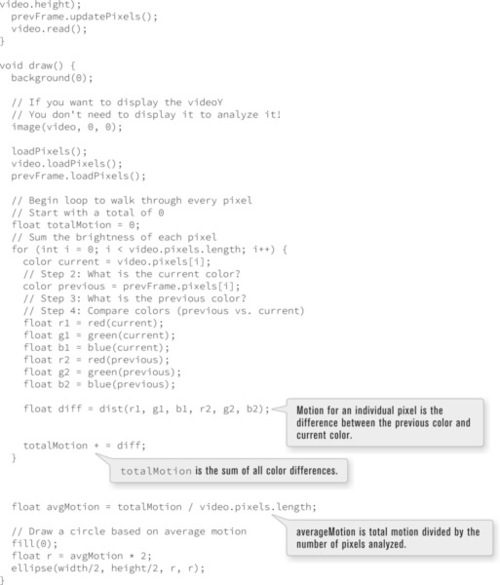
What if you want to know only the “overall” motion in a room? At the start of Section 16-4 on page 345, I calculated the average brightness of an image by taking the sum of each pixel’s brightness and dividing it by the total number of pixels.
Average Brightness = Total Brightness/Total Number of Pixels
I can calculate the average motion the same way:
Average Motion = Total Motion/Total Number of Pixels
The following example displays a circle that changes color and size based on the average amount of motion. Note again that you do not need to display the video in order to analyze it!
Exercise 16-7: Create a sketch that looks for the average location of motion. Can you have an ellipse follow your waving hand?
16-7 Computer vision libraries
There are several computer vision libraries already available for Processing (and there will inevitably be more). The nice thing about writing your own computer vision code is that you can control the vision algorithm at the lowest level, performing an analysis that conforms precisely to your needs. The benefit to using a third-party library is that since there has been a great deal of research in solving common computer vision problems (detecting edges, blobs, motion, tracking color, etc.), you do not need to do all of the hard work yourself! You can find a full list on the Processing website (http://processing.org/reference/libraries/#video&vision). Here are two I would recommend checking out.
OpenCV for Processing by Greg Borenstein (https://github.com/atduskgreg/opencv-processing)
OpenCV (“Open Source Computer Vision”) is an open source library written in C++ and originally developed by Intel Research. It provides a broad array of computer vision and image processing capabilities from image filtering to contour finding to object detection and more.
BlobDetection by Julien “v3ga” Gachadoat (http://www.v3ga.net/processing/BlobDetection/)
This library, as made obvious by its name, is specifically designed for detecting blobs in an image. Blobs are defined as areas of pixels whose brightness is above or below a certain threshold. The library takes any image as input and returns an array of Blob objects, each of which can tell you about its edge points and bounding box.
Finally, it’s also worth mentioning that recent innovations in depth sensing (most notably with the Microsoft Kinect sensor) have made many complex computer vision problems possible to implement in Processing. As all the examples in this chapter show, a traditional camera provides a grid of pixels. What if you could know the distance of each pixel from the camera? This would certainly make background subtraction much simpler for example. With a depth sensor, this is all possible. For more about depth sensing, visit the book’s website for links and examples.
Lesson Seven Project
Develop a software mirror that incorporates computer vision techniques. Follow these steps.
1. Design a pattern with no color. This could be a static pattern (such as a mosaic) or a moving one (such as the “scribbler” example) or a combination.
2. Color that pattern according to pixels from an image.
3. Replace the JPG with images from a live camera (or recorded movie).
4. Using computer vision techniques, alter the behavior of the the drawn elements according to the properties of the image. For example, perhaps brighter pixels cause shapes to spin or pixels that change a lot cause shapes to fly off the screen, and so on.
Use the space provided below to sketch designs, notes, and pseudocode for your project.