
Exporting
In this chapter:
– Stand-alone applications
– High resolution PDFs
– Images and image sequences
– Video recording
I have focused the energy in this book on learning to program. Nevertheless, eventually your code babies will grow up and want to find their way out in the world. This chapter is dedicated to a discussion of the various publishing options available to Processing sketches.
21-1 Exporting to web
Casey Reas and Ben Fry started Processing in 2001 when Java ruled the web. If you wanted to share real-time graphics or animation in a browser, embedding a Java “applet” was the primary mechanism for doing so. While Java applets still do work, it’s an outdated technology not easily supported by modern day browsers. In 2012, the Processing Foundation, a not-for-profit 501(c)(3) organization, was created to support and maintain multiple environments empowering people of all backgrounds to program. The philosophy and approach to learning and creating is the core mission of the foundation rather than a focus on any particular language. Currently the Foundation maintains and supports three environments.
Processing (http://processing.org)
The environment this book is primarily about, and the continuation of the original 2001 version built on top of Java
Processing.py (http://py.processing.org)
A Python version of the project
p5.js (http://p5js.org)
A modern-day re-interpretation of Processing for the web using JavaScript, HTML, and CSS. This is the one to use if the browser is your platform of choice.
While it may seem overwhelming to learn an entire new language just to get your sketches to run online, this is the path I would recommend if you’re interested in creating work for the web. In fact, p5.js is used by this book at its website for the examples running online (and where you can find p5.js versions of this book’s examples). To get started I would suggest reading the Processing transition tutorial at p5js.org (https://github.com/processing/p5.js/wiki/Processing-transition). You’ll discover that while there are some quirks and syntax differences with JavaScript, all of the fundamental concepts of computation (variables, conditionals, loops, objects, arrays) are the same. In addition all of the drawing functions you’ve learned here are implemented in p5.js. Finally, as a bonus, you’ll discover a slew of new functions related to HTML and CSS.
I should also briefly mention the processing.js (http://processingjs.org) project as well. Processing.js, often confused with p5.js, is a port of Processing to JavaScript that automatically translates your Processing Java code to JavaScript. The idea here is to be able to run Processing sketches in the browser without any additional work. This is magical when it works, however, there are loads of reasons why this can go wrong. For example, any sketch using a third party library will fail. In addition, a lot of the new functionality from Processing 2.0+ is not supported. For quick and dirty publishing of simple sketches, Processing.js is a nice solution, however, if you have a larger project you’re building for the web I would recommend working natively in JavaScript with p5.js.
21-2 Stand-alone applications
A great feature of Processing is that sketches can be published as stand-alone applications, meaning double-clickable programs that can run without the Processing development environment being installed.
This feature is useful if you want to distribute a downloadable version of your sketch for non-Processing users. In addition, if you’re creating a program for an installation or kiosk environment, you can set an exported application to launch automatically when a machine boots up. Finally exported applications are also useful if you need to run multiple copies of a sketch at the same time (such as in the case of the client/server examples in Chapter 19).
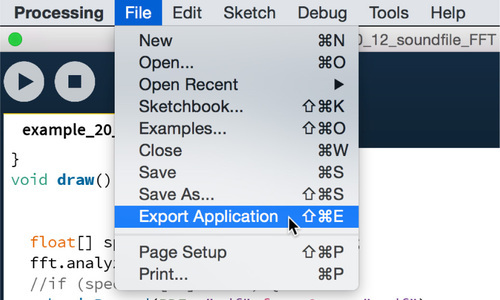
Figure 21-1
To export as an application, go to: File → Export Application (see Figure 21-1).
You’ll then be presented with some options. You can select the operating systems you want to generate the application for, set the application to run in fullscreen, as well as optionally embed Java in application file itself. Embedding Java can be useful since the user of your application will need Java installed on his or her computer in order for the application to run properly. Nevertheless, the trade-off here is that this option will balloon the size of the application file itself.
While Processing can build applications for multiple operating systems all at once: Mac OS X, Windows, Linux, it’s generally recommended to build the application for the same operating system you are using on a particular machine as there can often be issues otherwise.
After exporting, you will notice that a new folder appears containing the files you need, as depicted in Figure 21-2.
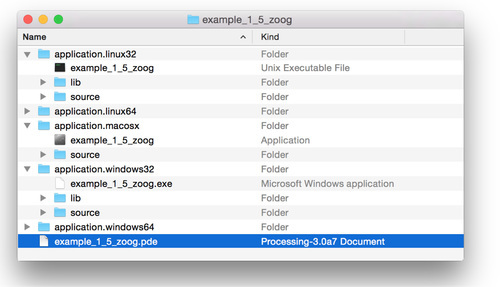
Figure 21-2
• sketchName.exe (or named simply sketchName on Mac and Linux). This file is the double-clickable application.
• “source”directory. The application folder will include a directory containing the source files for your program. This folder is not required to run the application.
• “lib”. This folder only appears for Windows and Linux and contains required library files. It will always contain core.jar, the core processing library, as well as any others you import. On Mac OS X, the library files are visible by control-clicking the application file and selecting “Show Package Contents.”
There are a few tricks related to the Export Application feature. You can adjust the application’s icon as well as the text in the title bar, for example. For tips, take a look at the export info wiki (https://github.com/processing/processing/wiki/Export-Info-and-Tips).
 Exercise 21-1: Export a stand-alone application for any Processing sketch you have made or any example in this book.
21-3 High-resolution PDFs
You have been using Processing primarily as a means for creating graphics programs that run on a computer screen. In fact, if you recall Chapter 3, I spent a great deal of time discussing how the flow of a program works over time. Nevertheless, now is a good time to return to the idea of a static program, one whose sole purpose is to create a static image. The Processing PDF library allows you to take these static sketches and create high-resolution images for print. (In fact, almost all of the images in this book were produced with this method.)
Following are the required steps for using the PDF library.
1. Import the library.
import processing.pdf.*;
2. In setup(), use the size() function with the PDF renderer and a filename.
size(400, 400, PDF, "filename.pdf");
3. In draw(), do your magic!
background(255);
fill(175);
stroke(0);
ellipse(width/2, height/2, 160, 160);
4. Call the function exit(). This is very important. Calling exit() causes the PDF to finish rendering. Without it, the file will not open properly.
exit(); // Required!
Here is how the program looks all together:
If you run this example, you will notice that no window appears. Once you have set the Processing renderer to PDF, the sketch window will no longer appear.
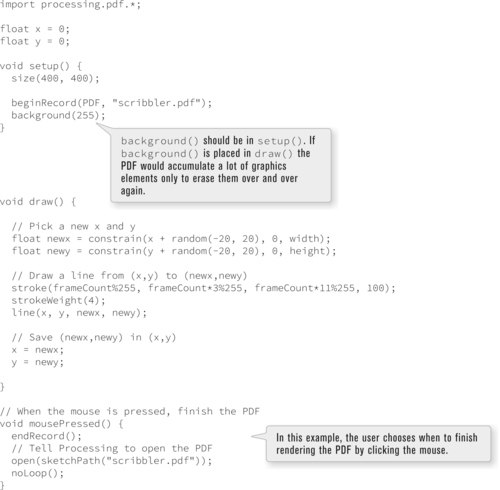
However, it’s possible to see the Processing sketch window while rendering a PDF using the functions beginRecord() and endRecord(). This runs slower than the first example, but allows you to see what is being saved.

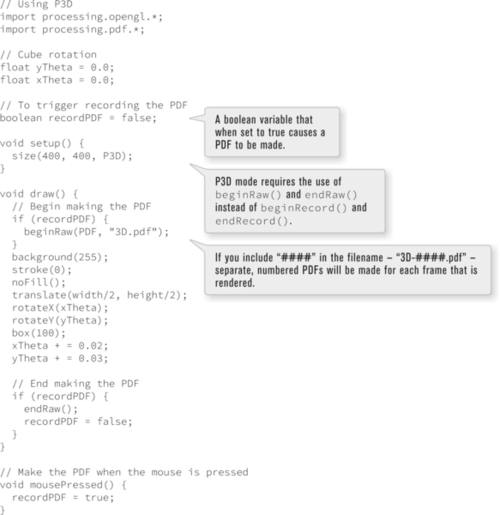
The endRecord() function does not have to be called on the first frame rendered, and therefore this mode can be used to generate a PDF compiled from multiple cycles through draw(). The following example takes the “Scribbler” program from Chapter 16 and renders the result to a PDF. Here the colors are not taken from a video stream, but are picked based on a counter variable. See Figure 21-3 for a sample output.

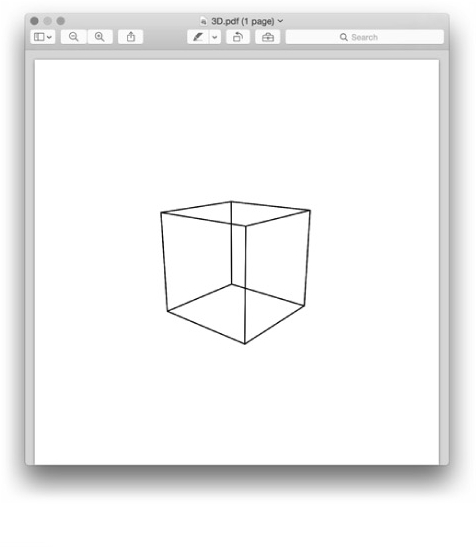
Figure 21-3
If you’re rendering 3D shapes (using P3D), you will want to use beginRaw() and endRaw() instead of beginRecord() and endRecord(). This example also uses a boolean variable recordPDF to trigger the recording process.
Two important notes about the PDF library.
• Images — If you’re displaying images in the PDF, these will not necessarily look good after export. A 320 × 240 pixel image is still a 320 × 240 pixel image whether rendered into a high-resolution PDF or not.
• Text — If you’re displaying text in the PDF, you will have to have the font installed in order to view the PDF properly. One way around this is to include textMode(SHAPE); after size(). This will render the text as a shape to the PDF and not require the font installed.
For full documentation of the PDF library, visit the Processing reference page (http://processing.org/reference/libraries/pdf/). While the PDF library will take care of many of your needs related to high-resolution generation, there are other contributed libraries that might be of interest. One is P8gGraphicsSVG by Philippe Lhoste for exporting files in the SVG (“Scalable Vector Graphics”) format.
Exercise 21-2: Create a PDF from any Processing sketch you have made or any example in this book.
21-4 Images and saveFrame()
High-resolution PDFs are useful for printing; however, you can also save the contents of the Processing window as an image file (with the same resolution as the pixel size of the window itself). This is accomplished with save() or saveFrame().
save() takes one argument, the filename for the image you want to save. save() will generate image files with the following formats: JPG, TIF, TGA, or PNG, indicated by the file extension you include in the filename. If no extension is included, Processing will default to the TIF format.
background(255, 0, 0);
save("file.png");
21-5 Recording video
If you call save() multiple times with the same filename, it will overwrite the previous image. However, if you want to save a sequence of images, the saveFrame() function will auto-number the files. Processing will look for the String “####” in the filename and replace it with a numbered sequence of images. See Figure 21-5.
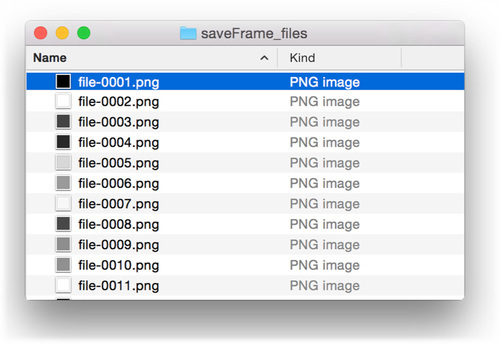
Figure 21-5
background(random(255));
saveFrame("file-####.png");
}
This technique is commonly used to saved a numbered sequence of images that can be stitched together into a movie using video editing software or Processing’s Movie Maker tool. Let’s create a short example that adds a few features like starting and stopping recording.
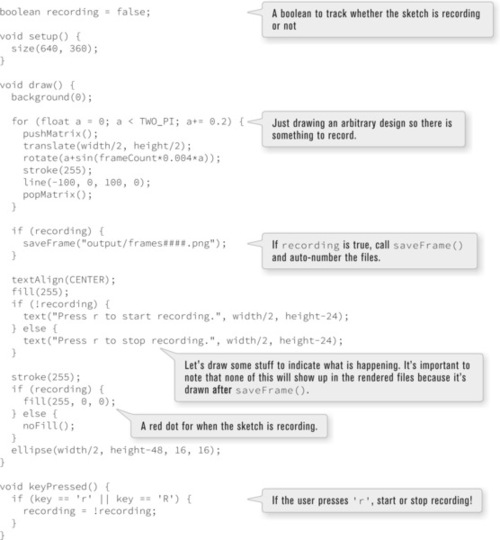
The first thing I might like to add is a boolean variable to track whether the sketch is recording frames or not.
boolean recording = false;
In the main draw() loop I can then check the current state and save frames if recording is true.

Finally I can toggle the state of recording between true to false with user interaction, in this case pressing the ‘r’ key on a keyboard.

Another nice trick involves the placement of the call to saveFrame() in draw(). Processing only writes the current pixels to the rendered image file so any calls after saveFrame() won’t be recorded. This is useful if you want to add some visual elements that indicate whether the sketch is recording or not. In the example below, a red circle is drawn when recording.
To convert the image sequence into a movie file, there are a number of options such as MPEG StreamClip for Mac and Windows (http://www.squared5.com/) or any commercial video editing software like Adobe Premiere or Final Cut. Processing also includes a “Movie Maker” tool (found under the file menu “Tools”) which you can use by dragging in the directory of images.

Exercise 21-3: Create a movie from any Processing sketch you have made or any example in this book. Try adding visual elements that do not get recorded like a display of the count of the number of recorded frames.
Lesson Nine Project
Choose one or both!
1. Incorporate sound into a Processing sketch, either by adding sound effects or by controlling the sketch with live input.
2. Use Processing to generate an output other than real-time graphics. Make a print (using PDF). Make a video, and so on.
Use the space provided below to sketch designs, notes, and pseudocode for your project.