
In this section, you will learn how to install an operating system to the Raspberry Pi. There are different ways using which you can install OS to Raspberry Pi. Raspberry Pi runs from the OS installed on the SD card.
New Out Of the Box Software (NOOBS) is the official installation method developed by the Raspberry Pi Foundation as an attempt to simplify the installation procedure for beginners and add support for multiple operating systems on the same card. BerryBoot predates NOOBS and it has the advantage that it supports more operating systems, is able to install them to a USB stick, and can back up, restore, and clone operating systems.
The steps to install BerryBoot and NOOBS are as follows:
- First, download BerryBoot at http://www.berryterminal.com/doku.php/berryboot or NOOBS from http://www.raspberrypi.org/downloads.
- Next, format the SD card as FAT32, depending on your OS system.
- Windows users are recommended to use SD Association's SD Formatter, which can be accessed at https://www.sdcard.org/downloads/formatter_4/.
- Linux users can use GParted.
- Then, extract the downloaded archive onto the SD card.
- After this, the card can be ejected and inserted into the Raspberry Pi.
- Finally, boot up the Raspberry Pi with the card inserted and follow the on-screen instructions.
Installing Raspbian using RAW images is the original method that was used to install an operating system onto the SD card. The RAW image contains the binary data directly as it will appear on the card. This includes the Master Boot Record (MBR) and all of the partitions. This method has clear advantages as it is supported by all the operating systems, and there is very little that can go wrong. This does not require the user to partition or format the card as everything is already contained in the image file.
There are also some disadvantages. Since the sizes of SD card vary and the image file contains a static partition table and filesystem, you will end up with unusable free space. The other problem is the lack of flexibility. The image files make it hard to boot multiple operating systems from the same card or have an operating system on the SD card.
- First, download Win32 Disk Imager from https://launchpad.net/win32-image-writer.
- Next, select the appropriate image file.
- Then, select the SD card from the drop-down menu.
- Finally, click Write and remove the card.
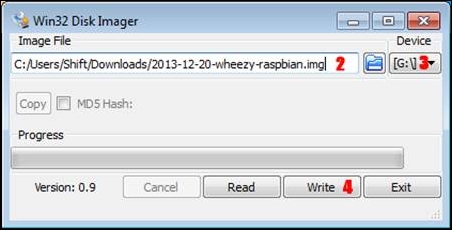
The annotations in the preceding screenshot of Win32 Disk Imager correspond to the previous step numbers
- First, ensure the card is not mounted.
- Then write to disk, replacing
mmcblk0with the appropriate device. You can do this by running the following command:# dd if=file.img of=/dev/mmcblk0 bs=4M - Before removing the card, it is important to flush the filesystem buffers by running the following command:
# sync
Once you have installed the Raspbian OS to the SD card, insert the SD card into Raspberry Pi and connect the keyboard, mouse, and LCD screen using the HDMI port and power the Raspberry Pi. On the first run, it will ask for your username and to type pi and the password as raspberry when prompted. Now, type startx to load the familiar UI.
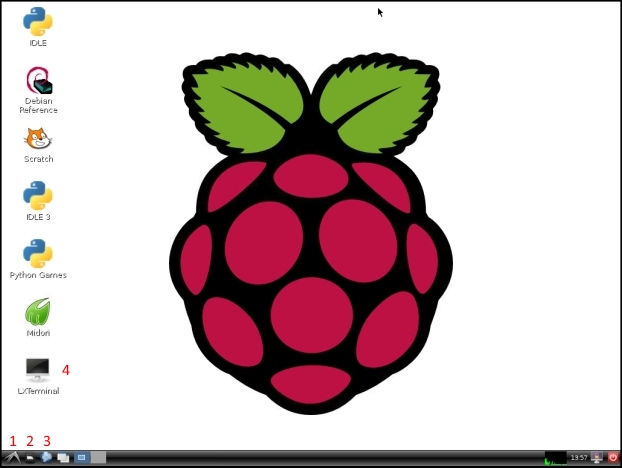
- The Start button
- Folders
- The Midori browser
- Terminal (command windows)
Now, connect the Ethernet cable to your Raspberry Pi.
Tip
Before you start reading further, I recommend you spend some time playing with the OS and trying some of the commands that you are familiar with, of the operating system (Windows, Linux, Mac) you are using right now. Some of the things you can try are:
- Find out what all applications are already installed on your Raspberry Pi
- Access your e-mail account using the Midori browser
- Get yourself familiarized with the folder structure
If you are using Raspbian, this can be done by choosing the Expand Filesystem option within the raspi-config script, which executes on the first boot. However, you can also launch this script manually by running sudo raspi-config. If your distribution does not provide an automated way to expand the filesystem and you do not have GParted available on your PC, this can be done on the Raspberry Pi itself. For this example, a card containing the Arch Linux image is resized by following these steps:
- First, launch fdisk by typing the following command:
# fdisk /dev/mmcblk0 - Then, press p, followed by Enter in order to display the current partition table, which should be displayed as follows:
Command (m for help): p
Disk /dev/mmcblk0: 29.7 GiB, 31918653440 bytes, 62341120 sectors
Units: sectors of 1 * 512 = 512 bytes
Sector size (logical/physical): 512 bytes / 512 bytes
I/O size (minimum/optimal): 512 bytes / 512 bytes
Disklabel type: dos
Disk identifier: 0x417ee54b

Device         Boot     Start       End  Blocks  Id System
/dev/mmcblk0p1           2048    186367   92160   c W95 FAT32 (LBA)
/dev/mmcblk0p2         186368   3667967 1740800   5 Extended
/dev/mmcblk0p5         188416   3667967 1739776  83 Linux
- Since the card contains an extended partition (p2) with a logical partition side of it (p5), you can simply delete partition 2, so partition 5 will be removed automatically. This can be carried out as follows:
Command (m for help): d
Partition number (1,2,5, default 5): 2

Partition 2 has been deleted.
- After this, create a new extended partition to replace the one that has been deleted. Ensure that the first sector of the new partition matches the one deleted. Then, accept the default last sector, as it will automatically use all of the free space:
Command (m for help): n

Partition type:
   p   primary (1 primary, 0 extended, 3 free)
   e   extended
Select (default p): e
Partition number (2-4, default 2):
First sector (186368-62341119, default 186368):
Last sector, +sectors or +size{K,M,G,T,P} (186368-62341119, default 62341119):

Created a new partition 2 of type 'Extended' and of size 29.7 GiB.
- Then, create a new logical partition, again making sure the start sector matches the old start sector of partition 5 and accept the default last sector:
Command (m for help): n

Partition type:
   p   primary (1 primary, 1 extended, 2 free)
   l   logical (numbered from 5)
Select (default p): l

Adding logical partition 5
First sector (188416-62341119, default 188416):
Last sector, +sectors or +size{K,M,G,T,P} (188416-62341119, default 62341119):

Created a new partition 5 of type 'Linux' and of size 29.7 GiB.
- Next, display the partition table again to make sure that only the end sectors are different from the original partition table:
Command (m for help): p
Disk /dev/mmcblk0: 29.7 GiB, 31918653440 bytes, 62341120 sectors
Units: sectors of 1 * 512 = 512 bytes
Sector size (logical/physical): 512 bytes / 512 bytes
I/O size (minimum/optimal): 512 bytes / 512 bytes
Disklabel type: dos
Disk identifier: 0x417ee54b

Device         Boot     Start       End   Blocks  Id System
/dev/mmcblk0p1           2048    186367    92160   c W95 FAT32 (LBA)
/dev/mmcblk0p2         186368  62341119 31077376   5 Extended
/dev/mmcblk0p5         188416  62341119 31076352  83 Linux
- Once you are happy with the partition table, write it to disk and quit:
Command (m for help): wThe partition table has been altered.
- Next, restart the Raspberry Pi by running the following command:
# reboot - When the Raspberry Pi has booted up, log in and resize the filesystem:
# resize2fs /dev/mmcblk0
Hifi's raspbian-ua-netinst is a small tool that gives you a minimal Raspbian installation, using the latest packages. This install differs greatly from the RAW image released by the Raspberry Pi Foundation and is therefore only recommended for power-users. The complete documentation can be found at http://github.com/hifi/raspbian-ua-netinst.
The NetInstall has distributed an image, as it is simpler for Linux users. The following steps help in preparing the NetInstall on Linux:
- First, download the installer using the following command:
# wget http://hifi.iki.fi/raspbian-ua-netinst/raspbian-ua- netinst-latest.img.xz - Then, extract the image to the SD card by running this command:
# xzcat /path/to/raspbian-ua-netinst-latest.img.xz > /dev/mmcblk0 - Next, flush the filesystem buffers using the
synccommand. - Finally, remove the card, boot the Raspberry Pi, and let the installer finish.
Download and extract http://hifi.iki.fi/raspbian-ua-netinst/raspbian-ua-netinst-latest.zip onto a FAT32 formatted SD card, as shown in the NOOBS install steps.
The default install does not replace the kernel, customize the install to your locale, or install any of the Raspberry Pi headers and libraries. The following steps provide a more complete install:
- First, log in as
root, with the passwordraspbian. - Then, change the password using the
passwdcommand. - If necessary, configure your locale, keyboard layout, and time zone by running the following command:
# dpkg-reconfigure locales keyboard-configuration tzdata - Next, update the package index by typing this:
# apt-get update - Then, install the kernel, bootloader, optimized memory routines, the Raspberry Pi utilities, and a text editor by running the following command:
# apt-get install linux-image-rpi-rpfv raspberrypi-bootloader- copies-and-fills libraspberrypi-bin nanoNote
The
linux-image-rpi-rpfvpackage contains a kernel managed by the Raspbian project, while theraspberrypi-bootloaderpackage contains a kernel provided by the Raspberry Pi Foundation. Although the Raspbian kernel is recommended, the Foundation kernel can be used instead by skipping the sixth and seventh steps. - The Raspbian kernel can then be installed by copying it to the boot partition using the following command:
# cp /vmlinuz /boot/raspbian-kernel.img - In order to avoid conflicts with the Raspberry Pi Foundation's kernel, configure the Raspberry Pi to use the new kernel. This can be done by running the following command and inserting the line
kernel raspbian-kernel.img:# nano /boot/config.txt - Finally, modify the sources list to include the
non-freeandcontribpackages, if necessary. This includes things such as WiFi firmware, which may be required for some people. The/etc/apt/sources.listfile should look as follows:deb http://mirrordirector.raspbian.org/raspbian/ wheezy main contrib non-free rpi deb http://archive.raspberrypi.org/debian/ wheezy main