
Modern web technologies allow web pages to be used as full-featured applications to replace traditional programs. The most important of these is AJAX, which allows a page to communicate with the server and dynamically alter web page elements. In this chapter, you will learn the basics of web development by creating a simple web page, changing its visual appearance, and making it interactive. Then, you will learn how a web server can serve dynamic pages generated by Python, before putting all of these skills together to create a media player and radio station that you can access from anywhere. We will cover the following topics in this chapter:
- Adding page content with HTML
- Customizing the visual appearance
- Adding interactivity with JavaScript
- Simplifying scripts with jQuery
- An introduction to Python
- Creating an Internet radio station
In the previous chapter, you were introduced to Raspberry Pi and installed LAMP server on your Raspberry Pi. You also installed WordPress to host your personal website/blogs. So, how do you create your blog/website? This section will give a high-level overview of HTML, CSS, JavaScript, and jQuery.
HTML is used by the web browser to display content. To get started, replace /srv/www/index.php with the index.html file, which contains the following code:
<!DOCTYPE html>
<html lang="en">
<head>
  <meta charset="UTF-8">
  <title>Hello world</title>
</head>

<body>
  <h1>Hello World!</h1>
  <p>This is a <em>simple</em><abbr title=
  "HyperTextMarkup Language">HTML</abbr> example.</p>
  <!-- This is a comment -->
  <form class="exampleform">
    <p><input name="num1"> * <input name="num2"> =
    <span id="result"></span></p>
<button id="calculate">Calculate</button>
  </form>
</body>
</html>
Tip
Downloading the example code
You can download the example code files from your account at http://www.packtpub.com for all the Packt Publishing books you have purchased. If you purchased this book elsewhere, you can visit http://www.packtpub.com/support and register to have the files e-mailed directly to you.
Accessing the Raspberry Pi through the web browser should show how the preceding code is interpreted. The top line, <!DOCTYPE html>, specifies the document type, which in this case is HTML5. The rest of the document can be broken down into elements, tags, attributes, content and comments. This is well represented in the following diagram:

The components of an HTML element.
Tags are used to delimit elements. The start tags consist of angled brackets <…> containing the element's tag name, optionally followed by attributes. The end tags are similar, but the difference is that the opening bracket is followed by a / character and no attributes may be present. Void elements are those that are not allowed any content and do not require an end tag. In the preceding example, the void elements are meta and input. The tags must be nested. So, for example, <b><i></i></b> is valid, on the other hand,<b><i></b></i> is not.
Attributes are contained within the start tag and are of the form name = value. Where an attribute has a Boolean (true or false) value, it is sufficient to only include or exclude the attribute name to set it as true or false, respectively. Each element may have a set of attributes that have a specific meaning to that element. Global attributes are those that are applicable to all elements. In the preceding example, these are lang, id, and class. Where a value has spaces, quote marks must be used; otherwise, the spaces are optional. If quote marks are omitted and the attribute value contains spaces, each space will indicate the start of a new attribute.
The class and id attributes do nothing by themselves, but are useful for CSS and JavaScript. The class attribute can be applied to multiple elements on a page. The id, on the other hand, must be unique to a single element. For example, you can give class=border to multiple elements but you can't give id=point1 to multiple elements on a page.
Content is simply the content to which the tags apply. In the preceding code example, the content of the h1 element is Hello World!.
Finally, comments are text contained between the start delimiter <!-- and the end delimiter -->. These are not parsed by the browser and are only there for code readability.
The html element is the root of the HTML document and contains all other elements. The lang attribute is used to define the language of the element. Although optional, it is recommended as it helps spell checkers, speech synthesis programs as well as search engines.
The head element contains the document's metadata. The title element tells the browser and search engines what the document title is. This appears in the window and tab captions in the browser. The meta element has multiple purposes, but in the given example, it sets the character encoding declaration to Unicode. Again, this helps browsers and search engines to understand how to interpret the data.
The body element contains the non-metadata part of the HTML document.
The text formatting tags in the preceding example are h1, p, em, and abbr. These are used for headings, paragraphs, emphasis, and abbreviations, respectively. The 1 in h1 can be replaced with any number up to 6 for subheadings. When we apply the abbr element, the title attribute value is displayed when the mouse is over the element, and in our example, it will be the expansion of the abbreviation HTML.
As the name suggests, the form element is used for user-submittable forms. In the preceding example, this consists of two input elements and a button. The name attribute on the input elements is used to identify the data when it is submitted to the server or processed in a script. When the user clicks Calculate, the form data (num1 and num2) will be sent to the server using a GET request.
When a URL is entered, the browser sends a GET request. The server responds with a response header, which contains information to help the browser interpret the data. This is followed by a response body, which is the HTML document itself. When data is submitted with a GET request, it is appended to the URL. In the preceding example, ?num1=&num2= will be appended to the URL if the input fields were left blank.
The GET request works well for such cases, but there are situations where the POST request should be used instead. Data sent using this request may be arbitrarily large and is not stored by the browser once it's sent. However, neither methods offer any security and any data sent over HTTP is easily intercepted.
The remaining span element does not represent anything specific. It is a generic wrapper that will be used to store the answer.
As summaries written for beginners are usually incomplete, sometimes inaccurate and often misleading, whenever writing an HTML document, it is a good idea to have the relevant specification open. The HTML5 specification is accessible at http://www.w3.org/TR/html5/. If you are uncertain that the HTML document is valid, you can use W3C's validator to catch mistakes. The validator is accessible at http://validator.w3.org/.
CSS is used to modify the appearance of HTML elements. In the same directory as index.html, you can create hello.css, which contains the following:
body {
  padding: 30px 30px;
  font: 13px/100% Verdana, sans-serif;
  text-align: center;
}
body:after {
  content: "This text is generated using CSS";
  display: block;
  margin-top: 2em;
}
input {
  width: 50px;
}
span#result {
  width: 50px;
  display: inline-block;
}
form.exampleform {
  display: inline-block;
  border:1px solid;
  border-radius:20px;
  box-shadow: 5px 5px 2px #888888;
  padding: 20px;
}
Simply adding the file has no effect, so the following element must be added to the content of the head element of the index.html file:
<link rel="stylesheet" href="hello.css" type="text/css">
The link element is used to define the relationship between documents. In this case, the attributes specify that the document should be linked to a stylesheet file hello.css of the type text/css.
Refreshing the page now should show the effect of the added stylesheet. To get a clear understanding of this, have a look at the following diagram:
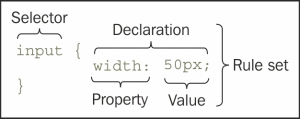
The components of a CSS rule set
The added CSS file contains five rule sets. Each rule set starts with a selector that is followed by a declaration block. The declaration block contains ;(semicolons), which are separated declarations in curly brackets {…}. Each declaration is made up of a property name followed by a : (colon) and a property value.
The selector is a pattern used to select which HTML elements the declaration block applies to. A summary of commonly used patterns is given here:
*: All elementsA: All A elementsA B: All B elements descending from an A elementA > B: All B elements that are children of an A element- Please note the difference between descendants and children. Descendant elements can be nested in many levels deep, while children are elements nested directly within the parent element.
A[att=test]: TheAelement containing attributeattmatchingtestA.test: ElementsAwhoseclassattribute containstestA#test: ElementsAwhoseidattribute matchestest
:before and :after are pseudo-elements, which are used to prepend and append content to the element using the content property. These can be used to add bullet points and numbers to lists or quote marks for quoted text.
HTML elements inherit the CSS properties of their parent elements. For example, a heading containing a bold word will look different from a bold word in a paragraph. Whenever a property does get changed, it can be given the inherit value in order to force inheritance.
The comments within CSS documents begin with /* and end with */.
In the case that a property value is a length, it can be specified as a length relative to the font-size property, an absolute length or a percentage. In order to specify the nature of the length as a number, it should be directly followed by a unit identifier. The relative unit identifiers are em and ex, referring to the font point size and x-height, respectively. The absolute unit identifiers are in, cm, mm, pt, pc and px, which are used for inches, centimeters, millimeters, points, picas, and pixels respectively. Percentages use the % unit identifier, where the percentage is relative to the property value of the parent element.
Each visible element has a box that helps to define its positioning. The content of the element is surrounded by padding, a border and a margin, as shown here:
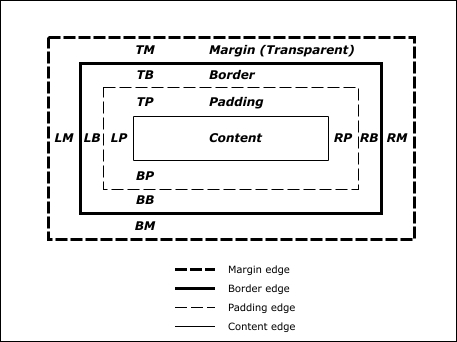
The CSS box mode showing how the margin, border, and padding properties affect the appearance. You can access this at http://www.w3.org/TR/html5/.
The padding area can be defined using the individual padding-top, padding-right, padding-bottom, and padding-left properties or a single padding property. Each element may be a fixed width or a percentage. The padding property can take multiple values. If a single value is given, it applies to all sides. The two values set the top and bottom sides. In the case of three values that are given, the first and third values set the top and bottom sides, while the second value sets the left and right sides. Giving all four value sets the top, right, bottom, and left sides to each individual value. The margins work the same way, using the margin-top, margin-right, margin-bottom, margin-left, and margin properties. The border-width property can be set using the same pattern. In the case that a border is the same on all sides, a single border property can be set by specifying any combination of width, color, and style (for example, solid, dashed, dotted, and so on).
Colors are specified using one of CSS color keywords, which are aqua, black, blue, fuchsia, gray, green, lime, maroon, navy, olive, orange, purple, red, silver, teal, white, and yellow. Alternatively, this can be via RGB notation, where RGB values are given as hexadecimal #rgb, #rrggbb (#FF00EE) values or by rgb(r, g, b), where each color value is a positive integer up to 255(0xFF hex). Additionally, margin values may be auto, which calculates the values based on context.
The layout is also specified using the display, width, height, position, top, right, bottom, and left properties. The four direction properties are used to set the box offset of the element. The values have different meanings depending on the display and position combinations. The common display values are inline, inline-block, and block. In general, the inline elements flow with the text whereas block elements start a new line and utilize maximum horizontal space. The inline-block elements are somewhere in between as they shrink the size of their content and can flow with the page content. position is a complicated property, so for now, it is enough to know that the valid values are static, relative, absolute, and fixed.
As with HTML, to understand all of the intricate details of CSS, you should refer to the specification found at http://www.w3.org/TR/CSS2/. The CSS validator can be accessed via http://jigsaw.w3.org/css-validator/.
JavaScript is used to add interactivity to web pages. In the following example, the form is displayed but the calculation does not take place. You can do this by creating a hello.js file with the following content:
varcalc = document.getElementById('calculate'),
var result = document.getElementById('result'),
calc.onclick = function () {
  var num1 = calc.form.num1.value;
  var num2 = calc.form.num2.value;
  result.textContent = num1 * num2;
  return false;
}
In order to use the script, the following element must be within the body of the index.html document, as you can see here:
<script type=text/javascript src="hello.js"></script>
Alternatively, the entire script can be contained directly in the body of the HTML document within the <script>…</script> tags. Whenever a script does not interact directly with any elements on the page, it may be placed in the head element. In general, it is recommended to put all scripts just before the body end tag, as this allows the web page to load all page content first, ensuring the site feels responsive.
The var keyword is used to declare variables. In the preceding example, two global variables and two local variables are declared. Global variables are declared outside of all functions and are accessible by all functions. These may also be declared within functions by omitting the var keyword, although this method is not recommended. Local variables are only accessible within the scope they are declared. Referring to the previous example, the variables num1 and num2 exist only within the function block assigned to calc.onclick.
The document object provides a way to get information about the page. The document object's getElementById function takes the element ID as an argument and returns a reference to the element. As a result, the calc variable refers to the Calculate button and the result variable refers to the span element.
Functions can be defined using the following syntax:
function add (number1, number2){
    return number1 + number 2;
}
The add() function takes two arguments: number1 and number2. This then returns the sum. For example, calling add (5, 2); will return 7.
Alternatively, the same can be accomplished using the following code:
var add = function (number1, number2){
    return number1 + number2;
};
In this case, an add function is created and assigned to the add variable. Again, the function can be called as before, as variables can be functions.
Assigning a function to the button's onclick handler ensures that the function runs every time the button is clicked. The function reads the values of the input fields and assigns the product of the two as the content of the span element. calc.form.num1.value can be understood as "the value of field named num1 in the form that calc belongs to". The function returns false, as a true value would submit the form and refresh the page, which is not desired in this case.
For more resources, you can visit http://developer.mozilla.org/docs/Web/JavaScript.
jQuery simplifies scripting by providing a quicker way to reference and modify elements, handle events, and communicate with the server without refreshing the page. In order to use jQuery, it must first be included in the HTML document. One method to do this is shown here:
- First, download the compressed
.jsfile from http://jquery.com. - Next, place it in the web page's directory
- Finally, include it in the HTML document using
<script type=text/javascriptsrc="jquery-1.11.0.js"></script>, as shown earlier.
However, there are advantages to letting Google's content distribution network (known as CDN) host jQuery for you. This can be done simply by setting the src attribute to //ajax.googleapis.com/ajax/libs/jquery/1.11.0/jquery.min.js. As other websites do this as well, chances are that many visitors will already have the file cached by their browser. This also reduces the load on your server and speed up loading times, as Google distributes its traffic across many servers.
Returning to hello.js, the code can be replaced with the following:
$(document).ready(function() {
  $("#calculate").click(function() {
   var num1 = $("input[name=num1"]).val();
    var num2 = $("input[name=num2"]).val();
    $"#result").text(num1 * num2);
    return false;
  });
});
jQuery's element selection method is similar to that of CSS, where you can include the selection pattern inside $("…"). The preceding example has five selectors using this pattern:
$(document): The document object represents the root of the HTML page$("#calculate"): This is an element with theidattribute set tocalculate$("#result"): This is an element with theidattribute set toresult$("input[name=num1]"): This is an element with thenameattribute set tonum1$("input[name=num2]"): This is an element with thenameattribute set tonum2.
JavaScript cannot work with elements that have not already loaded. .ready can be used to provide a handler function that executes when the element is ready for use. In the preceding example, an anonymous function is passed as the parameter to $(document).ready, which is executed once the HTML document has fully loaded.
Although it looks like there is more, the function passed to $(document).ready is a single statement. This is simply passing another anonymous function as the argument of $("#calculate").click. This binds the function to the Calculate button's click event.
Finally, the bound function multiplies the values of the input fields and passes the result to $("#result").text, which sets the span element's text to the given value. Again, a false value is returned to ensure the form has not submitted.
You can find complete documentation for jQuery at http://api.jquery.com/.