
You must have noticed that throughout this book, in the initial section of the chapter, you learned something new and in the last section of the chapter will you solve few real-life problems by developing a prototype. Following this tradition, in this section, you will develop two prototypes. In this section, you will learn about the following topics:
- The track object position
- The case study of OpenRelief
- Twitter-enabled surveillance systems
For an object, there are needs that you want to keep particular item at the same place where you have taken and in some cases you require precise information. In this section, you will develop an application that will find the position of a particular object (for example, a circular coin) and determine its offset in x, y and any rotation of the object. Consider a scenario where you want to keep two circular objects at a particular location.
As a starting point, here two circular objects are taken. Create a file named objectPosition.py inside the chapter6 folder.
Here is the code that you need to write in objectPosition.py file:
import os
import cv2
import math
##Resize with resize command
def resizeImage(img):
dst = cv2.resize(img,None, fx=0.25, fy=0.25, interpolation = cv2.INTER_LINEAR)
return dst
##Take image with Raspberry Pi camera
os.system("raspistill -o image.jpg")
##Load image
img = cv2.imread("/home/pi/Desktop/image.jpg")
gray = cv2.imread("/home/pi/Desktop/image.jpg",0) #0 for grayscale
##Run Threshold on image to make it black and white
ret, thresh = cv2.threshold(gray,50,255,cv2.THRESH_BINARY)
##Use houghcircles to determine centre of circle
circles = cv2.HoughCircles(thresh,cv2.cv.CV_HOUGH_GRADIENT,1,75,param1=50,param2=13,minRadius=0,maxRadius=175)
for i in circles[0,:]:
#draw the outer circle
cv2.circle(img,(i[0],i[1]),i[2],(0,255,0),2)
#draw the centre of the circle
cv2.circle(img,(i[0],i[1]),2,(0,0,255),3)
##Determine co-ordinates for centre of circle
x1 = circles[0][0][0]
y1 = circles[0][0][1]
x2 = circles[0][1][0]
y2 = circles[0][1][1]
##Angle betwen two circles
theta = math.degrees(math.atan((y2-y1)/(x2-x1)))
##print information
print "x1 = ",x1
print "y1 = ",y1
print "x2 = ",x2
print "y2 = ",y2
print theta
print circles
##Resize image
img = resizeImage(img)
thresh = resizeImage(thresh)
##Show Images
cv2.imshow("thresh",thresh)
cv2.imshow("img",img)
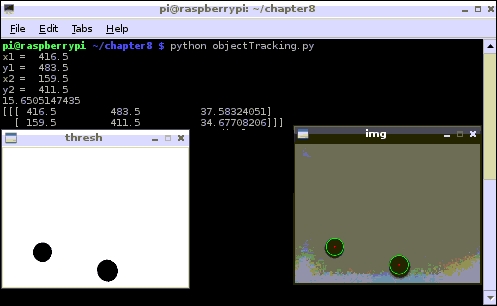
cv2.waitKey(0)Here is the result of the preceding code:

The following image shows the result of the previous algorithm running on the other image:
Here is a detailed explanation of the previous code:
import os
import cv2
import math
The preceding lines of code will import the three modules. Although you will do analysis on a full image, you need to make the images smaller for a proper display on the screen. The following lines will create a function named resizeImage():
def resizeImage(img):
  dst = cv2.resize(img,None, fx=0.25, fy=0.25, interpolation = cv2.INTER_LINEAR)
  return dst
Using os.system, you can input a command into the command line. raspistill -o image.jpg will take an image from the Raspberry Pi camera and store it as image.jpg in the current folder:
img – image that you want to resize
fx=0.25 and fy=0.25 are the factors that x and y are multiplied by. 0.25 makes the image 1/4 size.
os.system("raspistill -o image.jpg")
The following lines will load the image that was taken by the Raspberry Pi camera. img will have the color image and gray will have the grayscale image:
img = cv2.imread("/home/pi/Desktop/image.jpg")
gray = cv2.imread("/home/pi/Desktop/image.jpg",0)
ret, thresh = cv2.threshold(gray,50,255,cv2.THRESH_BINARY)
Using threshold function, you can convert your image into a binary image, as shown here:
Gray – the image that you want to convert
50 – It is a threshold value. It should be between 0 to 255 where 0 is white and 255 is black
255 – If a pixel is above threshold value , make it 255. Else it is 0.
On the preceding binary image, you can run HoughCircles as follows:
circles = cv2.HoughCircles(thresh,cv2.cv.CV_HOUGH_GRADIENT,1,75,param1=50,pa ram2=13,minRadius=0,maxRadius=175)
HoughCircle returns x and y coordinates for each circle as well as the radius of the circle. These details are stored in circle variables, as shown here:
thresh - refers that you are running hough transform on the black and white image.
75 - refers to the minimum distance allowed between circles.
Param1 = 50  This is one of the parameters which determines where the circles are, you can play around with this figure if needs be.
Param2 = 13 If you are getting too many circles then increase this number, and vice versa.The smaller it is, the more false circles may be detected.
minRadius - the smallest radius allowed for a circle.
maxRadius - the largest radius allowed for a circle.
for i in circles[0,:]:
  #draw the outer circle
  cv2.circle(img,(i[0],i[1]),i[2],(0,255,0),2)
  #draw the centre of the circle
  cv2.circle(img,(i[0],i[1]),2,(0,0,255),3)
cv2.circle(img,(i[0],i[1]),i[2],(0,255,0),2) will draw the outer circle on the image img at (i[0],i[1]) with the radius i[2] with green color (0,255,0) and thickness of 2 pixels. Similarly, cv2.circle(img,(i[0],i[1]),2,(0,0,255),3) will draw the center circle on the image img at (i[0],i[1]) with the radius 2 with red color (0,0,255) and thickness of 3 pixels. Let's take a look at the following lines of code:
#Determine co-ordinates for center of circle
x1 = circles[0][0][0]
y1 = circles[0][0][1]
x2 = circles[0][1][0]
y2 = circles[0][1][1]
##Angle betwen two circles
theta = math.degrees(math.atan((y2-y1)/(x2-x1)))
The main application of this project is to find out the coordinate of the object (here, circle) and preceding lines of code to extract the coordinate of the two circles, and using simple trigonometry, the angle between two circles is calculated.
print "x1 = ",x1
print "y1 = ",y1
print "x2 = ",x2
print "y2 = ",y2
print theta
print circles
The preceding lines will print all the information that was calculated from the previous code. The following lines will make use of the resizeImage function that was created in the beginning of the program so that it will get displayed properly on the screen:
img = resizeImage(img)
thresh = resizeImage(thresh)
Now, let's look at the rest of the code:
cv2.imshow("thresh",thresh)
cv2.imshow("img",img)
cv2.waitKey(0)
There is no need of displaying the image as you have already printed all the information. However, for fault finding, it will be of good help.
Planning disaster relief efforts is like trying to see through fog. OpenRelief is a project to develop better communications tools that will help clear this fog. This enables the right aid to get to the right places at the right time.
OpenRelief uses an open source approach that ensures everyone, anywhere, can access our technology. We are working to complement other projects around the world to support the emergence of open, humanitarian drone technology.
In this section, you will extend the work that you have done in the Face detection section. You will develop a Twitter-enabled surveillance system. The system will look for any intruder in your house and will send you a tweet with the current photograph when someone enters your house.
Create a filename twitterSurveillance.py in the folder named chapter6 using this code:
import numpy as np
import cv2
import tweepy
import os
import time
# Consumer keys and access tokens, used for OAuth
consumer_key = 'copy your consumer key here'
consumer_secret = 'copy your consumer secret here'
access_token = 'copy your access token here'
access_token_secret = 'copy your access token secret here'
# OAuth process, using the keys and tokens
auth = tweepy.OAuthHandler(consumer_key, consumer_secret)
auth.set_access_token(access_token, access_token_secret)
api = tweepy.API(auth)
tweetUserID='USERID' #ENTER TWITTER HANDLE with @ here. For Example @SamarthShah_
face_cascade = cv2.CascadeClassifier('haarcascade_frontalface_default.xml') # You can get xml file from book website under code bundle section
while True:
os.system("raspistill -o image.jpg")
cv2.waitKey(10)
img = cv2.imread('/home/pi/chapter6/image.jpg')
gray = cv2.imread('/home/pi/chapter6/image.jpg',0)
faces = face_cascade.detectMultiScale(gray, 1.3, 5)
for (x,y,w,h) in faces:
cv2.rectangle(img,(x,y),(x+w,y+h),(255,0,0),2)
# Send the tweet with photo
photo_path = '/home/pi/chapter6/image.jpg'
status = tweetUserID +'Photo tweet from Pi: ' + time.strftime('%Y/%m/%d %H:%M:%S')
api.update_with_media(photo_path, status=status)
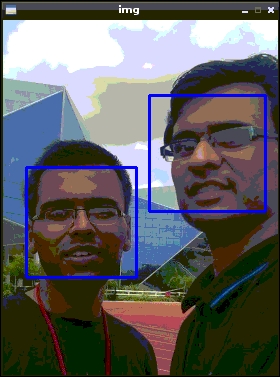
time.sleep(60)The following picture was taken by a Raspberry Pi camera:
Here is a detailed explanation of the previous code:
import numpy as np
import cv2
import tweepy
import os
import time
The preceding code will import the required Python modules. Let's take a look at the following code:
# Consumer keys and access tokens, used for OAuth
consumer_key = 'copy your consumer key here'
consumer_secret = 'copy your consumer secret here'
access_token = 'copy your access token here'
access_token_secret = 'copy your access token secret here'
These are the keys that are required for using the Twitter API. For getting these keys, please refer to Getting Twitter Access keys section in Chapter 5, Introduction to Image Processing. The following lines of code will create the tweepy object using the access key that was provided:
# OAuth process, using the keys and tokens
auth = tweepy.OAuthHandler(consumer_key, consumer_secret)
auth.set_access_token(access_token, access_token_secret)
api = tweepy.API(auth)
This
api can be used to post the tweet to Twitter from Raspberry Pi. The following line of code will store the Twitter UserID of the user to whom the tweet should be sent when someone enters the house:
tweetUserID='USERID' #ENTER TWITTER HANDLE with @ here. For Example @SamarthShah_
The following line of code will load the trained classifier for the face:
face_cascade = cv2.CascadeClassifier('haarcascade_frontalface_default.xml')The following line of code will take the picture from the Raspberry Pi camera:
os.system("raspistill -o /home/pi/chapter6/image.jpg")
cv2.waitKey(60)
As mentioned a couple of times in this book, os.system is used to execute the command in a command window. raspistill takes around 6 seconds to take the pictures, so cv2.waitKey(60) is used to stop the further execution of the program until the image has been saved. Let's take a look at the following lines of code:
img = cv2.imread('/home/pi/chapter6/image.jpg')
gray = cv2.imread('/home/pi/chapter6/image.jpg',0)
faces = face_cascade.detectMultiScale(gray, 1.3, 5)
This will read the image taken by the Raspberry Pi camera, and then using the detectMultiScale function of the face_cascade object, faces were detected and it gets stored in the faces variable. Let's take a look at the following lines of code:
for (x,y,w,h) in faces:
  cv2.rectangle(img,(x,y),(x+w,y+h),(255,0,0),2)
# Send the tweet with photo
  photo_path = '/home/pi/chapter6/image.jpg'
status = tweetUserID +' Photo tweet from Pi: ' + time.strftime('%Y/%m/%d %H:%M:%S')
  api.update_with_media(photo_path, status=status)
  time.sleep(60)
Once the faces are detected for the detected face, a tweet will get sent to the user with tweetUserID. The time.strftime('%Y/%m/%d %H:%M:%S') statement will give the current time, which will also get sent to tweetUserID.
So, once you have started this program, if someone enters your home while you are out, the tweet will get sent to you with the image taken from the Raspberry Pi camera and the current time.