
Like humans learn from their day-to-day activities, a machine or computer can also learn from the data that they are getting. The scientific area that explores the construction and exploration of such algorithms is called machine learning. In this section, you will learn about machine learning-based object detection algorithms, or more specifically, face detection and eye detection algorithms.
In 2001, Viola and Jones proposed an effective object detection method for using Haar feature-based cascade classifiers. As mentioned earlier, it is a machine learning-based object detection method. You will require lots of positive images (images with an object to detect) and negative images (images without the object to detect) to train the classifier. Once you have many positive and negative images, you need to extract the features from it, but extracting all the features from the image and selecting the best features from the image would require extensive computation. This problem can be solved using AdaBoost in which after applying a feature on all the training images, based on some threshold value, images get classified into "With Object" and "Without Object". Of course, there will be some misclassification in this. There is some gain in terms of computation requirement with this setup, but again checking all the image window with all (reduced) features is a bit time consuming. In an image, most of the image region is a "Non-Object" region. So, it is a better idea to have a simple method to check whether a window is not a "Object" region. If it is not, discard it in a single shot. Don't process it again. Instead focus on a region where there can be a "Object". For this, they introduced the concept of cascade of classifiers. Instead of applying all the features on a window, group the features into different stages of classifiers and apply one by one. Normally, the first few stages will contain very less number of features. If a window fails the first stage, discard it. If it passes, apply the second stage of features and continue the process. The window that will pass all the classifiers contains the "object". This is the simple explanation of Viola-Jones algorithm from http://opencv-python-tutroals.readthedocs.org/en/latest/py_tutorials/py_objdetect/py_face_detection/py_face_detection.html. Refer to their research paper for more detailed explanation.
The Viola-Jones algorithm can be used for any object detection. In this section, you will use it to detect faces in the image. OpenCV comes with a detector as well as trainer. In this section, you will not train the Haar classifier to detect faces. Instead you will use the pre-trained classifier for face. This classifier (XML file) for face can be found in the opencv/data/haarcascades/ directory.
Note
If you want to train your own classifier for detecting other objects such as car, planes, and ball, refer to http://docs.opencv.org/doc/user_guide/ug_traincascade.html for detailed explanation.
Create a file faceDetection.py inside the chapter6 folder.
Here is the complete code:
import numpy as np
import cv2
face_cascade = cv2.CascadeClassifier('haarcascade_frontalface_default.xml') # You can get the xml file from book website under code bundles.
img = cv2.imread('samarth.jpg')
gray = cv2.cvtColor(img, cv2.COLOR_BGR2GRAY)
faces = face_cascade.detectMultiScale(gray, 1.3, 5)
for (x,y,w,h) in faces:
  cv2.rectangle(img,(x,y),(x+w,y+h),(255,0,0),2)
cv2.imshow('img',img)
cv2.waitKey(0)
cv2.destroyAllWindows()
The following image shows the result of the preceding code:
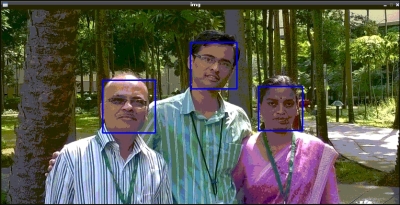
The preceding code is explained in detail as follows:
import numpy as np
import cv2
The preceding lines will import the required Python module. The following line of code will load the trained classifier of the frontal face from the haarcascade_frontalface_default.xml file. It will return a cascadeClassifier object to face_cascade variable:
face_cascade = cv2.CascadeClassifier('haarcascade_frontalface_default.xml')The following line of code will load an image on which this algorithm needs to be run:
img = cv2.imread('samarth.jpg')The following line of code will convert the loaded image into a grayscale image:
gray = cv2.cvtColor(img, cv2.COLOR_BGR2GRAY)
The following line of code will detect objects of different sizes in the input image:
faces = face_cascade.detectMultiScale(gray, 1.3, 5)
The detected objects are returned as a list of rectangles. Here, the second and third parameters are scaleFactor and minNeighbours, respectively:
The following line of code will run for all the faces detected:
for (x,y,w,h) in faces:
    cv2.rectangle(img,(x,y),(x+w,y+h),(255,0,0),2)
The cv2.rectangle(img,(x,y),(x+w,y+h),(255,0,0),2) statement will draw a rectangle between (x,y) top left and (x+w,y+h) bottom right will red color (255,0,0) with thickness of 2 pixels. Let's take a look at the remaining lines of code:
cv2.imshow('img',img)
cv2.waitKey(0)
cv2.destroyAllWindows()
The preceding lines of code will display the result image and wait for user input infinitely. Once user inputs are received, it will close all the windows created by this application.
In the previous section, you developed a Python application that can detect the faces in the image. In this section, you will expand the same code and use it to detect eyes. Similar to the previous section, here also you will use a pretrained classifier for eyes. Here is the complete code for eye detection:
import numpy as np
import cv2
face_cascade = cv2.CascadeClassifier('haarcascade_frontalface_default.xml')
eye_cascade = cv2.CascadeClassifier('haarcascade_eye.xml')
img = cv2.imread('samarth.jpg')
gray = cv2.cvtColor(img, cv2.COLOR_BGR2GRAY)
faces = face_cascade.detectMultiScale(gray, 1.3, 5)
for (x,y,w,h) in faces:
  cv2.rectangle(img,(x,y),(x+w,y+h),(255,0,0),2)
  roi_gray = gray[y:y+h, x:x+w]
  roi_color = img[y:y+h, x:x+w]
  eyes = eye_cascade.detectMultiScale(roi_gray)
  for (ex,ey,ew,eh) in eyes:
    cv2.rectangle(roi_color,(ex,ey),(ex+ew,ey+eh),(0,255,0),2)
cv2.imshow('img',img)
cv2.waitKey(0)
cv2.destroyAllWindows()
The following image shows the result of the following code:
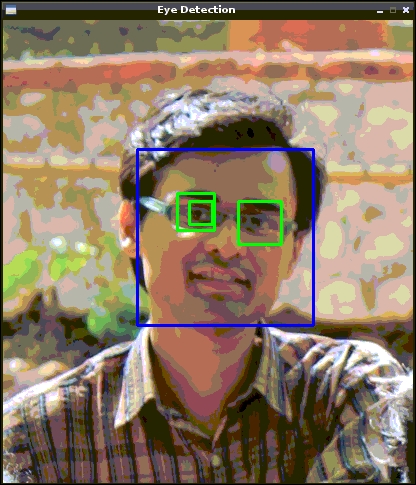
Most of the code should be self-explanatory as it is derived from a face detection application. However, there are a couple of lines that were added, which are explained as follows:
eye_cascade = cv2.CascadeClassifier('haarcascade_eye.xml')The preceding line of code will load the trained classifier of eye from the haarcascade_eye.xml file. It will return an cascadeClassifier object to the eye_cascade variable. Let's take a look at the following lines of code:
for (x,y,w,h) in faces:
  cv2.rectangle(img,(x,y),(x+w,y+h),(255,0,0),2)
  roi_gray = gray[y:y+h, x:x+w]
  roi_color = img[y:y+h, x:x+w]
  eyes = eye_cascade.detectMultiScale(roi_gray)
  for (ex,ey,ew,eh) in eyes:
    cv2.rectangle(roi_color,(ex,ey),(ex+ew,ey+eh),(0,255,0),2)
For detecting the eye, you don't have to run the classifier on a whole image instead you can run in on the detected face. roi_gray will store the gray region that you should use for the eye detection algorithm. Similarly, roi_color will have the color region that you should use for the eye detection algorithm. Similar to face_cascade_detectMultiScale(gray) , eye_cascade.detectMultiScale(roi_gray) returns all the detected eyes in the form of a rectangle. cv2.rectangle(roi_color,(ex,ey),(ex+ew,ey+eh),(0,255,0),2) draws a rectangle at (ex,ey) top left and (ex+ew,ey+eh) bottom right with green color (0,255,0) with a thickness of 2 pixels.