
In this book, you were introduced to Raspberry Pi and its capability, you configured the LAMP server on Raspberry Pi, got introduced to electronics concepts, and finally, the basics of image processing and algorithm were developed and tested on Raspberry Pi. There might be instances when you wanted to know more about a certain topic or you were stuck in between. This chapter answers all those questions. In the first section, common troubleshooting techniques are mentioned. The second part of the chapter mentions some of the useful tips and tricks. Finally, the last part of this chapter has resources that will be useful if you want to go advanced with Raspberry Pi. We will cover the following topics in this chapter:
- Troubleshooting
- Tips and tricks
- Resources for advanced users
This section has answers to some of the common problems that you might face while working with Raspberry Pi.
Raspberry Pi power supply is widely misunderstood. A lot of the problem is because of improper power supply. A power supply that can provide 5V and 1A is good enough. However, if you are planning to use a WiFi USB adapter other than what I had suggested, try using a 5V, 2A power supply, which can help Raspberry Pi run more stable.
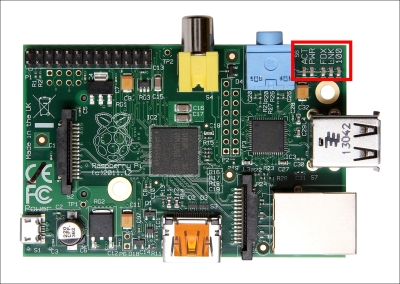
There are five LEDs near the USB connector. The status of these LEDs can help interpret the problem with a Raspberry Pi:
|
LED |
Color |
Function |
Normal status |
|---|---|---|---|
|
OK |
Green |
Card status |
This will flash during an SD card activity |
|
PWR |
Red |
Power |
This will be steady ON when Raspberry Pi receives power |
|
FDX |
Orange |
Full duplex |
This will be ON when the Ethernet connection is fully duplex |
|
LNK |
Orange |
Link |
This will be ON when the Ethernet is connected |
|
100 |
Orange |
100 Mbps |
This will be ON when connected to 100 Mbps |
The LED status and their interpretation is as follows:
This means your power is not properly connected. Check the power supply connection and try again.
Raspberry Pi is getting power, but this is not sufficient. Use a different power supply.
This means one of the following things:
- Raspberry Pi is getting a proper power supply, but the SD card is not inserted. Check the SD card status and try again.
- Raspberry Pi is getting a proper power supply, but the SD card is not connected properly. Check the SD card status and try again.
- Raspberry Pi is getting a proper power supply, the SD card is inserted properly, but there is no valid image on the SD card (make sure you have installed a valid OS on the SD card).
- Raspberry Pi is getting a proper power supply, the SD card is inserted properly, but it is corrupted. Use a different SD card, load the OS, and try again.
- Raspberry Pi is taking too much power because of the connected peripherals. Remove all the peripherals and try again.
- The power supply in itself is not able to provide 5V power supply. Use a different power supply and try again.
A colored splash screen is displayed after start.elf is launched. This should get replaced by the Linux kernel when kernel.img is loaded, but if the colored splash screen is staying forever, Raspberry Pi cannot find kernel.img. Try replacing the SD card, reload the OS again to the SD card, and check again.
Raspberry Pi does not respond to keyboard/mouse.
As mentioned earlier, most of the problem with Raspberry Pi is because of the inadequate power supply. In this case too, try using a good power supply and good cable. Some cheap cables that work with a cell phone cannot fully power the Raspberry Pi. There are USB devices that require more power. Check the voltage and current rating of the devices before connecting it to the Raspberry Pi USB port. If it is more than 5V 100mA, it is better to use USB hub to power such devices.
You can use the following command to test your webcam with Raspberry Pi and change configuration settings if required:
sudo apt-get install guvcview
Based on the camera, it might work with an internal USB port only, not with an external USB hub.
Ethernet connects at 10M instead of 100M.
In rev.1.0, the LED corner is mislabeled with 10M instead of 100M. When that LED is ON, Raspberry Pi is connected to 100 Mbps.
The Ethernet connection is lost when any USB device is plugged in
The Raspberry Pi USB ports are configured in such a way that it can provide 100mA current to both the USB port. However, if you try to connect the USB device, which requires more current (>100 mA), then connect it using a powered USB hub.
Sound does not work with the HDMI monitor. This is caused by some computer monitors that select the DVI mode even if an HDMI cable is connected. This is required even if the other HDMI devices work perfectly with the same monitor.
Add the following line to the configuration file, /boot/config.txt:
hdmi_drive=2
The preceding line of code will force it to select the HDMI mode.
Sound does not work in some applications.
The Raspberry Pi OS also comes with drivers installed by default. However, to install support for sound, enter the following command in your command line:
sudo apt-get update
sudo apt-get upgrade
sudo apt-get install alsa-utils
sudo modprobe snd_bcm2835
Try entering the following command to test whether sound is working or not:
aplay /usr/share/sounds/alsa/Front_Center.wav
The camera board requires 250mA to operate. Make sure your power supply can provide enough power for the camera module as well as Raspberry Pi, and any peripherals directly attached to Raspberry Pi.
The Raspberry Pi camera is very simple to use. First, make sure that you have connected the camera as per the instruction mentioned in Chapter 4, Getting into Robotics. When the camera module is in use, you will see the red LED blinking on the module.
If you just get errors instead of a desktop, when typing startx, you may be out of storage space on the SD card. gparted can expand a partition, if the SD card is less then 2 GB. Expanding the partition will solve the problem.
The kernel and firmware are installed as a Debian package. These packages are updated infrequently after extensive testing. You can use the following command to update the Raspberry Pi firmware:
sudo apt-get update && sudo apt-get install rpi-update
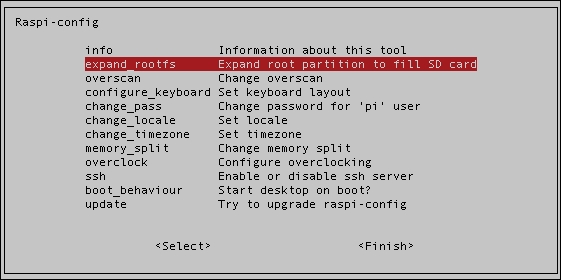
The Raspbian wheezy image (as downloaded) only uses the first 2 GB of space on the SD card. There are two options. You can use the Raspi-config GUI to resize the disk or you can do it programmatically. The expand_rootfs menu item reconfigures the operating system to use all of the space available on the SD card. A restart is required to make the reconfigure take effect, as shown in the following image:
These are the steps to manually resize the disk:
- From the command line or a terminal window, enter the following:
sudo fdisk /dev/mmcblk0 - Type
pto list the partition table. - You should see three partitions. If you look in the last column labeled System, you should have:
W95 FAT32
Linux
Linux Swap
- Make a note of the start number for partition 2, you will need this later.
- Next, type
dto delete a partition. - You will then be prompted for the number of the partition you want to delete. In the preceding case, you would want to delete both the Linux and Linux swap partitions, so type
2. - Then, type
dagain and then type3to delete the swap partition. - Now, you can resize the main partition. Type
nto create a new partition. - This new partition needs to be a primary partition, so type
p. - Next, enter
2when prompted for a partition number. - You will now be prompted for the first sector for the new partition. Enter the start number from the earlier step (the Linux partition) (In my case it was 122880 which I got from Step 4).
- Next, you will be prompted for the last sector; you can just hit Enter to accept the default value as this value can vary depending upon the memory card size, which will utilize the remaining disk space.
- Type
wto save the changes you made. - Next, reboot the system with the following command:
sudo reboot - Once the system reboots and you are back at the command line, enter the following command:
sudo resize2fs /dev/mmcblk0p2Note that this can take a long time (depending on the card size and speed); be patient and let it finish so that you do not mess up the filesystem and have to start from scratch.
- Once it is done, reboot the system with the following command:
sudo reboot - You can now verify that the system is using the full capacity of the SD card by entering the following command:
df -h