You have learned about the sensors and motors associated with EV3 and have skimmed the surface of what the EV3 brick has to offer. The time has come to start constructing actual robots and programming them to function to our specifications.
The EV3 brick comes with a Brick Program application installed that allows EV3 to be programmed directly using the brick. This is the fastest way of getting up and running with programming an EV3 robot.
In this chapter, we will cover the following topics:
- An overview of the Brick Program application
- Learning about the EV3 visual programming language
- Writing several simple programs to illustrate visual programming
- Constructing an obstacle-avoiding robot
- Discussing the limitations of the visual programming language
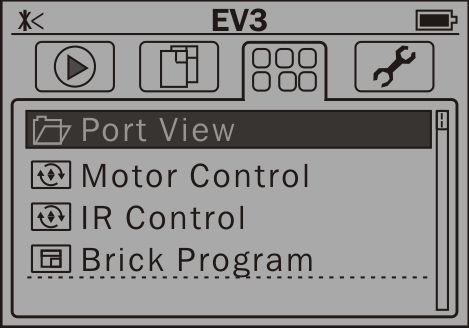
We are already familiar with two applications on EV3: Port View and Motor Control. The Brick Program application is far more powerful. It allows you to use a visual programming language to write programs directly on the brick and execute them.
To open the Brick Program application, navigate to the applications tab (the third one), press Down three times to highlight Brick Program, and then press Enter:
The initial screen of the Brick Program application displays two icons on the left and an empty program waiting to be filled in, as shown in the following diagram:
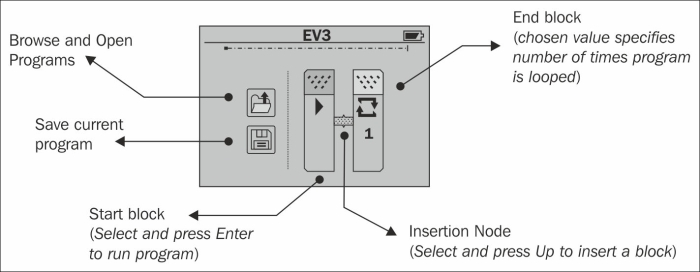
You use the hardware buttons on the face of EV3 to navigate between the various icons. The two icons on the left are the Open and Save buttons. The Open icon is used to open an existing program for running or editing. The Save icon is pretty self-explanatory. Remember to save your work often. Any unsaved programs will be lost if the brick runs out of power.
On the right side of the gray vertical dividing line is the program itself. It consists of icons strung together. The variety of icons and the sequences in which they can be assembled make up the visual programming language.
The two icons that are displayed on the initial screen denote the start and end of a program. Selecting (by using the navigation buttons) and then pressing Enter on the start icon (the one with the triangular play symbol) runs the program.
The end icon not only denotes the end of the program sequence, it is also used to specify how many times the program should be repeated. The default value is 1, in which case the program is run only once. To change the loop value, navigate to the icon and press Enter. Two small arrows will appear above and below the number 1, indicating that you can press the Up and Down keys to change the value. Choose the repetition value; it can be 1, 2, 3, 4, 5, 10, or infinity (loop endlessly) and press Enter. A running program can be stopped/cancelled by pressing the Back button.
In the middle of the start and end icons is an insertion node, as shown in the following screenshot:

Navigate to it (using the Right and Left buttons) and a hint appears (also shown in the preceding screenshot), indicating that pressing Up will display a list of options. These options consist of icons that denote specific functionality that can be inserted at this location. The following screenshot shows the first page of icons that are displayed when one navigates to the insertion node and presses Up. One can navigate through the list of icons by pressing the Up and Down buttons.
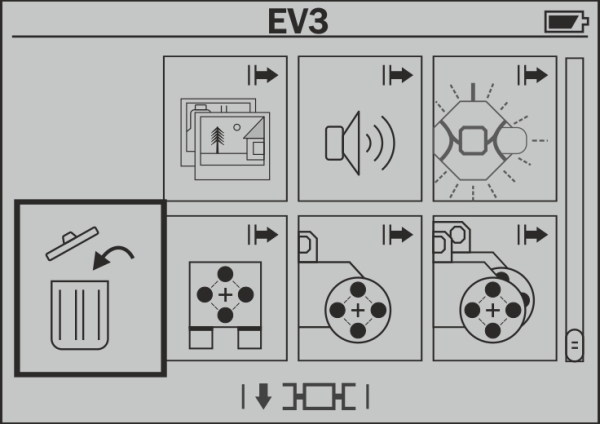
Choose the icon with the speaker drawn on it. A new block will now appear inserted between the start and end icons with insertion nodes on either end:

Press Right to choose the insertion node between the sound icon you just inserted and the end icon and press Up to insert another icon. Press Up (repeatedly) and then Right to select the clock icon with the hourglass on it. A clock block will be inserted into the program:

Our first visual program is now complete. Navigate to the start icon and press Enter to execute the program. The EV3 LCD screen will display run and the speaker will play a sound saying Hello. It is appropriate that our first EV3 program be of the Hello World variety.
If at first you don't succeed, you can either wait for the faulty program to come to an end or, if that doesn't work (or you are getting impatient), simply press the Escape button to terminate the running program immediately (a perfectly safe operation) and fix it.