
In Chapter 18, I showed you how to use VARIABLE and CONSTANT blocks to hold data such as Numbers and Text. But the problem with the VARIABLE block is that when the program ends, the data disappears! Even worse, if the batteries die or the power is turned off on your robot while it's running, the VARIABLE blocks all lose whatever values they were holding. The CONSTANT block solves this problem by allowing you to create a global variable that can be reused by multiple programs, but you must create the constant and its value ahead of time, either using the Define Constants menu option (see Chapter 18) or the CONSTANT block's configuration panel. Another limitation to the CONSTANT block is the amount of data this block can hold.
Fortunately, your NXT robots have access to a block that can hold a larger amount of data in memory and this data doesn't have to be pre-defined. That block is the FILE ACCESS block. It allows you to store data in a text file that doesn't disappear—even if you turn off the robot's power or the program ends. Your data is stored in a file that is kept in the NXT Brick's memory, and it stays there until you delete it, just like a program.
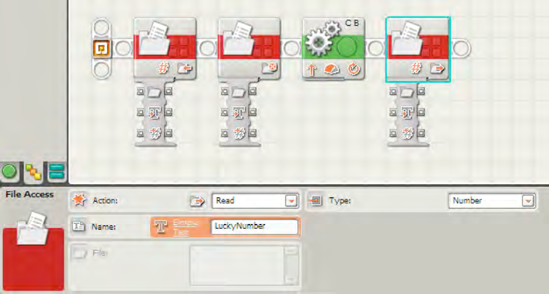
The FILE ACCESS block is shown in Figure 22-1 along with its configuration panel.

Now, before I get into showing you how to use this block, let me first explain some simple rules that you must obey when using the FILE ACCESS block:
Rule 1: The block can only hold Number or Text data, not Logic.
Rule 2: The block can perform four actions: Read, Write, Close, and Delete.
Rule 3: Each
FILE ACCESSblock can only perform one of the actions; this means that you need to use oneFILE ACCESSblock per action type.Rule 4: When you write data to a file, the data is added to the end of any existing data already in the file.
Suppose that your Text data file has the following data stored in it: 15429823. Now, what will happen if you add 34 to it? Well, according to rule 4, the file will now be holding 1542982334. The 34 is appended to the end.
There are just a few more rules for you to remember:
Rule 5: To read the data written to a file, you must first close the file.
Rule 6: To overwrite the file (but keep the same filename), you must delete the file and create a new one with the same name.
The FILE ACCESS block does require some experimentation to learn how to properly use it. I highly encourage you to perform the following examples and then experiment by making changes. Try to read a mixture of values (of Number and Text types). Next, close the file and try opening it again and reading back your values. By playing with the block, you'll quickly figure out how best to use it with your own robots.
But for now, let me go over the basics of how to use the block.
Let's start with the Action section in the configuration panel. The Action section has a drop-down menu with four options: Read, Write, Close, and Delete. Easy enough—choose the Read option to read the contents of a file; choose the Write option to write data to a file; choose the Close option to close the file; and choose Delete to delete the file.
The Name section is where you specify the name of the file you will be working with (you might be writing, reading, closing, or deleting it). If you are creating a new file, keep the name short and unique but descriptive enough so you'll remember what kind of data it holds. Good examples are "RightTurns" (it could hold the total number of right turns a robot makes) and "TeamName" (this could hold a team's name for use in different programs).
The File section will list any files that currently exist on the NXT Brick when the Brick is connected and communicating with the software. You can choose a file from this list rather than specifying a new filename.
The Type section has a drop-down with two options: Number and Text. Choosing Number creates a Number section where you can type in a numeric value or use the small buttons to increase or decrease the number (if you are writing to the file). Choosing Text will create a Text section where you can type in a bit of text (also if you are writing to a file).
If you are reading from a file, you must specify if you are reading a Number or Text value from the file. If the file contains 1234, for example, and you select to read a text value, the data will be treated as text and not as a number. Keep that in mind, and remember to always select the proper type of data to read or write to a file.
If you are closing a file, this simply protects the file from being written or deleted. It's a good practice to always close a file when you are finished using it and before opening a different file.
Let me give you a small example of a program that uses the FILE ACCESS block.
First, I'll create a new file called LuckyNumber, as shown in Figure 22-2. Choose to write 15 as a Number value into the file.

You'll need to close the file after the number has been written to the file. This will allow you to later read the data. So add another FILE ACCESS block that closes the file (see Figure 22-3).

Now, here's some pseudo-code for SPOT:
Me: SPOT, I've stored a file in your memory called LuckyNumber. I want you to move forward three rotations and then display my lucky number on your LCD screen.
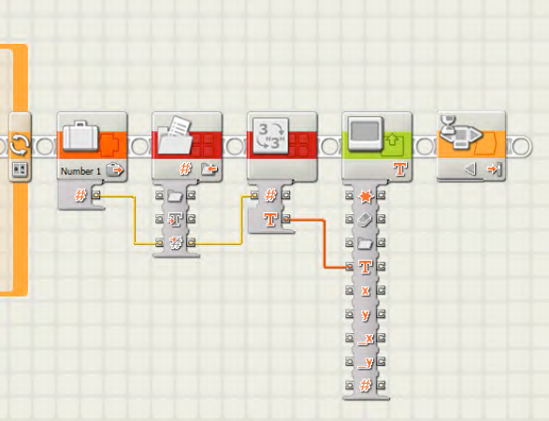
Here's how the program will look. First, drop in a MOVE block that will move SPOT forward three rotations (see Figure 22-4).

Now, you'll need to read the number stored in the LuckyNumber file and have SPOT display that value on his LCD screen. Fortunately, you can use a NUMBER TO TEXT block that will take a Number value and send that to a DISPLAY block. So, your first step is to read that value from the file. This is done by dropping in another FILE ACCESS block and reading the data (see Figure 22-5).
Now, you need to drop in a NUMBER TO TEXT block and configure it to read the value stored in the file. You'll then pass this Text value on to a DISPLAY block. This is shown in Figure 22-6 along with the final WAIT block and its configuration panel.

Be sure to notice that there are two output data plugs that have the pound (number) symbol: #. One is used to provide the current number being written to the FILE ACCESS block (the block is set to the Write action), and the other is used to read data from the file. This sounds confusing but remember that you can be writing a number or text to a file that contains many numbers or many strings of text. When a FILE ACCESS block is set to the Read action, it will read the first bit of data it encounters in the file. Dropping another FILE ACCESS block and setting it to the Read action will read the next bit of data stored in the file. (You can also place a FILE ACCESS block set to Read in a LOOP block and every loop will cause it to read the next number or bit of text in the file.)
Figure 22-6 shows a data wire running from the output data plug. Be careful to select the correct one when using a FILE ACCESS block, or you'll receive a broken wire. Once this is completed, the FILE ACCESS block will provide the number stored as data that can be read by the NUMBER TO TEXT block. You'll just have to test this to prove it to yourself. The NUMBER TO TEXT block provides this to the DISPLAY block; the program waits for you to press the Left button (using the final WAIT block), and the program then ends.
The FILE ACCESS block is a great way for you to store data that your robot obtains during its explorations. You could use files to store things like number of motor rotations and left and right turns it makes. Your robot could later read from these files and find its way back home. There are many ways to use files stored on your Brick, and now you know how to create them, add to them, and delete them.
Before I close out this chapter, I want to mention a couple of useful tips. The first is to always get in a habit of closing your file. By doing this, you reset the file, and any values stored inside will be read in order (first to last). If you are using a FILE ACCESS block in other programs, I also suggest that you place a FILE ACCESS block at the beginning of the program and configure it to close the file. Again, do this to ensure that the file's data will be read in proper order.
Remember, because the data stored in a file is in sequential order, to read another value simply requires adding another FILE ACCESS block set to Read, or you can place a FILE ACCESS block inside a LOOP block so that every time the program loops, the FILE ACCESS block will read the next value in the file.
Finally, do remember that the file has an end. When the end of the file is reached, the FILE ACCESS block will not read any more values. To determine if this is happening, the FILE ACCESS block has a very useful Error data plug that returns a True or False Logic value (this uses a data plug and not a stored value of True or False inside the actual file). You can drag a data wire out of the Error data plug and use it as a condition to monitor. For example, a LOOP block could be configured to break when a True value is received from the Error data plug—the loop breaks and the program continues.
This chapter has only touched lightly on the power of the FILE ACCESS block. Believe me; there are many more uses for this block, and you'll find that giving your robots the ability to record data (and later retrieve it) will be a powerful tool. You can use it to keep track of light values, left and right turns, and more. Play around and experiment with the FILE ACCESS block to learn the little tricks that will allow you to give your robot a long-term memory!
Create a program for SPOT that generates a series of five random turns, left or right, and pauses for a few seconds between each turn. Count the number of left turns. Write the number of left turns to a file that will be stored on the brick for later use. Also, display the value stored in the file on the LCD screen before the program terminates.
This exercise will test what you've learned about a variety of NXT-G blocks, including the VARIABLE, LOOP, SWITCH, and MATH blocks. If you have trouble, I've included one possible solution at the end of this chapter.
Up next, make sure your Light and Sound sensors are working properly using the CALIBRATION block. I find this block isn't used as often as it should be, and that many errors related to these sensors are often related to the fact that trigger values are often set in one condition (a bright room, for example) while the robot and its program is executed in a different condition (a dimly lit room, for example). The CALIBRATION block can help eliminate these types of inconsistent conditions.
Because Exercise 22-1 is rather lengthy, I'll provide a little extra discussion on why I've used certain blocks. Figures 22-7 through 22-22 provide the complete program and configuration panels for Exercise 22-1.

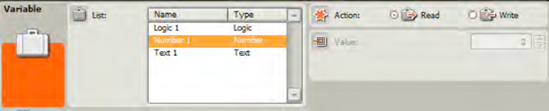
The VARIABLE block is initially configured to hold a value of 0. This variable will hold the number of left turns made during the program's execution.


Because I want to make random left or right turns, I'll configure a RANDOM block to generate two values—1 or 2. I'll then use this value with the SWITCH block next.

Remember to set it to a Number type and change the default values for the two possible conditions to 1 and 2. (See Chapter 12 for information on configuring a SWITCH block.)

The SWITCH block will take the value from the RANDOM block (1 or 2) and use this to select a path. Condition 2 will have the robot make a right turn. Condition 1 will have the robot make a left turn. Note that the MOVE block for Condition 2 is not seen in Figure 22-7; this figure shows the SWITCH block's tab for Condition 1.

This is the MOVE block that will have the robot make a left turn. In addition to this MOVE block, a few other blocks are required in order to track the number of left turns made.
Here is where the current value stored in the VARIABLE block is read into the MATH block.

The MATH block increments the value stored in the VARIABLE block by 1. Every time Condition 1 is executed, the value stored will increase by a value of 1.

After the value increases by 1, it must then be rewritten to the VARIABLE block. Notice in Figure 22-16 that the block is set to the Write option.


After the looping is completed, the value stored in the VARIABLE block must be written the FILE ACCESS block, so make certain the action is set to Read.


