
Chapter 5
Introduction to Digital Audio and MIDI
In This Chapter
![]() Understanding the fundamentals of digital audio
Understanding the fundamentals of digital audio
![]() Getting high-quality audio from Logic Pro
Getting high-quality audio from Logic Pro
![]() Setting up audio and MIDI preferences
Setting up audio and MIDI preferences
![]() Connecting your audio and MIDI hardware
Connecting your audio and MIDI hardware
Even though Logic Pro does a great job of giving you exactly what you need, understanding the basics of digital audio and MIDI are still important for making high-quality recordings. One of the first steps you take with a project is defining your project’s audio settings. These settings can have a big effect on the sound quality of your recordings. Your project’s audio settings can also affect compatibility with your hardware and other audio systems.
In this chapter, you find out how to set up Logic Pro to get the best sound quality. You discover how to connect your audio and MIDI devices and avoid common pitfalls. You also choose the recording audio file type that’s right for the job
Understanding Digital Audio
So what’s the big difference between digital and analog audio anyway? In analog recording, a representation (an analog) of the sound source is reproduced on a physical medium, such as records or tape. In digital recording, multiple measurements are taken of the sound source and stored digitally as binary code, or 1s and 0s. The process of measuring and recording digital audio is called sampling.
The sample rate is how often a slice of audio is turned into a digit each second. The higher the sample rate, the higher the audio fidelity. You want high-quality audio even if your goal is to mangle and distort it. The noise you introduce into your audio should be a choice, not the result of a misunderstanding.
You also want a wide dynamic range, which is the ratio of loudest to quietest sound. Dynamic range is measured in decibels, or dB. CDs have a dynamic range of about 90 dB. Logic Pro is capable of 24-bit recording and has a dynamic range of around 125 dB. You'll be pleased that Logic Pro is capable of recording audio at and exceeding industry standards, depending on your hardware capabilities.
In this section, you find out how to set your project's sample rate and bit depth, and you choose the best audio file type for your project. This knowledge will ensure high sound quality and compatibility.
Acoustics 101
Ready to get out your calculus textbooks and start plotting sine waves? You’re not? Phew. Me neither. But it’s important to define some audio terms so you understand the choices you make as you record digital audio.
After you understand some basic acoustic theory, you’ll be able to identify how the choices you make in Logic Pro affect what you hear. Without getting too technical and long-winded, let’s define some aspects of sound:
- Frequency is the number of cycles completed by a sound wave in one second, as shown in Figure 5-1. Frequency is measured in Hertz (Hz).
- Wavelength is the distance traveled over one cycle of a sound wave.
- Period is the duration of a sound wave cycle in time and is inversely proportional to frequency. The lower the frequency, the longer the period.
Here’s why understanding some audio fundamentals is important. Audio has to travel through the atmosphere to get to you so you can perceive it. A low E string on a bass guitar has a frequency of 41.2 Hz and takes about 27 feet to complete a full cycle. Bass frequencies travel far, so you can hear the low boom of a loud car stereo coming a mile away. But bass doesn’t always sound good in a small space because it can’t complete a full wavelength without hitting a wall and bouncing around the room. And before you know it, all those bass frequencies pile on each other and multiply, causing room modes. Room modes are frequencies that can be too loud or too quiet based on how sound reacts to the room's dimensions.
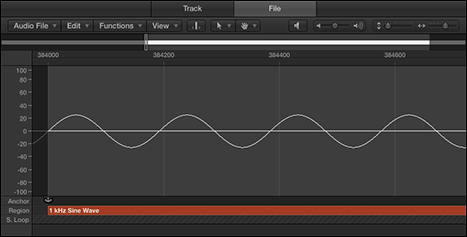
Figure 5-1: A sine wave in the audio file editor.
Knowing a little bit about audio will enable you to make adjustments to your sound to improve its quality. Knowing what frequency is and that every sound is made up of multiple frequencies will help you as you record and mix your audio. In the upcoming sections, I keep the technical information to a minimum and the discussion as practical as the subject will allow.
Set your sample rate
Setting your project sample rate is one of the first things you should do before you begin recording audio. If your project consists only of software instruments and MIDI, you can change the sample rate at any time. But when audio is included in your project, changing the sample rate will require your audio to be converted to the new sample rate.
Logic Pro is capable of converting your audio to any sample rate, but this processing introduces the potential for degradation. Strive to capture clear recordings that need little processing. Beginning your project with the correct sample rate will help you achieve this goal.
If you must change the sample rate, downsampling (converting the sample rate from high to low) is preferable to upsampling. So start your projects with as high a sample rate as your hardware will allow or the project requires. The downsides of very high sample rates are larger file sizes and additional hardware processing. Your computer can’t hold as many tracks or effects plug-ins on a project with a higher sample rate.
To set your sample rate:
- Choose File⇒Project Settings⇒Audio.
The Project Settings window opens to the Audio pane, as shown in Figure 5-2.
- In the Sample Rate drop-down list, select the sample rate.
Logic Pro supports the following sample rates: 44.1, 48, 88.2, 96, 176.4, and 192 kHz.
 CD audio uses a sample rate of 44.1 kHz and is ideal for most situations. For video production, 48 kHz is common. Higher sample rates are usually reserved for audiophile recordings, such as classical music and DVD audio. However, as hardware and processing power improves, higher sample rates may become more common.
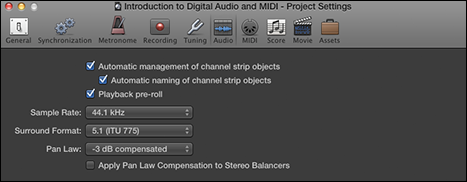
Figure 5-2: Audio project settings.
Determine your bit depth
Bit depth is the number of bits of information in each sample. A higher bit depth equals higher resolution for each sample. The default Logic Pro setting is 24-bit recording. If you turn off 24-bit recording, Logic Pro will record in 16 bit. Similar to your sample rate, the only downsides of using a higher bit depth are that it takes up more drive space and uses more processing power.
To turn on or off 24-bit recording:
- Choose Logic Pro⇒Preferences⇒Audio.
The Preferences window opens to the Audio pane.
- Click the Devices tab, as shown in Figure 5-3.
- Select the Core Audio check box.
- In the middle of the screen, select or deselect the 24-Bit Recording option.
When 24-bit recording is not selected, Logic Pro records in 16 bit.
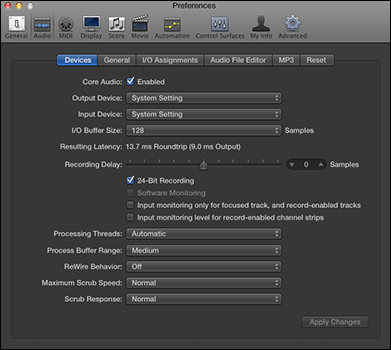
Figure 5-3: The Devices tab of Audio Preferences.
Bit depth is different than bit rate, which is the number of bits of information processed each second, as opposed to each sample. When exporting your project to lossy audio formats such as MP3, higher bit rates equal higher quality sound. You choose a bit rate when you export your audio in Chapter 19.
Choosing audio file types
When Logic Pro records audio, it creates an audio file on your hard drive. Different file types have different advantages. All recording file formats are lossless, so they have the same sound quality. The major difference in the recording file type is the recording duration.
Logic Pro can record audio in the following file types:
- AIFF: 4 GB size limit. AIFF has a stereo-file time limit between 20 minutes and 3 hours and 15 minutes, depending on bit depth and sample rate. AIFF is the default Mac lossless audio file type. All Macs and most other operating systems can read AIFF files.
- WAVE: 4 GB size limit. WAVE has a stereo-file time limit between 40 minutes and 13 hours and 30 minutes, depending on bit depth and sample rate. This file type is the default audio file type in Windows operating systems. To be nice to a Windows user, it can’t hurt to use the WAVE file type. WAVE also has a longer recording duration, which gives it an advantage over AIFF.
- CAF: No size limit. CAF has a time limit of hundreds of years, if you can call that a limit. Apple loops and sound effects installed with Logic Pro use the CAF file type.
To choose the recording file type for your audio recordings, follow these steps:
- Choose Logic Pro⇒Preferences⇒Audio.
- Click the General tab.
- On the Recording File Type drop-down menu, make a selection, as shown in Figure 5-4.
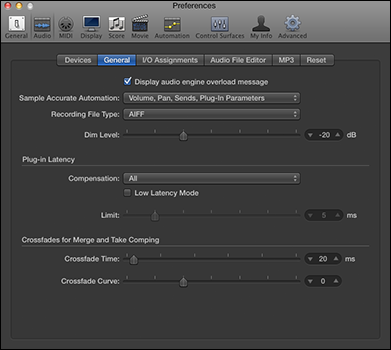
Figure 5-4: The General tab of Audio Preferences.
Connecting Your Audio Devices
If you plan on recording audio from a microphone or an instrument, you'll need a way to get the audio into Logic Pro. Your Mac probably has a built-in line in or microphone. Although these may work in a pinch, professional recordings need higher-quality input devices. The documentation of most professional hardware will show you how to set it up with Logic Pro.
Choosing your input and output device
After your hardware is set up and connected to your computer, you must select the hardware in Logic Pro Preferences. To choose your audio input and output devices:
- Choose Logic Pro X⇒Preferences⇒Audio.
- Click the Devices tab.
- On the Input Device and Output Device drop-down menus (refer to Figure 5-3), make your selections.
 You can choose separate input and output devices. You may want to record a guitar by using a mobile guitar interface and monitoring through the computer speakers or headphones. In this case, you select the audio interface as the input and select Built-in Output as the output.
 - Click the Apply Changes button.
Logic Pro will now begin using your selected input and output device for audio.
Setting your I/O buffer size and reducing latency
Latency refers to the delay between your audio input and audio output. This delay is unavoidable in software because your sound source must be converted to digital audio and processed before it can be heard. In many cases, latency is negligible and won’t be noticeable. However, latency can become an issue when a track has lots of plug-ins that require significant processing.
It’s a good idea to record most of your tracks before you begin adding lots of plug-ins. The more plug-ins you add, the more processing power required, and the more latency you can introduce into the system. If you record without a lot of plug-ins, latency probably won’t be an issue.
When you record, latency can be a hindrance if you can’t hear what you’re playing exactly when you’re playing it. Fortunately, you can adjust the latency as follows:
- Choose Logic Pro X⇒Preferences⇒Audio.
- Click the Devices tab.
- On the I/O Buffer Size drop-down menu (refer to Figure 5-3), make your selections.
Note that a smaller buffer size will reduce latency.
A smaller buffer size requires more processing power. If you set the buffer size too low, you can introduce clicks and pops in your audio. Experiment with the buffer size until you find a setting that minimizes latency but doesn’t introduce unwanted audio artifacts. - Click the Apply Changes button.
Logic Pro will begin using your selected I/O buffer size.
Monitoring signals through your hardware or software
Some audio interfaces have built-in monitoring capabilities. This means you can listen to the source material you're recording through your hardware instead of through the Logic Pro X software. Monitoring through your hardware is useful if the software introduces too much latency.
By default, Logic Pro monitors audio through the software. To turn software monitoring off, follow these steps:
- Choose Logic Pro X⇒Preferences⇒Audio.
- Click the Devices tab.
- Deselect the Software Monitoring check box (refer to Figure 5-3).
If no hardware is connected, the check box will appear dimmed and will be unavailable.
The Software Monitoring check box is available only if Show Advanced Tools is selected in the Advanced pane of Logic Pro X Preferences, as discussed in Chapter 1. - Click the Apply Changes button.
Audio will no longer be monitored through Logic Pro.
Exploring audio preferences
You’ve seen Logic Pro X audio preferences throughout this chapter. As you’ve discovered, you can customize the software to your audio needs in many ways. Next, I briefly cover some global audio preferences that will be of use as you record, edit, and mix your audio in Logic Pro.
Open the Audio Preferences window by choosing Logic Pro X⇒Preferences⇒Audio. Here’s a brief description of the audio preferences:
- I/O Assignments tab: The I/O Assignments tab has three tabs: Output, Bounce Extensions, and Input, as shown in Figure 5-5. The Output tab enables you to send your audio to a different output pair if your hardware supports it. Select the Mirroring check box to send your output through stereo out in addition to a second output.
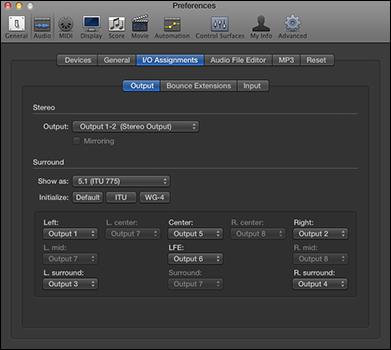
Figure 5-5: The I/O Assignments tab in Audio Preferences.
- Audio File Editor tab: This tab, shown in Figure 5-6, let’s you set the preferences for the audio file editor. (For details on this editor, see Chapter 14.) The audio file editor has its own undo history with a definable number of steps. You can also choose an external audio editor if you have one that you prefer.
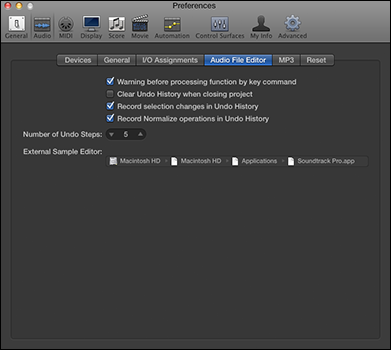
Figure 5-6: The Audio File Editor tab in Audio Preferences.
- MP3 tab: The MP3 tab, shown in Figure 5-7, enables you to set the default bit rate of mono and stereo MP3 files. As discussed previously in this chapter, a higher bit rate will result in higher quality audio.
- Reset panel: If your software instruments get stuck and continuously play notes, you can reset them in this tab. Sometimes sustain messages from a sustain pedal get stuck, and notes continue playing as a result. You can reset sustain MIDI messages in addition to modulation and pitch bend in this tab, as shown in Figure 5-8.
In addition to global audio preferences, you can make changes to the project's audio settings by choosing File⇒Project Settings⇒Audio (refer to Figure 5-2). These preferences usually work just fine in their default state. The only setting you’ll want to adjust when you begin your project is the sample rate, which you learned how to do previously in this chapter.
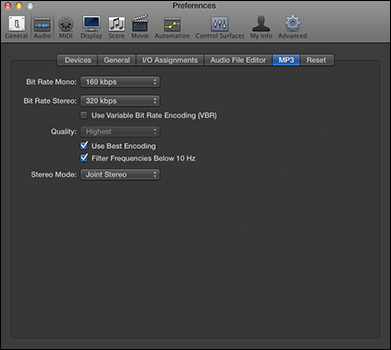
Figure 5-7: The MP3 tab in Audio Preferences.
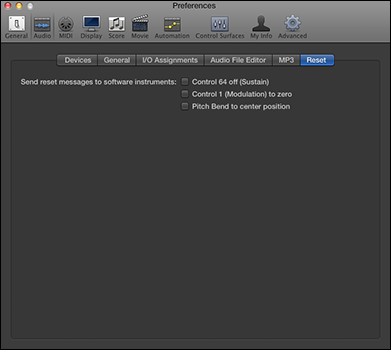
Figure 5-8: The Reset tab in Audio Preferences.
Understanding MIDI
The MIDI (Musical Instrument Digital Interface) protocol enables compatible devices to send and receive data. It was created to allow hardware to speak to each other. Logic Pro uses the MIDI protocol to play and record software instruments, automation, and external MIDI hardware. In this next section, you find out how to use MIDI and to connect your MIDI devices to Logic Pro.
MIDI does not contain audio. Your external MIDI devices still need their audio to be routed into your computer and Logic Pro to be heard. Follow the instructions for connecting your audio devices as described previously in the “Connecting Your Audio Devices” section.
Sending MIDI messages
MIDI messages are sent from one device and received by another, such as from a MIDI controller to Logic Pro. These messages can include information about pitch, velocity, sustain, and much more. Logic Pro translates the MIDI messages and sends them to a software instrument or to external hardware. (You create software instrument tracks and external MIDI tracks in Chapter 4.)
You’ll use MIDI to accomplish many of your musical goals in Logic Pro. As described in Chapter 3, you can even assign your MIDI controller to a Logic Pro command. It’s not difficult to map a button on your MIDI keyboard to tell Logic Pro to play your project. But while Logic Pro is always using MIDI under the hood, you’ll mostly be using MIDI to play software instruments.
To verify that Logic Pro is receiving the messages your MIDI controller is sending, show the MIDI activity in the LCD on your control bar as follows:
- Control-click an empty area on your control bar and choose Customize Control Bar and Display.
A window opens with customization options.
- In the LCD column, choose Custom.
- Select the MIDI Activity (In/Out) check box.
- Click the OK button.
Your LCD displays a small dot in the upper-right corner . If no MIDI is being received, the display will read No In/No Out.
Changing MIDI channels
MIDI devices send and receive information on 16 different channels. Many Logic Pro software instruments are multi-timbral, which means they can play multiple different sounds simultaneously. You can set these sounds to different MIDI channels, which allows you to play them independently using multiple MIDI controllers. Or if you have a MIDI controller that has a split or layer function, you can potentially use a single keyboard to play multiple software instruments at a time. You find out how to set MIDI channels for MIDI recording in Chapter 7.
Connecting Your MIDI Devices
MIDI devices can include keyboards, drum pads, alternative controllers such as guitar MIDI systems, and more. Although you don’t need a MIDI controller to make music with Logic Pro, it's a lot more fun if you have a way to play software instruments. And trained players can make use of their skills to input music more quickly and accurately.
Connecting MIDI controllers
Many MIDI controllers will send and receive MIDI through USB, eliminating the need for a third-party interface. Older MIDI controllers may use 5-pin DIN cables and require a third-party hardware interface. Connect your controller to your MIDI interface or to your computer’s USB port.
Connecting external instruments
If you're connecting a MIDI synthesizer or workstation to Logic Pro, in addition to making MIDI connections, you must be able to monitor the instrument’s audio. If your audio interface supports hardware monitoring, you can monitor the instrument through your hardware. If it doesn’t, you’ll need to add an audio track to your project to monitor the instrument. For more on monitoring audio sources, see Chapter 6.
When you play the keyboard, the instrument is sending and receiving MIDI at the same time, so sounds are doubled. Most keyboards have a Local Off function, which you'll want to use to stop the sound from doubling.
Exploring MIDI preferences
Global and project preferences are similar to audio preferences. To open the Global MIDI Preferences pane, choose Logic Pro X⇒Preferences⇒MIDI. Here’s a brief description of three tabs in the MIDI Preferences pane:
- General: If you have MIDI communication problems, click the Reset All MIDI Drivers button.
- Reset Messages: If your MIDI controllers get stuck, including stuck notes, select the controller you want to reset on this tab.
- Sync: If you want to sync Logic Pro with another device or adjust the timing of your MIDI, you can do so on this tab.
To open the Project MIDI Preferences pane, choose File⇒Project Settings⇒MIDI. Here’s a brief description of the three tabs on the Project Preferences pane:
- General: You can set up MIDI to scrub with audio in the tracks area. Scrubbing means to audition audio while you drag your cursor over it.
- Input Filter: If you’re not using certain MIDI functions or don’t want these functions to be sent or received, you can select them on this tab and they will be filtered out.
- Chase: Use this tab to set how MIDI events will behave when you start your project after a MIDI event has been triggered. For example, if you play your project in the middle of a pitch bend, selecting the Pitch Bend check box will ensure that the bend is synchronized correctly.
You can use the Audio MIDI Setup utility to set up devices connected to your computer. (Audio MIDI Setup is in the Utilities folder of your Applications folder.) You can test MIDI and audio devices, set audio levels, and much more. For a video tour of the Audio MIDI Setup utility, visit http://logicstudiotraining.com/lpxfordummies.
Now that you know the fundamentals of digital audio and MIDI, you're well on your way to recording your own audio and MIDI. With your hardware set up and your audio and MIDI preferences chosen, you’re ready to begin recording some great sounds.