
Chapter 8. Working with Virtual Machines
This chapter covers the following subjects:
![]() Basic Virtual Machine Deployment: This section covers rather basic configurations that are nonetheless critical. In fact, this area of the chapter delves into important considerations such as memory and resource metering.
Basic Virtual Machine Deployment: This section covers rather basic configurations that are nonetheless critical. In fact, this area of the chapter delves into important considerations such as memory and resource metering.
![]() Advanced Virtual Machine Deployment: This part of the chapter details more advanced virtual machine management techniques, including best practices for Linux and FreeBSD environments.
Advanced Virtual Machine Deployment: This part of the chapter details more advanced virtual machine management techniques, including best practices for Linux and FreeBSD environments.
In the heavily virtualized world of information technology, virtual machines play a key role in the datacenter. This chapter focuses on the deployment and management of these various virtual machines, using some important best practices.
“Do I Know This Already?” Quiz
The “Do I Know This Already?” quiz allows you to assess whether you should read the entire chapter. Table 8-1 lists the major headings in this chapter and the “Do I Know This Already?” quiz questions covering the material in those headings so you can assess your knowledge of these specific areas. The answers to the “Do I Know This Already?” quiz appear in Appendix A, “Answers to the ‘Do I Know This Already?’ Quizzes and Q&A Questions.”

Caution
The goal of self-assessment is to gauge your mastery of the topics in this chapter. If you do not know the answer to a question or are only partially sure of the answer, you should mark your answer as incorrect for purposes of the self-assessment. Giving yourself credit for an answer you correctly guess skews your self-assessment results and might provide you with a false sense of security.
1. Which is not an Add Hardware option for a VM in Hyper-V?
a. SCSI controller
b. Virtual Fibre Channel adapter
c. Legacy network adapter
d. Smart paging file location
2. What cmdlet do you use to update a VM version?
a. Update-VMVersion
b. Update-VMType
c. Upgrade-VM
d. Upgrade-VersionVM
3. What dynamic memory setting allows you to specify how to prioritize the availability of memory for this virtual machine compared to other virtual machines on the host?
a. Resource metering
b. Memory weight
c. Memory buffer
d. Maximum RAM
4. What cmdlet enables resource metering?
a. Enable-VMMetering
b. Enable-RMVM
c. Enable-VMResourceMetering
d. Enable-VMRM
5. What mode allows you to resize the VMConnect window?
a. DDA Mode
b. KVM Mode
c. Enhanced Session Mode
d. Virtual Machine Compatibility Mode
6. Which of the following is a false statement about LIS and BIS?
a. FreeBSD 10.0 contains BIS.
b. They provide drivers and services for improved integration.
c. They are never present in distributions.
d. LIS 4.0 ships with two scripts: Install.SH and Upgrade.SH.
7. Which OS is not enabled for Secure Boot?
a. CentOS 6.0 and later
b. RHEL 7 and later
c. Ubuntu 14.04 and later
d. SUSE Linux Enterprise Server 12 and later
8. Which of the following is not an option when moving a VM?
a. Moving all the VM’s data to a single location
b. Moving the VM’s data to different locations
c. Moving the VM’s virtual hard disks
d. Moving just the VM configuration file
Foundation Topics
Basic Virtual Machine Deployment
One of the key first decisions with virtual machines in the Hyper-V environment of Windows Server 2016 is the use of Generation 1 versus Generation 2 VMs. The section “Planning for Windows Server Virtualization” in Chapter 3, “Working with Images,” discusses this key topic at length. Be sure to refresh your memory on this information if required. Here is a brief recap of the advantages of Generation 2 VMs:
![]() PXE boot
PXE boot
![]() SCSI boot
SCSI boot
![]() Boot volume size
Boot volume size
![]() VHDX boot volume resizing
VHDX boot volume resizing
![]() Software-based peripherals
Software-based peripherals
![]() Enhanced Session Mode
Enhanced Session Mode
![]() Storage Spaces Direct
Storage Spaces Direct
Note
Shielded Virtual Machines ensure that the disk and the system state are encrypted and accessible only by authorized administrators; Virtual Machine Connection inside of Hyper-V Manager cannot be used to connect to these machines.
An Overview of Virtual Machine Settings
Settings for virtual machines are stored in .vmcx and .vmrs files. A .vmcx file is for VM configuration settings, while a .vmrs file is for runtime data.
Remember that virtual machines use simulated (virtual) hardware. This abstraction layer manages access to the actual physical hardware of the host. Note that Generation 1 virtual machines have the following hardware by default:
![]() BIOS
BIOS
![]() Memory
Memory
![]() Processor
Processor
![]() IDE controller
IDE controller
![]() SCSI controller
SCSI controller
![]() Hyper-V-specific network adapter
Hyper-V-specific network adapter
![]() COM port
COM port
![]() Disk drive
Disk drive
The following options are available with the Add Hardware option in the Properties dialog of a virtual machine:
![]() SCSI controller
SCSI controller
![]() Legacy network adapter
Legacy network adapter
![]() Virtual Fibre Channel adapter
Virtual Fibre Channel adapter
![]() Microsoft RemoteFX 3D video adapter
Microsoft RemoteFX 3D video adapter
Note
To start a VM from the network, we use a Gen 2 VM or a Gen 1 VM with the legacy network adapter.
Available management settings include the following:
![]() Name
Name
![]() Integration services
Integration services
![]() Checkpoint file location
Checkpoint file location
![]() Smart paging file location
Smart paging file location
![]() Automatic stop action
Automatic stop action
Virtual Machine Configuration Versions
Configuration versions represent a virtual machine’s compatibility settings for its configuration, saved stateseckpoint files. In earlier versions of Hyper-V, virtual machines upgraded as soon as they moved to the upgraded host. With Windows Server 2016, a virtual machine’s configuration version does not upgrade automatically. The process of upgrading the VM version is now “manual” with Hyper-V in Windows Server 2016.
This is an important change because, with rolling upgrades, it is highly likely that a Hyper-V failover cluster might have both Windows Server 2012 R2 and Windows Server 2016. Windows Server 2012 R2 version 5.0 runs on both Windows Server 2012 R2 and Windows Server 2016 hosts. This allows administrators to leave virtual machines unchanged until the upgrade of all failover cluster nodes is complete. After you upgrade all hosts or when you believe you will not need to move your virtual machines to legacy hosts, you can shut down a virtual machine and upgrade the configuration version when needed.
To check a virtual machine’s configuration number, run the following command in an elevated PowerShell command prompt:
Get-VM * | Format-Table Name, Version
Here is the complete syntax of the Get-VM cmdlet:
Get-VM [[-Name] <String[]>] [-CimSession <CimSession[]>]
[-ComputerName <String[]>] [-Credential <PSCredential[]>]
[<CommonParameters>]
To update the version of a single virtual machine, run the following command from an elevated PowerSheld prompt:
Update-VMVersion -Name VM1304
Here is the complete syntax of the Update-VMVersion cmdlet:
Update-VMVersion [-CimSession <CimSession[]>] [-ComputerName
<String[]>] [-Credential <PSCredential[]>] [-Name]
<String[]> [-Force] [-AsJob] [-Passthru] [-WhatIf] [-Confirm]
[<CommonParameters>]
To update all of the virtual machines’ versions on all cluster nodes, run the following command sequence from an elevated PowerShell command prompt:
Get-VM –ComputerName (Get-Clusternode) | Stop-VM
Get-VM –ComputerName (Get-Clusternode) | Update-Version –confirm
$false
Get-VM –ComputerName (Get-Clusternode) | Start-VM
Remember that you cannot take advantage of new Windows Server 2016 Hyper-V features (for example, adding or removing memory from a running virtual machine) until the upgrade has taken place.
Creating a Virtual Machine
Follow these steps to create a new virtual machine in Windows Server 2016 Hyper-V:
Step 1. Launch the Hyper-V Manager by selecting Tools > Hyper-V Manager. (This step assumes that you have installed Hyper-V and its management tools properly, as described in Chapter 7, “Installing Hyper-V.”)
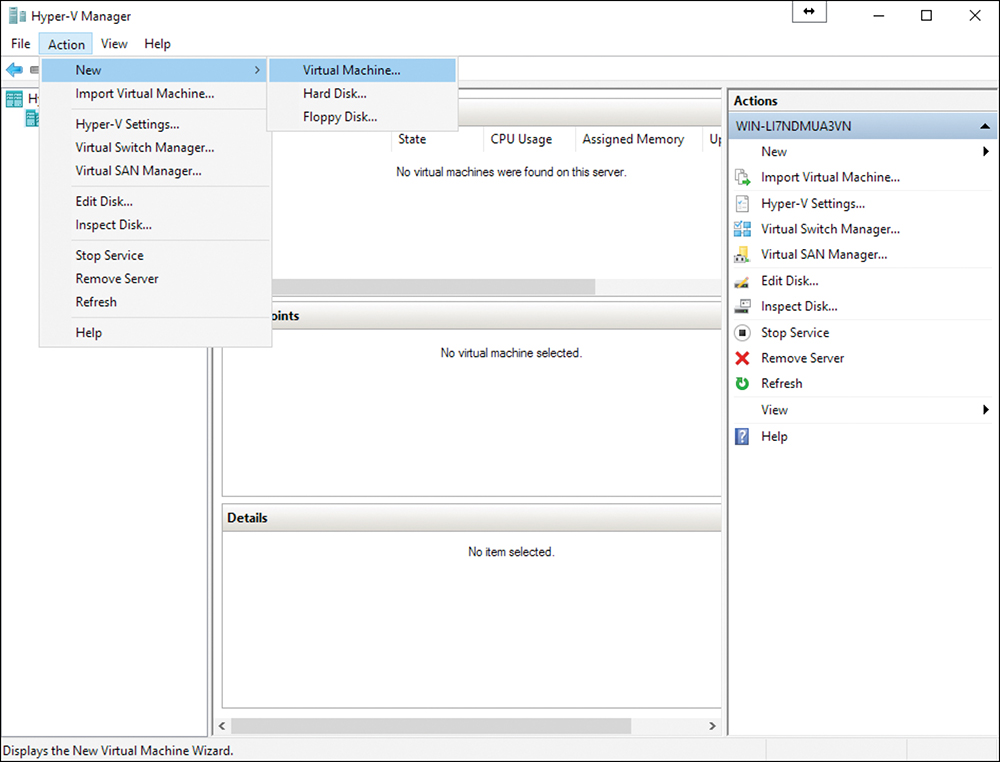
Step 2. Ensure that your Hyper-V host is selected in the left pane and choose Action > New > Virtual Machine, as shown in Figure 8-1.
Step 3. Click Next in the New Virtual Machine Wizard - Before You Begin page.
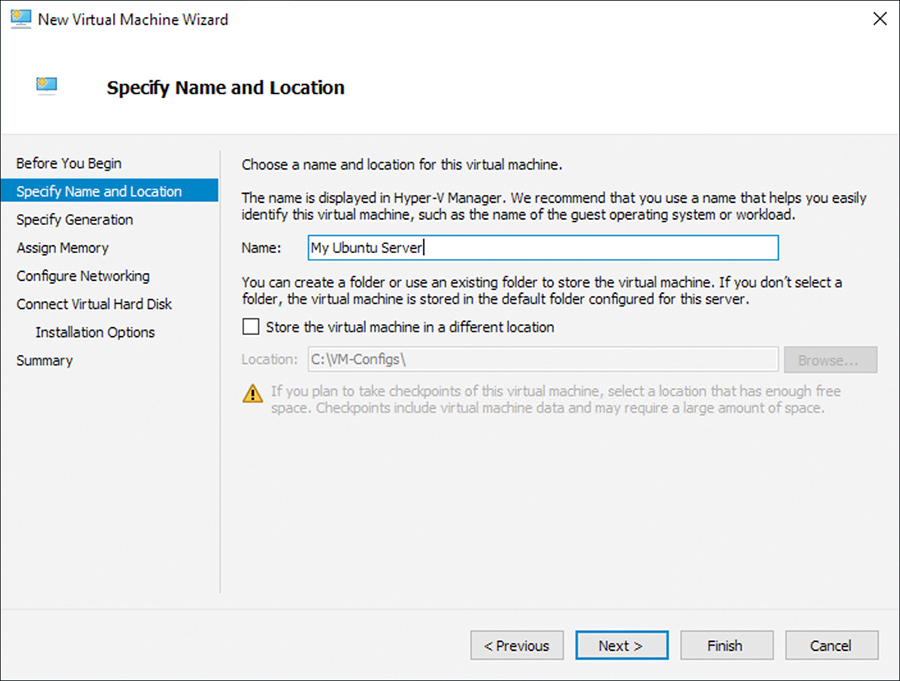
Step 4. Provide a name for your virtual machine and select a location on the Specify Name and Location page, as shown in Figure 8-2. Click Next when you are done.
Step 5. On the Specify Generation page, choose a Generation 1 or Generation 2 virtual machine. Remember that this choice cannot be changed once the VM is created. Click Next.
Step 6. Assign memory and decide on the usage of dynamic memory for your virtual machine on the Assign Memory page. Click Next.
Step 7. Select your network adapter on the Configure Networking page and click Next.
Step 8. Select your virtual hard disk settings on the Connect Virtual Hard Disk page. Click Next.
Step 9. On the Installation Options page, choose from one of three options:
![]() Install an operating system later
Install an operating system later
![]() Install an operating system from a bootable image file
Install an operating system from a bootable image file
![]() Install an operating system from a network-based installation server
Install an operating system from a network-based installation server
When you are done making selections, click Next.
Step 10. On the Completing the New Virtual Machine Wizard page, click Finish.
Your new virtual machine is created and appears in the Virtual Machines page of Hyper-V Manager. Note that the state is off. If you attached a bootable image file to the VM in step 9, right-click the VM and choose Connect and then click the Start button on the toolbar of the VM. This starts the installation of your operating system from the image file that you specified.
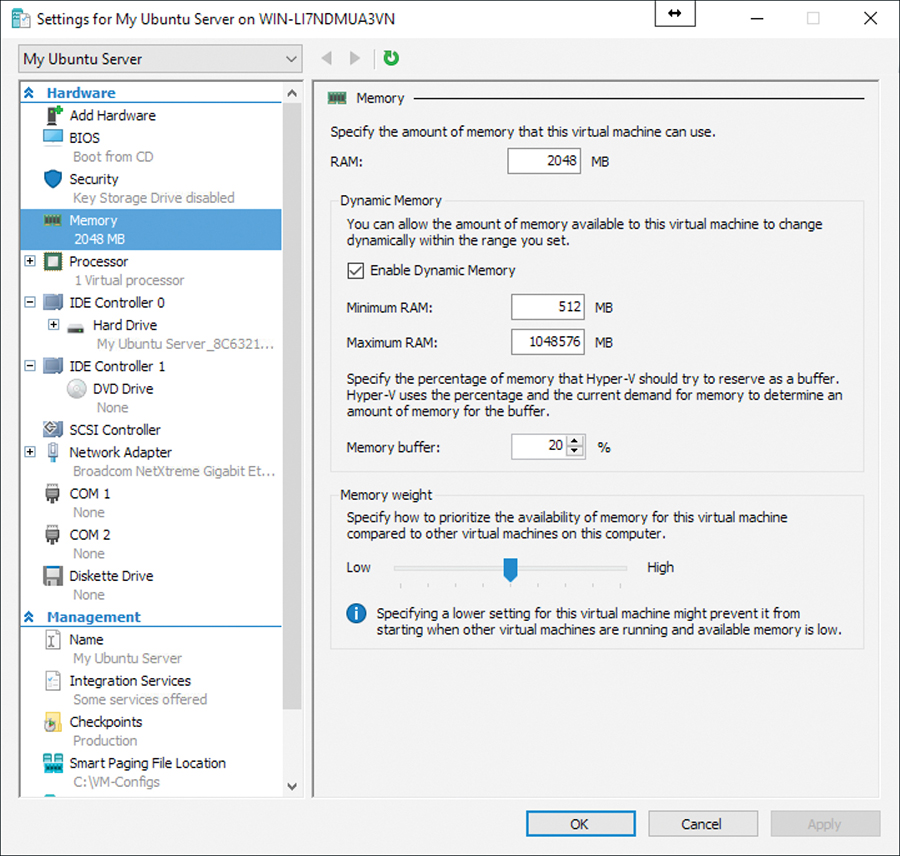
Virtual Machine Memory
Way back in Windows Server 2008 Hyper-V, you had to allocate a static amount of memory to virtual machines. This was challenging from a virtualization design perspective. Windows Server 2008 R2 Service Pack 1 (SP1) introduced the important concept of dynamic memory, which allows you to let the virtual machine request more memory as needed, up to a certain limit.
Figure 8-3 shows the robust options available for the configuration of dynamic memory available in Windows Server 2016.
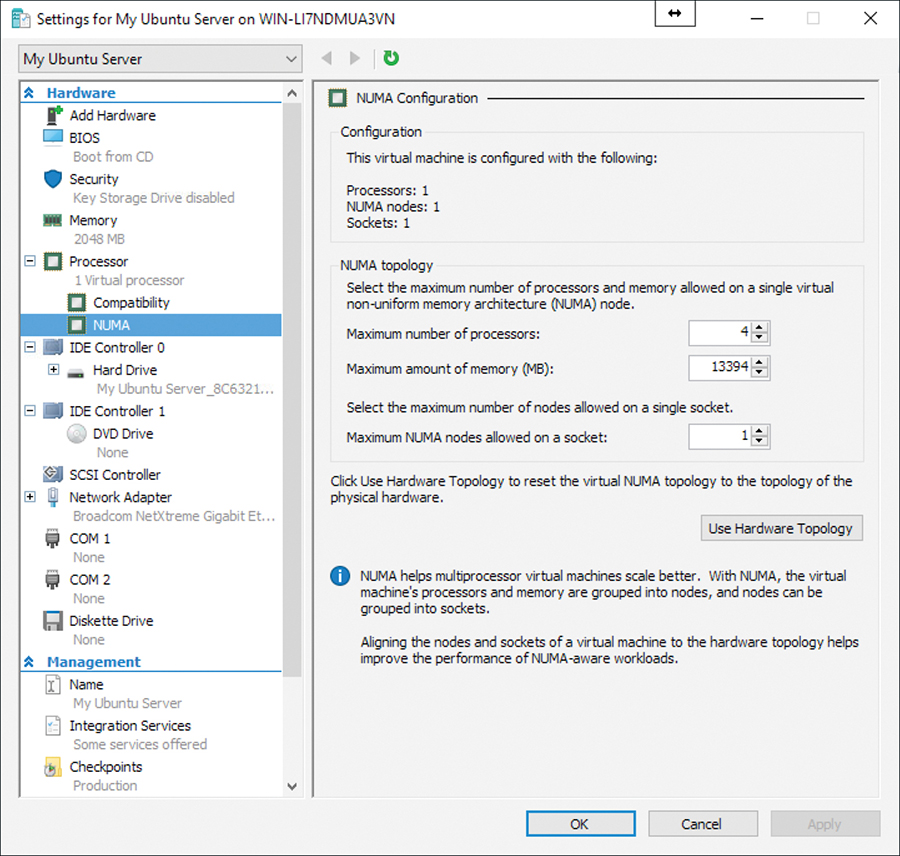
Non-uniform memory access (NUMA) support continues to exist in Windows Server 2016. NUMA is a computer memory design in which the memory access time depends on the memory location relative to the processor. Under NUMA, a processor can access its own local memory faster than non-local memory (memory local to another processor or memory shared between processors). The benefits of NUMA are limited to certain workloads, notably on servers where the data are often associated strongly with certain tasks or users. Figure 8.4 shows the NUMA configurations possible in Server 2016 for a VM.
While it is rare to manipulate the NUMA settings for a virtual machine, you might need to do so in a scenario where you plan to live migrate a VM to a server that supports a different (smaller) NUMA topology. Using the NUMA settings for both servers of the smaller of the two servers guards against VM problems.
Windows Server 2016 includes the first version of Hyper-V that allows a running virtual machine that has been configured for a static amount of memory to have memory “hot added” to the VM. Notice in Figure 8-5 that the options for altering the virtual memory of the running VM are available, while those that are not configurable for the running VM are grayed out.
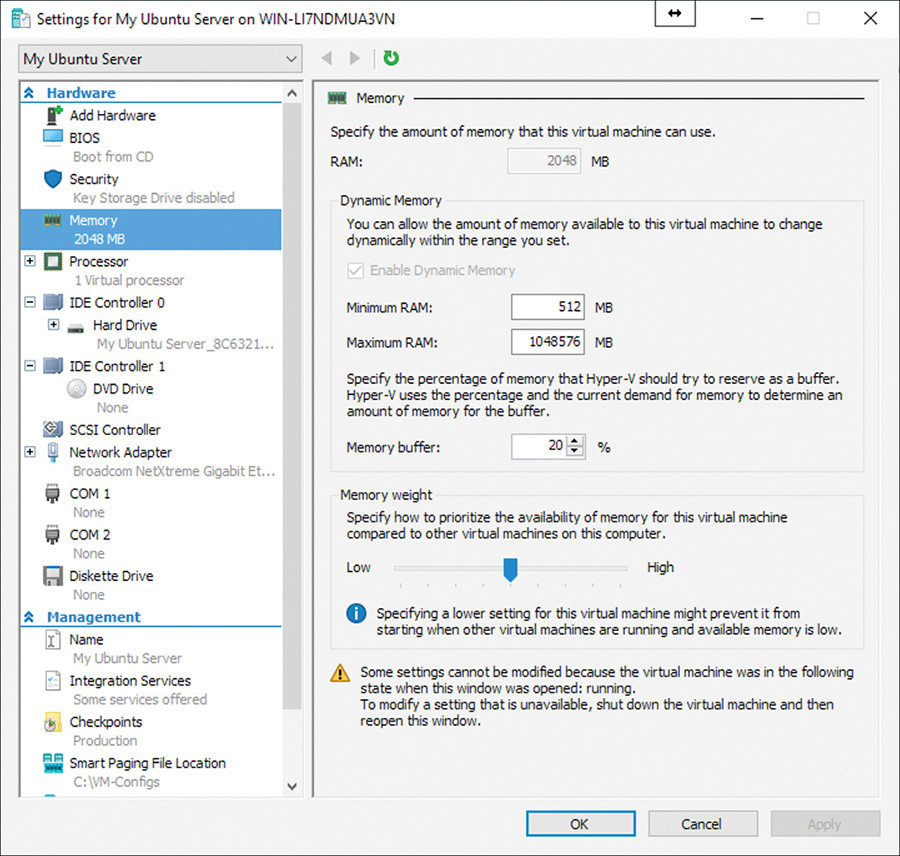
Hyper-V also supports smart paging, which eliminates the need to provide more memory than is needed to run the VM just because VM startup might temporarily require more memory. Smart paging uses disk paging for more temporary memory when additional memory beyond the minimum allocation is required to start a virtual machine. This does have one major disadvantage, however, smart paging VMs suffer in restart performance compared to their VM peers.
You can configure VM memory in the GUI or by using the Set-VMMemory cmdlet in PowerShell. Here is the complete syntax:
Set-VMMemory [-CimSession <CimSession[]>] [-ComputerName <String[]>]
[-Credential <PSCredential[]>] [-VMName] <String[]> [-Buffer
<Int32>] [-DynamicMemoryEnabled <Boolean>] [-MaximumBytes <Int64>]
[-StartupBytes <Int64>] [-MinimumBytes <Int64>] [-Priority <Int32>]
[-MaximumAmountPerNumaNodeBytes <Int64>] [-ResourcePoolName
<String>] [-Passthru] [-WhatIf] [-Confirm] [<CommonParameters>]
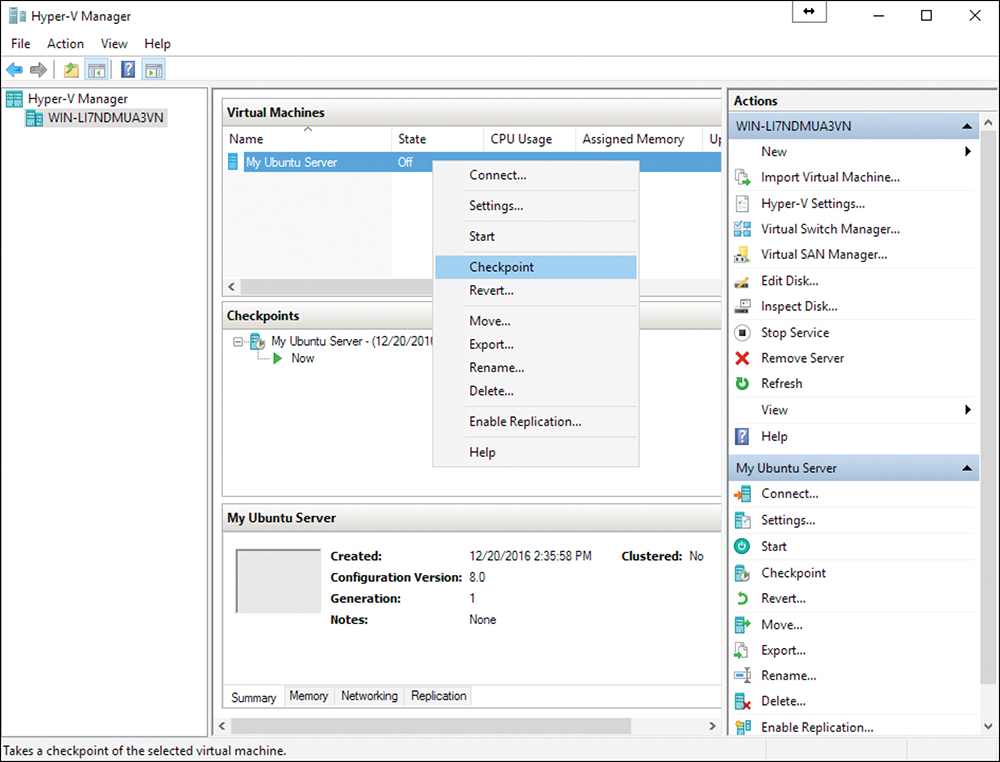
Checkpoints
Checkpoints allow for “snapshots” of a virtual machine at certain points in time. It is critical that you keep these points in mind regarding checkpoints in Hyper-V:
![]() Each VM can have a maximum of 50 checkpoints.
Each VM can have a maximum of 50 checkpoints.
![]() When creating checkpoints for multiple virtual machines that have dependencies, you should create them at the same time to ensure synchronization of items such as computer account passwords.
When creating checkpoints for multiple virtual machines that have dependencies, you should create them at the same time to ensure synchronization of items such as computer account passwords.
![]() Checkpoints do not replace backups.
Checkpoints do not replace backups.
![]() With a standard checkpoint, Hyper-V creates an .avhd file that stores the data that differentiates the checkpoint from either the previous checkpoint or the parent virtual hard disk.
With a standard checkpoint, Hyper-V creates an .avhd file that stores the data that differentiates the checkpoint from either the previous checkpoint or the parent virtual hard disk.
![]() With a production checkpoint, Hyper-V uses Volume Shadow Copy Service (VSS) or File System Freeze for Linux; note that production checkpoints are much closer to a state backup.
With a production checkpoint, Hyper-V uses Volume Shadow Copy Service (VSS) or File System Freeze for Linux; note that production checkpoints are much closer to a state backup.
Creating a checkpoint is simple. As shown in Figure 8-6, you right-click a virtual machine in Hyper-V Manager and select Checkpoint.
Resource Metering
Resource metering was added to Hyper-V in Windows Server 2012. Resource metering allows the tracking of total and average resource utilizations of a virtual machine, which you can view at any time. This metering information persists even if the virtual machine moves between Hyper-V nodes. You can gain access to this resource metering data by using PowerShell or WMI.
To enable resource metering for a VM, use this PowerShell command:
Enable-VMResourceMetering –VMName <VM name>
Here is the complete syntax:
Enable-VMResourceMetering [-CimSession <CimSession[]>] [-ComputerName
<String[]>] [-Credential <PSCredential[]>] [-VMName] <String[]>
[<CommonParameters>]
To view this valuable data in a detailed list format, use the following command:
Measure-VM –Name <VM name>
Here is the complete syntax:
Measure-VM [-CimSession <CimSession[]>] [-ComputerName
<String[]>] [-Credential <PSCredential[]>] [-Name] <String[]>
[<CommonParameters>]
Keep in mind that these metrics never reset unless you disable resource metering or perform a manual reset with the following command:
Reset-VMResourceMetering -VMName <VM name>
Here is the complete syntax:
Reset-VMResourceMetering [-CimSession <CimSession[]>] [-ComputerName
<String[]>] [-Credential <PSCredential[]>] [-VMName] <String[]>
[<CommonParameters>]
To disable resource metering, use this command:
Disable-VMResourceMetering -VMName <VM name>
Here is the complete syntax:
Disable-VMResourceMetering [-CimSession <CimSession[]>]
[-ComputerName <String[]>] [-Credential <PSCredential[]>] [-VMName]
<String[]> [<CommonParameters>]
You can also check to see which of your VMs have resource metering enabled by using this command:
Get-VM | Format-Table Name, ResourceMeteringEnable
Managing Integration Services
A number of services improve the integration between the host server and the operating system in the virtual machine. Integration services that are available through the settings of the VM with Windows Server 2016 include the following:
![]() Operating system shutdown: This permits the “graceful” shutdown of the OS in the VM, using the controls in Hyper-V for shutdown; you can also use the Stop-VM cmdlet in PowerShell.
Operating system shutdown: This permits the “graceful” shutdown of the OS in the VM, using the controls in Hyper-V for shutdown; you can also use the Stop-VM cmdlet in PowerShell.
![]() Time synchronization: This permits the synchronization of time in the guest OS with that of the host.
Time synchronization: This permits the synchronization of time in the guest OS with that of the host.
![]() Data exchange: Also known as key-value pairs (KVP), data exchange permits the sharing of information between the host and the virtual machine; access to this data from the host is only available using WMI scripts.
Data exchange: Also known as key-value pairs (KVP), data exchange permits the sharing of information between the host and the virtual machine; access to this data from the host is only available using WMI scripts.
![]() Heartbeat: The heartbeat service monitors the state of running virtual machines by reporting a heartbeat at regular intervals; you can check the heartbeat status of a virtual machine on the Summary tab of the virtual machine’s details page, or you can use the Get-VMIntegrationSerivce cmdlet:
Heartbeat: The heartbeat service monitors the state of running virtual machines by reporting a heartbeat at regular intervals; you can check the heartbeat status of a virtual machine on the Summary tab of the virtual machine’s details page, or you can use the Get-VMIntegrationSerivce cmdlet:
Get-VMIntegrationService [-CimSession <CimSession[]>]
[-ComputerName <String[]>] [-Credential <PSCredential[]>]
[-VMName] <String[]> [[-Name] <String[]>] [<CommonParameters>]
![]() Backup (volume snapshot): The backup service enables consistent backup of the virtual machines from backup software running on the host. The backup service allows for a virtual machine to be backed up while it is running without any interruption to the virtual machine or the services running in the virtual machine.
Backup (volume snapshot): The backup service enables consistent backup of the virtual machines from backup software running on the host. The backup service allows for a virtual machine to be backed up while it is running without any interruption to the virtual machine or the services running in the virtual machine.
![]() Guest services: You can copy files to a running virtual machine without using a network connection. To copy a file to a virtual machine, you need to use the Copy-VMFile PowerShell cmdlet:
Guest services: You can copy files to a running virtual machine without using a network connection. To copy a file to a virtual machine, you need to use the Copy-VMFile PowerShell cmdlet:
Copy-VMFile [-CimSession <CimSession[]>] [-ComputerName
<String[]>] [-Credential <PSCredential[]>] [-Name] <String[]>
[-SourcePath] <String> [-DestinationPath] <String> -FileSource
<CopyFileSourceType> [-CreateFullPath] [-Force] [-AsJob]
[-WhatIf] [-Confirm] [<CommonParameters>]
Advanced Virtual Machine Deployment
This section covers more advanced manipulations of virtual machines.
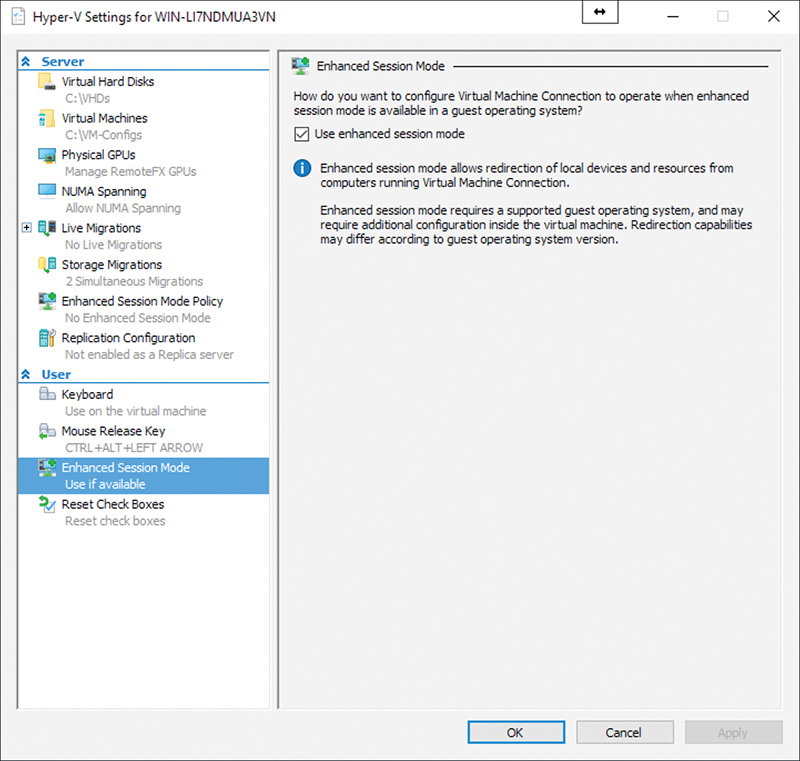
Enhanced Session Mode
Enhanced Session Mode permits use of VMConnect to use a computer’s local resources within a VM. Maybe you want to use a removable flash drive or printer of the host. Enhanced Session Mode also lets you resize the VMConnect window.
You set Enhanced Session Mode through the settings for the Hyper-V machine itself in the Hyper-V Manager, as shown in Figure 8-7.
Linux Integration Services (LIS) and FreeBSD Integration Services (BIS)
Linux Integration Services provides drivers and services for improved Linux integration in Hyper-V environments. Once Linux Integration Services are deployed, virtual machines running Linux distributions can use features like the following:
![]() Live migration
Live migration
![]() Jumbo frames
Jumbo frames
![]() VLAN tagging and trunking
VLAN tagging and trunking
![]() Support for symmetric multiprocessing (SMP)
Support for symmetric multiprocessing (SMP)
![]() Static IP injection
Static IP injection
![]() Virtual Fibre Channel
Virtual Fibre Channel
![]() Live virtual machine backup
Live virtual machine backup
![]() Hot adding and removal of memory using the Dynamic Memory feature
Hot adding and removal of memory using the Dynamic Memory feature
Note
Some Linux distributions require that you add LIS, while others come with it already installed.
LIS 4.0 ships with two scripts: Install.SH and Upgrade.SH. In earlier versions of LIS, you had to switch to the correct Linux distribution directory before you could install/upgrade LIS on a Linux virtual machine. Now with Hyper-V LIS 4.0, you need to execute only one script to either install (Install.SH) or upgrade (Upgrade.SH) on a Linux distribution.
Follow these steps if your Linux distribution shipped with LIS installed:
Step 1. Edit the modules file located in /etc/initramfs-tools, using this command:
sudo vi /etc/initramfs-tools/modules
Step 2. In the vi editor, navigate to the last line in the file and use the insert (I) command to append and enter the following lines:
hv_vmbus
hv_storvsc
hv_blkvsc
hv_netvsc
Step 3. Save the file by pressing the Esc key and then issue the : x command.
Step 4. Run the following command to re-initialize the modules file:
sudo update-initramfs –u
Step 5. Reboot the virtual machine by executing the following command:
sudo shutdown -r now
If your Linux distro does not ship with LIS installed, follow these steps:
Step 1. Attach the LinuxICv35.ISO file to a Linux virtual machine.
Step 2. As a root user, execute this command to mount the ISO file:
mount /dev/cdrom /media
Step 3. Run the script provided with the LIS ISO to install LIS:
./install.sh
Step 4. Type reboot and press Enter.
Microsoft has given upgrade scripts to update the Hyper-V LIS drivers for Linux distributions. Follow the preceding steps to mount the ISO file, switch to the directory relevant to your Linux distribution, and execute the Upgrade.sh script.
Once the script has finished installing LIS drivers and services, reboot the virtual machine so that the Hyper-V LIS drivers and services are registered with the Linux kernel.
For older FreeBSD releases (before 10.0), Microsoft offers ports that hold the installable BIS drivers and corresponding daemons for FreeBSD virtual machines. For newer FreeBSD releases, BIS is built in to the FreeBSD operating system, and no separate download or installation is required except that a KVP ports download is needed for FreeBSD 10.0.
Secure Boot
Linux operating systems running on Generation 2 virtual machines can now boot with the Secure Boot option enabled. The following operating systems are enabled for Secure Boot on hosts that run Server 2016:
![]() Ubuntu 14.04 and later
Ubuntu 14.04 and later
![]() SUSE Linux Enterprise Server 12 and later
SUSE Linux Enterprise Server 12 and later
![]() Red Hat Enterprise Linux 7.0 and later
Red Hat Enterprise Linux 7.0 and later
![]() CentOS 7.0 and later
CentOS 7.0 and later
Before you boot the virtual machine for the first time, you must configure it to use the Microsoft UEFI Certificate Authority. You can do this from Hyper-V Manager, Virtual Machine Manager, or an elevated Windows PowerShell session.
With PowerShell, run this command:
Set-VMFirmware -VMName SAMPLEVM -SecureBootTemplate
MicrosoftUEFICertificateAuthority
The full syntax is as follows:
Set-VMFirmware [-CimSession <CimSession[]>] [-ComputerName
<String[]>] [-Credential <PSCredential[]>] [-VMName]
<String[]> [-BootOrder <VMComponentObject[]>] [-FirstBootDevice
<VMComponentObject>] [-EnableSecureBoot <OnOffState>]
[-SecureBootTemplate <String>] [-SecureBootTemplateId <Guid>]
[-PreferredNetworkBootProtocol <IPProtocolPreference>] [-ConsoleMode
<ConsoleModeType>] [-PauseAfterBootFailure <OnOffState>] [-Passthru]
[-WhatIf] [-Confirm] [<CommonParameters>]
Importing, Exporting, and Moving Virtual Machines
Simple export and import capabilities in Hyper-V enable the easy transfer of virtual machines between physical hosts or virtual hosts (as is the case in nested virtualization). This functionality also enables you to create point-in-time backups of virtual machines.
Import functionality is much improved in Windows Server 2016, and the Hyper-V Manager is able to detect such problems as missing virtual hard disks or virtual switches. Server 2016 also supports the import of virtual machines from copies of virtual machine configurations, checkpoints, or virtual hard disk files. This is critical in recovery situations where the guest OS has failed but the virtual machine files are fine.
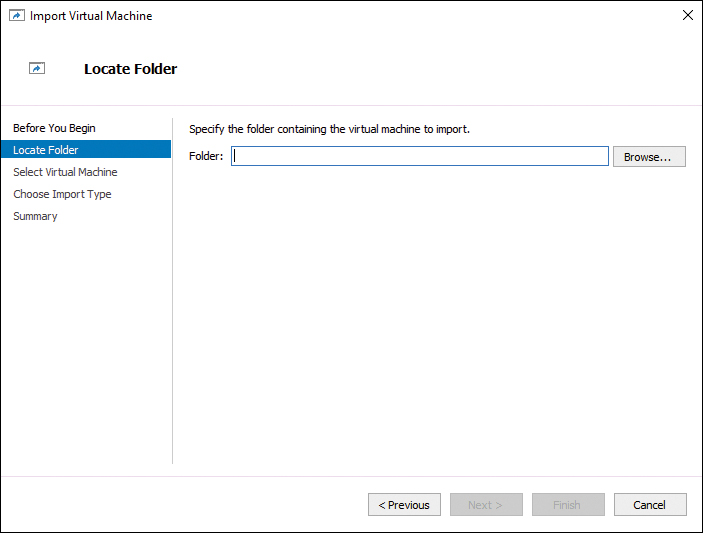
To import a virtual machine in Hyper-V Manager, follow these simple steps:
Step 1. In the Actions pane of the console, click Import Virtual Machine.
Step 2. On the Before You Begin page, click Next.
Step 3. On the Locate Folder page, specify the folder that hosts the virtual machine files and click Next (see Figure 8-8).
Step 4. On the Select Virtual Machine page, choose the virtual machine you want to import and then click Next.
Step 5. On the Choose Import Type page, choose one of the following:
![]() Register the virtual machine in-place (use the existing unique ID)
Register the virtual machine in-place (use the existing unique ID)
![]() Restore the virtual machine (use the existing unique ID)
Restore the virtual machine (use the existing unique ID)
![]() Copy the virtual machine (create a new unique ID)
Copy the virtual machine (create a new unique ID)
You can also import virtual machines by using the Import-VM cmdlet in PowerShell.
When performing an export, you have a choice of two options:
![]() Export a checkpoint: Right-click the checkpoint in Hyper-V Manager and click Export.
Export a checkpoint: Right-click the checkpoint in Hyper-V Manager and click Export.
![]() Export the virtual machine with a checkpoint: Click the virtual machine and then click Export to export the virtual machine and all associated checkpoints it might have.
Export the virtual machine with a checkpoint: Click the virtual machine and then click Export to export the virtual machine and all associated checkpoints it might have.
Exporting a virtual machine does not affect the existing virtual machine. Understand, however, that you cannot import the virtual machine again unless you use the Copy the Virtual Machine option, which creates a new unique ID.
Note
Beginning with Windows Server 2012 R2, you do not have to stop or pause the virtual machine in order to export it.
There are two ways to move a virtual machine. There is the live migration and then there is the option of a move of the actual virtual machine. Live migration must be enabled and occurs when you move a VM from one host to another while keeping the virtual machine online and available to clients. This is a Failover Clustering capability.
The move of the actual machine offers these options:
![]() Move all the virtual machine’s data to a single location.
Move all the virtual machine’s data to a single location.
![]() Move the virtual machine’s data to different locations.
Move the virtual machine’s data to different locations.
![]() Move the virtual machine’s virtual hard disks.
Move the virtual machine’s virtual hard disks.
In Hyper-V Manager, moving a VM is a simple matter of right-clicking the VM and selecting Move from the shortcut menu.
The Move-VM cmdlet of PowerShell is an alternative to GUI-based VM moves. The full syntax for this PowerShell cmdlet is as follows:
Move-VM [-ComputerName <String[]>] [-Credential <PSCredential[]>]
[-Name] <String> [-DestinationHost] <String>
[-DestinationCredential <PSCredential>] [-IncludeStorage]
[-DestinationStoragePath <String>] [-ResourcePoolName <String>]
[-RetainVhdCopiesOnSource] [-RemoveSourceUnmanagedVhds] [-AsJob]
[-Passthru] [-WhatIf] [-Confirm] [<CommonParameters>]
Discrete Device Assignment (DDA)
Windows Server 2012 introduced support for technology termed SR-IOV, which permits compatible network adapters that connect via PCI Express to bypass the Hyper-V virtual switch completely and be mapped directly to a VM. This, of course, gives very low-latency connectivity.
Discrete Device Assignment (DDA) in Windows Server 2016 enables PCI Express–connected devices to connect more directly to VMs. This is very useful in scenarios where hardware is not functioning properly because of unrecognized drivers. DDA allows the use of the hardware’s IHV drivers instead of generic virtual device drivers. This can be critical with certain storage and graphical adapters.
Note that DDA drops the sharing of hardware with the host or with other VMs. Also, live migration is not possible since the VM is bound to hardware in a specific host.
Best Practices for VM Deployment
Here are some best practices to keep in mind for VM deployments:
![]() Use dynamic memory. The only exception is if you are hosting applications that would continue to request more memory if available.
Use dynamic memory. The only exception is if you are hosting applications that would continue to request more memory if available.
![]() Set the minimum and maximum memory for VMs.
Set the minimum and maximum memory for VMs.
![]() Avoid using differencing disks. Using them may reduce disk space, but they can dramatically reduce performance.
Avoid using differencing disks. Using them may reduce disk space, but they can dramatically reduce performance.
![]() Use multiple Hyper-V-specific network adapters connected to different external virtual switches to provide redundancy in the networking configuration.
Use multiple Hyper-V-specific network adapters connected to different external virtual switches to provide redundancy in the networking configuration.
![]() Store virtual machine files on their own volumes if you are not using shared storage. Doing this will minimize the impact of a single virtual machine’s hard disk growth on other VMs.
Store virtual machine files on their own volumes if you are not using shared storage. Doing this will minimize the impact of a single virtual machine’s hard disk growth on other VMs.
Exam Preparation Tasks
As mentioned in the section “How to Use This Book” in the Introduction, you have a couple choices for exam preparation: the exercises here, Chapter 21, “Final Preparation,” and the exam simulation questions in the Pearson Test Prep Software Online.
Review All Key Topics
Review the most important topics in this chapter, noted with the Key Topics icon in the outer margin of the page. Table 8-2 lists these key topics and the page number on which each is found.
Table 8-2 Key Topics for Chapter 8
Complete Tables and Lists from Memory
There are no memory tables in this chapter.
Define Key Terms
Define the following key terms from this chapter and check your answers against the glossary:
Configuration Version
NUMA
Smart Paging
Resource Metering
Enhanced Session Mode
LIS/BIS
DDA
Q&A
The answers to these questions appear in Appendix A. For more practice with exam format questions, use the Pearson Test Prep Software Online.
1. Name at least two Add Hardware options for a Generation 1 VM.
2. What change has been made in Windows Server 2016 regarding VM versions?
3. What three options exist when creating a VM for an OS install?
4. What are three options you can use for importing a VM?
5. What two options are available when exporting a VM?
6. Name at least three best practices for VM deployment.