
Chapter 19. Maintaining Servers
This chapter covers the following subjects:
![]() Windows Server Update Services: This section examines WSUS in detail, including its implementation, the configuration of groups, and patch management.
Windows Server Update Services: This section examines WSUS in detail, including its implementation, the configuration of groups, and patch management.
![]() Windows Defender: This section covers the implementation of Windows Defender and how to integrate it with WSUS.
Windows Defender: This section covers the implementation of Windows Defender and how to integrate it with WSUS.
![]() Backup and Restore: This part of the chapter covers backup and restore operations using Windows Server Backup and covers backup strategies for different Windows Server roles and workloads.
Backup and Restore: This part of the chapter covers backup and restore operations using Windows Server Backup and covers backup strategies for different Windows Server roles and workloads.
To keep your Windows Server 2016 machines running properly and to recover from potentially bad situations, you need to learn about updates, Windows Defender, and backups. This chapter covers these topics and more.
“Do I Know This Already?” Quiz
The “Do I Know This Already?” quiz allows you to assess whether you should read the entire chapter. Table 19-1 lists the major headings in this chapter and the “Do I Know This Already?” quiz questions covering the material in those headings so you can assess your knowledge of these specific areas. The answers to the “Do I Know This Already?” quiz appear in Appendix A, “Answers to the ‘Do I Know This Already?’ Quizzes and Q&A Questions.”

Caution
The goal of self-assessment is to gauge your mastery of the topics in this chapter. If you do not know the answer to a question or are only partially sure of the answer, you should mark your answer as incorrect for purposes of the self-assessment. Giving yourself credit for an answer you correctly guess skews your self-assessment results and might provide you with a false sense of security.
1. What is the minimum hard disk space requirement for WSUS?
a. 500 MB
b. 1 GB
c. 20 GB
d. 100 GB
2. Where do you specify the WSUS location in Group Policy?
a. Windows Server Update Services Location
b. Internal Update Server
c. Specify Intranet Microsoft Update Service Location
d. WSUS Database
3. What management component is not typically used to control Windows Defender in a server environment?
a. PowerShell
b. WMI
c. XML
d. Group Policy
4. What method in a server environment permits the automatic download and installation of Windows Defender updates? Choose Three.
a. Windows Update in Control Panel
b. Group Policy
c. AUOptions Registry Key
d. WinDefend.exe
5. Which of the following destinations does Windows Server Backup support? Choose three.
a. Internal hard drive
b. Writable DVD
c. Remote tape
d. Network share
6. What type of Active Directory restore do you use if you are recovering a deleted AD object?
a. Base restore
b. Authoritative
c. Nonauthoritative
d. Partial restore
Foundation Topics
Windows Server Update Services
Windows Server Update Services (WSUS) permits you to deploy the latest Microsoft product updates in a more controlled and flexible manner than how clients and servers might ordinarily receive these enhancements. WSUS is a Windows Server role that you install to manage and distribute updates. A WSUS server can be the update source for other WSUS servers in an organization. The server that acts as an update source is an upstream server.
In a WSUS implementation, at least one WSUS server in the network must connect to Microsoft Update to get available update information.
Implementing Windows Server Update Services (WSUS) Solutions
Here are the system requirements for WSUS:
![]() Processor: 1.4 gigahertz (GHz) x64 processor (2 GHz or faster is recommended).
Processor: 1.4 gigahertz (GHz) x64 processor (2 GHz or faster is recommended).
![]() Memory: WSUS requires an additional 2 GB of RAM over what is required by the server and all other services or software.
Memory: WSUS requires an additional 2 GB of RAM over what is required by the server and all other services or software.
![]() Available disk space: 20 GB (40 GB or greater is recommended).
Available disk space: 20 GB (40 GB or greater is recommended).
![]() Network adapter: 100 megabits per second (Mbps) or greater.
Network adapter: 100 megabits per second (Mbps) or greater.
The following are also required in some cases:
![]() For viewing reports, WSUS requires Microsoft Report Viewer Redistributable 2008.
For viewing reports, WSUS requires Microsoft Report Viewer Redistributable 2008.
![]() Microsoft .NET Framework 4.0 must be installed on the server where the WSUS server role will be installed.
Microsoft .NET Framework 4.0 must be installed on the server where the WSUS server role will be installed.
![]() The account you plan to use to install WSUS must be a member of the Local Administrators group.
The account you plan to use to install WSUS must be a member of the Local Administrators group.
During the installation of WSUS, the following are also installed:
![]() .NET API and Windows PowerShell cmdlets
.NET API and Windows PowerShell cmdlets
![]() Windows Internal Database (WID), which is used by WSUS
Windows Internal Database (WID), which is used by WSUS
![]() Services used by WSUS, including the following:
Services used by WSUS, including the following:
![]() Update service
Update service
![]() Reporting web service
Reporting web service
![]() Client web service
Client web service
![]() Simple Web Authentication web service
Simple Web Authentication web service
![]() Server Synchronization service
Server Synchronization service
![]() DSS Authentication web service
DSS Authentication web service
You can install the WSUS role on a computer that is separate from the database server computer. In this case, the following additional criteria apply:
![]() The database server cannot be configured as a domain controller.
The database server cannot be configured as a domain controller.
![]() The WSUS server cannot run Remote Desktop Services.
The WSUS server cannot run Remote Desktop Services.
![]() The database server must be in the same Active Directory domain as the WSUS server, or it must have a trust relationship with the Active Directory domain of the WSUS server.
The database server must be in the same Active Directory domain as the WSUS server, or it must have a trust relationship with the Active Directory domain of the WSUS server.
![]() The WSUS server and the database server must be in the same time zone or must be synchronized to the same coordinated universal time (Greenwich Mean time) source.
The WSUS server and the database server must be in the same time zone or must be synchronized to the same coordinated universal time (Greenwich Mean time) source.
To install the WSUS server role, follow these steps:
Step 1. Log on to the server on which you plan to install the WSUS server role by using an account that is a member of the Local Administrators group.
Step 2. In Server Manager, click Manage > Roles and Features.
Step 3. On the Before you begin page, click Next.
Step 4. In the Select installation type page, confirm that the Role-based or feature-based installation option is selected and click Next.
Step 5. On the Select destination server page, choose where the server is located (from a server pool or from a virtual hard disk) and then choose the server on which you want to install the WSUS server role and click Next.
Step 6. On the Select server roles page, select Windows Server Update Services, add features that are required for Windows Server Update Services, and click Add Features, as shown in Figure 19-1, and then click Next.

Step 7. On the Select features page, keep the default selections and click Next.
Step 8. On the Windows Server Update Services page, click Next.
Step 9. On the Select role services page, leave the default selections and click Next.
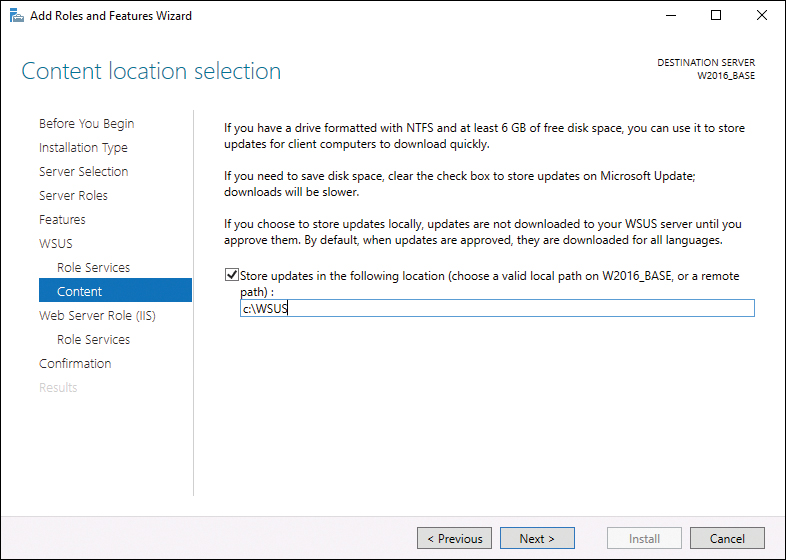
Step 10. On the Content location selection page, type a valid location to store the updates, as shown in Figure 19-2, and click Next.
Step 11. On the Web Server Role (IIS) page that appears, review the information and then click Next.
Note
WSUS only needs the default Web Server role configuration. If you are prompted for added Web Server role configuration while setting up WSUS, you can safely accept the default values and continue setting up WSUS. If you plan to install SQL Server for WSUS support, you must select that option here.
Step 12. On the Select the role services to install for Web Server (IIS) page, keep the defaults and click Next.
Step 13. On the Confirm installation selections page, review the selected options and click Install.
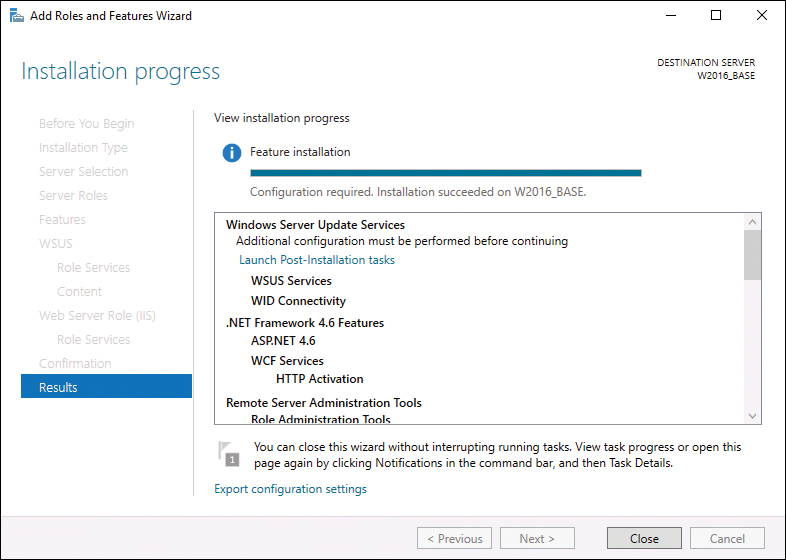
Step 14. Once WSUS installation is complete, in the results window on the Installation progress page, click the Launch Post-Installation tasks link, as shown in Figure 19-3.
Step 15. Click Close.
Configuring WSUS Groups
Computer groups are an important part of WSUS deployments. Computer groups allow you to test and target updates to specific computers. There are two default computer groups:
![]() All computers
All computers
![]() Unassigned computers
Unassigned computers
By default, when each client computer first contacts the WSUS server, the server adds that client computer to both groups.
You can create as many custom computer groups as you need to manage updates in your organization. It is a best practice to create at least one computer group to test updates before you deploy the updates to other computers.
Use the following steps to complete the configuration of WSUS, create a new group, and assign a computer to this group:
Step 1. In Server Manager, select Tools > WSUS Administration Console.
Step 2. On the Before You Begin page of the Configuration Wizard, click Next.
Step 3. Decide whether to join the Microsoft Update Improvement Program and click Next.
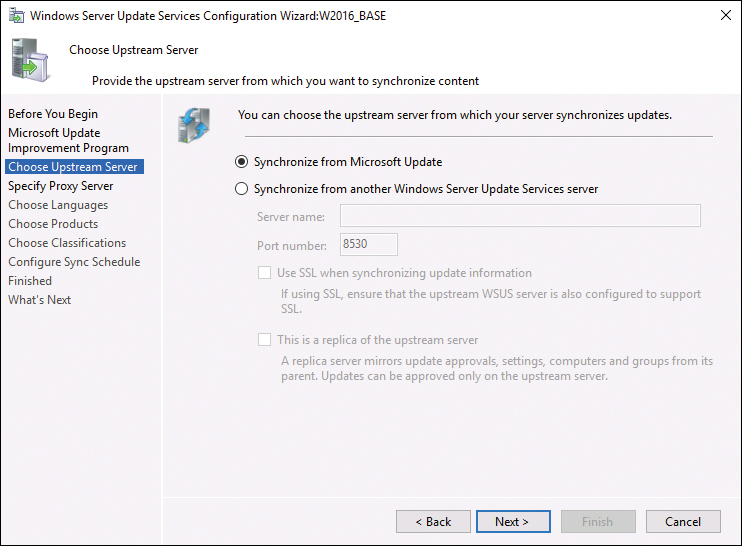
Step 4. In the Choose Upstream Server dialog, shown in Figure 19-4, choose the upstream server to sync from or use the Microsoft Update Internet service.
Step 5. On the Specify the Proxy Server page, configure any required proxy server settings and click Next.
Step 6. On the Connect to Upstream Server page, choose Start Connecting in order to contact the upstream server. Completing this process could take a few minutes.
Step 7. Click Next.
Step 8. Choose the languages you want installed and click Next.
Step 9. Select the products for which you want updates and click Next.
Step 10. In the Choose Classifications window, select the updates you want for the products you have selected in the previous page and click Next.
Step 11. Set the sync schedule and click Next.
Step 12. Choose Begin Initial Synchronization and click Next.
Step 13. On the What’s Next page, click Finish.
Step 14. In the WSUS Administration Console, under Update Services, expand WSUS server, expand computers, right-click All computers, and then click Add computer group.
Step 15. In the Add computer group dialog box, for Name, specify the name of the new group and then click Add.
Step 16. Click Computers and then select the computers that you want to assign to this new group.
Step 17. Right-click the computer names you selected in step 16 and then click Change membership.
Step 18. In the Set Computer Group Membership dialog box, select the test group you created and then click OK.
Once you create groups, you can move your computers from the Unassigned Computers group to the group of your choice using one of two methods:
![]() Server-side targeting: Right-click the system in the Update Services console and choose Change Membership.
Server-side targeting: Right-click the system in the Update Services console and choose Change Membership.
![]() Client-side targeting: Use Group Policy to cause systems to automatically add themselves to the group you want updated; the Group Policy setting is Enable Client-Side Targeting.
Client-side targeting: Use Group Policy to cause systems to automatically add themselves to the group you want updated; the Group Policy setting is Enable Client-Side Targeting.
Managing Patches in Mixed Environments
One of the main reasons administrators tend to consider WSUS a cherished element of their enterprise deployment is its ability to aid in update testing in mixed environments. A mixed environment refers to the typical situation in which many different versions and editions of Windows exist, and the different versions are running on many different types of hardware in many different types of configurations.
WSUS lets you group different types of systems together, test the Microsoft updates and patches against systems, and wait some time before deploying the updates enterprise wide. In fact, it is conceivable that an enterprise wide update may never even occur for various reasons. You might wonder if this is an unnecessarily paranoid reaction. Surely, Microsoft tests these updates thoroughly. Microsoft does test them. However, Microsoft would never be able to test against the incredible number of different options that might exist within your corporate walls. Imagine all the different hardware configurations, driver downloads, and application combinations possible!
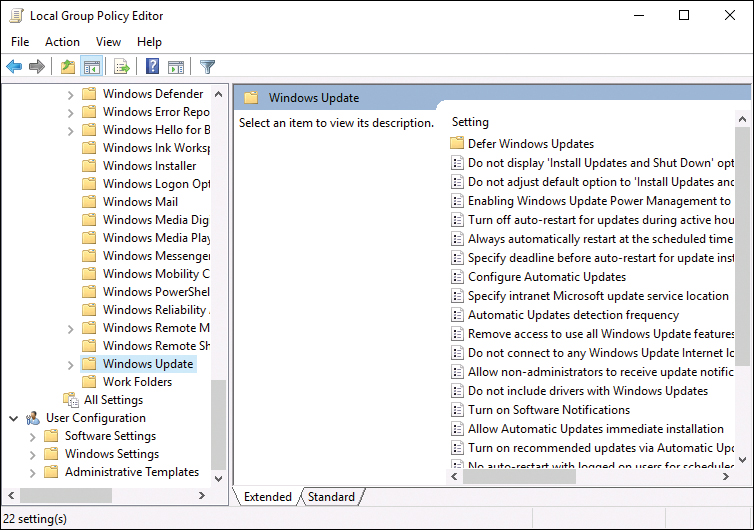
When you are sure updates are ready for your servers and workstations, you enable these clients to receive them from WSUS. You configure this through Group Policy, as shown in Figure 19-5, via the path Computer ConfigurationAdministrative TemplatesWindows ComponentsWindows Update.
The main settings for WSUS client behavior are Configure Automatic Updates and Specify Intranet Microsoft Update Service Location. You can also set these options to help control WSUS client behavior:
![]() Automatic Updates Detection Frequency
Automatic Updates Detection Frequency
![]() Allow Signed Updates from an Intranet Microsoft Update Service Location
Allow Signed Updates from an Intranet Microsoft Update Service Location
You also need to consider the following:
![]() What to do about restart? You can configure parameters such as the following:
What to do about restart? You can configure parameters such as the following:
![]() Delay Restart for Scheduled Installations
Delay Restart for Scheduled Installations
![]() Re-Prompt for Restart with Scheduled Installations
Re-Prompt for Restart with Scheduled Installations
![]() No Auto-Restart with Logged On Users for Scheduled Automatic Updates Installations
No Auto-Restart with Logged On Users for Scheduled Automatic Updates Installations
![]() What if the target system is shut down for the scheduled update time? Group Policy settings here include the following:
What if the target system is shut down for the scheduled update time? Group Policy settings here include the following:
![]() Enabling Windows Update Power Management to Automatically Wake Up the System to Install Scheduled Updates
Enabling Windows Update Power Management to Automatically Wake Up the System to Install Scheduled Updates
![]() Reschedule Automatic Updates Scheduled Installations
Reschedule Automatic Updates Scheduled Installations
Windows Defender
Windows Server 2016 now includes Windows Defender, which is malware protection that actively protects Windows Server 2016 against known malware and can regularly update antimalware definitions through Windows Update. If you are familiar with Windows clients, you are already familiar with Windows Defender. While Windows Defender had a much-maligned start, thanks to cloud-based data on malware, its effectiveness is ever increasing.
Implementing an Antimalware Solution with Windows Defender
By default, Microsoft installs and enables Windows Defender on most Windows Server 2016 versions.
You manage Windows Defender using the following:
![]() WMI
WMI
![]() Windows PowerShell
Windows PowerShell
![]() Group Policy
Group Policy
If your installation of Windows Server 2016 does not have Defender, use the Add Roles and Features Wizard or the Install-WindowsFeature cmdlet, as in this example:
Install-WindowsFeature -Name Windows-Defender-GUI
To disable Windows Defender, uninstall it by using the Remove Roles and Features Wizard or using the Uninstall-WindowsFeature cmdlet, as in this example:
Uninstall-WindowsFeature -Name Windows-Server-Antimalware
To verify that Windows Defender is running on the server, run the following command from a command prompt:
sc query Windefend
The sc query command returns information about the Windows Defender service. If Windows Defender is running, the STATE value displays RUNNING, as shown in Figure 19-6.

Integrating Windows Defender with WSUS and Windows Update
To receive updated antimalware definitions (which is critical if the service is to be of real use), you must have the Windows Update service running. If you use Windows Server Update Services (WSUS), make sure to approve updates for Windows Defender definitions.
Remember that, by default, Windows Update does not download and install updates automatically on Windows Server 2016. You can change this configuration by using one of the following methods:
![]() Windows Update in Control Panel, Install updates automatically: Selecting this option results in all updates automatically being installed, including Windows Defender definition updates. Selecting Download updates but let me choose whether to install them allows Windows Defender to download and install definition updates automatically, but other updates do not install automatically.
Windows Update in Control Panel, Install updates automatically: Selecting this option results in all updates automatically being installed, including Windows Defender definition updates. Selecting Download updates but let me choose whether to install them allows Windows Defender to download and install definition updates automatically, but other updates do not install automatically.
![]() Group Policy: Use the following path: Administrative TemplatesWindows ComponentsWindows UpdateConfigure Automatic Updates.
Group Policy: Use the following path: Administrative TemplatesWindows ComponentsWindows UpdateConfigure Automatic Updates.
![]() AUOptions registry key: The following two values allow Windows Update to automatically download and install definition updates:
AUOptions registry key: The following two values allow Windows Update to automatically download and install definition updates:
![]() Install updates automatically
Install updates automatically
![]() Download updates but let me choose whether to install them
Download updates but let me choose whether to install them
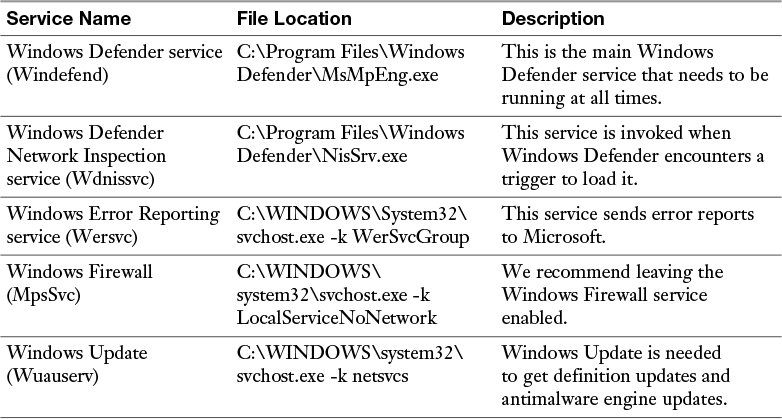
To ensure that you support protection against malware, Microsoft recommends the following services:
![]() Windows Defender Network Inspection service
Windows Defender Network Inspection service
![]() Windows Error Reporting service
Windows Error Reporting service
![]() Windows Update service
Windows Update service
Table 19-2 lists the services for Windows Defender and the dependent services.
Backup and Restore
Many times in this text, we have talked about high-availability features. In fact, this is the number-one tested topic by far in the exam. However, none of the high-availability solutions replaces the need for backup.
Windows Server 2016 includes a backup software program that you can use to back up your volumes. Backup destinations include the following:
![]() Internal hard drive
Internal hard drive
![]() External hard drive
External hard drive
![]() Writable DVD drive
Writable DVD drive
![]() Network share
Network share
Keep the following in mind regarding Windows Server Backup:
![]() Drive support: Windows Server Backup does not support tape or optical drives that are not accessible through the file system.
Drive support: Windows Server Backup does not support tape or optical drives that are not accessible through the file system.
![]() Scheduling: Windows Server Backup can schedule only a single job and is limited to running the job either daily or multiple times per day.
Scheduling: Windows Server Backup can schedule only a single job and is limited to running the job either daily or multiple times per day.
![]() Job types: Windows Server Backup does not enable you to perform full, incremental, and differential backups on a per-job basis.
Job types: Windows Server Backup does not enable you to perform full, incremental, and differential backups on a per-job basis.
![]() Different backup format: Windows Server Backup writes its backup files in VHDX (virtual hard disk) format, which makes them accessible using Hyper-V or the Disk Management snap-in.
Different backup format: Windows Server Backup writes its backup files in VHDX (virtual hard disk) format, which makes them accessible using Hyper-V or the Disk Management snap-in.
You install Windows Server Backup by using the Add Roles and Features Wizard in Server Manager or the Install-WindowsFeature cmdlet in Windows PowerShell. When you install this feature, you also install the Windows Server Backup console. Figure 19-7 shows the installation of the feature in the Add Roles and Features Wizard.

To create a single backup job using a local disk as the job destination, follow these steps:
Step 1. Open the Windows Server Backup console by selecting the Tools menu in Server Manager and then, in the Actions pane with Local backup selected, click Backup once to launch the Backup Once Wizard.
Step 2. On the Backup Options page, leave the Different options option selected, as shown in Figure 19-8.

Step 3. On the Select Backup Configuration page, select the Custom option.
Step 4. On the Select Items for Backup page, click Add Items.
Step 5. In the Select Items dialog box, select the system elements you want to back up.
Step 6. On the Specify Destination Type page, leave the Local drives choice selected.
Step 7. On the Select Backup Destination page, use the Backup destination drop-down list to select the volume where you want the program to store the backups.
Step 8. On the Confirmation page, click Backup to begin the job.
Note that you can also create a scheduled backup job. To do so, open the Windows Server Backup console and, in the Actions pane, click Backup Schedule to launch the Backup Schedule Wizard.
To perform a restore of selected files or folders, open the Windows Server Backup console and, in the Actions pane, click Recover to launch the Recovery Wizard.
The sections that follow detail the important considerations for important backup tasks related to different Windows Server roles and workloads, including the Hyper-V host, Hyper-V guests, Active Directory, file server, and web server, using Windows Server 2016 native tools and solutions.
Hyper-V Host and Hyper-V Guest
You can approach Hyper-V backup two ways:
![]() You can back up virtual machines as though they are separate systems, by running Windows Server Backup in the guest operating system.
You can back up virtual machines as though they are separate systems, by running Windows Server Backup in the guest operating system.
![]() You can back them up as part of the host server, by backing up the virtual machine files and the virtual hard disks.
You can back them up as part of the host server, by backing up the virtual machine files and the virtual hard disks.
Backing up virtual machines from the Hyper-V host uses the Hyper-V Volume Shadow Copy Requestor service in the guest operating system to enable the host to back up the VM while it is running. The requestor service in the guest communicates with the Volume Shadow Copy Service (VSS) in the host, enabling it to back up the virtual machine configuration files, the virtual hard disks, and any checkpoints associated with the VM. You can then restore the virtual machine from the host, if needed, without having to first configure it in Hyper-V.
Windows Server Backup includes support for the VSS writer and the guest requestor service, making it a simple matter to back up virtual machines and their host settings. When you create a backup of a Hyper-V host, the Select Items dialog box includes a Hyper-V item that enables you to select the host components and the individual VMs running on the server.
Active Directory
Most administrators do not overly concern themselves with the concept of restoring Active Directory from backup. Why? They always have at least two domain controllers in their enterprise. If one has a catastrophic failure, they implement another server, promote it, and have Active Directory synchronize to it.
If you perform a scheduled backup of an Active Directory domain controller, sure enough, you back up Active Directory. You also back up Active Directory if you are specially backing up the system state on a server backup.
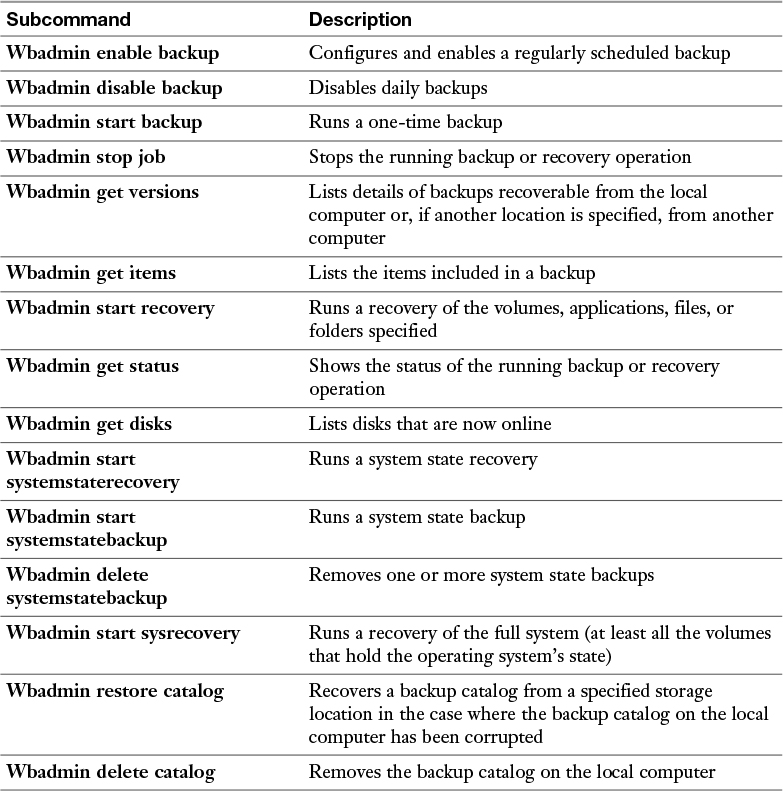
If you perform a full restoration of a server backup, you do restore the system state and, thus, Active Directory. But what about selectively restoring just the system state? You can do this by using the Wbadmin.exe command-line tool.
Table 19-3 shows the subcommands available with Wbadmin. Note that the systemstaterecovery option is particularly relevant for this discussion.
There are two types of system state restores:
![]() Non-authoritative: Non-authoritative restores replace Active Directory from the backup but then allow its overwriting from the Active Directory synchronization process from other domain controllers.
Non-authoritative: Non-authoritative restores replace Active Directory from the backup but then allow its overwriting from the Active Directory synchronization process from other domain controllers.
![]() Authoritative: Authoritative restores require you to restart the computer in Directory Services Restore mode by pressing F8 during boot. You then restore the system state by using Wbadmin followed by Ntdsutil.exe to specify Active Directory objects to selectively restore.
Authoritative: Authoritative restores require you to restart the computer in Directory Services Restore mode by pressing F8 during boot. You then restore the system state by using Wbadmin followed by Ntdsutil.exe to specify Active Directory objects to selectively restore.
File Servers and Web Servers
While backing up file servers is straightforward using the backup and restore steps described earlier in this chapter, backup of a web (IIS) server needs some discussion. Keep the following in mind:
![]() Static files (such as local HTML files) are not a problem for Windows Server Backup.
Static files (such as local HTML files) are not a problem for Windows Server Backup.
![]() Web servers connected to backend databases (such as Microsoft SQL Server) might be accessing databases stored on other servers. Windows Server Backup performs VSS backups of SQL Server databases for this purpose.
Web servers connected to backend databases (such as Microsoft SQL Server) might be accessing databases stored on other servers. Windows Server Backup performs VSS backups of SQL Server databases for this purpose.
![]() Configuration files (XML) for an IIS web server are located in WindowsSystem32intserv; you must remember to back up these files to properly backup IIS.
Configuration files (XML) for an IIS web server are located in WindowsSystem32intserv; you must remember to back up these files to properly backup IIS.
Exam Preparation Tasks
As mentioned in the section “How to Use This Book” in the Introduction, you have a couple choices for exam preparation: the exercises here, Chapter 21, “Final Preparation,” and the exam simulation questions in the Pearson Test Prep Software Online.
Review All Key Topics
Review the most important topics in this chapter, noted with the Key Topics icon in the outer margin of the page. Table 19-4 lists these key topics and the page number on which each is found.

Table 19-4 Key Topics for Chapter 19
Complete Tables and Lists from Memory
Print a copy of Appendix B, “Memory Tables” (found on the book website), or at least the section for this chapter, and complete the tables and lists from memory. Appendix C, “Memory Tables Answer Key,” also on the website, includes completed tables and lists to check your work.
Define Key Terms
Define the following key terms from this chapter and check your answers against the glossary:
Windows Server Update Services (WSUS)
WSUS Groups
Windows Defender
Q&A
The answers to these questions appear in Appendix A. For more practice with exam format questions, use the Pearson Test Prep Software Online.
1. Name at least two criteria that must be met if a database server for WSUS is separate from the WSUS role.
2. Name at least one service Microsoft recommends for protection against malware.
3. What format does Windows Server Backup use for backups?