
Chapter 17. Managing VM Movement
This chapter covers the following subjects:
![]() Moving VMs: This part of the chapter examines live migrations, quick migrations, and storage migrations.
Moving VMs: This part of the chapter examines live migrations, quick migrations, and storage migrations.
![]() More VM Management: This section examines importing, exporting, and copying VMs as well as the features Network Health Protection and Drain on Shutdown.
More VM Management: This section examines importing, exporting, and copying VMs as well as the features Network Health Protection and Drain on Shutdown.
The ability to quickly and efficiently move VMs is a very powerful part of a high-availability (HA) solution. This chapter explores this important topic in detail.
“Do I Know This Already?” Quiz
The “Do I Know This Already?” quiz allows you to assess whether you should read the entire chapter. Table 17-1 lists the major headings in this chapter and the “Do I Know This Already?” quiz questions covering the material in those headings so you can assess your knowledge of these specific areas. The answers to the “Do I Know This Already?” quiz appear in Appendix A, “Answers to the ‘Do I Know This Already?’ Quizzes and Q&A Questions.”

Caution
The goal of self-assessment is to gauge your mastery of the topics in this chapter. If you do not know the answer to a question or are only partially sure of the answer, you should mark your answer as incorrect for purposes of the self-assessment. Giving yourself credit for an answer you correctly guess skews your self-assessment results and might provide you with a false sense of security.
1. What PowerShell cmdlet allows you to set a VM for high availability?
a. Add-VMHA
b. Add-ClusterVMHA
c. Add-ClusterVirtualMachineRole
d. Add-ClusterVM
2. Which of the following is a useful feature of Quick Migration that Live Migration does not offer?
a. Moving a VM and the storage at the same time
b. Moving a VM with no pause at all
c. Moving a stopped VM
d. Moving a running VM
3. What PowerShell cmdlet performs the export of a VM?
a. Export-VM
b. Send-VM
c. Place-VM
d. Set-VMNode
4. What Drain on Shutdown status code means enabled?
a. 0
b. 1
c. 2
d. 3
Foundation Topics
Moving VMs
A critical administrative task in the modern datacenter is moving virtual machines (VMs). It is important to be able to move VMs themselves and their storage quickly and efficiently. The following sections review how to do this and elaborate on parts of the process not covered elsewhere in this text.
Performing a Live Migration
When you create a Virtual Machine role on a cluster, you create the VM and then configure it for high availability using the High Availability Wizard or the Add-ClusterVirtualMachineRole PowerShell cmdlet. When you do so, you enable Live Migration for the role.
Here is the complete syntax of the Add-ClusterVirtualMachineRole cmdlet:
Add-ClusterVirtualMachineRole [[-VMName] <String> ] [-Cluster <String>
] [-InputObject <PSObject> ] [-Name <String> ] [-VirtualMachine
<String> ] [-VMId <Guid> ] [ <CommonParameters>]
There is no need to manually configure the Hyper-V server to enable Live Migration or select an authentication protocol. Once you create the virtual machine in the cluster, performing a live migration is simply a matter of right-clicking the VM on the Roles page and, from the context menu, selecting Move and then Live Migration. You can let the cluster choose the best node or select any of the nodes in the cluster as the target.
To start a live migration in PowerShell, you use the Move-ClusterVirtualMachineRole cmdlet, as in the following example:
Move-ClusterVirtualMachineRole -name MYCLUSTER1 -node server2
Here is the complete syntax for the cmdlet:
Move-ClusterVirtualMachineRole [[-Name] <String> ] [[-Node] <String>
] [-Cancel] [-Cluster <String> ] [-IgnoreLocked] [-InputObject
<PSObject> ] [-MigrationType <NativeGroupHelp+VmMigrationType>
{TurnOff | Quick | Shutdown | ShutdownForce | Live} ] [-VMId <Guid> ]
[-Wait <Int32> ] [ <CommonParameters>]
Performing a Quick Migration
Even though Live Migration is king, Windows Server 2016 still includes Quick Migration. Quick Migration is still useful in some situations. One nice feature of a quick migration is that the VM does not need to be running, as it does with a live migration.
Unfortunately, moving VMs with Quick Migration is not instantaneous, as it is with Live Migration. There is a very brief pause in processing. Just as with a live migration, the data files do not move during a quick migration. In practice, administrators typically use Quick Migration only when they cannot perform a live migration.
A quick migration of a running Virtual Machine role proceeds as follows:
1. The cluster pauses the Virtual Machine role, suspending the I/O and CPU functions of the VM.
2. The cluster saves the source VM’s memory contents and system state to shared storage and places the VM into the Saved state.
3. The cluster copies the symbolic link specifying the location of the source VM’s files to the destination node and transfers ownership of the source VM’s files to the destination VM.
4. The cluster removes the symbolic link from the source VM.
5. The cluster resumes the role from the Saved state, copying the memory contents and the system state from shared storage to the destination VM, now running on the destination node.
The fundamental difference between Quick Migration and Live Migration is that Quick Migration copies the VM’s memory first to disk and then from disk to the destination, whereas Live Migration copies the memory directly from the source to the destination. The length of the pause in a quick migration depends on the size of the VM’s memory and the performance of the storage subsystem.
The only data copied directly from the source to the destination VM is the tiny symbolic link.
When the VM stops, a quick migration needs only the transfer of the symbolic link from the source to the destination. In this case, the process is instantaneous.
The effect of the pause on the clustered role depends on the applications running on the VM. Some applications can recover easily from a pause of a few seconds, while others might not.
The process of performing a quick migration is almost identical to the process of performing a live migration. You right-click the VM on the Roles page and, from the context menu, select Move and then Quick Migration, and then you choose the desired destination node. As the migration proceeds, you can see the role enter the Saved state and then the Starting state as the role is resumed.
Performing a Storage Migration
Live Migration and Quick Migration move the memory contents and the system state from one virtual machine to another. They do not move the virtual hard disk files that the VM uses to store its operating system, application files, and data.
In a failover cluster, these files should be placed on shared storage, so the destination VM already has access to them. Storage Migration has the opposite effect: It moves a VM’s virtual hard disk files but not its memory and system state.
There are few limitations on Storage Migration:
![]() The virtual machine does not have to be part of a cluster, so you see it implemented in Hyper-V as well as Failover Clustering.
The virtual machine does not have to be part of a cluster, so you see it implemented in Hyper-V as well as Failover Clustering.
![]() On a standalone Hyper-V server, you can move the files to any destination you have permission to access, including a different location on the same computer. This is helpful because it updates the VM with the new locations of the files as it migrates them.
On a standalone Hyper-V server, you can move the files to any destination you have permission to access, including a different location on the same computer. This is helpful because it updates the VM with the new locations of the files as it migrates them.
In Hyper-V, you use the Move Wizard to perform storage migrations, but you can also use a tool in Failover Cluster Manager. When you right-click a virtual machine cluster role and click Move and then Virtual Machine Storage, the Move Virtual Machine Storage dialog box appears. In this dialog box, you can select any of the virtual machine’s stored resources—including individual VHD and VHDX files, checkpoints, and smart paging files—and you can drag and drop them to a location anywhere in cluster storage. A new Destination Folder Path value appears, specifying where the tool will move the file. When you have selected destinations for all the files you want to move, you can click the Start button to close the dialog box and begin the storage migration process.
More VM Management
There are a few VM management tasks we have not explored yet in this chapter. These include importing, exporting, and copying VMs, and the Health Protection and Drain on Shutdown features. The following sections cover these important tasks.
Importing, Exporting, and Copying VMs
In Hyper-V, you need to export and import VMs for a variety of useful purposes. Hyper-V Manager offers access to an Export Virtual Machine dialog box and an Import Virtual Machine Wizard, but Failover Cluster Manager has no such interface.
You can use the Export-VM and Import-VM cmdlets in Windows PowerShell to effectively clone a clustered virtual machine. To export a virtual machine, running or stopped, you use the Export-VM cmdlet as follows:
Export-VM -name myclustervm1 -path z:vm
Here is the complete syntax of the Export-VM cmdlet:
Export-VM [-CimSession <CimSession[]>] [-ComputerName <String[]>]
[-Credential <PSCredential[]>] [-Name] <String[]> [-Path] <String>
[-AsJob] [-Passthru] [-CaptureLiveState <CaptureLiveState>]
[-WhatIf] [-Confirm] [<CommonParameters>]
You can run the cmdlet from any node in the cluster, but if you specify a local, unshared disk for the -Path parameter, the VM exports to the specified path on the node where it is running. Obviously, specifying shared storage for the -Path value is preferred.
To import the virtual machine into the Hyper-V host, you copy the files to the host’s default folders and generate a new security identifier (SID) for the VM. To prevent conflicts, you can use the Import-VM cmdlet in the following manner:
Import-VM -path "z:vmvirtual machines
5ae40946-3a98-428e-8c83-081a3c68d17a.xml" -copy -generatenewid
Here is the complete syntax for the Import-VM cmdlet:
Import-VM [-CimSession <CimSession[]>] [-ComputerName <String[]>]
[-Credential <PSCredential[]>] [-Path] <String>
[[-VhdDestinationPath] <String>] [-Copy] [-VirtualMachinePath
<String>] [-SnapshotFilePath <String>] [-SmartPagingFilePath
<String>] [-VhdSourcePath <String>] [-GenerateNewId] [-AsJob]
[-WhatIf] [-Confirm] [<CommonParameters>]
When the process is complete, you have a new virtual machine on that host. If you configure the Hyper-V host to store VM files on shared storage by default, you can then use Failover Cluster Manager to add that VM as a Virtual Machine role and configure it for high availability.
Configuring VM Network Health Protection
Network Health Protection is a feature that detects whether a VM on a cluster node has a functional connection to a designated network. If it does not, the cluster automatically live migrates the VM role to another node that does have a connection to that network.
Without this feature, clustered virtual machines can lose contact with the network and continue to run as though nothing is wrong. If the problem is a simple one, such as an unplugged cable, other nodes in the cluster might still have access to that network, and migrating the VM to one of those nodes can keep it operational until you repair the network fault.
Windows Server 2016 enables Network Health Protection by default, but there are situations in which you might not want a live migration to occur automatically. For example, if you configure the cluster nodes with connections to redundant networks, you might not want live migrations to occur in response to one network’s failure.
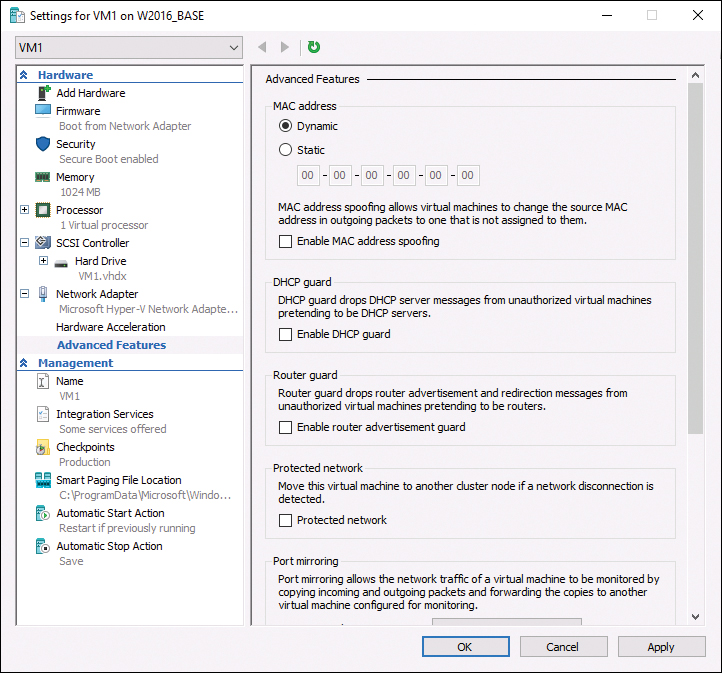
To control whether Network Health Protection applies, open the Settings dialog box for the VM, either in Failover Cluster Manager or Hyper-V Manager, and expand the network adapter offering the connection to the network in question to display the Advanced Features option, as shown in Figure 17-1.

Select the Advanced Features option to view its settings. When you clear the Protected Network check box, you prevent live migrations from occurring due to faults detected on that network. Figure 17-2 shows this.
Configuring Drain on Shutdown
When you want to shut down a cluster node holding VMs for maintenance or any other reason, the proper procedure is to drain the roles off the node (that is, live migrate them to other nodes) before you shut down the machine.
In Failover Cluster Manager, you do this by selecting a node and clicking Pause and then Drain Roles in the Actions pane. If you click the Roles tab at the bottom of the page, you should see that each one is live migrated to another node in the cluster.
In PowerShell, you can drain a node by using the Suspend-ClusterNode cmdlet. Here is the complete syntax for this cmdlet:
Suspend-ClusterNode [[-Name] <StringCollection> ] [[-TargetNode] <String> ] [-Cluster <String> ] [-Drain] [-ForceEvacuation] [-InputObject <PSObject> ] [-Wait] [ <CommonParameters>]
At one time, if you did not drain the node and just shut it down with the roles running, Windows Server 2016 placed the roles into a Saved state, causing a service outage until the VMs could be moved to another node and resumed.
Now, Windows Server 2016 Failover Clustering includes a feature called Drain on Shutdown, which automatically live migrates all the roles on a node before shutting down the system.
It is worth noting, however, that Microsoft still recommends pausing a node and draining it before initiating a shutdown.
Drain on Shutdown is enabled by default, as you can tell by running the (Get-Cluster).DrainOnShutdown command. The value 1 indicates that the feature is enabled, and 0 indicates disabled. To disable Drain on Shutdown, you therefore use the following command:
(get-cluster).drainonshutdown = 0
Exam Preparation Tasks
As mentioned in the section “How to Use This Book” in the Introduction, you have a couple choices for exam preparation: the exercises here, Chapter 21, “Final Preparation,” and the exam simulation questions in the Pearson Test Prep Software Online.
Review All Key Topics
Review the most important topics in this chapter, noted with the Key Topics icon in the outer margin of the page. Table 17-2 lists these key topics and the page number on which each is found.
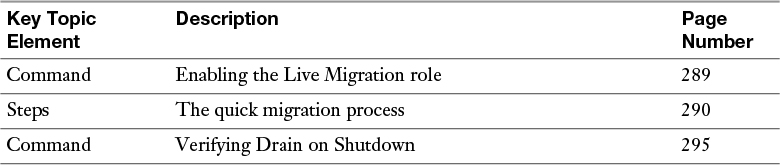
Table 17-2 Key Topics for Chapter 17
Define Key Terms
Define the following key terms from this chapter and check your answers against the glossary:
Quick Migration
Storage Migration
Network Health Protection
Drain on Shutdown
Q&A
The answers to these questions appear in Appendix A. For more practice with exam format questions, use the Pearson Test Prep Software Online.
1. What are the main differences between a live migration and a quick migration?
2. Where in the network adapter properties do you find the Network Health Protection option?