
Chapter 7. Installing Hyper-V
This chapter covers the following subjects:
![]() Preparing for Installation: Just as with Server 2016 itself, you must carry out careful planning before you attempt to roll out a Hyper-V deployment. This section ensures that you are aware of the various requirements.
Preparing for Installation: Just as with Server 2016 itself, you must carry out careful planning before you attempt to roll out a Hyper-V deployment. This section ensures that you are aware of the various requirements.
![]() Installing Hyper-V: When it is time to deploy Hyper-V, you should use this section as a guide. It discusses the installation of Hyper-V using the GUI as well as PowerShell.
Installing Hyper-V: When it is time to deploy Hyper-V, you should use this section as a guide. It discusses the installation of Hyper-V using the GUI as well as PowerShell.
![]() Managing VMs: There are many options for managing the many VMs you might have in a Hyper-V deployment. This section ensures that you are familiar with these options.
Managing VMs: There are many options for managing the many VMs you might have in a Hyper-V deployment. This section ensures that you are familiar with these options.
Hyper-V allows amazing system virtualization and was one of the main areas of focus for Microsoft in revising Server 2012 R2 for the new and improved Server 2016 version. This chapter examines many of these improved capabilities, including nested virtualization.
“Do I Know This Already?” Quiz
The “Do I Know This Already?” quiz allows you to assess whether you should read the entire chapter. Table 7-1 lists the major headings in this chapter and the “Do I Know This Already?” quiz questions covering the material in those headings so you can assess your knowledge of these specific areas. The answers to the “Do I Know This Already?” quiz appear in Appendix A, “Answers to the ‘Do I Know This Already?’ Quizzes and Q&A Questions.”

Caution
The goal of self-assessment is to gauge your mastery of the topics in this chapter. If you do not know the answer to a question or are only partially sure of the answer, you should mark your answer as incorrect for purposes of the self-assessment. Giving yourself credit for an answer you correctly guess skews your self-assessment results and might provide you with a false sense of security.
1. At least how much RAM should you reserve for the host Windows Server 2016 OS in a Hyper-V deployment?
a. 8 GB
b. 1 GB
c. 4 GB
d. 2 GB
2. What application can you run to test your system for Hyper-V?
a. TestHyperV.exe
b. Systeminfo.exe
c. TestVirtual.exe
d. CheckVHD.exe
3. What PowerShell cmdlet can you use to install Hyper-V?
a. Install-HyperV
b. NewFeature-HyperV
c. Install-WindowsFeature
d. Create-WindowsHyperV
4. What cmdlet can you use to check for the success of the installation of Hyper-V?
a. Get-WindowsFeature
b. Acquire-WindowsFeature
c. Check-HyperV
d. Test-HyperV
5. Which option can you use if you are not logged on as the admin of your Hyper-V system and you want to manage the remote Hyper-V device?
a. Delegate to self admin
b. Connect as admin
c. Elevate permission
d. Connect as another user
6. To enable nested virtualization, at least how much RAM should you have?
a. 2 GB
b. 4 GB
c. 8 GB
d. 16 GB
Foundation Topics
Preparing for Installation
Microsoft certainly understands the importance of its server-based virtualization platform and has added many new features and improvements to the platform. Here are the main new features you should be aware of:
![]() Windows Server Hyper-V containers and Docker: Docker support offers more application isolation than using other container technologies.
Windows Server Hyper-V containers and Docker: Docker support offers more application isolation than using other container technologies.
![]() Host resource protection: You can protect virtual machines from other VMs that might be trying to use excessive resources.
Host resource protection: You can protect virtual machines from other VMs that might be trying to use excessive resources.
![]() Nested virtualization: This awesome new feature lets you create virtualization instances inside an existing VM.
Nested virtualization: This awesome new feature lets you create virtualization instances inside an existing VM.
![]() PowerShell Direct: This feature allows you to run commands in PowerShell against your virtual machines; this is carried out with special configuration or remoting capabilities.
PowerShell Direct: This feature allows you to run commands in PowerShell against your virtual machines; this is carried out with special configuration or remoting capabilities.
![]() Shielded virtual machines: You can encrypt virtual machines and force them to run on host guardian server clients only.
Shielded virtual machines: You can encrypt virtual machines and force them to run on host guardian server clients only.
![]() Virtual Trusted Platform Modules: You can use Trusted Platform Modules (TPM) in virtual machines.
Virtual Trusted Platform Modules: You can use Trusted Platform Modules (TPM) in virtual machines.
![]() BitLocker Drive Encryption: You can use BitLocker Drive Encryption with virtual machines.
BitLocker Drive Encryption: You can use BitLocker Drive Encryption with virtual machines.
![]() Hot Add/Remove Memory: While a VM is online, you can now add static memory.
Hot Add/Remove Memory: While a VM is online, you can now add static memory.
![]() Hot Add/Remove Network Adapters: While a VM is online, you can now add network adapters.
Hot Add/Remove Network Adapters: While a VM is online, you can now add network adapters.
The following features have been greatly improved:
![]() Checkpoints: Windows Server 2016 improves checkpoints with a new production checkpoint feature; production checkpoints are “point in time” images of a virtual machine, which can be restored later in a way that is completely supported for all production workloads; this is achieved through using backup technology inside the VM instead of the more traditional saved state approach.
Checkpoints: Windows Server 2016 improves checkpoints with a new production checkpoint feature; production checkpoints are “point in time” images of a virtual machine, which can be restored later in a way that is completely supported for all production workloads; this is achieved through using backup technology inside the VM instead of the more traditional saved state approach.
![]() Linux: Many of the latest versions of Linux can now use Secure Boot.
Linux: Many of the latest versions of Linux can now use Secure Boot.
![]() Storage Quality of Server (QoS): Windows Server 2016 improves QoS dramatically with support for Scale-Out File Server and centrally managed QoS policies.
Storage Quality of Server (QoS): Windows Server 2016 improves QoS dramatically with support for Scale-Out File Server and centrally managed QoS policies.
The following are some of the Hyper-V Manager improvements:
![]() Hyper-V Manager: This critical management tool now supports alternate credentials.
Hyper-V Manager: This critical management tool now supports alternate credentials.
![]() Connections over the Web Services Management Protocol: Hyper-V Manager can communicate using Kerberos, MT LAN Manager, or Credential Security Support Provider.
Connections over the Web Services Management Protocol: Hyper-V Manager can communicate using Kerberos, MT LAN Manager, or Credential Security Support Provider.
![]() Previous version support: The Hyper-V Manager running on Windows Server 2016 can manage earlier versions of Hyper-V (Windows Server 2012, for example).
Previous version support: The Hyper-V Manager running on Windows Server 2016 can manage earlier versions of Hyper-V (Windows Server 2012, for example).
Installation Prerequisites
It is critical that you supply the proper prerequisites for the installation of Hyper-V:
![]() x64 processor with Second Level Address Translation (SLAT)
x64 processor with Second Level Address Translation (SLAT)
![]() A minimum of 4 GB of RAM
A minimum of 4 GB of RAM
![]() At least 1 GB of RAM for the host operating system of Windows Server 2016
At least 1 GB of RAM for the host operating system of Windows Server 2016
![]() VM Monitor Mode extensions
VM Monitor Mode extensions
![]() Virtualization support enabled in the BIOS or UEFI
Virtualization support enabled in the BIOS or UEFI
![]() Processors with Intel Virtualization Technology (Intel VT) or AMD Virtualization (AMD-V) technology
Processors with Intel Virtualization Technology (Intel VT) or AMD Virtualization (AMD-V) technology
![]() Available and enabled hardware-enforced Data Execution Prevention (DEP); for Intel systems, this is the XD bit (execute disable bit), and for AMD systems, it is the NX bit (no execute bit)
Available and enabled hardware-enforced Data Execution Prevention (DEP); for Intel systems, this is the XD bit (execute disable bit), and for AMD systems, it is the NX bit (no execute bit)
You should not use third-party virtualization apps that rely on the same processor features that Hyper-V needs; examples include VMware Workstation and VirtualBox.
You can use Systeminfo.exe from a command prompt or Windows PowerShell to check your system for the requirements. There is a Hyper-V Requirements section in the report.
Remember that certain advanced features in Hyper-V need specific components. Consider the following examples:
![]() Discrete device assignment: The processor must have either Intel’s Extended Page Table (EPT) or AMD’s Nested Page Table (NPT); the chipset must have interrupt remapping, such as Intel’s VT-d with the Interrupt Remapping capability (VT-d2) or any version of AMD I/O Memory Management Unit (I/O MMU); DMA remapping is required, such as Intel’s VT-d with Queued Invalidations or any AMD I/O MMU; Access Control Service (ACS) must be available on PCI Express root ports; and devices need GPU or nonvolatile memory express (NVMe).
Discrete device assignment: The processor must have either Intel’s Extended Page Table (EPT) or AMD’s Nested Page Table (NPT); the chipset must have interrupt remapping, such as Intel’s VT-d with the Interrupt Remapping capability (VT-d2) or any version of AMD I/O Memory Management Unit (I/O MMU); DMA remapping is required, such as Intel’s VT-d with Queued Invalidations or any AMD I/O MMU; Access Control Service (ACS) must be available on PCI Express root ports; and devices need GPU or nonvolatile memory express (NVMe).
![]() Shielded virtual machines have the following requirements:
Shielded virtual machines have the following requirements:
![]() Host requirements: UEFI 2.3.1c supports secure, measured boot; TPM v2.0 protects platform security assets; IOMMU (Intel VT-D) enables the hypervisor to provide direct memory access (DMA) protection.
Host requirements: UEFI 2.3.1c supports secure, measured boot; TPM v2.0 protects platform security assets; IOMMU (Intel VT-D) enables the hypervisor to provide direct memory access (DMA) protection.
![]() Virtual machine requirements: The VM must be Generation 2, and the guest operating system must be Windows Server 2016, Windows Server 2012 R2, or Windows Server 2012.
Virtual machine requirements: The VM must be Generation 2, and the guest operating system must be Windows Server 2016, Windows Server 2012 R2, or Windows Server 2012.
Installing Hyper-V
To install Hyper-V using the GUI, follow these steps:
Step 1. In Server Manager, select Manage > Add Roles and Features.
Step 2. On the Before You Begin page, verify that your destination server and network environment are prepared for the role and feature you want to install and click Next.
Step 3. On the Select Installation Type page, as shown in Figure 7-1, select Role-based or feature-based installation and then click Next.

Step 4. On the Select Destination Server page, select a server from the server pool and then click Next.
Step 5. On the Select Server Roles page, select Hyper-V, as shown in Figure 7-2.

Step 6. To add the tools you use to create and manage virtual machines, click Add Features on the Features page and click Next.
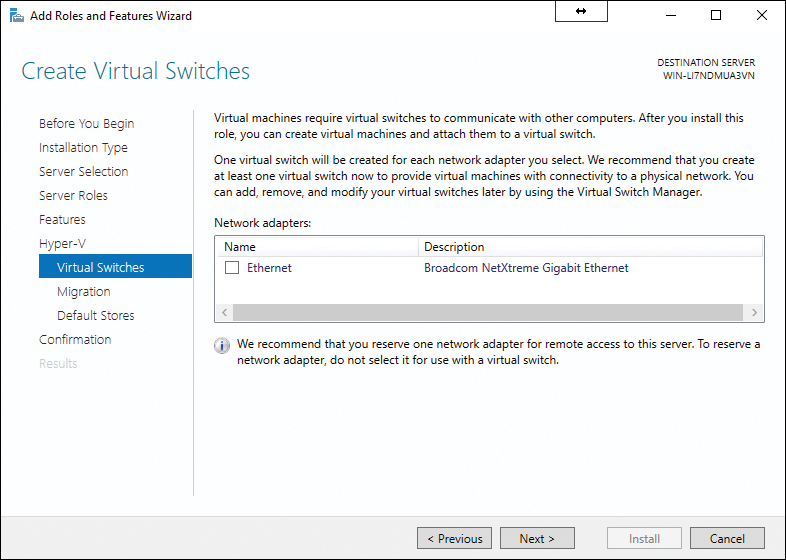
Step 7. On the Create Virtual Switches page (see Figure 7-3), the Virtual Machine Migration page, and the Default Stores page, select the proper options.
Step 8. On the Confirm Installation Selections page, click Restart to restart the destination server automatically, if required, and then click Install.
To install Hyper-V using the Install-WindowsFeature cmdlet, follow these steps:
Step 1. Launch Windows PowerShell, right-click, and choose Run as Administrator.
Step 2. To install Hyper-V on a server you are connected to remotely, run this command:
Install-WindowsFeature -Name Hyper-V -ComputerName
<computer_name> -IncludeManagementTools -Restart
Note
If you are performing the installation on the local server, run the command without the -ComputerName parameter.
Step 3. After the server restarts, check the success of installation with the following command:
Get-WindowsFeature -ComputerName <computer_name>
Managing VMs
As described in the following sections, there are more options for managing VMs in your Hyper-V environment than ever before.
Delegating Virtual Machine Management
Your fellow administrators can connect to the Hyper-V host when they are not running on the local computer as a user that is a member of either the Hyper-V Administrators group or a member of the Administrators group of your Hyper-V host. Admins can follow these steps in Hyper-V Manager:
Step 1. In Server Manager, select Tools > Hyper-V Manager.
Step 2. In the left pane, select Hyper-V Manager.
Step 3. Click Connect to Server in the Actions pane (see Figure 7-4).
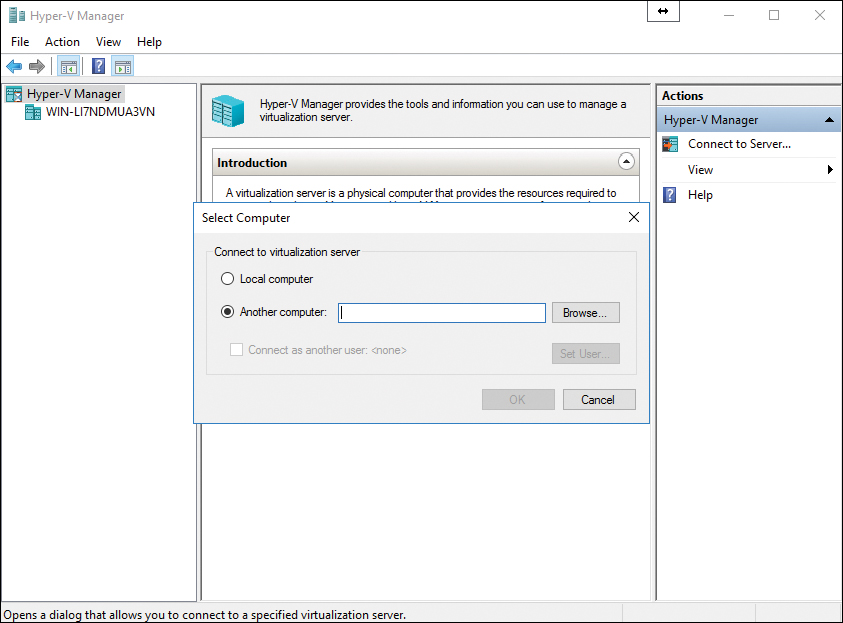
Step 4. Select Another computer in the Select Computer dialog and then click Connect as another user.
Step 5. Click Set User.
You can also use delegation so that an administrator can connect to a system that is outside his or her domain or with no domain at all:
Step 1. On the Hyper-V host where you want remote management capabilities, open PowerShell as an administrator.
Step 2. Run the following commands:
Set-Item WSMan:localhostClientTrustedHosts -Value
"fqdn-of-hyper-v-host"
Enable-WSManCredSSP -Role client -DelegateComputer
"fqdn-of-hyper-v-host"
Step 3. Configure the following group policy:
Computer Configuration > Administrative Templates > System > Credentials Delegation > Allow delegating fresh credentials with NTLM-only server authentication
Then click Enable and add wsman/fqdn-of-hyper-v-host. Figure 7-5 shows credentials delegation settings in the Group Policy Editor.

Step 4. Open Hyper-V Manager.
Step 5. Right-click Hyper-V Manager in the left pane.
Step 6. Click Connect to Server.
PowerShell Direct
Remember from Chapter 3, “Working with Images,” that there are two ways to run PowerShell Direct:
![]() Create and exit a PowerShell Direct session using PSSession cmdlets.
Create and exit a PowerShell Direct session using PSSession cmdlets.
![]() Run a script or command with the Invoke-Command cmdlet.
Run a script or command with the Invoke-Command cmdlet.
![]() At least 4 GB of RAM
At least 4 GB of RAM
![]() Windows Server 2016 or Windows 10 Anniversary Update as your operating system
Windows Server 2016 or Windows 10 Anniversary Update as your operating system
![]() A virtual machine the same build as the host for the VM that is running Hyper-V
A virtual machine the same build as the host for the VM that is running Hyper-V
![]() An Intel processor with VT-x and EPT technology
An Intel processor with VT-x and EPT technology
To configure nested virtualization, follow these steps:
Step 1. Create a virtual machine.
Step 2. With the virtual machine in the OFF state, run the following command on the physical Hyper-V host:
Set-VMProcessor -VMName <VMName> -ExposeVirtualizationExtensions
$true
Step 3. Start the virtual machine.
Step 4. Install Hyper-V on the virtual machine.
Exam Preparation Tasks
As mentioned in the section “How to Use This Book” in the Introduction, you have a couple choices for exam preparation: the exercises here, Chapter 21, “Final Preparation,” and the exam simulation questions in the Pearson Test Prep Software Online.
Review All Key Topics
Review the most important topics in this chapter, noted with the Key Topics icon in the outer margin of the page. Table 7-2 lists these key topics and the page number on which each is found.
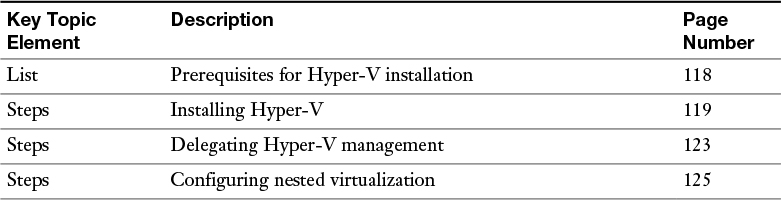
Table 7-2 Key Topics for Chapter 7
Complete Tables and Lists from Memory
There are no memory tables for this chapter.
Define Key Terms
Define the following key terms from this chapter and check your answers against the glossary:
Docker
Q&A
The answers to these questions appear in Appendix A. For more practice with exam format questions, use the Pearson Test Prep Software Online.
1. Name at least three requirements that you must meet in order to run shielded virtual machines.
2. How can you install Hyper-V using the GUI?
3. Name at least two requirements for nested virtualization.