
Chapter 4. Disks and Volumes
This chapter covers the following subjects:
![]() Creating Disks: This section includes tasks such as configuring sector sizes appropriate for various workloads, configuring GUID partition table (GPT) disks, creating VHD and VHDX files using Server Manager or Windows PowerShell, and mounting virtual hard disks. This part of the text also discusses the NTFS and ReFS file systems.
Creating Disks: This section includes tasks such as configuring sector sizes appropriate for various workloads, configuring GUID partition table (GPT) disks, creating VHD and VHDX files using Server Manager or Windows PowerShell, and mounting virtual hard disks. This part of the text also discusses the NTFS and ReFS file systems.
![]() NFS and SMB Shares: This section details the creation of these shared using tools like Server Manager and PowerShell.
NFS and SMB Shares: This section details the creation of these shared using tools like Server Manager and PowerShell.
![]() File and Folder Permissions: This section ensures that you are comfortable controlling important file and folder permissions in Windows Server 2016.
File and Folder Permissions: This section ensures that you are comfortable controlling important file and folder permissions in Windows Server 2016.
Storage is all about physical and virtual disks and volumes. Server Manager and PowerShell are very valuable tools for managing both disks and volumes. This chapter examines these important storage topics in detail.
“Do I Know This Already?” Quiz
The “Do I Know This Already?” quiz allows you to assess whether you should read the entire chapter. Table 4-1 lists the major headings in this chapter and the “Do I Know This Already?” quiz questions covering the material in those headings so you can assess your knowledge of these specific areas. The answers to the “Do I Know This Already?” quiz appear in Appendix A, “Answers to the ‘Do I Know This Already?’ Quizzes and Q&A Questions.”

Caution
The goal of self-assessment is to gauge your mastery of the topics in this chapter. If you do not know the answer to a question or are only partially sure of the answer, you should mark your answer as incorrect for purposes of the self-assessment. Giving yourself credit for an answer you correctly guess skews your self-assessment results and might provide you with a false sense of security.
1. Your Windows Server 2016 is working with Advanced Format disks. How many bytes exist per physical sector?
a. 512
b. 1024
c. 2048
d. 4096
2. What partition style lets you to use disk space beyond 2 TB?
a. EUFI
b. MBR
c. GPT
d. SMB
3. What type of share do you typically use with UNIX-based systems?
a. SMB
b. MBR
c. GPT
d. NFS
4. What PowerShell command permits the creation of a new SMB share?
a. Create-SmbShare
b. Get-SmbShare
c. New-SmbShare
d. Build-SmbShare
5. Which of the following is not a basic NTFS folder permission?
a. Full control
b. List folder contents
c. Modify
d. Write attributes
6. Which statement about file ownership in an NTFS permission system is not correct?
a. The owner can always change the permissions on a file.
b. By default, the creator of the file is the owner.
c. There is a special permission called Take Ownership.
d. No user accounts are granted Take Ownership by default.
Foundation Topics
Creating Disks
Thanks to new features and capabilities with Windows Server 2016, you must become expert regarding many aspects of disk creation. The following sections make these topics clear and concise for you.
Configuring Sector Sizes Appropriate for Various Workloads
Most people are unaccustomed to worrying about sector sizes in storage. Today, however, there are three options: 512 bytes, 512e, and 4K.
Windows Server 2016 supports Standard Format and Advanced Format hard disks. Here are key distinctions:
![]() Standard Format:
Standard Format:
![]() Use 512 bytes per physical sector
Use 512 bytes per physical sector
![]() Often referred to as 512 native sector drives
Often referred to as 512 native sector drives
![]() Sometimes referred to simply as 512b drives
Sometimes referred to simply as 512b drives
![]() Advanced Format:
Advanced Format:
![]() Use 4096 bytes per physical sector
Use 4096 bytes per physical sector
![]() Available in 4K native and 512 emulation (512e) versions
Available in 4K native and 512 emulation (512e) versions
![]() Allow for the use of huge multi-terabyte drives
Allow for the use of huge multi-terabyte drives
Remember that Windows Server 2016 handles media updates with the granularity of their physical sector size. Standard Format disks work with 512 bytes at a time, while Advanced Format disks use 4096 bytes at a time. For best performance, update your workloads to read and write at the 4096 bytes with your new, massive disk drives.
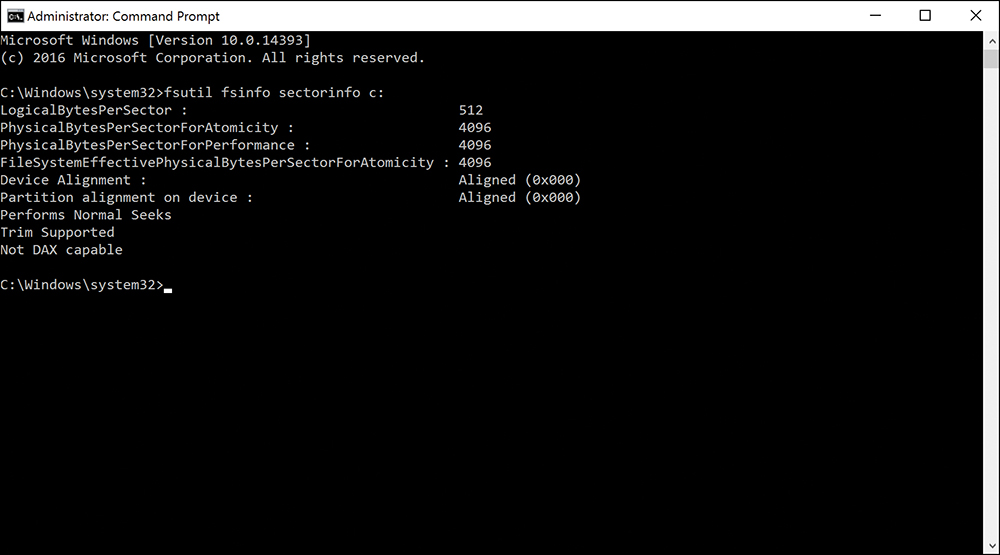
You can use the fsutil tool at the command prompt to check sector size information. Here is an example:
fsutil fsinfo sectorinfo c:
Figure 4-1 shows this tool in action.
When you are performing volume creation in the Windows Server 2016 Disk Management tool, you set the allocation unit size as shown in Figure 4-2.
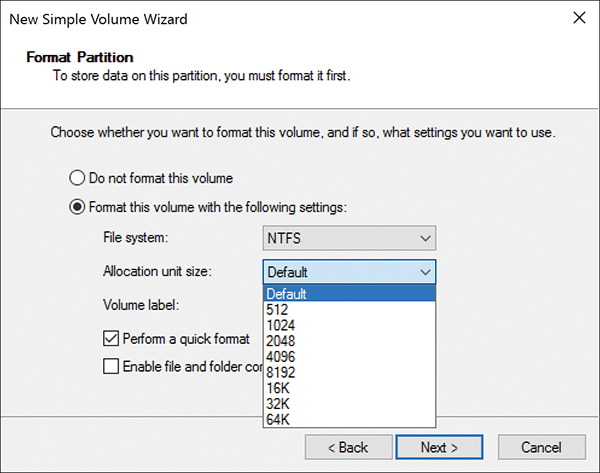
All file systems that are used by Windows organize a hard disk based on cluster size (also known as allocation unit size). Cluster size is the smallest amount of disk space that can be used to hold a file. When file sizes do not come out to an even multiple of the cluster size, more space must be used to hold a file. On the typical hard disk partition, the average amount of space that is lost in this manner can be calculated by using the equation Cluster Size / 2 — Number of Files.
If you specify no cluster size when you format a partition, Windows Server 2016 defaults are based on the size of the partition. A server selects these defaults to reduce the space lost and to reduce the fragmentation that occurs on the partition.
For some specific workloads, Microsoft has best-practice recommendations for the allocation unit size. For example, when formatting a data disk for Microsoft SQL Server, Microsoft recommends that you use a 64 KB allocation unit size for data and log files, as well as TempDB.
Configuring GUID Partition Table (GPT) Disks
Remember that the disks in Windows Server 2016 can use the older Master Boot Record (MBR) partition style or the new and improved GUID Partition Table (GPT) partition style. GPT is very common these days as it allows the use of disk space beyond 2 TB. GPT uses the new and improved UEFI boot mode.
It is super simple to check your partition style in Windows Server 2016. Use the following steps to check your settings using Disk Management:
Step 1. Right-click the Start button.
Step 2. Choose Disk Management from the shortcut menu.
Step 3. Right-click your disk.
Step 4. Choose Properties.
Step 5. Click the Volumes tab and check the Partition Style field.
Windows Server 2016 allows the conversion of disks to GPT from MBR and vice versa. A disk must be empty and can hold no partitions or volumes. Obviously, it is important to back up your data before performing such a conversion.
Follow these steps to convert within Disk Management:
Step 1. Right-click the Start button.
Step 2. Choose Disk Management from the shortcut menu.
Step 3. Right-click the existing partition(s) and choose Delete Volume.
Step 4. Right-click the disk and choose Convert to GPT Disk.
Note
Third-party tools can perform this conversion without the deletion of data.
You can also use the diskpart command prompt tool to perform the conversion, using the following steps:
Step 1. Right-click the Start menu.
Step 2. Choose the Command Prompt (Admin).
Step 3. Type diskpart and press Enter.
Step 4. Type list disk and press Enter.
Step 5. Type select disk # and press Enter.
Step 6. Type clean and press Enter.
Step 7. Type convert gpt and press Enter.
Creating and Mounting VHD and VHDX Files Using Server Manager or Windows PowerShell
Virtual hard disks are growing in popularity in our heavily virtualized datacenter environments, and it is no surprise that their creation is simple both in the GUI of Windows Server 2016 and in PowerShell. Using Server Manager is an easy way to access Disk Management and create VHD or VHDX files. Here is how it works:
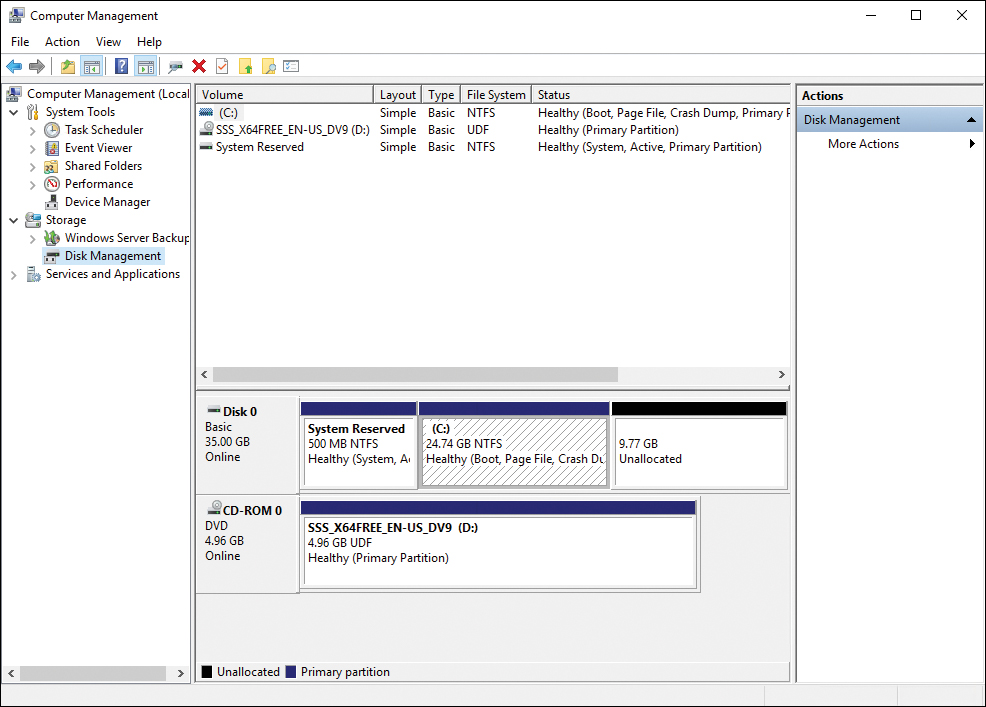
Step 1. In Server Manager, select Tools > Computer Management.
Step 2. In Computer Management, under Storage, choose Disk Management, as shown in Figure 4-3.
Step 3. Select an active volume and then, from the Action menu in Disk Manager, choose Create VHD to open the Create and Attach Virtual Hard Disk window, as shown in Figure 4-4.
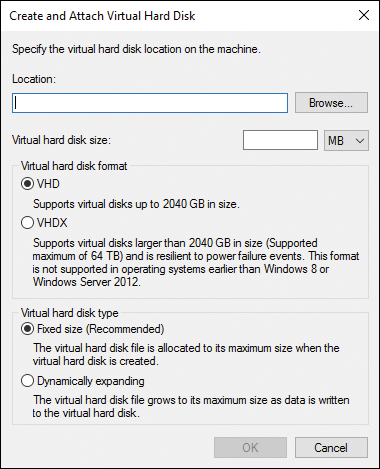
Step 4. Specify the location of the VHD or VHDX, the size of the disk, the format of the disk (Gen 1 VHD or Gen 2 VHDX) and whether the VHD is of a fixed size or dynamically expanding.
Step 5. Confirm that the VHDX appears in Disk Management, as shown in Figure 4-5 (ours is the 1 GB Disk 1).

Step 6. Right-click the disk identifier on the left and choose Initialize Disk, as shown in Figure 4-6.

Step 7. Choose the MBR or GPT partition method and click OK.
Step 8. Right-click your VHDX and choose New Simple Volume to create and mount your virtual hard disk to a drive letter.
Of course, PowerShell offers cmdlets to make these storage manipulations as well. Here are some key cmdlets you should know:
![]() New-VHD: Creates a new VHD or VHDX:
New-VHD: Creates a new VHD or VHDX:
New-VHD [-Path] <String[]> [-SizeBytes] <UInt64> [-AsJob]
[-BlockSizeBytes <UInt32> ] [-CimSession <Microsoft.
Management.Infrastructure.CimSession[]> ] [-ComputerName
<String[]> ] [-Credential <System.Management.Automation.
PSCredential[]> ] [-Dynamic] [-LogicalSectorSizeBytes <UInt32>
{512 | 4096} ] [-PhysicalSectorSizeBytes <UInt32> {512 | 4096}
] [-Confirm] [-WhatIf] [ <CommonParameters>]
![]() Mount-VHD: Mounts one or more virtual hard disks:
Mount-VHD: Mounts one or more virtual hard disks:
Mount-VHD [-Path] <String[]> [-CimSession <Microsoft.Management.
Infrastructure.CimSession[]> ] [-ComputerName <String[]> ]
[-Credential <System.Management.Automation.PSCredential[]> ]
[-NoDriveLetter] [-Passthru] [-ReadOnly] [-SnapshotId
<Nullable [System.Guid]> ] [-Confirm] [-WhatIf] [
<CommonParameters>]
![]() Get-Disk: Gets one or more disks visible to the operating system:
Get-Disk: Gets one or more disks visible to the operating system:
Get-Disk [[-Number] <UInt32[]> ] [-CimSession <CimSession[]>
] [-ThrottleLimit <Int32> ] [ <CommonParameters>] [
<WorkflowParameters>]
![]() Initialize-Disk: Initializes a RAW disk for first time use, enabling the disk to be formatted and used to store data:
Initialize-Disk: Initializes a RAW disk for first time use, enabling the disk to be formatted and used to store data:
Initialize-Disk [-Number] <UInt32[]> [-CimSession <CimSession[]>
] [-PartitionStyle <PartitionStyle> {Unknown | MBR | GPT} ]
[-PassThru] [-ThrottleLimit <Int32> ] [-Confirm] [-WhatIf] [
<CommonParameters>] [ <WorkflowParameters>]
![]() New-Partition: Creates a new partition on an existing Disk object:
New-Partition: Creates a new partition on an existing Disk object:
New-Partition [-DiskNumber] <UInt32[]> [-Alignment <UInt32> ]
[-AssignDriveLetter] [-CimSession <CimSession[]> ]
[-DriveLetter <Char> ] [-GptType <String> ] [-IsActive]
[-IsHidden] [-MbrType <MbrType> {FAT12 | FAT16 | Extended
| Huge | IFS | FAT32} ] [-Offset <UInt64> ] [-Size
<UInt64> ] [-ThrottleLimit <Int32> ] [-UseMaximumSize] [
<CommonParameters>] [ <WorkflowParameters>]
![]() Format-Volume: Formats one or more existing volumes or a new volume on an existing partition:
Format-Volume: Formats one or more existing volumes or a new volume on an existing partition:
Format-Volume [-DriveLetter] <Char[]> [-AllocationUnitSize
<UInt32> ] [-CimSession <CimSession[]> ] [-Compress]
[-DisableHeatGathering] [-FileSystem <String> {FAT |
FAT32 | exFAT | NTFS | ReFS} ] [-Force] [-Full] [-IsDAX]
[-NewFileSystemLabel <String> ] [-SetIntegrityStreams
<Boolean> ] [-ShortFileNameSupport <Boolean> ]
[-ThrottleLimit <Int32> ] [-UseLargeFRS] [-Confirm] [-WhatIf]
[ <CommonParameters>] [ <WorkflowParameters>]
![]() Get-Partition: Returns a list of all partition objects visible on all disks, or optionally a filtered list using specified parameters:
Get-Partition: Returns a list of all partition objects visible on all disks, or optionally a filtered list using specified parameters:
Get-Partition [[-DiskNumber] <UInt32[]> ] [[-PartitionNumber]
<UInt32[]> ] [-CimSession <CimSession[]> ] [-ThrottleLimit
<Int32> ] [ <CommonParameters>] [ <WorkflowParameters>]
![]() Add-PartitionAccessPath: Adds an access path such as a drive letter or folder to a partition:
Add-PartitionAccessPath: Adds an access path such as a drive letter or folder to a partition:
Add-PartitionAccessPath [-DiskNumber] <UInt32[]>
[-PartitionNumber] <UInt32[]> [[-AccessPath] <String>
] [-AssignDriveLetter] [-CimSession <CimSession[]> ]
[-PassThru] [-ThrottleLimit <Int32> ] [-Confirm] [-WhatIf] [
<CommonParameters>] [ <WorkflowParameters>]
![]() Dismount-VHD: Dismounts a virtual hard disk:
Dismount-VHD: Dismounts a virtual hard disk:
Dismount-VHD [-DiskNumber] <UInt32> [-CimSession <Microsoft.
Management.Infrastructure.CimSession[]> ] [-ComputerName
<String[]> ] [-Credential <System.Management.Automation.
PSCredential[]> ] [-Passthru] [-Confirm] [-WhatIf] [
<CommonParameters>]
Determining When to Use NTFS and ReFS File Systems
It is interesting that NTFS is no longer the only realistic option for file formats. Microsoft now provides a new and improved version 2 of the Resilient File System (ReFS).
ReFS has some distinct advantages over NTFS that you should be aware of:
![]() ReFS gives Accelerated VHDX options in Hyper-V; these options permit massive performance increases when creating and extending a virtual hard disk, when merging checkpoints, and when performing backups.
ReFS gives Accelerated VHDX options in Hyper-V; these options permit massive performance increases when creating and extending a virtual hard disk, when merging checkpoints, and when performing backups.
![]() A block cloning approach is key to excellent checkpoint performance.
A block cloning approach is key to excellent checkpoint performance.
![]() Use of a 64 KB block size allows optimal performance in Hyper-V, with partition alignment handled automatically by Hyper-V.
Use of a 64 KB block size allows optimal performance in Hyper-V, with partition alignment handled automatically by Hyper-V.
![]() When your Storage Spaces pool uses ReFS as the underlying on-disk format, it leverages new features to greatly improve the repair process.
When your Storage Spaces pool uses ReFS as the underlying on-disk format, it leverages new features to greatly improve the repair process.
![]() ReFS v2 uses the concept of cluster “bands” to group multiple chunks of data together for efficient I/O; this really helps with your use of data tiering—specifically in moving data between tiers.
ReFS v2 uses the concept of cluster “bands” to group multiple chunks of data together for efficient I/O; this really helps with your use of data tiering—specifically in moving data between tiers.
![]() Automatic integrity checking exists in ReFS.
Automatic integrity checking exists in ReFS.
![]() ReFS features new data scrubbing techniques.
ReFS features new data scrubbing techniques.
![]() ReFS offers better protection against data degradation.
ReFS offers better protection against data degradation.
![]() It features built-in drive recovery and redundancy.
It features built-in drive recovery and redundancy.
![]() ReFS supports up to 1 trillion terabytes.
ReFS supports up to 1 trillion terabytes.
![]() You can create new volumes faster with ReFS.
You can create new volumes faster with ReFS.
There are also some disadvantages to ReFS that you should be aware of:
![]() It cannot replace NTFS in all scenarios.
It cannot replace NTFS in all scenarios.
![]() You cannot use it with Clustered Shared Volumes.
You cannot use it with Clustered Shared Volumes.
![]() There is no conversion capability between NTFS and ReFS.
There is no conversion capability between NTFS and ReFS.
![]() There is no file-based deduplication.
There is no file-based deduplication.
![]() There are no disk quotas.
There are no disk quotas.
![]() There are no object identifiers.
There are no object identifiers.
![]() There is no encryption support.
There is no encryption support.
![]() You cannot use named streams.
You cannot use named streams.
![]() There is no transaction support.
There is no transaction support.
![]() There are no hard links.
There are no hard links.
![]() There is no support for external attributes.
There is no support for external attributes.
![]() There is no support for 8.3 filenames.
There is no support for 8.3 filenames.
SMB and NFS Shares
Creating and managing SMB or NFS shares for a network can be critical for your Windows Server 2016 requirements. The following sections examine these topics. Remember that SMB shares are used in Windows environments, while NFS shares are found in UNIX environments.
Configuring SMB and NFS Shares Using Server Manager
NFS and SMB shares of various complexity are simple to create directly from within Server Manager. Follow these steps:
Step 1. Launch Server Manager.
Step 2. Choose File and Storage Services in the left column.
Step 3. Select Shares.
Step 4. In the Shares area, right-click an empty space and choose New Share to launch the New Share Wizard, as shown in Figure 4-7.

Notice that this wizard offers many options for share creation, including the following:
![]() SMB Share - Quick: This choice is for the simple creation of shares for mainly Windows-based computers.
SMB Share - Quick: This choice is for the simple creation of shares for mainly Windows-based computers.
![]() SMB Share - Advanced: This option creates the SMB share with many more advanced options, including the following:
SMB Share - Advanced: This option creates the SMB share with many more advanced options, including the following:
![]() Setting the shares’ owners: This can be critical when users are denied access to the share.
Setting the shares’ owners: This can be critical when users are denied access to the share.
![]() Configuring the default classification of data in the share: This assists in the creation of management and access policies.
Configuring the default classification of data in the share: This assists in the creation of management and access policies.
![]() Enabling quotas: This allows restrictions on the space that users can consume.
Enabling quotas: This allows restrictions on the space that users can consume.
![]() SMB Share - Applications: This choice creates SMB shares with settings designed for Hyper-V, certain databases, and other server applications.
SMB Share - Applications: This choice creates SMB shares with settings designed for Hyper-V, certain databases, and other server applications.
![]() NFS Share - Quick: This option provides the fastest method of creating basic shares to be used primarily by UNIX-based systems. To use this option, you must install Server for NFS, found under the File and Storage Services - Files and iSCSI Services node of Roles and Features.
NFS Share - Quick: This option provides the fastest method of creating basic shares to be used primarily by UNIX-based systems. To use this option, you must install Server for NFS, found under the File and Storage Services - Files and iSCSI Services node of Roles and Features.
![]() NFS Share - Advanced: This choice creates the NFS share with advanced options. Note that it requires the installation of Server for NFS as well as the File Server Resource Manager. Advanced options include the following:
NFS Share - Advanced: This choice creates the NFS share with advanced options. Note that it requires the installation of Server for NFS as well as the File Server Resource Manager. Advanced options include the following:
![]() Setting the shares’ owners: This can be critical when users are denied access to the share.
Setting the shares’ owners: This can be critical when users are denied access to the share.
![]() Configuring the default classification of data in the share: This can aid in the creation of management and access policies.
Configuring the default classification of data in the share: This can aid in the creation of management and access policies.
![]() Enabling quotas: This allows restrictions on the space that users can consume.
Enabling quotas: This allows restrictions on the space that users can consume.
Configuring SMB and NFS Shares and Server and Client Settings with PowerShell
A robust set of cmdlets exists for SMB and NFS share management, as well as the control of server and client settings for both SMB and NFS.
Table 4-2 details the SMB-related cmdlets you should be aware of.

Table 4-3 details the NFS-related cmdlets you should be aware of.


File and Folder Permissions
File and folder permissions enable granular security controls over data in a network. This section describes the options available for these files and folders.
Before you read the details of the powerful NTFS file and folder permissions that you should become an expert in, remember that share permissions are also provided in Windows Server 2016. The share permissions include the following:
![]() Basic share permissions:
Basic share permissions:
![]() Read
Read
![]() Read/Write
Read/Write
![]() Advanced share permissions:
Advanced share permissions:
![]() Full Control
Full Control
![]() Change
Change
![]() Read
Read
A weakness of share permissions is that they take effect only when the resource is accessed over a network connection. Local access to the file and folder resources is not changed by share permissions.
For this reason, administrators often “override” share permissions by granting the Everyone group Full Control via the share permissions and then using NTFS file and folder permissions to control access both locally and over the network connection. Another reason administrators often use NTFS permissions over shared permissions is that, as you will soon learn, the NTFS permissions are more varied and granular.
To access the share permissions, use the Sharing tab on the Properties dialog for a folder in the File Explorer.
Use the Security tab on the Properties dialog for a file or folder to set NTFS permissions.
These are the basic NTFS file permissions:
![]() Full Control
Full Control
![]() Modify
Modify
![]() Read & Execute
Read & Execute
![]() Read
Read
![]() Write
Write
These are the special NTFS file permissions:
![]() Full Control
Full Control
![]() Traverse Folder/Execute File
Traverse Folder/Execute File
![]() List Folder/Read Data
List Folder/Read Data
![]() Read Attributes
Read Attributes
![]() Read Extended Attributes
Read Extended Attributes
![]() Create Files/Write Data
Create Files/Write Data
![]() Create Folders/Append Data
Create Folders/Append Data
![]() Write Attributes
Write Attributes
![]() Write Extended Attributes
Write Extended Attributes
![]() Delete
Delete
![]() Read Permissions
Read Permissions
![]() Change Permissions
Change Permissions
![]() Take Ownership
Take Ownership
These are the basic NTFS folder permissions:
![]() Full Control
Full Control
![]() Modify
Modify
![]() Read & Execute
Read & Execute
![]() List Folder Contents
List Folder Contents
![]() Read
Read
![]() Write
Write
These are the special NTFS folder permissions:
![]() Full Control
Full Control
![]() Traverse Folder/Execute File
Traverse Folder/Execute File
![]() List Folder/Read Data
List Folder/Read Data
![]() Read Attributes
Read Attributes
![]() Read Extended Attributes
Read Extended Attributes
![]() Create Files/Write Data
Create Files/Write Data
![]() Create Folders/Append Data
Create Folders/Append Data
![]() Write Attributes
Write Attributes
![]() Write Extended Attributes
Write Extended Attributes
![]() Delete Subfolders and Files
Delete Subfolders and Files
![]() Delete
Delete
![]() Read Permissions
Read Permissions
![]() Change Permissions
Change Permissions
![]() Take Ownership
Take Ownership
In addition to understanding these options that are available for permissions, it is critical that you understand the following points:
![]() File permissions always take precedence over folder permissions—that is, if a user can execute a program in a folder, this is possible even if such permissions do not exist at the folder level.
File permissions always take precedence over folder permissions—that is, if a user can execute a program in a folder, this is possible even if such permissions do not exist at the folder level.
![]() Permissions are cumulative—that is, users obtain the cumulative effect of different permissions they might obtain through different group memberships.
Permissions are cumulative—that is, users obtain the cumulative effect of different permissions they might obtain through different group memberships.
![]() Deny permissions always override Allow permissions. Note that this is the one powerful exception to the preceding rule of permissions being cumulative.
Deny permissions always override Allow permissions. Note that this is the one powerful exception to the preceding rule of permissions being cumulative.
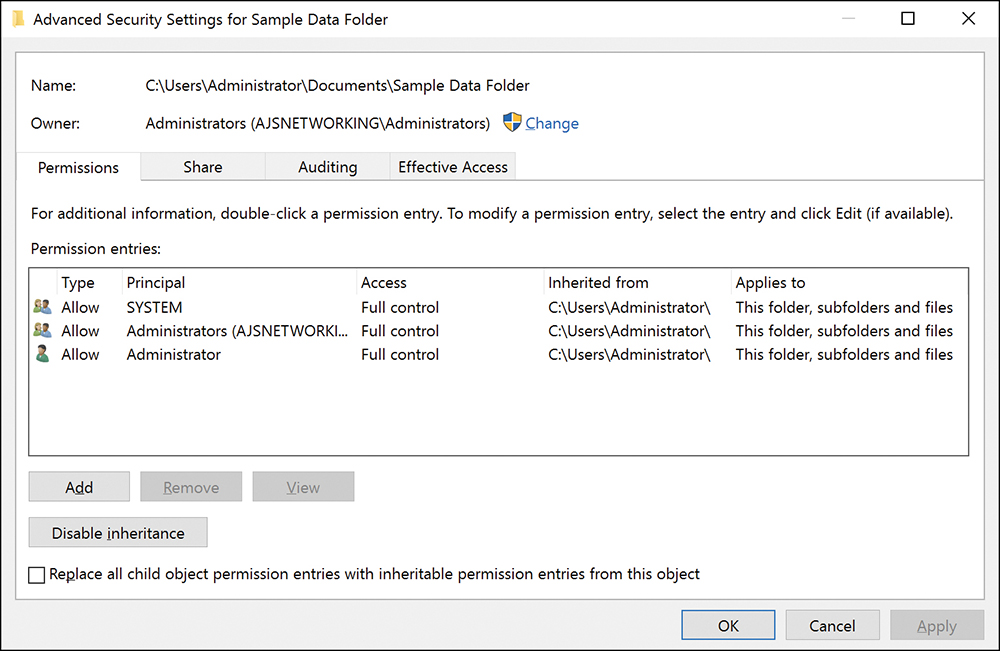
![]() Permissions migrate from the top down in a process known as inheritance. Inheritance allows files and folders created within already existing folders to have a set of permissions automatically assigned to them.
Permissions migrate from the top down in a process known as inheritance. Inheritance allows files and folders created within already existing folders to have a set of permissions automatically assigned to them.
![]() You enable or disable inheritance in the Advanced Security Settings window, as shown in Figure 4-8.
You enable or disable inheritance in the Advanced Security Settings window, as shown in Figure 4-8.
![]() The specified owner of a file or folder has full control over the file or folder and therefore keeps the ability to change permissions on it, regardless of the effect of other permissions on that file or folder.
The specified owner of a file or folder has full control over the file or folder and therefore keeps the ability to change permissions on it, regardless of the effect of other permissions on that file or folder.
![]() By default, the owner of the file or folder is the object that created it.
By default, the owner of the file or folder is the object that created it.
![]() There is a special permission called Take Ownership that an owner can assign to any other user or group; this allows that user or group to assume the role of owner and therefore assign permissions at will.
There is a special permission called Take Ownership that an owner can assign to any other user or group; this allows that user or group to assume the role of owner and therefore assign permissions at will.
![]() The administrator account on a system has the Take Ownership permission by default.
The administrator account on a system has the Take Ownership permission by default.
![]() The Effective Access tab (shown not selected in Figure 4-8) allows you to easily determine the effective permissions for a user, group, or device, given various cumulative and inherited permissions that might exist.
The Effective Access tab (shown not selected in Figure 4-8) allows you to easily determine the effective permissions for a user, group, or device, given various cumulative and inherited permissions that might exist.
Exam Preparation Tasks
As mentioned in the section “How to Use This Book” in the Introduction, you have a couple choices for exam preparation: the exercises here, Chapter 21, “Final Preparation,” and the exam simulation questions in the Pearson Test Prep Software Online.
Review All Key Topics
Review the most important topics in this chapter, noted with the Key Topics icon in the outer margin of the page. Table 4-4 lists these key topics and the page number on which each is found.

Table 4-4 Key Topics for Chapter 4
Complete Tables and Lists from Memory
Print a copy of Appendix B, “Memory Tables” (found on the book website), or at least the section for this chapter, and complete the tables and lists from memory. Appendix C, “Memory Tables Answer Key,” also on the website, includes completed tables and lists you can use to check your work.
Define Key Terms
Define the following key terms from this chapter and check your answers against the glossary:
Standard Format Disk
Advanced Format Disk
Master Boot Record (MBR)
GUID Partition Table (GPT)
VHD or VHDX
NTFS
ReFS
SMB
NFS
Q&A
The answers to these questions appear in Appendix A. For more practice with exam format questions, use the Pearson Test Prep Software Online.
1. Under Computer Management, what tool would you use to create and attach VHDX disks?
2. What option would you choose in Server Manager’s New Share Wizard in order to create a share for UNIX systems that would include quotas?
3. What NTFS permission always overrides all other access permissions?