
Chapter 5. Server Storage
This chapter covers the following subjects:
![]() Storage Spaces: Windows Server 2016 makes it simple to combine multiple physical disks into whatever logical storage scheme you might need. The industry term for this is storage virtualization. Of course, this section details this technology for you.
Storage Spaces: Windows Server 2016 makes it simple to combine multiple physical disks into whatever logical storage scheme you might need. The industry term for this is storage virtualization. Of course, this section details this technology for you.
![]() Storage Area Networks: Windows Server 2016 can integrate very well with Fibre Channel and related Storage Area Network (SAN) technologies. This part of the chapter covers topics like the creation of iSCSI targets and initiators as well as advanced topics like DCB and MPIO.
Storage Area Networks: Windows Server 2016 can integrate very well with Fibre Channel and related Storage Area Network (SAN) technologies. This part of the chapter covers topics like the creation of iSCSI targets and initiators as well as advanced topics like DCB and MPIO.
![]() Storage Replica: A great new feature of Windows Server 2016 is the replication of data between storage locations. This section describes the various options available, and when they are right for your design.
Storage Replica: A great new feature of Windows Server 2016 is the replication of data between storage locations. This section describes the various options available, and when they are right for your design.
Microsoft offers many rich storage features in Windows Server 2016. This chapter covers some of the most important ones, including Storage Spaces, Storage Area Network (SAN) features, and Storage Replica capabilities.
“Do I Know This Already?” Quiz
The “Do I Know This Already?” quiz allows you to assess whether you should read the entire chapter. Table 5-1 lists the major headings in this chapter and the “Do I Know This Already?” quiz questions covering the material in those headings so you can assess your knowledge of these specific areas. The answers to the “Do I Know This Already?” quiz appear in Appendix A, “Answers to the ‘Do I Know This Already?’ Quizzes and Q&A Questions.”

Caution
The goal of self-assessment is to gauge your mastery of the topics in this chapter. If you do not know the answer to a question or are only partially sure of the answer, you should mark your answer as incorrect for purposes of the self-assessment. Giving yourself credit for an answer you correctly guess skews your self-assessment results and might provide you with a false sense of security.
1. What Storage Spaces layout choice is similar to RAID 5?
a. Simple
b. Three-way mirror
c. Parity
d. Two-way mirror
2. How many disks are needed for three-way mirroring?
a. Two
b. Three
c. Four
d. Five
3. What SAN technology is critical for lossless connectivity in a converged network?
a. iSNS
b. DCB
c. MPIO
d. MCS
4. What SAN technology is critical for resiliency for the connectivity of iSCSI targets?
a. DCB
b. iSNS
c. MPIO
d. FC
5. In what scenarios could Storage Replica be critical? Choose two.
a. File Server
b. SYSVOL
c. SQL Server
d. Microsoft Exchange
6. What PowerShell cmdlet do you use to configure Storage Replica?
a. New-Replica
b. New-SRPartnership
c. New-SReplica
d. New-SReplicaPeer
Foundation Topics
Storage Spaces
Storage Spaces offers a nice alternative to a potentially expensive and complex Storage Area Network (SAN). Storage Spaces allows you to use multiple physical disks attached to a Windows Server 2016 system and present them to users in a flexible manner. For example, you can pool together physical disks with Storage Spaces and present them to users as one large logical disk.
Note
The Datacenter Edition of Windows Server 2016 offers a new feature called Storage Spaces Direct. This feature can use local, unshared storage to create highly available storage for hosting virtual machine files. Chapter 16, “Storage Spaces Direct,” discusses this feature.
Configuring Storage Pools and Storage Spaces
Storage Spaces storage virtualization technology in Windows Server 2016 consists of two components:
![]() Storage Pools: A collection of physical disks presented as logical disks (for example, one large logical disk).
Storage Pools: A collection of physical disks presented as logical disks (for example, one large logical disk).
![]() Storage Spaces: Virtual disks created from free space in a Storage Pool. These virtual disks are like LUNs (logical unit numbers) in a Storage Area Network (SAN) environment.
Storage Spaces: Virtual disks created from free space in a Storage Pool. These virtual disks are like LUNs (logical unit numbers) in a Storage Area Network (SAN) environment.
Storage management is extremely flexible and offers many options, including the following:
![]() The Windows Storage Management API (Application Programming Interface) in Windows Management Instrumentation (WMI)
The Windows Storage Management API (Application Programming Interface) in Windows Management Instrumentation (WMI)
![]() PowerShell
PowerShell
![]() The File and Storage Services role in Server Manager
The File and Storage Services role in Server Manager
You can format your Storage Spaces virtual disk as either of the following:
![]() NTFS
NTFS
![]() ReFS
ReFS
Remember, as discussed in Chapter 4, “Disks and Volumes,” that various needs often dictate your choice of formatting. For example, data deduplication needs NTFS as the file system technology.
To configure Storage Spaces, you need to consider the following:
![]() Disk-sector size: If you can use only 512 and/or 512e drives, your pool defaults to 512e; remember that the 512e disks use 4096-byte sectors that emulate 512-byte sectors. If there is one or more 4K drives, the pool defaults to 4K. You can define the sector size for Storage Spaces, but remember that it forces you into the type of disks that you can add.
Disk-sector size: If you can use only 512 and/or 512e drives, your pool defaults to 512e; remember that the 512e disks use 4096-byte sectors that emulate 512-byte sectors. If there is one or more 4K drives, the pool defaults to 4K. You can define the sector size for Storage Spaces, but remember that it forces you into the type of disks that you can add.
![]() Drive allocation: This dictates how a pool distributes drives; options include automatic by the OS (the default), manual, or hot spare.
Drive allocation: This dictates how a pool distributes drives; options include automatic by the OS (the default), manual, or hot spare.
![]() Provisioning scheme: Options are thin provisioned or fixed provisioning space.
Provisioning scheme: Options are thin provisioned or fixed provisioning space.
Implementing Simple, Mirror, and Parity Storage Layout Options for Disks or Enclosures
Storage layout is obviously a critical choice for Storage Spaces. Valid options include the following:
![]() Simple: Simple features striping but no parity for resiliency; remember that striping means segments of data are written across multiple physical disks. Why would you choose Simple? The answer lies in performance improvements.
Simple: Simple features striping but no parity for resiliency; remember that striping means segments of data are written across multiple physical disks. Why would you choose Simple? The answer lies in performance improvements.
![]() Two-way and three-way mirrors: These spaces support two- or three-way copies of the data they host; note that mirror spaces also stripe data across multiple physical disks.
Two-way and three-way mirrors: These spaces support two- or three-way copies of the data they host; note that mirror spaces also stripe data across multiple physical disks.
![]() Parity: This Storage Spaces technology is like RAID 5: Data is striped, along with parity information, across multiple physical drives; the parity information permits resiliency.
Parity: This Storage Spaces technology is like RAID 5: Data is striped, along with parity information, across multiple physical drives; the parity information permits resiliency.
Note
You can use Storage Spaces with Failover Clustering, as described in Chapter 14, “Failover Clustering.”
It is critical to remember these rules regarding the physical disks of your Storage Spaces configuration:
![]() To create a storage pool, you need at least one physical disk.
To create a storage pool, you need at least one physical disk.
![]() If you want to create a resilient mirror virtual disk, you need a minimum of two physical disks.
If you want to create a resilient mirror virtual disk, you need a minimum of two physical disks.
![]() To create a resilient virtual disk with parity, you need a minimum of three physical disks.
To create a resilient virtual disk with parity, you need a minimum of three physical disks.
![]() For three-way mirroring resiliency, you need at least five physical disks.
For three-way mirroring resiliency, you need at least five physical disks.
![]() Your disks must be blank and unformatted, with no volumes on any disk.
Your disks must be blank and unformatted, with no volumes on any disk.
![]() Failover Clustering cannot use SATA, USB, or SCSI disks.
Failover Clustering cannot use SATA, USB, or SCSI disks.
Follow these steps to configure the Storage Spaces functionality in various configurations:
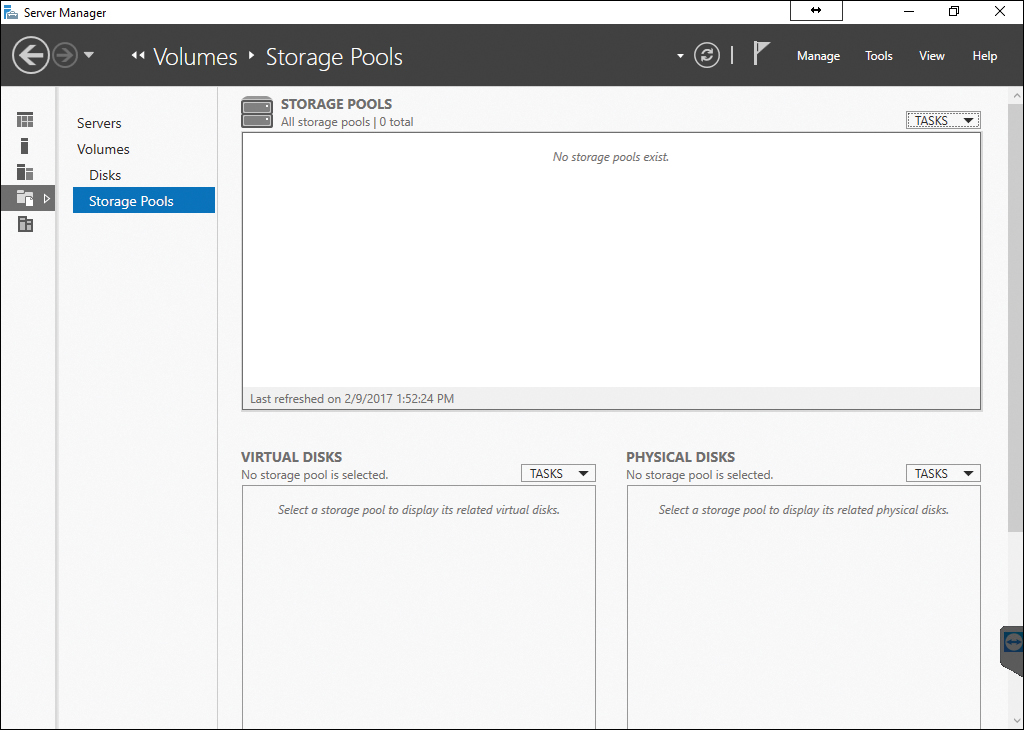
Step 1. In Server Manager, select File and Storage Services and then Storage Pools, as shown in Figure 5-1.
Step 2. Create a new Storage Pool by using the Tasks drop-down menu.
Step 3. Provide values for Storage Pool Name and Available Disk Group, and choose Physical Disks for the pool.
Step 4. Create a new virtual disk and specify the following values:
![]() Storage Pool
Storage Pool
![]() Virtual Disk Name
Virtual Disk Name
![]() Enclosure Awareness
Enclosure Awareness
![]() Storage Layout
Storage Layout
![]() Resiliency Settings
Resiliency Settings
![]() Provisioning Type
Provisioning Type
![]() Size of the Virtual Disk
Size of the Virtual Disk
Step 5. When the virtual disk is created, select Create a volume when this wizard closes.
Step 6. In the New Volume Wizard, complete the following:
![]() Virtual Disk
Virtual Disk
![]() Volume Size
Volume Size
![]() Drive Letter
Drive Letter
![]() File System
File System
![]() Volume Label
Volume Label
Expanding Storage Pools
Expanding a Storage Pool is simple. Follow these steps:
Step 1. Add a new virtual disk by navigating to iSCSI in Server Manager.
Step 2. Create a new iSCSI virtual disk by specifying the following values:
![]() Storage location
Storage location
![]() Disk name
Disk name
![]() Size
Size
![]() ISCSI target
ISCSI target
Step 3. In Server Manager, click the Refresh button and wait for all the panes to refresh.
Step 4. In the STORAGE POOLS pane, right-click your Storage Pool and then add the new physical disk to the Storage Pool.
Step 5. In the VIRTUAL DISKS pane, right-click Mirrored vDisk and then extend your virtual disk to the desired size.
Configuring Tiered Storage
Tiered Storage Spaces is an exciting feature in Windows Server 2016. It allows you to mix the types of disks you use in a Storage Space and use them efficiently. For example, you might use slow, large mechanical disks in conjunction with small, fast SSD (solid state drive) disks. Windows Server can dynamically move data based on the frequency of access.
When you add HDDs and SSDs to a Storage Space, Windows Server 2016 registers each type of disk and automatically creates two tiers. By default, each night at 1 a.m., optimization of the disks can occur.
To manually run the optimization, use the following PowerShell command:
Get-ScheduledTask -TaskName "Storage Tiers Optimization" |
Start-ScheduledTask
You can pin files to certain tiers by using the PowerShell cmdlet Set-FileStorageTier. Here is the complete syntax for this cmdlet:
Set-FileStorageTier -DesiredStorageTierFriendlyName <String>
-FilePath <String> [-CimSession <CimSession[]> ] [-ThrottleLimit
<Int32> ] [-Confirm] [-WhatIf] [ <CommonParameters>] [
<WorkflowParameters>]
Storage Area Networks
Storage Area Network (SAN) technologies now integrate with Windows Server 2016 more seamlessly than ever before. The sections that follow detail this integration.
Configuring iSCSI Target and Initiator
iSCSI storage provides an inexpensive and simple way to configure a connection to remote disks. An iSCSI SAN implementation typically includes the following:
![]() An IP network: IP is the glue holding the various parts of the datacenter together
An IP network: IP is the glue holding the various parts of the datacenter together
![]() iSCSI targets: ISCSI targets advertise storage, just like controllers for hard disk drives of locally attached storage.
iSCSI targets: ISCSI targets advertise storage, just like controllers for hard disk drives of locally attached storage.
![]() iSCSI initiators: iSCSI targets display storage to the iSCSI initiator.
iSCSI initiators: iSCSI targets display storage to the iSCSI initiator.
![]() iSCSI qualified name (IQN): IQNs are unique identifiers that iSCSI uses to address initiators and targets on an iSCSI network.
iSCSI qualified name (IQN): IQNs are unique identifiers that iSCSI uses to address initiators and targets on an iSCSI network.
The iSCSI Target Server role service supports a software-based and hardware-independent iSCSI disk subsystem. You can use the iSCSI Target Server to create iSCSI targets and iSCSI virtual disks, and then you can use Server Manager to manage your iSCSI targets and virtual disks. In Windows Server 2016, the iSCSI Target Server is available as a role service under the File and Storage Services role in Server Manager.
The following Windows PowerShell cmdlets exist for managing the iSCSI Target Server:
Install-WindowsFeature FS-iSCSITarget-Server
New-IscsiVirtualDisk [-Path] <String> [-SizeBytes] <UInt64>
[-BlockSizeBytes <UInt32> ] [-ComputerName <String> ] [-Credential
<PSCredential> ] [-Description <String> ] [-LogicalSectorSizeBytes
<UInt32> ] [-PhysicalSectorSizeBytes <UInt32> ] [
<CommonParameters>]
New-IscsiServerTarget [-TargetName] <String> [-ClusterGroupName
<String> ] [-ComputerName <String> ] [-Credential <PSCredential> ]
[-InitiatorIds <InitiatorId[]> ] [ <CommonParameters>]
Add-IscsiVirtualDiskTargetMapping [-TargetName] <String> [-Path]
<String> [-ComputerName <String> ] [-Credential <PSCredential> ]
[-Lun <Int32> ] [ <CommonParameters>]
Windows Server 2016 installs the iSCSI initiator by default. To connect your computer to an iSCSI target, you only need to start the service and configure it. The following Windows PowerShell cmdlets allow management of the iSCSI initiator:
Start-Service msiscsi
Set-Service msiscsi -StartupType “Automatic”
New-IscsiTargetPortal -TargetPortalAddress <String>
[-AuthenticationType <String> ] [-ChapSecret <String> ]
[-ChapUsername <String> ] [-CimSession <CimSession[]> ]
[-InitiatorInstanceName <String> ] [-InitiatorPortalAddress
<String> ] [-IsDataDigest <Boolean> ] [-IsHeaderDigest <Boolean>
] [-TargetPortalPortNumber <UInt16> ] [-ThrottleLimit <Int32> ] [
<CommonParameters>] [ <WorkflowParameters>]
Connect-IscsiTarget -NodeAddress <String> [-AuthenticationType
<String> ] [-ChapSecret <String> ] [-ChapUsername <String>
] [-CimSession <CimSession[]> ] [-InitiatorInstanceName
<String> ] [-InitiatorPortalAddress <String> ] [-IsDataDigest
<Boolean> ] [-IsHeaderDigest <Boolean> ] [-IsMultipathEnabled
<Boolean> ] [-IsPersistent <Boolean> ] [-ReportToPnP <Boolean>
] [-TargetPortalAddress <String> ] [-TargetPortalPortNumber
<UInt16> ] [-ThrottleLimit <Int32> ] [ <CommonParameters>] [
<WorkflowParameters>]
Configuring iSNS
You use the Internet Storage Name Service (iSNS) protocol for interaction between iSNS servers and iSNS clients. iSNS clients are initiators that are trying to discover targets on an Ethernet network. iSNS eases automated discovery, management, and configuration of iSCSI and Fibre Channel devices (using iFCP gateways) on a TCP/IP network.
Note
Windows Server 2016 only supports the discovery of iSCSI devices, not Fibre Channel devices.
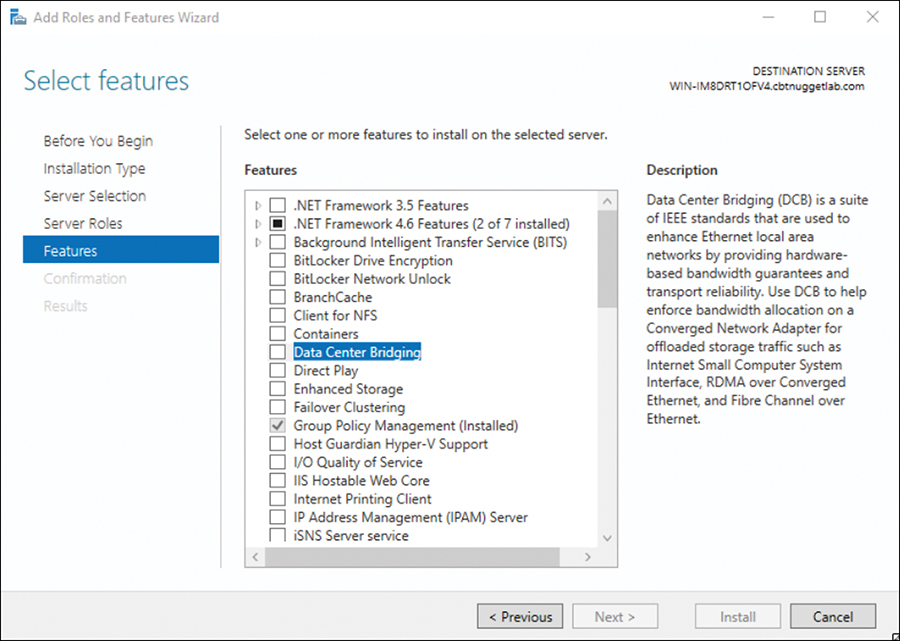
Adding iSNS simply installs as a feature in Server 2016, as shown in Figure 5-2.

Configuring Datacenter Bridging (DCB)
Data Center Bridging (DCB) is a suite of Institute of Electrical and Electronics Engineers (IEEE) standards that enables Converged Fabrics in the data center. This is an environment where storage, data networking, cluster IPC, and management traffic all share the same Ethernet network infrastructure.
DCB offers hardware-based bandwidth allocation to a specific type of traffic and enhances Ethernet transport reliability with the use of priority-based flow control. Hardware-based bandwidth allocation is essential if traffic bypasses the operating system and offloads to a converged network adapter. This adapter might support Internet Small Computer System Interface (iSCSI), Remote Direct Memory Access (RDMA) over Converged Ethernet, or Fiber Channel over Ethernet (FCoE). Priority-based flow control is essential if the upper-layer protocol, such as Fiber Channel, assumes a lossless underlying transport.
You install DCB as a feature in a Windows Server 2016 system as shown in Figure 5-3.
Configuring Multipath IO (MPIO)
Creating a single connection to iSCSI storage makes that storage available. There is an issue, however, because this configuration does not make the storage highly available. If iSCSI loses the connection, the server loses access to its storage. Therefore, you should make most iSCSI storage connections redundant through one of two high-availability technologies—Multiple Connected Session (MCS) and Multipath I/O (MPIO).
MCS is an iSCSI protocol feature that does the following:
![]() Enables multiple TCP/IP connections from the initiator to the target for the same iSCSI session
Enables multiple TCP/IP connections from the initiator to the target for the same iSCSI session
![]() Supports automatic failover
Supports automatic failover
![]() Needs explicit support by iSCSI SAN devices
Needs explicit support by iSCSI SAN devices
MPIO offers redundancy in a different fashion:
![]() If you have multiple network interface cards in an iSCSI initiator and iSCSI Target Server, you can use MPIO to provide failover redundancy during network outages.
If you have multiple network interface cards in an iSCSI initiator and iSCSI Target Server, you can use MPIO to provide failover redundancy during network outages.
![]() MPIO needs a device-specific module (DSM) if you want to connect to a third-party SAN device connected to the iSCSI initiator.
MPIO needs a device-specific module (DSM) if you want to connect to a third-party SAN device connected to the iSCSI initiator.
![]() MPIO is widely supported.
MPIO is widely supported.
![]() MPIO is more complex to configure and is not as fully automated during failover as MCS.
MPIO is more complex to configure and is not as fully automated during failover as MCS.
Note
Our exam blueprint requires knowledge of the MPIO approach to SAN redundancy. This text presents MCS here for the sake of completeness.
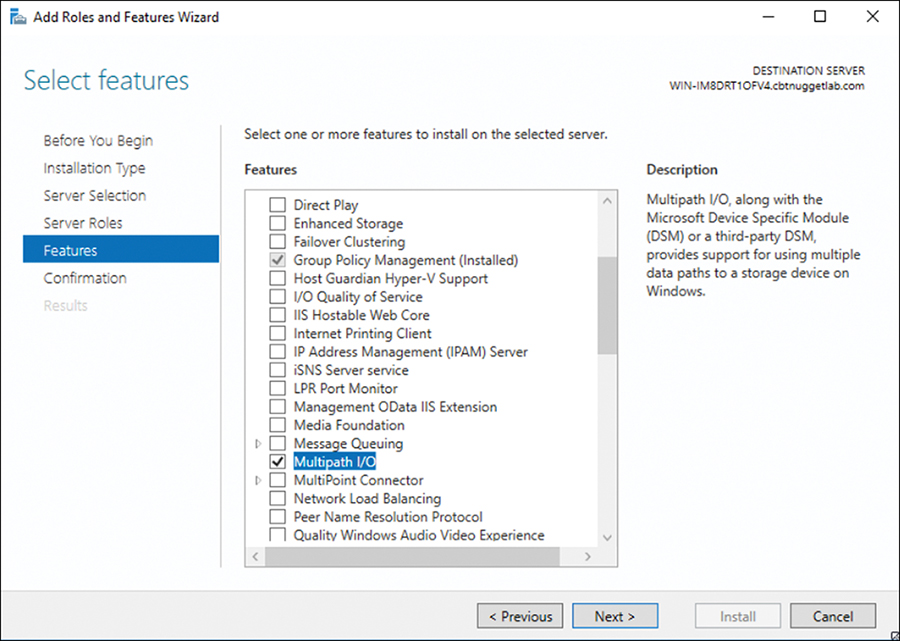
You install MPIO in the Add Roles and Features Wizard, as shown in Figure 5-4.
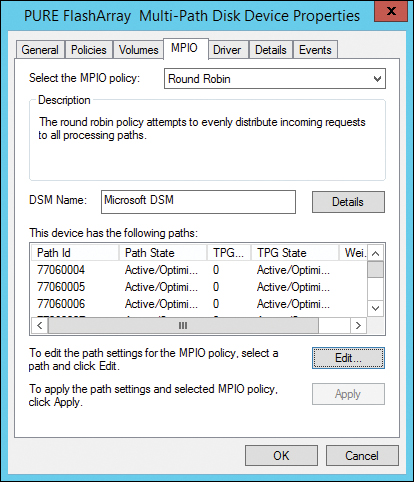
You can then carry out MPIO policy in the Properties dialog of your storage device (see Figure 5-5).
Storage Replica
Another exciting new data storage feature in Windows Server 2016 is Storage Replica. This technology permits storage and agnostic data replication between clusters or servers.
Remember these key points about Storage Replica:
![]() Synchronous and asynchronous replication choices exist; as the administrator, you can choose based on network latency and geographic distances.
Synchronous and asynchronous replication choices exist; as the administrator, you can choose based on network latency and geographic distances.
![]() Storage Replica requires the Datacenter Edition of Windows Server 2016.
Storage Replica requires the Datacenter Edition of Windows Server 2016.
![]() Storage Replica requires GPT initialized disks.
Storage Replica requires GPT initialized disks.
![]() Supported replication scenarios include Server-to-Server, Cluster-to-Cluster, and Stretch Cluster.
Supported replication scenarios include Server-to-Server, Cluster-to-Cluster, and Stretch Cluster.
![]() Only one-to-one replication is supported; a third replica is not an option.
Only one-to-one replication is supported; a third replica is not an option.
![]() Storage Replica performs replication at the block level, and therefore you should not consider it for branch office scenarios with slow WAN links.
Storage Replica performs replication at the block level, and therefore you should not consider it for branch office scenarios with slow WAN links.
![]() Storage Replica can replicate data involving open files.
Storage Replica can replicate data involving open files.
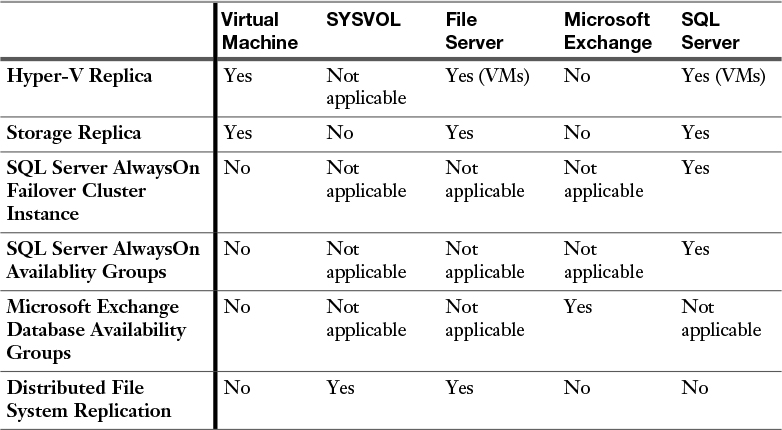
Determining Usage Scenarios for Storage Replica
While Storage Replica is not application specific, you should note that some replication technologies are better suited for some implementations. Table 5-2 shows appropriate usage scenarios for the Storage Replica feature. Note that this table also helps you determine the appropriate application-specific replication technology.
Implementing Storage Replica for Server-to-Server, Cluster-to-Cluster, and Stretch Cluster Scenarios
As described earlier in this section, there are three scenarios available with Storage Replica:
![]() Server-to-Server
Server-to-Server
![]() Cluster-to-Cluster
Cluster-to-Cluster
![]() Stretch Cluster
Stretch Cluster
Server-to-Server
You use PowerShell to implement Server-to-Server replication, which involves the following requirements:
![]() The servers must be participants in a domain.
The servers must be participants in a domain.
![]() Each storage set must have two volumes—one for data and one for logs. The two data volumes must be the same size, and their sector size must also be the same.
Each storage set must have two volumes—one for data and one for logs. The two data volumes must be the same size, and their sector size must also be the same.
![]() Each file server needs at least a 1 GB connection.
Each file server needs at least a 1 GB connection.
![]() You need 4 GB of RAM in each server with at least two CPU cores.
You need 4 GB of RAM in each server with at least two CPU cores.
![]() Firewalls must allow ICMP, SMB, and WS-MAN bidirectional traffic.
Firewalls must allow ICMP, SMB, and WS-MAN bidirectional traffic.
![]() You need a network between servers of at least 1 Gbps and 5 ms round-trip latency.
You need a network between servers of at least 1 Gbps and 5 ms round-trip latency.
![]() Both server nodes must have local admin permissions.
Both server nodes must have local admin permissions.
Here is sample syntax for a PowerShell configuration:
New-SRPartnership -SourceComputerName SVR1 -SourceRGName RepGroup01
-SourceVolumeName
F: -SourceLogVolumeName G: -DestinationComputerName SVR2
-DestinationRGName RepGroup02
-DestinationVolumeName F: -DestinationLogVolumeName G:
-LogSizeInBytes 8GB
Here is the complete cmdlet syntax:
New-SRPartnership [[-SourceComputerName] <String> ] [-SourceRGName]
<String> [-DestinationComputerName] <String> [-DestinationRGName]
<String> [[-ReplicationMode] <ReplicationMode> {Synchronous |
Asynchronous} ] [[-PreventReplication]] [[-Seeded]] [[-AsyncRPO]
<UInt32> ] [[-EnableEncryption]] [[-Force]] [-CimSession
<CimSession[]> ] [-ThrottleLimit <Int32> ] [ <CommonParameters>] [
<WorkflowParameters>]
Cluster-to-Cluster
You use PowerShell to implement Cluster-to-Cluster replication. The requirements for Cluster-to-Cluster replication are identical to those for Server-to-Server.
Here are the steps for PowerShell Cluster-to-Cluster configuration:
Step 1. Grant the first cluster full access to the other cluster by running the Grant-ClusterAccess cmdlet on any node in the first cluster or remotely:
Grant-SRAccess -ComputerName SRV01 -Cluster SRVCLUSB
Step 2. Grant the second cluster full access to the other cluster by running the Grant-ClusterAccess cmdlet on any node in the second cluster or remotely:
Grant-SRAccess -ComputerName SRV03 -Cluster SRVCLUSA
Step 3. Configure the Cluster-to-Cluster replication, specifying the source and destination disks, the source and destination logs, the source and destination cluster names, and the log size. You can perform this command locally on the server or using a remote management computer:
New-SRPartnership -SourceComputerName SRVCLUSA -SourceRGName rg01
-SourceVolumeName c:ClusterStorageVolume2
-SourceLogVolumeName f: -DestinationComputerName SRVCLUSB
-DestinationRGName rg02 -DestinationVolumeName c:
ClusterStorageVolume2 -DestinationLogVolumeName f:
Stretch Cluster
Stretch Cluster is a configuration that features one Hyper-V cluster with nodes in two locations and storage in both locations. It allows failover of virtual machines from one cluster to the other. Requirements are identical to those for Server-to-Server and Cluster-to-Cluster.
You configure Stretch Cluster using Failover Cluster Manager or Windows PowerShell. To use the Failover Cluster Manager, follow these steps:
Step 1. Add a source data disk to a role or CSV.
Step 2. Enable replication on that source data disk.
Step 3. Select a destination data disk.
Step 4. Select a source log disk.
Step 5. Select a destination log disk.
To use PowerShell, follow these steps:
Step 1. Add the source data storage only to the cluster as CSV. To get the size, partition, and volume layout of the available disks, use the following commands:
Move-ClusterGroup -Name "available storage" -Node sr-srv01
$DiskResources = Get-ClusterResource | Where-Object { $_.ResourceType -eq 'Physical Disk' -and $_.State -eq 'Online' }
$DiskResources | foreach {
$resource = $_
$DiskGuidValue = $resource | Get-ClusterParameter DiskIdGuid
Get-Disk | where { $_.Guid -eq $DiskGuidValue.Value } | Get-Partition | Get-Volume |
Select @{N="Name"; E={$resource.Name}}, @{N="Status"; E={$resource.State}}, DriveLetter, FileSystemLabel, Size, SizeRemaining
} | FT -AutoSize
Move-ClusterGroup -Name "available storage" -Node sr-srv03
$DiskResources = Get-ClusterResource | Where-Object { $_.ResourceType -eq 'Physical Disk' -and $_.State -eq 'Online' }
$DiskResources | foreach {
$resource = $_
$DiskGuidValue = $resource | Get-ClusterParameter DiskIdGuid
Get-Disk | where { $_.Guid -eq $DiskGuidValue.Value } | Get-Partition | Get-Volume |
Select @{N="Name"; E={$resource.Name}}, @{N="Status"; E={$resource.State}}, DriveLetter, FileSystemLabel, Size, SizeRemaining
} | FT -AutoSize
Step 2. Set the correct disk to CSV:
Add-ClusterSharedVolume -Name "Cluster Disk 4"
Get-ClusterSharedVolume
Move-ClusterSharedVolume -Name "Cluster Disk 4" -Node sr-srv01
Step 3. Configure the Stretch Cluster, as in this example:
New-SRPartnership -SourceComputerName sr-srv01
-SourceRGName rg01 -SourceVolumeName "C:ClusterStorage
Volume1" -SourceLogVolumeName e: -DestinationComputerName
sr-srv03 -DestinationRGName rg02 -DestinationVolumeName d:
-DestinationLogVolumeName e:
Exam Preparation Tasks
As mentioned in the section “How to Use This Book” in the Introduction, you have a couple choices for exam preparation: the exercises here, Chapter 21, “Final Preparation,” and the exam simulation questions in the Pearson Test Prep Software Online.
Review All Key Topics
Review the most important topics in this chapter, noted with the Key Topics icon in the outer margin of the page. Table 5-3 lists these key topics and the page number on which each is found.
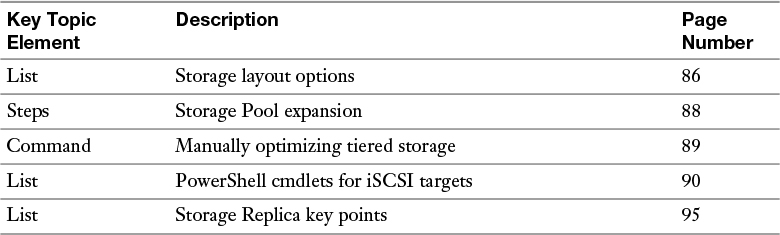
Table 5-3 Key Topics for Chapter 5
Complete Tables and Lists from Memory
Print a copy of Appendix B, “Memory Tables” (found on the book website), or at least the section for this chapter, and complete the tables and lists from memory. Appendix C, “Memory Tables Answer Key,” also on the website, includes completed tables and lists you can use to check your work.
Define Key Terms
Define the following key terms from this chapter and check your answers against the glossary:
Tiered Storage
iSNS
DCB
MPIO
Storage Replica
Q&A
The answers to these questions appear in Appendix A. For more practice with exam format questions, use the Pearson Test Prep Software Online.
1. What two tiers of disk types are used with tiering inside Storage Spaces?
2. What PowerShell command can you use to connect an iSCSI target in a Windows Server 2016 environment?
3. What type of partition system does Storage Replica require on disks? What edition of Windows Server 2016 does it require?