
Chapter 13. High Availability in Hyper-V
This chapter covers the following subjects:
![]() Hyper-V Replica: The replication of virtual machines from one host to another is a key part of a disaster recovery configuration. This section details the components and prerequisites, as well as the configuration of Hyper-V Replica.
Hyper-V Replica: The replication of virtual machines from one host to another is a key part of a disaster recovery configuration. This section details the components and prerequisites, as well as the configuration of Hyper-V Replica.
![]() Live Migration: Moving virtual machines from one host to another is simple, thanks to live migrations. This section covers live migration considerations and implementation. This section also details shared-nothing live migrations.
Live Migration: Moving virtual machines from one host to another is simple, thanks to live migrations. This section covers live migration considerations and implementation. This section also details shared-nothing live migrations.
![]() Storage Migration: Moving just the storage of a virtual machine is a storage migration. This part of the chapter details this process.
Storage Migration: Moving just the storage of a virtual machine is a storage migration. This part of the chapter details this process.
Microsoft makes it very clear just how important high availability is in the modern datacenter. Microsoft also makes it very clear just how important this topic is in the exam environment: It is the largest section of questions you will face!
Note
For the detailed breakdown on exam topic coverage, visit the Skills Measured section at https://www.microsoft.com/en-us/learning/exam-70-740.aspx.
“Do I Know This Already?” Quiz
The “Do I Know This Already?” quiz allows you to assess whether you should read the entire chapter. Table 13-1 lists the major headings in this chapter and the “Do I Know This Already?” quiz questions covering the material in those headings so you can assess your knowledge of these specific areas. The answers to the “Do I Know This Already?” quiz appear in Appendix A, “Answers to the ‘Do I Know This Already?’ Quizzes and Q&A Questions.”

Caution
The goal of self-assessment is to gauge your mastery of the topics in this chapter. If you do not know the answer to a question or are only partially sure of the answer, you should mark your answer as incorrect for purposes of the self-assessment. Giving yourself credit for an answer you correctly guess skews your self-assessment results and might provide you with a false sense of security.
1. What is the term for replicating to a third host in Hyper-V Replica?
a. Extended (chained) replication
b. Advanced replication
c. Forest-trust replication
d. Three-way replication
2. What options exist for authentication in Hyper-V Replica? Choose two.
a. Kerberos
b. Token-based
c. Certificate-based
d. SCP
3. What options for failover exist in Hyper-V Replica? Choose three.
a. Production
b. Test
c. Planned
d. Unplanned
4. You can perform a live migration between Windows Server 2016 and Windows Server 2012 R2 if the virtual machine is at least what version?
a. 2
b. 3
c. 4
d. 5
5. What live migration authentication option forces the configuration of constrained delegation?
a. SCP
b. Certificate-based
c. Kerberos
d. Token-based
6. What PowerShell cmdlet allows you to configure performance options for live migrations?
a. Enable-VMMigration
b. Set-VMMigrationOptions
c. Set-VMHost
d. Set-VMMigrationNetwork
7. Which of the following is not an example of a component moved in storage migration?
a. Configuration files
b. Virtual machine state
c. Checkpoints
d. Smart paging files
8. What dramatically simplifies the storage migration process?
a. Ensuring that the move location is within the same geographic location
b. Ensuring that the source VM is stopped
c. Ensuring that the source is not a VHD file
d. Ensuring the use of pass-through disks
Foundation Topics
Hyper-V Replica
You can implement a large part of disaster recovery thanks to Hyper-V Replica. Hyper-V Replica allows the replication of virtual machines from one host to another. Server 2016 makes this possible by creating a copy of a live virtual machine and setting it as an offline virtual machine copy.
Consider the following regarding Hyper-V Replica:
![]() Hyper-V hosts: You can physically co-locate primary and secondary host servers or use separate geographic locations with replication over a WAN link. Hyper-V hosts can be standalone, clustered, or a mixture of both. There is no Active Directory dependency between the servers, and they do not need to be domain members.
Hyper-V hosts: You can physically co-locate primary and secondary host servers or use separate geographic locations with replication over a WAN link. Hyper-V hosts can be standalone, clustered, or a mixture of both. There is no Active Directory dependency between the servers, and they do not need to be domain members.
![]() Replication and change tracking: When you enable Hyper-V Replica for a specific virtual machine, initial replication creates an identical replica virtual machine on a secondary host server. Hyper-V Replica then uses change tracking and creates and maintains a log file that captures changes on a virtual machine VHD. The log file plays in reverse order to the replica VHD, based on replication frequency settings; thus, the latest changes store and replicate asynchronously. Replication is over HTTP or HTTPS.
Replication and change tracking: When you enable Hyper-V Replica for a specific virtual machine, initial replication creates an identical replica virtual machine on a secondary host server. Hyper-V Replica then uses change tracking and creates and maintains a log file that captures changes on a virtual machine VHD. The log file plays in reverse order to the replica VHD, based on replication frequency settings; thus, the latest changes store and replicate asynchronously. Replication is over HTTP or HTTPS.
![]() Extended (chained) replication: This type of replication allows the replication of a virtual machine from a primary host to a secondary host and then the replication of the secondary host to a third host. You cannot replicate from the primary host directly to the second and the third. This feature makes Hyper-V Replica more robust for disaster recovery because if an outage occurs, you can recover with both the primary and extended replicas. You can also fail over to the extended replica if your primary and secondary locations fail. You should note that the extended replica does not support application-consistent replication and must use the same VHDs that the secondary replica uses.
Extended (chained) replication: This type of replication allows the replication of a virtual machine from a primary host to a secondary host and then the replication of the secondary host to a third host. You cannot replicate from the primary host directly to the second and the third. This feature makes Hyper-V Replica more robust for disaster recovery because if an outage occurs, you can recover with both the primary and extended replicas. You can also fail over to the extended replica if your primary and secondary locations fail. You should note that the extended replica does not support application-consistent replication and must use the same VHDs that the secondary replica uses.
![]() Failover: If an outage occurs in your primary location (or secondary, in the case of extended replication), you can manually start a test, planned or unplanned failover.
Failover: If an outage occurs in your primary location (or secondary, in the case of extended replication), you can manually start a test, planned or unplanned failover.
![]() Recovery points: When you configure replication settings for a virtual machine, you specify the recovery points you want to store from the virtual machine. A recovery point is a snapshot in time from which you can recover a virtual machine. You lose less data if you recover from a very recent recovery point. You can access recovery points up to 24 hours in the past.
Recovery points: When you configure replication settings for a virtual machine, you specify the recovery points you want to store from the virtual machine. A recovery point is a snapshot in time from which you can recover a virtual machine. You lose less data if you recover from a very recent recovery point. You can access recovery points up to 24 hours in the past.
Hyper-V Replica Prerequisites
Keep these important prerequisites in mind regarding Hyper-V Replica:
![]() Decide which VHDs to replicate: To conserve network bandwidth, you should exclude VHDs that hold rapidly changing data and data not used by the replica server after failover (for example, page file disks).
Decide which VHDs to replicate: To conserve network bandwidth, you should exclude VHDs that hold rapidly changing data and data not used by the replica server after failover (for example, page file disks).
![]() Determine the synchronization schedule: The data on the replica server synchronizes per the replication frequency you configure. Options might be 30 seconds, 5 minutes, or 15 minutes. As you choose the frequency, consider the following points:
Determine the synchronization schedule: The data on the replica server synchronizes per the replication frequency you configure. Options might be 30 seconds, 5 minutes, or 15 minutes. As you choose the frequency, consider the following points:
![]() Are the virtual machines running critical data with a low recovery point objective (RPO)? The RPO is the maximum targeted period in which data might be lost from an IT service due to a major incident.
Are the virtual machines running critical data with a low recovery point objective (RPO)? The RPO is the maximum targeted period in which data might be lost from an IT service due to a major incident.
![]() What are your bandwidth considerations?
What are your bandwidth considerations?
![]() Are your VMs highly critical? Highly critical virtual machines need more frequent replication.
Are your VMs highly critical? Highly critical virtual machines need more frequent replication.
![]() Decide how to recover data: By default, Hyper-V Replica stores only a single recovery point. This is the latest replication sent from the primary server to the secondary server. However, if you want the choice to recover data to an earlier point in time, you can specify that more recovery points be stored (to a maximum of 24 hourly points). Having additional recovery points requires more overhead on processing and storage resources.
Decide how to recover data: By default, Hyper-V Replica stores only a single recovery point. This is the latest replication sent from the primary server to the secondary server. However, if you want the choice to recover data to an earlier point in time, you can specify that more recovery points be stored (to a maximum of 24 hourly points). Having additional recovery points requires more overhead on processing and storage resources.
![]() Determine workloads to replicate: Remember that standard Hyper-V Replica replication maintains state for a VM after failover, but it does not maintain the state of applications running inside that VM. For this type of recovery of your workload state, you create app-consistent recovery points. Note that app-consistent recovery is not available on the extended replica site if you are using extended (chained) replication.
Determine workloads to replicate: Remember that standard Hyper-V Replica replication maintains state for a VM after failover, but it does not maintain the state of applications running inside that VM. For this type of recovery of your workload state, you create app-consistent recovery points. Note that app-consistent recovery is not available on the extended replica site if you are using extended (chained) replication.
![]() Determine the initial replication of virtual machine data: Replication starts by transferring the current state of the virtual machines. This first state is transmitted directly over the existing network, and this occurs either at once or a later time that you configure. You can also use a preexisting restored virtual machine as the initial copy. Or you can save network bandwidth by copying the initial copy to external media and then physically delivering the media to the replica site. If you want to use a preexisting virtual machine, delete all previous snapshots associated with it.
Determine the initial replication of virtual machine data: Replication starts by transferring the current state of the virtual machines. This first state is transmitted directly over the existing network, and this occurs either at once or a later time that you configure. You can also use a preexisting restored virtual machine as the initial copy. Or you can save network bandwidth by copying the initial copy to external media and then physically delivering the media to the replica site. If you want to use a preexisting virtual machine, delete all previous snapshots associated with it.
Implementing Replica
Follow these steps to implement Hyper-V Replica:
Step 1. In the Hyper-V settings for the server to which you replicate virtual machines, under Replication Configuration, select Enable this computer as a Replica server, as shown in Figure 13-1.
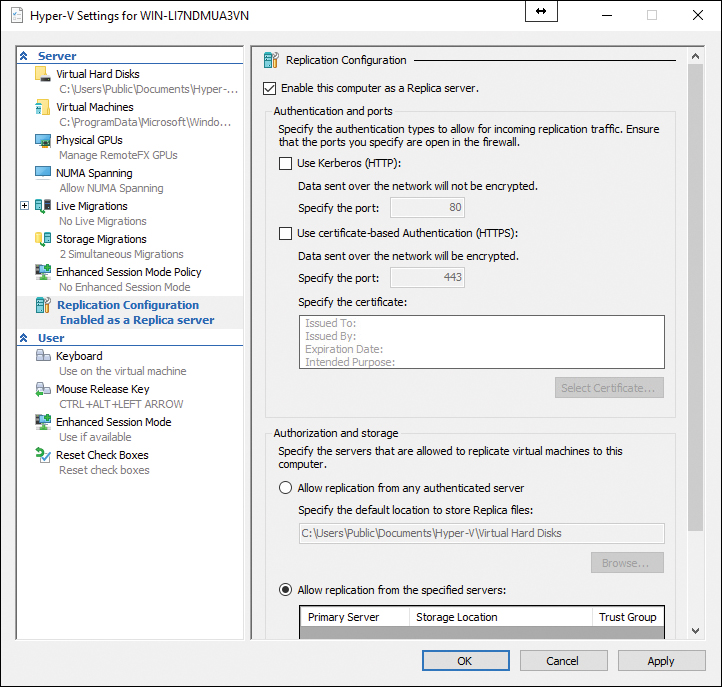
Step 2. For authentication, Select Use Kerberos (HTTP) or Use certificate-based Authentication (HTTPS).
Step 3. For authorization, select Allow replication from any authenticated server to allow the replica server to accept virtual machine replication traffic from any primary server that authenticates successfully or select Allow replication from the specified servers to accept traffic only from the primary servers you specifically select.
Step 4. Click OK.
Step 5. To allow replication between the primary and secondary servers, allow traffic through the Windows firewall:
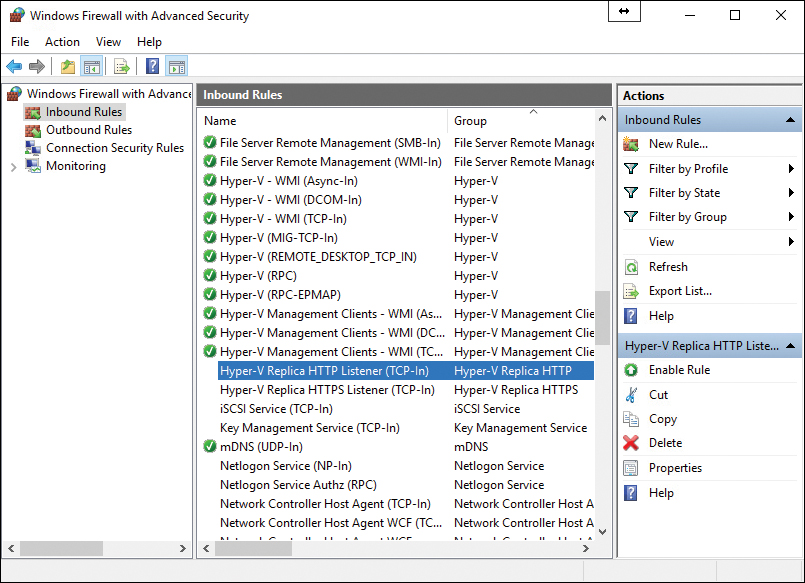
![]() To enable the rules on a standalone host server, open Windows Firewall with Advanced Security and click Inbound Rules; to enable HTTP (Kerberos) authentication, right-click Hyper-V Replica HTTP Listener (TCP-In) >Enable Rule; to enable HTTPS certificate-based authentication, right-click Hyper-V Replica HTTPS Listener (TCP-In) > Enable Rule. Figure 13-2 shows this tool.
To enable the rules on a standalone host server, open Windows Firewall with Advanced Security and click Inbound Rules; to enable HTTP (Kerberos) authentication, right-click Hyper-V Replica HTTP Listener (TCP-In) >Enable Rule; to enable HTTPS certificate-based authentication, right-click Hyper-V Replica HTTPS Listener (TCP-In) > Enable Rule. Figure 13-2 shows this tool.
![]() To enable the rules on a Hyper-V cluster, use the following command from an elevated PowerShell prompt for HTTP:
To enable the rules on a Hyper-V cluster, use the following command from an elevated PowerShell prompt for HTTP:
get-clusternode | ForEach-Object {Invoke-command
-computername $_.name -scriptblock {Enable-Netfirewallrule
-displayname "Hyper-V Replica HTTP Listener (TCP-In)"}}
![]() To enable the rules on a Hyper-V cluster, use the following command from an elevated PowerShell prompt for HTTPS:
To enable the rules on a Hyper-V cluster, use the following command from an elevated PowerShell prompt for HTTPS:
get-clusternode | ForEach-Object {Invoke-command
-computername $_.name -scriptblock {Enable-Netfirewallrule
-displayname "Hyper-V Replica HTTPS Listener (TCP-In)"}}
Step 6. In the Details pane of Hyper-V Manager, select a virtual machine by clicking it.
Step 7. Right-click the selected virtual machine and click Enable Replication to open the Enable Replication Wizard.
Step 8. On the Before you Begin page, click Next.
Step 9. On the Specify Replica Server page, in the Replica server box, enter either the NetBIOS or FQDN of the replica server; if the replica server is part of a failover cluster, enter the name of the Hyper-V Replica Broker and click Next, as shown in Figure 13-3.

Step 10. On the Specify Connection Parameters page, if Hyper-V Replica has not automatically retrieved the authentication and port settings you configured for the replica server, type in the settings manually.
Step 11. On the Choose Replication VHDs page, make sure the VHDs you want to replicate are selected and clear the check boxes for any VHDs that you want to exclude from replication; click Next.
Step 12. On the Configure Replication Frequency page, specify how often changes should be synchronized from primary to secondary and click Next.
Step 13. On the Configure Additional Recovery Points page, select whether you want to maintain only the latest recovery point or to create additional points. If you want to consistently recover applications and workloads that have their own VSS writers, select Volume Shadow Copy Service (VSS) frequency and specify how often to create app-consistent snapshots. Click Next.
Step 14. On the Choose Initial Replication page, select the initial replication method to use and click Next.
Step 15. On the Completing the Enable Replication page, review the information in the summary and then click Finish.
Step 16. If you want to configure extended (chained) replication, open the replica server, right-click the virtual machine you want to replicate, select Replication > Extend Replication, and specify the replication settings.
After you follow these deployment steps, your replicated environment is complete, and you can run the following failovers, as needed:
![]() Test failover: If you want to run a test failover, right-click the primary virtual machine and select Replication > Test Failover. Pick the latest or another recovery point, if configured. A new test virtual machine is created and started on the secondary site. After you have finished testing, select Stop Test Failover on the replica virtual machine. Note that for a virtual machine, you can only run one test failover at a time.
Test failover: If you want to run a test failover, right-click the primary virtual machine and select Replication > Test Failover. Pick the latest or another recovery point, if configured. A new test virtual machine is created and started on the secondary site. After you have finished testing, select Stop Test Failover on the replica virtual machine. Note that for a virtual machine, you can only run one test failover at a time.
![]() Planned failover: To run a planned failover, right-click the primary virtual machine and select Replication > Planned Failover. Planned failover performs prerequisite checks to ensure zero data loss. It involves checking that the primary virtual machine is shut down before beginning the failover. After the virtual machine is failed over, the failover process starts replicating the changes back to the primary site when it is available. Note that for this to work, the primary server should be configured to receive replication from the secondary server or from the Hyper-V Replica Broker, in the case of a primary cluster. Planned failover sends the last set of tracked changes.
Planned failover: To run a planned failover, right-click the primary virtual machine and select Replication > Planned Failover. Planned failover performs prerequisite checks to ensure zero data loss. It involves checking that the primary virtual machine is shut down before beginning the failover. After the virtual machine is failed over, the failover process starts replicating the changes back to the primary site when it is available. Note that for this to work, the primary server should be configured to receive replication from the secondary server or from the Hyper-V Replica Broker, in the case of a primary cluster. Planned failover sends the last set of tracked changes.
![]() Unplanned failover: To run an unplanned failover, right-click on the replica virtual machine and select Replication > Unplanned Failover from Hyper-V Manager or Failover Clustering Manager. You can recover from the latest recovery point or from previous recovery points if this option is enabled. After failover, check that everything is working as expected on the failed-over virtual machine and then click Complete on the replica virtual machine.
Unplanned failover: To run an unplanned failover, right-click on the replica virtual machine and select Replication > Unplanned Failover from Hyper-V Manager or Failover Clustering Manager. You can recover from the latest recovery point or from previous recovery points if this option is enabled. After failover, check that everything is working as expected on the failed-over virtual machine and then click Complete on the replica virtual machine.
Live Migration
Hyper-V live migration involves moving running virtual machines from one physical server to another, with no impact on the availability of virtual machines to users. The following sections present important information related to live migration.
Live Migration Requirements
Remember these important requirements for non-clustered hosts and live migration:
![]() A user account with permission to perform the various steps: Membership in the local Hyper-V Administrators group or the Administrators group on both the source and destination computers meets this need, unless you are configuring constrained delegation. Membership in the Domain Administrators group is required to configure constrained delegation.
A user account with permission to perform the various steps: Membership in the local Hyper-V Administrators group or the Administrators group on both the source and destination computers meets this need, unless you are configuring constrained delegation. Membership in the Domain Administrators group is required to configure constrained delegation.
![]() The Hyper-V role in Windows Server 2016 installed on the source and destination servers: You can do a live migration between hosts running Windows Server 2016 and Windows Server 2012 R2 if the virtual machine is at least version 5. The systems must be connected to the same virtual switch, and these systems must have the same brand of processor.
The Hyper-V role in Windows Server 2016 installed on the source and destination servers: You can do a live migration between hosts running Windows Server 2016 and Windows Server 2012 R2 if the virtual machine is at least version 5. The systems must be connected to the same virtual switch, and these systems must have the same brand of processor.
![]() Source and destination computers: These computers must either belong to the same Active Directory domain or belong to domains that trust each other.
Source and destination computers: These computers must either belong to the same Active Directory domain or belong to domains that trust each other.
![]() Hyper-V management tools: The Hyper-V management tools must be installed on a computer running Windows Server 2016 or Windows 10, unless the tools are installed on the source or destination servers and you plan to run the tools from the server.
Hyper-V management tools: The Hyper-V management tools must be installed on a computer running Windows Server 2016 or Windows 10, unless the tools are installed on the source or destination servers and you plan to run the tools from the server.
Live Migration Considerations
You should consider carefully how you want to set up the following parameters:
![]() Authentication: Here your options include:
Authentication: Here your options include:
![]() Kerberos: This lets you avoid signing in to the server, but you must configure constrained delegation (described in the next section).
Kerberos: This lets you avoid signing in to the server, but you must configure constrained delegation (described in the next section).
![]() CredSSP: This eliminates the need for constrained delegation but requires a sign-in on the source server; you can do this through a local console session, a Remote Desktop session, or a remote Windows PowerShell session.
CredSSP: This eliminates the need for constrained delegation but requires a sign-in on the source server; you can do this through a local console session, a Remote Desktop session, or a remote Windows PowerShell session.
![]() Performance: You can set various performance options, as discussed later in this chapter.
Performance: You can set various performance options, as discussed later in this chapter.
![]() Network preference: Here you determine if live migration traffic can use any available network. As a security best practice, consider constraining to trusted, private networks; remember that live migration traffic is not encrypted.
Network preference: Here you determine if live migration traffic can use any available network. As a security best practice, consider constraining to trusted, private networks; remember that live migration traffic is not encrypted.
Configuring Constrained Delegation
To configure constrained delegation, follow these steps, using an account that is a member of the Domain Administrators group:
Step 1. Open the Active Directory Users and Computers snap-in; from Server Manager, select the server and select Tools > Active Directory Users and Computers.
Step 2. From the Navigation pane in Active Directory Users and Computers, select the domain and double-click the Computers folder.
Step 3. From the Computers folder, right-click the computer account of the source server and then click Properties.
Step 4. From Properties, click the Delegation tab, as shown in Figure 13-4.
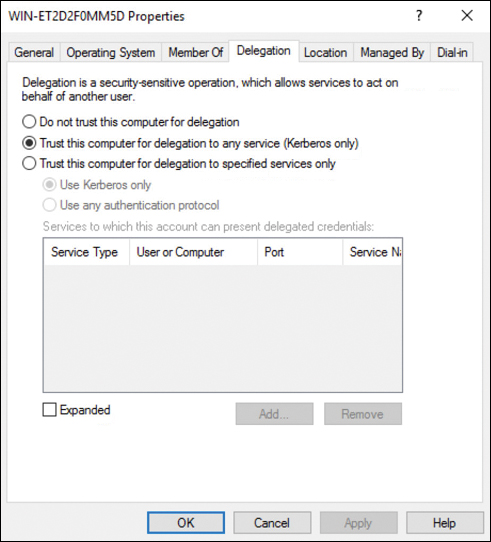
Step 5. On the Delegation tab, select Trust this computer for delegation to the specified services only and then select Use Kerberos only.
Step 6. Click Add.
Step 7. From Add Services, click Users or Computers.
Step 8. From Select Users or Computers, type the name of the destination server, click Check Names to verify it, and then click OK.
Step 9. From Add Services, in the list of available services, do the following:
![]() To move virtual machine storage, select cifs.
To move virtual machine storage, select cifs.
![]() To move virtual machines, select Microsoft Virtual System Migration Service.
To move virtual machines, select Microsoft Virtual System Migration Service.
Then click OK.
Step 10. On the Delegation tab of the Properties dialog box, verify that the services you selected in step 9 are listed as the services to which the destination computer can present delegated credentials and click OK.
Step 11. From the Computers folder, select the computer account of the destination server and repeat the process; in the Select Users or Computers dialog box, be sure to specify the name of the source server.
Configuring Live Migration in Hyper-V Manager
To configure live migration in Hyper-V Manager, follow these steps:
Step 1. Open Hyper-V Manager and from Server Manager, select Tools > Hyper-V Manager.
Step 2. In the Navigation pane, select one of your servers.
Step 3. In the Action pane, select Hyper-V Settings > Live Migrations.
Step 4. In the Live Migrations pane, check Enable incoming and outgoing live migrations.
Step 5. Under Simultaneous live migrations, specify a different number if you do not want to use the default of 2.
Step 6. Under Incoming live migrations, if you want to use specific network connections to accept live migration traffic, click Add to type the IP address information. Otherwise, click Use any available network for live migration and click OK.
Step 7. To choose Kerberos and performance options, expand Live Migrations and then select Advanced Features.
Step 8. If you have configured constrained delegation, under Authentication protocol, select Kerberos.
Step 9. Under Performance options, review the details and choose a different option if it is appropriate for your environment and click OK.
Step 10. Select your other server in Hyper-V Manager and repeat these steps.
Configuring Live Migration in PowerShell
You can use three cmdlets in Windows PowerShell for live migration on non-clustered hosts:
![]() Enable-VMMigration, which has the following syntax:
Enable-VMMigration, which has the following syntax:
Enable-VMMigration [-Passthru] [[-ComputerName] <String[]>]
[[-Credential] <PSCredential[]>] [-WhatIf] [-Confirm]
[<CommonParameters>]
![]() Set-VMMigrationNetwork, which has the following syntax:
Set-VMMigrationNetwork, which has the following syntax:
Set-VMMigrationNetwork [-ComputerName <String[]>] [-Credential
<PSCredential[]>] [-Subnet] <String> [[-NewSubnet] <String>]
[-NewPriority <UInt32>] [-Passthru] [-WhatIf] [-Confirm]
[<CommonParameters>]
![]() Set-VMHost, which has the following syntax:
Set-VMHost, which has the following syntax:
Set-VMHost [[-ComputerName] <String[]>] [[-Credential]
<PSCredential[]>] [-MaximumStorageMigrations
<UInt32>] [-MaximumVirtualMachineMigrations
<UInt32>] [-VirtualMachineMigrationAuthenticationType
<MigrationAuthenticationType>] [-UseAnyNetworkForMigration
<Boolean>] [-VirtualMachineMigrationPerformanceOption
<VMMigrationPerformance>] [-ResourceMeteringSaveInterval
<TimeSpan>] [-VirtualHardDiskPath <String>]
[-VirtualMachinePath <String>] [-MacAddressMaximum <String>]
[-MacAddressMinimum <String>] [-FibreChannelWwnn <String>]
[-FibreChannelWwpnMaximum <String>] [-FibreChannelWwpnMinimum
<String>] [-NumaSpanningEnabled <Boolean>]
[-EnableEnhancedSessionMode <Boolean>] [-Passthru] [-WhatIf]
[-Confirm] [<CommonParameters>]
Here is an example:
Enable-VMMigration
Set-VMMigrationNetwork 172.16.1.10
Set-VMHost -VirtualMachineMigrationAuthenticationType Kerberos
Setting Performance Options
Note that Set-VMHost allows you to choose a performance option, among many other settings. Performance options include the following:
![]() TCP/IP: Copies the memory of the virtual machine to the destination server over a TCP/IP connection
TCP/IP: Copies the memory of the virtual machine to the destination server over a TCP/IP connection
![]() Compression: Compresses the memory content of the virtual machine before copying it to the destination server over a TCP/IP connection; this is the default setting
Compression: Compresses the memory content of the virtual machine before copying it to the destination server over a TCP/IP connection; this is the default setting
![]() SMB: Copies the memory of the virtual machine to the destination server over an SMB 3.0 connection
SMB: Copies the memory of the virtual machine to the destination server over an SMB 3.0 connection
Implementing Shared-Nothing Live Migration
What does “shared-nothing” refer to in a shared-nothing live migration? It means that servers do not need to be part of a cluster, and they do not need access to shared storage. These requirements used to be in place for any live migration in Windows Server technology!
Shared-nothing live migration is a live migration, as described in the preceding section, and also a storage migration, as described in the next section. In a shared-nothing live migration, the source server copies the virtual machine’s storage to the destination, in addition to its memory and system state. The source VM remains active until the complete data transfer is complete.
Remember these shared-nothing live migration prerequisites:
![]() The source and destination servers must be members of the same Active Directory Domain Services domain (or trusted domains).
The source and destination servers must be members of the same Active Directory Domain Services domain (or trusted domains).
![]() The source and destination servers must be using the same processor family (Intel or AMD).
The source and destination servers must be using the same processor family (Intel or AMD).
![]() The source and destination servers must be connected by an Ethernet network running at a minimum of 1 Gbps.
The source and destination servers must be connected by an Ethernet network running at a minimum of 1 Gbps.
![]() The source and destination servers should have identical virtual switches that use the same name; if they do not, the migration process is interrupted to prompt the operator to select a switch on the destination server.
The source and destination servers should have identical virtual switches that use the same name; if they do not, the migration process is interrupted to prompt the operator to select a switch on the destination server.
You configure a shared-nothing live migration the same way you configure a non-clustered live migration, as covered in the preceding section. You select the Move the Virtual Machine’s Data to a Single Location option on the Choose Move Options page.
Storage Migration
Whereas a live migration moves a virtual machine from one host to another, leaving the storage in place, a storage migration moves the storage without moving the virtual machine. This occurs while the VM is running or stopped.
You can use storage migration to move the following for a virtual machine:
![]() Configuration files
Configuration files
![]() Checkpoints
Checkpoints
![]() Smart paging files
Smart paging files
These files migrate to any location the user has permission to access—perhaps another disk or a directory on the same computer or a directory on a different computer.
Storage migration uses the following process:
1. The destination server creates new virtual hard disk files of sizes and types corresponding to those on the source server.
2. The VM on the source server continues to operate using its local files, but Hyper-V begins mirroring disk writes to the destination server as well.
3. While continuing to mirror writes, Hyper-V on the source server initiates a single-pass copy of the source disks to the destination; blocks that have already been written to the destination by the mirroring process are skipped.
4. When the single-pass copy is completed, and with the mirrored writes continuing, Hyper-V updates the VM configuration and begins working from the files on the destination server.
5. Once the VM is running successfully from the migrated files, Hyper-V deletes the source files.
You should note the following:
![]() If the source VM is stopped, the preceding procedure is not needed; Hyper-V copies the files from the source to the destination, reconfigures the VM to use the destination files, and then deletes the source files.
If the source VM is stopped, the preceding procedure is not needed; Hyper-V copies the files from the source to the destination, reconfigures the VM to use the destination files, and then deletes the source files.
![]() You cannot migrate VMs that use pass-through disks for their storage.
You cannot migrate VMs that use pass-through disks for their storage.
![]() Files must use VHD or VHDX virtual hard disks.
Files must use VHD or VHDX virtual hard disks.
![]() To perform a storage migration, use the same Move Wizard as for non-clustered live migrations and shared-nothing live migrations. On the wizard’s Choose Move Type page, select the Move the Virtual Machine’s Storage option. The Choose Options for Moving Storage page appears, with the following options:
To perform a storage migration, use the same Move Wizard as for non-clustered live migrations and shared-nothing live migrations. On the wizard’s Choose Move Type page, select the Move the Virtual Machine’s Storage option. The Choose Options for Moving Storage page appears, with the following options:
![]() Image Move All of the Virtual Machine’s Data to a Single Location: Enables you to specify one destination for all of the source VM’s files
Image Move All of the Virtual Machine’s Data to a Single Location: Enables you to specify one destination for all of the source VM’s files
![]() Image Move All of the Virtual Machine’s Data to Different Locations: Permits the selection of the file types to migrate and specifies a destination for each type
Image Move All of the Virtual Machine’s Data to Different Locations: Permits the selection of the file types to migrate and specifies a destination for each type
![]() Image Move Only the Virtual Machine’s Virtual Hard Disks: Enables you to select which VHD/VHDX files to migrate and specify a destination for each one
Image Move Only the Virtual Machine’s Virtual Hard Disks: Enables you to select which VHD/VHDX files to migrate and specify a destination for each one
Exam Preparation Tasks
As mentioned in the section “How to Use This Book” in the Introduction, you have a couple choices for exam preparation: the exercises here, Chapter 21, “Final Preparation,” and the exam simulation questions in the Pearson Test Prep Software Online.
Review All Key Topics
Review the most important topics in this chapter, noted with the Key Topics icon in the outer margin of the page. Table 13-2 lists these key topics and the page number on which each is found.

Table 13-2 Key Topics for Chapter 13
Define Key Terms
Define the following key terms from this chapter and check your answers against the glossary:
Hyper-V Replica
Extended (Chained) Replication
Storage Migration
Q&A
The answers to these questions appear in Appendix A. For more practice with exam format questions, use the Pearson Test Prep Software Online.
1. In Hyper-V Manager, what option do you select from the shortcut menu of a virtual machine for Hyper-V Replica?
2. Name at least three requirements for Live Migration.
3. What are two requirements for disks in a storage migration scenario?