
HOW I PRINTED A Humanoid
3D-print a $12,000 humanoid robot — for half that price.
In recent years I’ve experimented with 3D-printing the structural brackets for my humanoid robot Boomer. Boomer and I compete at RoboGames and show off at Maker Faires, and people always ask me: Why 3D printing? Why not just make the brackets out of metal like everyone else?
Humanoid Evolution
The DARwIn-OP (Dynamic Anthropomorphic Robot with Intelligence — Open Platform) is a state-of-the-art research and development humanoid robot created by Virginia Tech’s Robotics and Mechanisms Laboratory (RoMeLa), led by Dr. Dennis Hong, in collaboration with the University of Pennsylvania, Purdue University, and the South Korean company Robotis, with support from the National Science Foundation.
Weighing in at just 2.9kg and standing 45.5cm tall, the DARwIn-OP has won the gold medal in the autonomous RoboCup Soccer Humanoid League, Kid Size class, in both 2011 and 2012.
I started to do it just because I could. The advent of cheap DIY 3D printers has given makers a new way to manufacture and customize objects, and I was simply exploring this new process. As I printed more parts for my robot, I realized that it could be done — and done cheaply.
Then I saw the DARwIn-OP at the 2010 International Conference on Humanoid Robots. After seeing how capable and groundbreaking it was, I wanted one. But how could I afford it? A new DARwIn-OP from Robotis costs $12,000.
That’s how this project got started. My mission was to print as much of the robot as possible using a DIY 3D printer costing $2,000 or less. DARwIn-OP is an open hardware and software project, so all of the 3D files and plans are free online. I bought 20 Dynamixel MX-28T servos and the complete electronics kit from Robotis.
Meet the Clone

Today, my DARwIn-OP clone is fully assembled, and I’ve spent about $6,100, not counting the costs of the 3D printers I used. That’s still a lot — but it’s almost half off the factory price.
Lessons Learned
» FREE 3D DESIGN
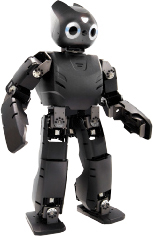
I had to fine-tune some of the parts, so I used Autodesk’s 123D design software to create my STL files, both for its price (free) and its ease of use (Figure 1).
» RAFTS AND SUPPORT MATERIAL
I like the Up Plus 3D printer’s accuracy and its automatic generation of both rafts (disposable footings that prevent warping) and support material to prop up overhangs, bridges, and screw holes (Figure 2). I still had to play around with the orientation of parts on the build platform, because this can affect the printing of overhangs and supports (Figures 3 and 4).


» HEATED PLATFORM
Printing in ABS requires a build platform heated to about 110°F. To improve performance, I upgraded my Up Plus platform to glass covered with Kapton tape for adhesion.
» LEVELING THE PLATFORM
Learn the paper leveling trick: if a sheet of paper can freely move between the extruder tip and the build platform, you’re OK. If not, then the extruder tip is too close. If it moves too easily or you see a gap, then it’s too far away.
» AWESOME MANUALS
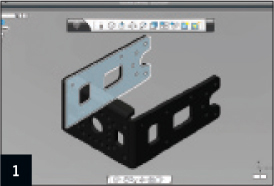
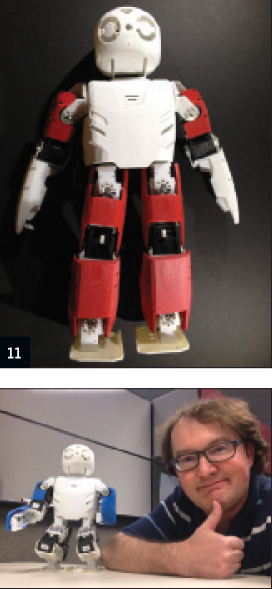
The open source DARwIn-OP manuals are the most comprehensive and detailed I’ve ever worked with — they break down the entire assembly into easy steps (Figures 7–10). I thank Dr. J.K. Han of Robotis for the tireless work he must have put into creating them!

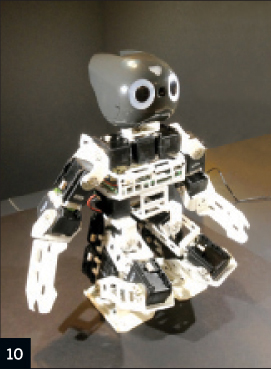
» DIY VS. COMMERCIAL
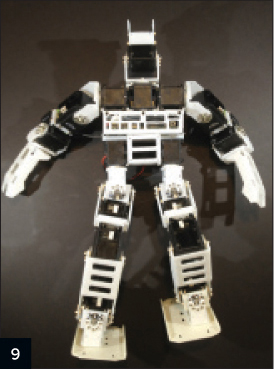
To print the whole robot (Figure 11), I used two spools of plastic that cost about $90 total. Shapeways’ price is almost $1,000. That’s close to the price of many DIY 3D printers, and in my opinion the quality of DIY prints is now 70% to 80% of professional prints. Still, I’m considering having all the covers printed by Shapeways for about $400, as they’re the most difficult parts to get right.
What’s Next
Next I’ll download the control software to the Fit-PC2 and get this robot to walk, talk, and see, with as few modifications to the software and hardware as possible. I may need to redesign some of the brackets and frames, because these were designed for aluminum. My friend Yoshihiro Shibata is helping me analyze DARwIn-OP’s structure to find its weak points when printed in plastic (Figures 5 and 6). My plan is to redesign only the parts that break, to make them stronger, as I don’t want to add unnecessary weight.
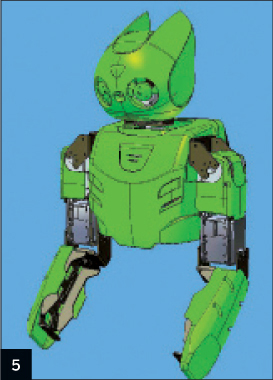
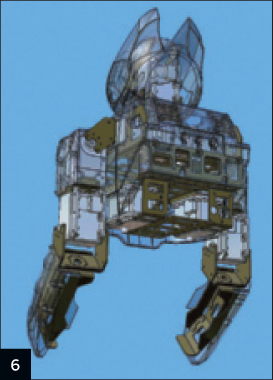
Michael Overstreet; Yoshihiro Shibata (5,6)
That’s one of the great benefits of personal manufacturing: if something doesn’t work, just redesign it and print it out. This process is called iterative design and experimentation. You can do it as many times as needed because the cost of a part is only a few dollars and you just have to wait for it to be printed!
After the robot is fully functional, I’ll modify its covers to resemble my favorite fictional humanoids Robby, Gort, Atom, or C-3PO, and maybe add a fully articulating hand with fingers.
But I’ve come to realize that I may never be fully done with this project. I think the only limit is my imagination. This, I think, is the greatest benefit that we’ll get from the personal fabrication movement. It has opened up limitless possibility for an individual to fully explore in solid form their dreams, ideas, and imagination. ![]()
Special thanks to Luis Rodriguez, Rob Giseburt, Paul Piong, Roc Terrell, James Rao, and Kayla Kim for their printers and knowledge.
BIO
Michael Overstreet (mike-ibioloid.blogspot.com) is a computer programmer by day and amateur roboticist by night. He and his humanoid robot Boomer have won medals in the last six RoboGames. He’s a founding member of the Cowtown Computer Congress hackerspace in Kansas City, Mo., and has attended all of the national Maker Faires.