
PROJECTS DRYER MESSENGER
The Dryer Messenger
![]() TIME: A DAY
TIME: A DAY ![]() COST: $$
COST: $$
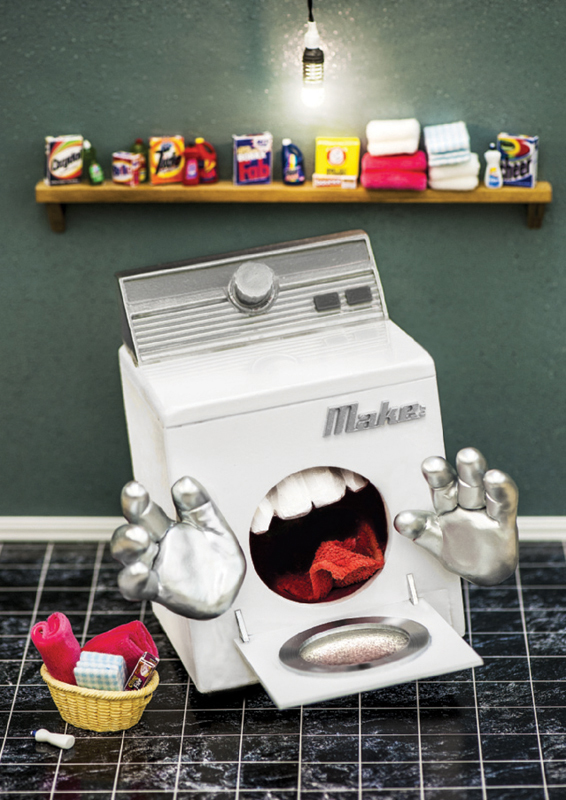
The dryer in our house is in an out-of-the-way corner where it’s hard to hear the buzzer. When we miss it, the clothes sit in the dryer getting wrinkly, so we start the dryer again, don’t hear the buzzer again … it’s an endless cycle. After what seemed like the thousandth time, my wife quipped, “I wish the dryer could just tell us when it’s done.”
I had just started playing with Arduino, so I thought a Dryer Messenger would be a good first project. When I ran the idea by my wife, she was enthusiastic but didn’t want me disassembling the dryer or voiding its warranty, since it was only months old. We decided to use SMS since our phones are usually nearby.

Model byJason Babler, hands by Gillian BenAry; photography by Gregory Hayes
Fast-forward a week or two and the dryer was texting us like a household assistant. We haven’t forgotten a load of laundry since.
Overview
The Dryer Messenger consists of 3 main components: a current sensor, the Arduino Pro Mini, and a Wi-Fi module. The current sensor is clipped around a power wire on the back of the dryer where, by electromagnetic induction, it outputs a low current that’s a small fraction of the current from the dryer. A burden resistor is needed across the terminals of the sensor to obtain a voltage that can be sampled by the Arduino; the sensor I used has this burden resistor built in.
Since the dryer runs on AC, current flows in both directions, causing the voltage to swing positive and negative. The Arduino can only sample positive voltages, so I used a voltage divider to bias the sensor’s output. The voltage divider uses two 10K resistors (R1 and R2) to obtain 1.65V from the 3.3V supply.
The current sensor has a fairly linear output up to 1V at 30A, which means the Arduino will read 0.65V or 2.65V when the sensor sees 30A. Capacitor C1 goes between the sensor and the Arduino to filter out noise.
The Arduino monitors the dryer’s current consumption and sends notification messages when it has determined the dryer has finished a cycle.
Since the Arduino Pro Mini has only one hardware serial port for both programming and debugging at 115,200 baud, I connected the Wi-Fi module to the Arduino digital pins and used the SoftwareSerial and WiFlySerial libraries to emulate a serial port and talk to the WiFly at 9,600 baud.
The Wi-Fi module connects to the local wireless network and sends notifications as tweets using NeoCat’s Twitter Library for Arduino. The dryer has a Twitter account both my wife and I follow, and by activating mobile notifications for the dryer’s tweets we can receive its updates as text messages on our phones.
MATERIALS & TOOLS
» Non-invasive current sensor, 30A YHDC model SCT-013-030
» Microcontroller, Arduino Pro Mini 328, 3.3V, 8MHz SparkFun Electronics #DEV-11114, sparkfun.com
» Wi-Fi module, Roving Networks WiFly RN-XV
» Breakout board for XBee module SparkFun #BOB-08276
» XBee sockets, 2mm, 10-pin (2) SparkFun #PRT-08272
» Protoboard
» Enclosure Digi-Key #HM1068-ND, digikey.com
» Capacitor, 10µF
» Resistors: 330Ω (2), 10kΩ (2)
» LEDs: green (1), red (1)
» Headers, 40-pin breakaway, 0.1" spacing (2) SparkFun #PRT-00116
» Stereo jack, 3.5mm SparkFun #PRT-08032 has pins with breadboard spacing.
» DC barrel jack, 5mm×2.1mm SparkFun #PRT-10811 has pins with breadboard spacing.
» Hookup wire
» Wall adapter, 9V 650mA
» Computer with Arduino IDE software free from arduino.cc
» FTDI programmer such as FTDI Friend, Maker Shed #MKAD22, makershed.com, or FTDI Basic Breakout 3.3V, SparkFun #DEV-09873
» Soldering iron and solder
1. Build the circuit.
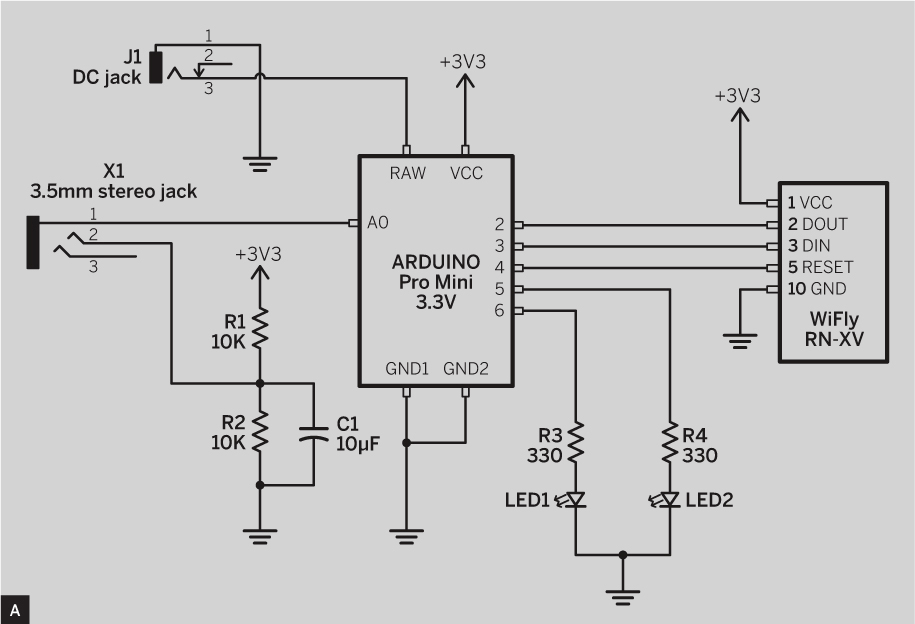
Solder the circuit shown in the schematic diagram (Figure A) on a protoboard. LED1 is green, LED2 is red. My board had a copper pour on the back that I was able to use as a ground plane.
Since the Wi-Fi module has 2mm headers, it can’t be directly mounted on the protoboard. Use the breakout board to adapt it to the protoboard’s 0.1" grid. Figure B shows how I arranged the components on my protoboard.
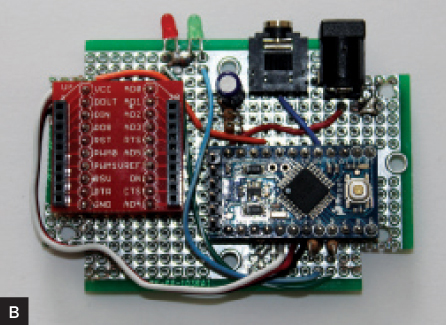
Plug the Wi-Fi module into the breakout board, and then mount the protoboard in your enclosure.
2. Attach the transformer to the dryer.
Unplug the dryer from the wall and remove the back panel to access the terminal block where the power cord is connected. Figure C shows the terminal block on my dryer.
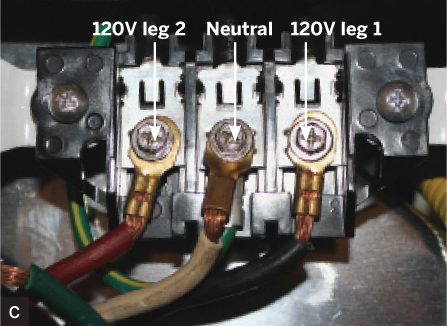
The current sensor needs to measure motor current. Use trial and error to determine which leg of the terminal block connections powers the motor.
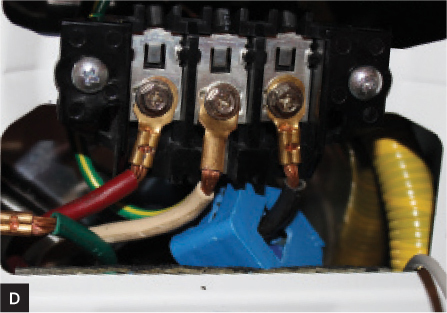
Clip the current sensor around the appropriate wire (Figure D), and run its output cable out the back of the dryer. Replace the panel and plug the dryer back into the wall.
Amanda Taylor
3. Get your dryer on Twitter.
Create a new Twitter account for your dryer. Adjust the privacy settings to keep it out of public view, if you prefer. Visit arduino-tweet.appspot.com and follow the instructions to set up your device to send tweets. You will be redirected to Twitter to authorize the Twitter Library’s use of the dryer’s account. Make sure you’re granting access to the right account. Save the token you’re given to paste into your Arduino sketch, as explained below.
Now, follow the dryer from your personal Twitter account. Turn on mobile notifications for the dryer’s updates, and you should be able to receive text messages on your phone when it tweets.
4. Install and tweak the software.
Download the 3 libraries and the Arduino sketch DryerMessenger.ino from makezine. com/34. Move the libraries to your Arduino libraries folder. Leave the .h and .cpp files in the same folder as DryerMessenger.ino.
Open DryerMessenger.ino in the Arduino editor, click the Credentials.h tab, and set the following parameters at the top of the file:
» Change ssid and passphrase to your network SSID and passphrase.
» Paste the token into twitter_token. Adjust the following parameters at the top of the Arduino sketch to suit your application:
» The CURRENT_THRESHOLD parameter is set to 1 amp by default, which should be low enough to detect when the dryer motor is running. You can adjust this value based on your particular dryer.
» WAITONTIME is how long the CURRENT_THRESHOLD value must be exceeded before the Arduino moves to the dryer RUNNING state.
» WAITOFFTIME is how long the dryer must be off before sending the notification. A longer time here allows for momentary interruption of the dryer cycle to insert more clothes or fabric softener (which I always forget).
» The messages array can be edited for more personalized texts, if you prefer.
After you’ve set the parameters as you like, upload the code to your Arduino using the FTDI module. Make sure it's set to 3.3V mode.
5. Use your Dryer Messenger.
Plug the current transformer’s stereo plug into the Dryer Messenger’s 3.5mm jack, and plug the AC adapter into the wall. Both LEDs should turn on. After successful start-up and connection to the wireless network, the red LED will turn off and the green one will stay lit.
If you leave the FTDI cable plugged in, debug information (such as the software state and the current measured by the sensor) will be displayed.
From now on, when your dryer finishes the cycle, you’ll be notified via SMS. No more forgotten, wrinkled clothes!
Modify It!
With the Arduino’s digital and analog inputs, it can monitor and send a notification when triggered by any detectable event. Since the software is a simple state machine, it could be easily adapted to monitor a digital line or a different analog voltage source. A temperature probe might be attached to monitor the temperature of a room or walk-in freezer. A momentary switch on a mailbox could alert you to the mail delivery, or a magnetic switch on a door could let you know when it’s been opened. The possibilities are endless! ![]()
Thomas Taylor is an electronics engineer in Fort Walton Beach, Fla., who enjoys creating embedded systems to make everyday life easier and integrating them with his wife’s crafting projects. He’s always on the lookout for new ways to apply technology. Reach him at [email protected].