
SMARTPHONE Servo
Plug hobby servos straight into your smartphone and control almost anything with a fingertip.
Smartphones have become our primary interface to the network world, and increasingly, to the real world as well. I call this project GlueMotor, because it works like “glue” for putting gadgets together under smartphone control, providing a very easy way to build simple servo-controlled machines.
![]() TIME: 30 MINUTES
TIME: 30 MINUTES ![]() COST: $$
COST: $$
MATERIALS
» Servomotors (2) Futaba S3003 or other standard hobby servos
» Stereo phone plug, 3.5mm (18"), with cable A pair of cheap earbuds is perfect.
» Battery holder, 4×AA, with wires
» Hookup wire, 22 AWG solid core You’ll use about 12" each of red, black, and yellow.
» Batteries, AA (4)
» Capacitors, ceramic, 0.1µF–0.47µF (2)
» Heat-shrink tubing or electrical tape
» Cable tie, plastic aka zip tie
TOOLS
» Smartphone or tablet iOS or Android
» Wire cutter/stripper
» Lighter or match
» Sandpaper, 400 grit
» Soldering iron and solder
» Multimeter

To use it, attach any convenient on-hand materials — PVC pipe, chopsticks, Legos, duct tape — to a GlueMotor, then plug it into your smartphone’s headphone jack. The GlueMotor app lets you control it with a finger swipe.
The GlueMotor can be attached to your smartphone’s headphone jack and used to actuate any convenient materials at hand — PVC pipe, Legos, duct tape, chopsticks, you name it! The GlueMotor app then lets you control all of this with the swipe of your finger.

How It Works
Controlling a hobby servomotor is relatively easy. It requires a single digital pulse-width modulation (PWM) signal at 50Hz, which means one pulse every 20ms. The width of the “high” pulse sets the absolute rotation angle of the servo.

PWM servo signals generated by an R/C radio receiver, left, and by an iPhone running the GlueMotor app.
Normally the width of the pulse at center angle is 1.5ms. A longer pulse will set the angle clockwise of center, and a shorter pulse will set it counterclockwise. The maximum and minimum angle will depend on the model of servomotor, but usually a range of 1.5ms±0.5ms is supported. In a typical R/C car or airplane application, the radio receiver generates the control signal.
But the radio receiver is not strictly necessary. If you can generate the proper PWM signal by whatever means, you can control a servomotor in exactly the same way. The GlueMotor project uses a smartphone to generate the control signal, and outputs it through the headphone jack.
The output from a headphone jack is usually an analog audio signal such as music or voice. If you can create digital sound data that only has “high” and “low” voltage values, then play the data through the headphone jack, you can produce a “nearly” digital signal good enough to control the servo.
To generate this signal, I have developed two applications, one for iOS devices, and another for Android. The user interface is very simple, converting the onscreen coordinates of a touch location to the width of two PWM signals, allowing simultaneous control of two servos. The GlueMotor app is free from the iOS App Store and Google Play.
Note: Some devices may not produce enough voltage at maximum volume for this project. To test your device, play a sine wave tone through the headphone jack and measure the output with the AC voltage mode of your multimeter. A reading of 0.6V or higher should work.
1. Prep the phone cable.
Cut the earbud cable (Figure A), then strip the outer insulation from the side attached to the plug (Figure B).


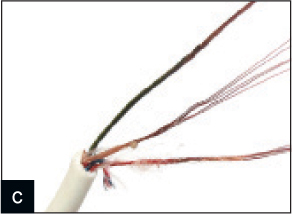
Now strip the 3 wires inside (Figure C) by quickly running them through a small flame to burn off the insulation and strain-relief fibers. Lightly rub the exposed metal wires with 400-grit sandpaper to clean off any residue.
Use the multimeter’s continuity setting to identify which wire corresponds with contact on the phone plug.
2. Solder the harness.
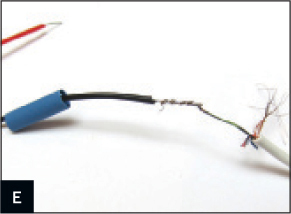
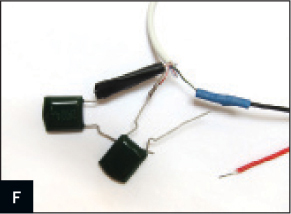
Use the schematic in Figure D as a guide. First, solder the black wire from the battery holder to the phone plug ground wire (Figure E). Next, solder a capacitor lead to each of the remaining 2 plug wires (Figure F). These capacitors aren’t polarized, so it doesn’t matter which lead you solder.

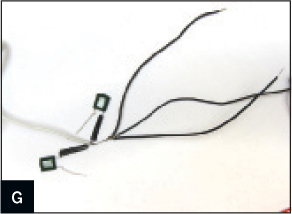
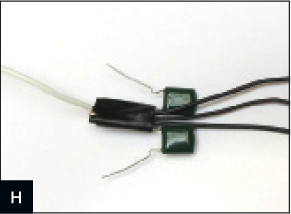
Cut two 6" black hookup wires, strip the ends, and solder them to the ground junction of the battery holder and phone plug (Figure G). Insulate this joint, and the 2 capacitor lead joints, with heat-shrink tubing or electrical tape (Figure H).
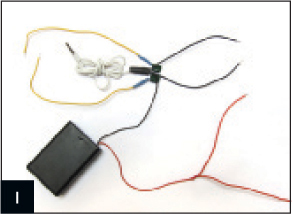
Cut two 6" yellow hookup wires, strip the ends, and solder one to each of the free capacitor leads. Cut two 6" red hookup wires, strip the ends, and solder both to the battery pack’s red lead, dividing it into 2 parallel leads. Insulate all these connections with heat-shrink tubing or electrical tape (Figure I).
3. Install the app.
Go to the Apple iTunes App Store or Google Play, search “GlueMotor” to find the app, and follow the instructions to install it on your device.
4. Test it on the servos.
Install the batteries in the holder. If they get hot, disconnect them immediately and check for a wiring error.
Before connecting the servos, insert the phone plug into your device’s headphone jack.
Turn the volume all the way up and launch the GlueMotor app. The 2 lines should cross right in the center of the screen. Don’t touch the screen yet.
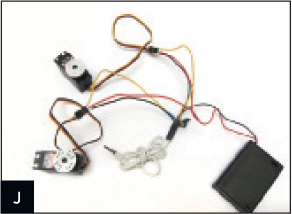
Connect the servos to your wiring harness, as shown in Figure J, by pushing the stripped ends of the wires into the servo cable header sockets. If you’ve used the wire colors indicated in the steps above, all you have to do is match the colors.
Touch the screen to move the crosshair. The horizontal position controls one servomotor, and the vertical position the other. Once it’s working, use zip ties to tidy up the wiring.
5. Get gluing.
For my recent demonstration at Maker Faire, I demonstrated GlueMotor by attaching Lego elements to the servo arms with double-sided tape (Figure K). Lego is a very handy prototyping system for this purpose. ![]()

BIO
Kazuhisa “Kazu” Terasaki is a software engineer who loves prototyping low-tech gadgets out of high-tech junk. He calls this stuff Pachi-Mon, which is Japanese for “not quite real, but works.”