
Often, a program generates an uncaught exception and terminates the execution. The commonly occurring exceptions in the program means that the code is broken and must be fixed. However, sometimes exceptions may happen due to errors in communication, hardware faults, and so on. The following is an example of the HTTP server, which is used to demonstrate this problem:
import 'dart:io';

main() {
  runServer();
}

runServer() {
  HttpServer
  .bind(InternetAddress.ANY_IP_V4, 8080)
  .then((server) {
    server.listen((HttpRequest request) {
      request.response.write('Hello, world!'),
      request.response.close();
    });
  });
}
The code in the main function can be terminated due to uncaught errors that may happen in the runServer function. Termination of the program under those circumstances can be undesirable.
So, how can this problem be solved? We wrap our code within a try/catch block to catch all the uncaught exceptions and it works perfectly, as shown in the following code:
main() {
  try {
    runServer();
  } on Error catch(e) {
    // ...
  }
}
This solution is universal and can be used in similar situations, so we will generalize it via the creation of a separate wrapper function:
wrapper(Function body, {Function onError}) {
  try {
    body();
  } on Error catch(e) {
    if (onError != null) {
      onError(e);
    }
  }
}

main() {
  wrapper(runServer, onError:(e) {
    // ...
  });
}
The body argument represents any preserved code and is covered within a try/catch block inside wrapper. A wrapper function uses the onError function to handle all the uncaught exceptions. Using a wrapper function is a good practice and its use is advised in other such situations. This is the zone.
Let's take a look at what zones can do:
- In critical situations, it allows you to handle exceptions properly
- It provides a way to handle multiple async operations in a single group
- It can have an unlimited number of nested zones, which behave like the parent one
Each zone creates a context, some kind of protected area, where the executing code exists. In addition to intercepting uncaught exceptions, zones can have local variables and can schedule microtasks, create one-off or repeating timers, print information, and save a stack trace for debugging purposes.
Let's transform our code to use a zone instead of the wrapper function, as follows:
import 'dart:io';
import 'dart:async';

main() {
  runZoned(runServer, onError:(e) {
    // ...
  });
}
The runZoned function is a code wrapper. By default, the async library implicitly creates a root zone and assigns it to a static current variable in the Zone class. So, we have an active zone that is always available to us inside the runZoned function. When the runZoned function runs, it forks the new nested zone from root one and executes the runServer function inside its context. Use the fork method of the current zone to create a new child of this one.
Let's say we have to serve static files in our server. So, we will need to read the file and serve it. To do this properly, we fork the nested zone and protect our code with the runZoned function, as follows:
 runServer() {
  HttpServer
  .bind(InternetAddress.ANY_IP_V4, 8080)
  .then((server) {
    server.listen((HttpRequest request) {
      runZoned(() {
        readFile(request.uri.path).then((String context){
          request.response.write(context);
          request.response.close();
        });
      }, onError:(e) {
        request.response.statusCode = HttpStatus.NOT_FOUND;
        request.response.write(e.toString());
        request.response.close();
      });
    });
  });
}

Future<String> readFile(String fileName) {
  switch (fileName.trim()) {
    case "/":
    case "/index.html":
    case "/favicon.ico":
      return new Future.sync(() => "Hello, world!");
  }
  return new Future.sync(() =>
      throw new Exception('Resource is not available'));
}
Inside the nested zone, we call the readFile function with a resource name and it returns the content. If the resource is not available, readFile generates an exception and the program catches it in the onError function, which is registered as the zone's error handler. If we don't specify the error handler, the exception will be bubbled up through the zone-nested hierarchy until any parent zone gets caught up in it or reaches a top-level executable and terminates the program.
Now, it's time to discuss authentication on our server as some resources may not be available to the general public. We will follow the idea of token-based authentication that relies on a signed token that is sent to the server on each request. We will create a map of tokens to remember all the authorized clients, and then fork a new zone for authentication. We will then read the client token from the header that is to be used for authentication. When we get a map of tokens from the current zone, we will inject them into the zone via zoneValues, as shown in the following code:
runServer() {
  HttpServer
  .bind(InternetAddress.ANY_IP_V4, 8080)
  .then((server) {
    Set tokens = new Set.from(['1234567890']);
    server.listen((HttpRequest request) {
      runZoned((){
        authenticate(request.headers.value('auth-token'));
      }, zoneValues: {'tokens': tokens}, onError:(e){
        request.response.statusCode = HttpStatus.UNAUTHORIZED;
        request.response.write(e.toString());
        request.response.close();
      });
      runZoned(() {
        readFile(request.uri.path).then((String context){
          request.response.write(context);
          request.response.close();
        });
      }, onError:(e) {
        request.response.statusCode = HttpStatus.NOT_FOUND;
        request.response.write(e.toString());
        request.response.close();
      });
    });
  });
}
The authentication based on the existence of a token within tokens is as follows:
authenticate(String token) {
  Set tokens = Zone.current['tokens'];
  if (!tokens.contains(token)) {
    throw new Exception('Access denied'),
  }
}
In the preceding code, we used the zone-local variables to track tokens and authenticate clients. Here, the variables were injected into the zone with the zoneValues argument of the runZoned function. Our tokens variable works like a static variable in the asynchronous context.
Now check whether our server-side code works as expected. We installed the Postman extension from http://www.getpostman.com/ to send requests from the Dartium web browser. Our first request to http://localhost:8080 that we send without auth-token is shown in the following screenshot:
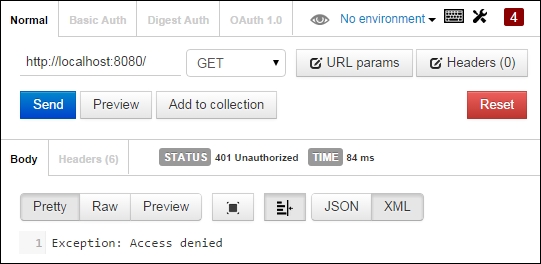
The request was unauthorized because of the absence of auth-token. Let's add it to the HTTP headers and see what happens:
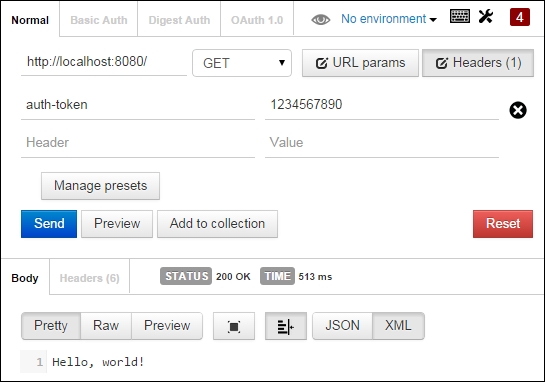
Finally, our request is authorized and returns Hello, world! as a success message.
Now, we have decided to log information about each server request and authentication. It is not recommended to inject the log function in all the possible places. Zones have print functions to print messages as a literal string. The print function bubbles up the message with the zone-nested hierarchy until a parent zone intercepts it or reaches up to the root zone to print it. So, we only need to override the print function in the ZoneSpecification class to intercept the message to the logger. We create a new zoneSpecification with the interceptor function to print and call the log function inside, as follows:
//…
main() {
  runZoned(runServer(),
    zoneSpecification: new ZoneSpecification(
      print:(self, parent, zone, message) {
        log(message);
      }
    ),
    onError:(e) {
    // ...
  });
}
Somewhere down the line, our log function logs message into a standard print, as shown in the following code:
log(String message) {
  print(message);
}
In the following code, we print the request path:
runServer() {
  HttpServer
  .bind(InternetAddress.ANY_IP_V4, 8080)
  .then((server) {
    Set tokens = new Set.from(['1234567890']);
    server.listen((HttpRequest request) {
      runZoned((){
        Zone.current.print('Resource ${request.uri.path}'),
        authenticate(request.headers.value('auth-token'));
//…
Bear in mind that all the interceptor functions expect the following four arguments:
print:(Zone self, ZoneDelegate parent, Zone zone, String message)
The first three of them are always the same:
The fourth argument always depends on the function. In our example, it is the message that will be printed.
Let's request the index.html file via the Postman extension to check this code, as shown in the following screenshot:
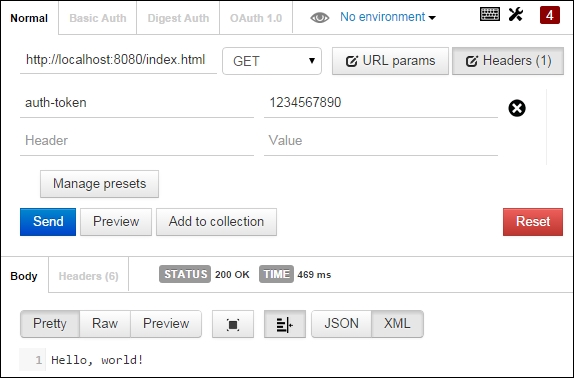
The following result will be displayed in the console log:
Resource /index.html
Finally, all works as expected.
Let's see how the communication between the parent and the nested zones can be useful in a server example. Suppose you want to have more control on the print content of static pages, you can use the following code:
//…
Set tokens = new Set.from(['1234567890']);
bool allowPrintContent = false;
    server.listen((HttpRequest request) {
      runZoned((){
//…
      });
      runZoned(() {
        readFile(request.uri.path).then((String context){
          Zone.current.print(context);
          request.response.write(context);
          request.response.close();
        });
      }, zoneValues: {'allow-print':allowPrintContent},
      zoneSpecification: new ZoneSpecification(
          print: (Zone self, ZoneDelegate parent, Zone zone, String message) {
            if (zone['allow-print']) {
              parent.print(zone, message);
            }
          }),
      onError:(e) {
//…
We add a Boolean variable allowPrintContent to manage the print operation. We call the print function of the zone to print the content of the page when processing Future of readFile. We inject allowPrintContent as a value of the allow-print key of zoneValues, and finally, inside the overridden print function, we add a condition that allows us to print the page content only if allow-print is true.
We requested the index.html file via the Postman extension again and see the following result in the console:
Resource /index.html
Hello, world!
As expected, our code prints the information that comes from both the nested zones. Now, we change the value to false and restart the server. The following request only prints the message from the first zone:
Resource /index.html
Interaction between zones can be easily organized via the zone variables.
The server listener contains two zones. The first one is used to authenticate the files and the second one is used to read the content of the static files and send them back to the client. It is quite interesting to know how long each static page takes to load and process. Zones support several run methods to execute a given function in the zone. We can override the run method in ZoneSpecification to count the time spent by the request processing function. We use Stopwatcher as the timer in our example. We are processing each request and print profiling the time just after sending the response back to the client, as shown in the following code:
//…
runServer() {
  HttpServer
  .bind(InternetAddress.ANY_IP_V4, 8080)
  .then((server) {
    Set tokens = new Set.from(['1234567890']);
    bool allowPrintContent = true;
    Stopwatch timer = new Stopwatch();
    server.listen((HttpRequest request) {
      runZoned((){
//…
      });
      runZoned(() {
        readFile(request.uri.path).then((String context){
          Zone.current.print(context);
          request.response.write(context);
          request.response.close();
          Zone.current.print(
              "Process time ${timer.elapsedMilliseconds} ms");
        });
      }, zoneValues: {'allow-print':allowPrintContent},
      zoneSpecification: new ZoneSpecification(
        print: (Zone self, ZoneDelegate parent, Zone zone, String message) {
          if (zone['allow-print']) {
            parent.print(zone, message);
          }
        },
        run: (Zone self, ZoneDelegate parent, Zone zone, f)
          => run(parent, zone, f, timer)
      ),
      onError:(e) {
        request.response.statusCode = HttpStatus.NOT_FOUND;
        request.response.write(e.toString());
        request.response.close();
      });
    });
  });
}
Now, we override the run function in ZoneSpecification to call a global run function with timer, as follows:
run(ZoneDelegate parent, Zone zone, Function f, Stopwatch timer) {
  try {
    timer.start();
    return parent.run(zone, f);
  } finally {
    timer.stop();
  }
}
In the global run function, we perform a trick when we call the original function from the parent zone delegate. We intend to wrap the function with a try/finally block to stop the timer before returning the result to the zone. Let's request the same resource again, as follows:
Resource /index.html
Hello, world!
Process time 54 ms
Now, we have the profiling information per request processed on the server. In addition to the standard run function, the zone has the runUnary and runBinary functions to pass one or two extra arguments to execute the given function inside a zone.