
The HTML5 canvas is a fantastic feature that allows you to code programmatic drawing operations. It has become very popular because it allows you to create and manipulate imagery directly within web pages. The canvas is one of the most flexible tags in new HTML5 features. This tag is a blank state. It defines a context object that users can draw inside. The actual drawing operations can be split in the following ways:
- Drawing a 2D context
- Drawing a 3D context formally known as a WebGL
A 2D context is available in all modern web browsers. It is more established and stable, while the 3D context is in the early process of being defined. Let's discuss the 2D context as it is more widely supported.
The canvas API is simple and powerful at the same time. You can only draw on a 2D bitmap surface using script. In the process of drawing, you do not have any DOM nodes for the shapes you draw. All that you produce is pixels, so you can forget about the performance penalties event if the image complexity increases.
Drawing on a canvas is all about adding pixels in the appropriate coordinates on the screen. In general, the coordinates of the pixels on the screen correlate to the points in the canvas that are represented as a grid, but they can vary when we zoom in or out of the screen or when a canvas is resized with CSS. The key point on the grid is the origin located in the left-hand side corner of the canvas with coordinates (0, 0). Each shape drawn on the canvas has an offset of x and y axes and size by width and height.
The canvas API gives you access to perform the following actions:
We don't want to pass through all these features with simple examples, so let's just create a canvas painting application to discover how to use many of them practically. You can find a prepared project in the code that accompanies this book. The application is based on Bootstrap 3.2 and jQuery 1.11.1. I have made a port of bootstrap-colorselector (https://github.com/flaute/bootstrap-colorselector) to Dart specially to show you how easily it can be done. In the following screenshot, you can see it running in the web browser application:
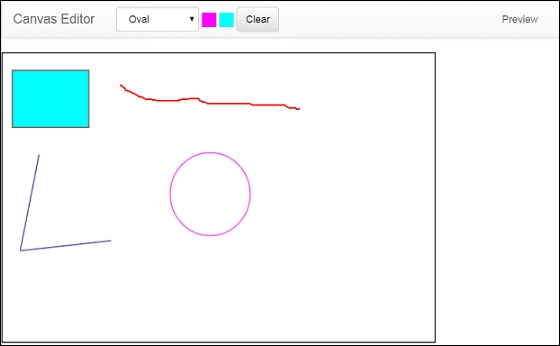
At the top of the application, we placed a Bootstrap navigation bar. It contains a select component with a drop-down option representing a list of available tools, such as Pen, Rectangle, Line, and Oval. There are two color selectors that we use to stroke and fill canvas styles. The Clear button helps wipe out the content of a canvas. Last but not least, the Preview button opens another window with the content of a canvas. Let's go deeper to discover different parts of the application and how they communicate with each other.
The content of the head tag is shown in the following code:
<meta charset="utf-8">
<meta name="viewport" content="width=device-width, initial-scale=1">
<title>Canvas</title>

<link rel="stylesheet" href="https://maxcdn.bootstrapcdn.com/bootstrap/3.2.0/css/bootstrap.min.css">
<link rel="stylesheet" href="https://maxcdn.bootstrapcdn.com/bootstrap/3.2.0/css/bootstrap-theme.min.css">

<link rel="stylesheet" type="text/css" href="css/bootstrap-colorselector.css" />
<link rel="stylesheet" type="text/css" href="css/index.css">

<!-- HTML5 Shim and Respond.js IE8 support of HTML5 elements and media queries -->
<!-- WARNING: Respond.js doesn't work if you view the page via
file:// -->
<!--[if lt IE 9]>
  <script src="https://oss.maxcdn.com/html5shiv/3.7.2/html5shiv.min.js"></script>
  <script src="https://oss.maxcdn.com/respond/1.4.2/respond.min.js"></script>
<![endif]-->

<!-- jQuery (necessary for Bootstrap's JavaScript plugins) -->
<script src="https://ajax.googleapis.com/ajax/libs/jquery/1.11.1/jquery.min.js"></script>
<script src="https://maxcdn.bootstrapcdn.com/bootstrap/3.2.0/js/bootstrap.min.js"></script>

<script async type="application/dart" src="index.dart"></script>
<script async src="packages/browser/dart.js"></script>
All bootstrap style sheets and the JavaScript code included in the HTML page are downloaded from a free and public content delivery network (CDN). The
html5shiv and respond libraries help run HTML5 features on IE Version 8 or higher.
The body of the web page is split into two sections. The first one is the responsive navbar component that serves as a navigation header for our application. It is collapsed and toggled in a mobile view, and then becomes horizontal if the available width space increases. We split the navigation bar into two subsections. The first subsection is the primary toolbar that keeps all components related to the direct canvas manipulation. The other one is the secondary toolbar that contains components that play a supporting role in the application.
The first component of the primary toolbar is toolSelector, which keeps all the registered tools, as shown in the following code:
<div class="form-group">
<select class="form-control" id="toolSelector"
  name="toolSelector">
</select>
</div>
The next two components are stroke_color_selector and fill_color_selector, which contain lists of colors presented as palettes. We will include only the first one in the following code snippet because of their similarity:
<div class="form-group">
  <select class="stroke_color_selector">
 <option value="#000000" data-color="black">Black</option>
 <option value="#808080" data-color="gray">Gray</option>
 <option value="#C0C0C0" data-color="silver">Silver</option>
 <option value="#FFFFFF" data-color="white">White</option>
 <option value="#800000" data-color="maroon">Maroon</option>
 <option value="#FF0000" data-color="red">Red</option>
 <option value="#808000" data-color="olive">Olive</option>
 <option value="#FFFF00" data-color="yellow">Yellow</option>
 <option value="#008000" data-color="green">Green</option>
 <option value="#00FF00" data-color="lime">Lime</option>
 <option value="#008080" data-color="olive">Teal</option>
 <option value="#00FFFF" data-color="aqua">Aqua</option>
 <option value="#000080" data-color="navy">Navy</option>
 <option value="#0000FF" data-color="olive">Blue</option>
 <option value="#800080" data-color="purple ">Purple </option>
 <option value="#FF00FF" data-color="fuchsia">Fuchsia</option>
</select>
</div>
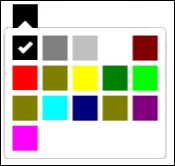
Both of the components, stroke_color_selector and fill_color_selector, are represented by the component ported from bootstrap-colorselector. The result of the color palette is shown in the following screenshot:
The last one in this group of components is the Clear button. The user can click on this button to clear the content of the canvas, as shown in the following code:
<div class="form-group">
  <button type="button"
    class="btn btn-default clear-btn">Clear</button>
</div>
The secondary toolbar is right aligned. It has only a Preview button component, as shown in the following code:
<ul class="nav navbar-nav navbar-right">
  <li><a href="#" class="previewBtn">Preview</a></li>
</ul>
Now, let's see our canvas components:
<div class="col-lg-12 text-center canvas-container">
  <canvas class="canvas view-canvas" width="600px"
    height="400px">
    <p>Unfortunately, your browser is currently unsupported by
      our web application.</p>
  </canvas>
  <canvas class="canvas draw-canvas" width="600px"
     height="400px">
     <p>Unfortunately, your browser is currently unsupported by
       our web application.</p>
  </canvas>
</div>
We use two canvases in our application. The first one is marked with a view-canvas class. It is only used to present data opposite to the second one marked with the draw-canvas class. The purpose of the second canvas is that all the tools must draw here. When their drawing operation ends, the pixels that they generated are then moved into the first canvas.
The foundation of our application is the components separated in to two types: widgets and tools. Widgets are components dealing with HTML elements and include extra behavior. All tool components are based on the Tool class. We use the tool-based components to draw in the canvas. Here is the main function of our application:
// Calculate absolute value of number
num abs(num value) => value < 0 ? -value : value;

// Return offset of mouse pointer from any mouse event
Point offset(MouseEvent event) => event.offset;

void main() {
  // Create an instance of [CanvasWidget]
  CanvasWidget canvas = new CanvasWidget(
    ".view-canvas", ".draw-canvas");
  // Create an instance of [BrushSelectorWidget]
  ToolSelectorWidget tools = new ToolSelectorWidget(
    ".tool-selector")
  ..onToolSelected.pipe(canvas);
  // Create and add tools to [ShapeSelectorWidget]
  tools.addTool(new Pen());
  tools.addTool(new Rectangle(), select:true);
  tools.addTool(new Line());
  tools.addTool(new Oval());
  // Create a stroke color selector
  new ColorSelectorWidget(".stroke_color_selector",
    ColorSelectedEvent.STROKE_COLOR, 'black')
  ..onColorSelected.pipe(canvas);
  // Create a fill color selector
  new ColorSelectorWidget(".fill_color_selector",
    ColorSelectedEvent.FILL_COLOR, 'aqua')
  ..onColorSelected.pipe(canvas);
  // Register a clear button listener
  querySelector(".clear-btn").onClick.listen((MouseEvent event) {
   canvas.clear();
  });
  // Register a preview button listener
  querySelector(".preview-btn").onClick.listen((MouseEvent event)
  {
    event.preventDefault();
    window.open(canvas.viewCanvas.toDataUrl("image/png"),
      "Image Preview");
  });
}
Now, let's discuss each component in order to better understand how they interact with each other.
As mentioned earlier, the application uses two canvas components—one on top of the other. Both of them are available via selectors. When we create an instance of the CanvasWidget component, we pass these selectors as arguments of the constructor. This component references the Tool component that is used to draw. The code is as follows:
/**
 * Canvas widget listens for mouse events from [CanvasElement] to draw
 * with selected tool.
 */
class CanvasWidget implements StreamConsumer {

  CanvasElement _viewCanvas, _drawCanvas;

  CanvasElement get viewCanvas => _viewCanvas;
  CanvasElement get drawCanvas => _drawCanvas;
  CanvasRenderingContext2D get context => _viewCanvas.context2D;
  CanvasRenderingContext2D get drawContext => _drawCanvas.context2D;

  Tool _tool;

/**
 * Create an instance of CanvasWidget. The [viewCanvasSelector] and
 * [drawCanvasSelector] need to find CanvasElements.
 */
CanvasWidget(String viewCanvasSelector, String drawCanvasSelector) {
  // Find canvas elements
  _viewCanvas = querySelector(viewCanvasSelector);
  _drawCanvas = querySelector(drawCanvasSelector);
  // Add mouse event listeners
  _drawCanvas.onMouseDown.listen((evt) =>
    _tool.beginDraw(drawContext, offset(evt)));
  _drawCanvas.onMouseMove.listen((evt) =>
    _tool.drawing(drawContext, offset(evt)));

  var _finishDraw = (evt) {
    _tool.finishDraw(drawContext, offset(evt));
    copyContext();
  };

  _drawCanvas.onMouseUp.listen(_finishDraw);
  _drawCanvas.onMouseLeave.listen(_finishDraw);
}
The user holds down the mouse button when he/she begins to draw. As a result, the onMouseDown listener invokes the beginDraw method of the Tool class. The drawContext method and the offset of the mouse coordinates are passed as parameters of this method. The drawing method of the Tool class is called every time the mouse is moved. Finally, the finishDraw method is called when the user releases the mouse button, and we call the local copyContext method to copy the content of the draw canvas to the view canvas. The CanvasWidget component implements the StreamConsumer interface via the addStream method to listen to two sorts of events, that is, ColorSelectedEvent from ColorSelectorWidget and ToolSelectedEvent from ToolSelectorWidget. The addStream method processes the incoming events, as shown in the following code:
/**
 * Copy drawn image from draw canvas into view context.
 * After all it clears the draw canvas.
 */
copyContext() {
  context.drawImage(_drawCanvas, 0, 0);
  _drawCanvas.context2D.clearRect(0, 0,
    _drawCanvas.width, _drawCanvas.height);
}

/**
 * Clear the view canvas
 */
 clear() {
   context.clearRect(0,  0, _viewCanvas.width, _viewCanvas.height);
 }

/**
 * Consumes the elements of [stream].
 * Listens on [stream] and does something for each event.
 */
 Future addStream(Stream stream) {
   return stream.listen((event) {
     if (event is ColorSelectedEvent) {
       if (event.type == ColorSelectedEvent.STROKE_COLOR) {
          drawContext.strokeStyle = event.value;
        } else {
          drawContext.fillStyle = event.value;
        }
      } else if (event is ToolSelectedEvent) {
    _tool = event.tool;
  }
}).asFuture();
}
We use the clear method to wipe out the content of _viewCanvas.
This component keeps the tool-based components and presents them in SelectElement. A tool-based component can be added via the addTool method, as shown in the following code:
class ToolSelectorWidget {
  SelectElement _selectElement;
  Tool selectedTool;
  Map<String, Tool> _tools = new Map<String, Tool>();

  Iterable<String> get toolsNames => _tools.keys;

  StreamController<ToolSelectedEvent> _toolSelectedController =
      new StreamController<ToolSelectedEvent>();
  Stream<ToolSelectedEvent> get onToolSelected =>
      _toolSelectedController.stream;

  ToolSelectorWidget(String selector) {
    _selectElement = querySelector(selector);
    _selectElement.onChange.listen((Event event) {
      selectTool(_selectElement.value);
    });
  }

  void addTool(Tool tool, {bool select: false}) {
    _tools[tool.name] = tool;
    OptionElement item = new OptionElement(
      data: tool.name, value: tool.name);
    _selectElement.append(item);
    if (select) {
      selectTool(tool.name);
    }
  }

  Tool getTool(String name) {
    if (_tools.containsKey(name)) {
      return _tools[name];
    }
    throw new Exception("Brush with $name not found");
  }

  selectTool(String name) {
    selectedTool = getTool(name);
    _toolSelectedController.add(new ToolSelectedEvent(selectedTool));
    _selectElement.value = selectedTool.name;
  }
}
When the user selects a new tool, this component generates a ToolSelectedEvent method with the selected tool instance as the parameter. The StreamController method is used to broadcast ToolSelectedEvent to any listener, that is, CanvasWidget.
This widget is a port of bootstrap-colorselector to Dart. This component creates a drop-down color palette from a predefined set of colors only. We have set predefined colors for and via the HTML markup. Every time the user chooses a new color, the StreamController method broadcasts a ColorSelectedEvent event to the CanvasWidget class.
Our application has an abstract Tool class to abstract the common behavior and properties of all the tool-based components, as shown in the following code:
/**
 * Abstract class defines common behavior and properties
 * for all tools.
 */
abstract class Tool {
  bool isDrawing = false;
  Point startPoint;

  String get name;

  void beginDraw(CanvasRenderingContext2D context, Point point) {
    isDrawing = true;
    startPoint = point;
  }

  void drawing(CanvasRenderingContext2D context, Point point);

  void finishDraw(CanvasRenderingContext2D context, Point point) {
    if (isDrawing) {
      drawing(context, point);
      isDrawing = false;
    }
  }
}
The isDrawing property reflects the status of the drawing operation. The startPoint property simply holds the cursor coordinates relative to the canvas when the user starts drawing on the canvas. The read-only property name returns the name of the tool. This name is used when the tool is added to ToolSelectorWidget. Each tool has three methods, and the whole drawing process is split into the following three phases:
- Start the drawing phase: The program calls the
beginDrawmethod when a user starts holding down the mouse button. We always switch on theisDrawingproperty and remember the cursor coordinates instartPoint. - Drawing phase: The
drawingmethod is called every time the user moves the cursor. Implementation of this method strongly depends on the tool, so we do not implement it in the abstract classTool. - End the drawing phase: The program invokes the
finishDrawmethod when the user releases the mouse button. In this method, we need to call thedrawingmethod for the last time and switch offisDrawingonly if the drawing process has happened.
Now, it's time to look at our tools implementation in detail.
As the canvas element doesn't directly support drawing a single point, we use lines instead. Drawing in a canvas is similar to using a virtual pen. At the beginning, we must call beginPath of context where we begin drawing. This method creates a new drawing path, so future drawing commands will be directed to the path and will be used to build the path. We start our path by moving to the startPoint coordinates with the moveTo method of context, as shown in the following code:
/**
 * Simple pen tool
 */
class Pen extends Tool {

  String get name => "Pen";

  @override
  void beginDraw(CanvasRenderingContext2D context, Point point) {
    super.beginDraw(context, point);
    context.beginPath();
    context.moveTo(startPoint.x, startPoint.y);
  }

  @override
  void drawing(CanvasRenderingContext2D context, Point point) {
    if (isDrawing) {
      context.lineTo(point.x, point.y);
      context.stroke();
    }
  }
}
Every time a user moves the mouse, the program calls the drawing method to connect our drawn path to next line's point with the lineTo method of context. Finally, it calls the stroke method to draw the shape by stroking its outline.
The behavior of the Line tool is similar to that of the Pen tool, but with a different drawing logic. We only implement the drawing method of the Tool class to draw our shape in a path. A path is a list of subpaths, and each of them is a list of points that are connected by straight or curved lines. Each one also contains a flag that indicates whether it is closed, so the last point of the closed subpath is connected to the first point by a straight line, as illustrated by the following code:
/**
 * Line tool is used to create lines.
 */
class Line extends Tool {

  String get name => "Line";

  @override
  void drawing(CanvasRenderingContext2D context, Point point) {
    if (isDrawing) {
      context.clearRect(0, 0,
        context.canvas.width, context.canvas.height);
      context.beginPath();

      context.moveTo(startPoint.x, startPoint.y);
      context.lineTo(point.x, point.y);

      context.stroke();
      context.closePath();
    }
  }
}
We must always clear the whole drawing canvas and start a new path via the beginPath method of context. We move the first point to the startPoint position and draw the line within the current cursor coordinates. Finally, we draw the line shape by stroking its outline and close the drawing path.
We can draw a rectangle with individual lines, but the Rectangle tool makes the task much easier. The context object has the following methods to draw rectangles:
strokeRect: This method uses the current stroke style to draw the box that outlines the given rectangle onto the canvasfillRect: This method uses the current fill style to draw the given rectangle onto the canvasclearRect: This method clears all the pixels on the canvas in the given rectangle to transparent black
The easiest way to draw a rectangle on the canvas is use the fillRect method of context. The fillRect method uses color from the fillStyle property, black by default. The Rectangle class, as shown in the following code:
/**
 * Rectangle tool
 */
class Rectangle extends Tool {

  String get name => "Rectangle";

  @override
  void drawing(CanvasRenderingContext2D context, Point point) {
    if (isDrawing) {
      context.clearRect(0, 0,
        context.canvas.width, context.canvas.height);

      int x = min(point.x, startPoint.x).round(),
          y = min(point.y, startPoint.y).round(),
          w = abs(point.x - startPoint.x).round(),
          h = abs(point.y - startPoint.y).round();

      context.fillRect(x, y, w, h);
      context.strokeRect(x, y, w, h);
    }
  }
}
In the preceding code, we drew a rectangle with fillRect and finally called strokeRect to draw the border line shape by stroking its outline.
Drawing ovals is a breeze too. The easiest way to draw ovals is using the arc method of context. The arc method takes the following five parameters:
arc(x, y, radius, startAngle, endAngle, anticlockwise)
The x and y parameters are the coordinates of the center of the oval on which the arc should be drawn. The radius parameter is the radius of the oval. The startAngel and endAngel parameters define the start and end coordinates of the arc in radians, measured from the x axis along with the curve of the oval. Finally, the last parameter is anticlockwise, which tells the canvas to draw the arc anticlockwise. The code is as follows:
/**
 * This tool transforms a drawing context into a rectangle
 * enclosing the oval and uses the arc method to draw it.
 */
class Oval extends Tool {

  String get name => "Oval";

  @override
  void drawing(CanvasRenderingContext2D context, Point point) {
    if (isDrawing) {
      context.save();
      context.clearRect(0, 0,
        context.canvas.width, context.canvas.height);
      context.beginPath();

      var rx = (point.x - startPoint.x) / 2;
      var ry = (point.y - startPoint.y) / 2;
      context.translate(startPoint.x + rx, startPoint.y + ry);

      rx = abs(rx);
      ry = abs(ry);
      if (rx < ry)
      {
          context.scale(1, abs(ry / rx));
          context.arc(1, 1, rx, 0, 2 * PI, false);
      }
      else
      {
          context.scale(abs(rx / ry), 1);
          context.arc(1, 1, ry, 0, 2 * PI, false);
      }

      context.stroke();
      context.restore();
    }
  }
}
First, we saved the current context's settings, cleared it, and started a new path. Then, we calculated the coordinates of the center of our oval and placed the result in rx and ry. After that, we moved the origin from (0, 0) to a new place via the translate method of context. For now, we took the absolute values for rx and ry so that we can draw an oval in different directions. Depending on the drawing direction, we can draw an oval by scaling it along the x or y axis. Finally, we draw the oval shape by stroking its outline and restored the parameters of context to prepare it for further use.
Many times, we try to clear the drawing context before we actually start to draw a new shape in the drawing context. So, now it's time to look at the following self-explanatory code from the CanvasWidget class that demonstrates how the view context can be cleaned:
/**
 * Clear the view canvas
 */
 clear() {
   context.clearRect(0,  0,
     _viewCanvas.width, _viewCanvas.height);
}If you need to preview the result of what you've done in the view canvas, you can open a new window with the content of the view canvas as shown here:
  // Register a preview button listener
  querySelector(".preview-btn").onClick
  .listen((MouseEvent event) {
    event.preventDefault();
    window.open(canvas.viewCanvas.toDataUrl("image/png"),
      "Image Preview");
  });
Now if you click on the Preview link, you will see the next result in a new window in your web browser, as shown in the following screenshot:
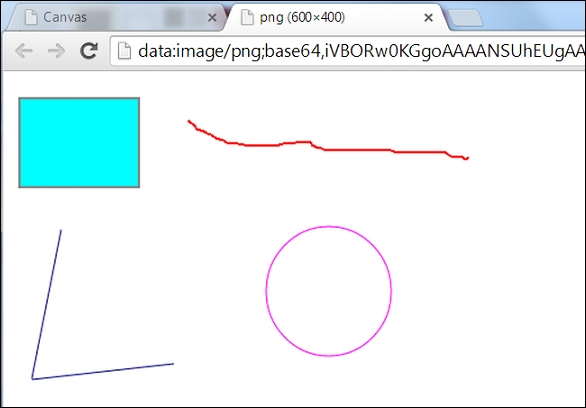
Here, we opened a new browser window with the image data URI directly and we could save it in the represented format. The data URI format shown in the address of the web browser is as follows:
data:[<MIME-type>][;charset=<encoding>][;base64],<data>
The toDataUrl method has an optional second parameter, quality. It represents the image quality in the range of 0.0 to 1.0 when the requesting type is image/jpeg or image/webp.