We have prepared our server side to secure the communication, and now it's time to talk about the security of the client side of our web application. For all our content, we will start using secure communication with TLS and we will start updating our client side using cookies.
A cookie has two special attributes: Secure and HttpOnly. The Secure attribute of a cookie allows it to be sent only to the TLS connection. The other attribute, HttpOnly, marks the cookie that is accessible only via HTTP or HTTPS connections. Mark both of them as true and this small improvement in cookies prevents the web browser from sending a cookie via an insecure connection. With each request sent, the cookies are accompanied to follow the server inside headers. Let's check what we can improve in other headers.
The well-known SSL man-in-the-middle attacks can be safely fixed with a HTTP Strict Transport Security (HSTS) header sent from the server via the HTTP response header, which obliges the web browser to interact with the server through a secure HTTPS connection. The code is as follows:
Strict-Transport-Security: max-age=31536000; includeSubDomains
The server must specify the max-age option in seconds; this is the time for which the pages should be served with HTTPS. In our example, this value is equal to 365 days. The includeSubDomains option is optional and tells the web browser that all subdomains must be served with a secure connection as well. This header is supported in the following browsers:
- Firefox 4
- Chromium and Google Chrome 4.0.211.0
- Safari 7
- Opera 12
- Internet Explorer in the next major release after IE 11
The web application security model is based on the same-origin policy principle. The origin is a combination of schema, hostname, and port number. The policy permits us to download and run scripts from the same origin. As time has shown, this policy may be broken very easily and quickly with Cross Site Scripting (XSS) or data injection attacks. Content Security Policy (CSP) is an added layer of security. It allows the web server to define the origin of each resource by securing the website and mitigates and reports on XSS attacks. Blocking all the inline scripts and styles can prevent the execution of code injected in comments or posts. CSP is backward compatible, so web browsers that don't support it still work using the standard same-origin policy.
The web browser assumes that all origins are allowed if a directive is not set. CSP can be set via an HTTP response header on a server or an HTML meta tag on a web page, as shown in the following code:
Content-Security-Policy: policy
The policy string is the one that contains the policy directives describing CSP with semicolon separation as source of whitelists.
The policy should include the default-src or script-src directives. This has the following advantages:
The inline JavaScript code includes the eval function; hence, the JavaScript URLs will not be executed. You need to slightly change your mind about development with CSP. Here is an example of restricting all the content that comes only from the site's own domain and subdomains:
Content-Security-Policy: default-src 'self' *.mydomain.com
The following example shows how to restrict all the content from being loaded via a secure connection:
Content-Security-Policy: default-src https://ibank.mydomain.com
In the following example, we will allow all the assets to be loaded from our site and scripts from the Google API server:
Content-Security-Policy: default-src: 'self'; script-src: https://apis.google.com;
We created the csp project to see how CSP works. The server-side code is a slightly modified version of the server code from the previous topic, and it includes the route library, as shown in the following code:
import 'dart:io';
import 'dart:async';
import 'package:route/server.dart';
import 'urls.dart';
import 'files.dart';

main() {
  var pkcertDB = Platform.script.resolve('pkcert').toFilePath();
  SecureSocket
  .initialize(database: pkcertDB, password: 'changeit'),

  HttpServer
  .bindSecure(InternetAddress.ANY_IP_V6, 8443,
      certificateName: 'localhost_cert')
  .then((server) {
    new Router(server)
    ..filter(allUrls, filter)
    ..serve(allUrls).listen(serveDirectory('', as: '/'))
    ..defaultStream.listen(send404);
  });
}

Future<bool> filter(HttpRequest request) {
  HttpResponse response = request.response;
  response.headers.add("Content-Security-Policy",
  "default-src 'self'; style-src 'self'");
  return new Future.value(true);
}
We now use a filter method of the Route class to intercept each request and inject the Content-Security-Policy header in response, as shown in the following screenshot:
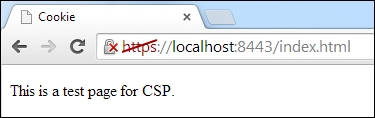
From the content of our header, it should be clear that all the scripts and styles from our website are permitted. Let's imagine a use case where you need to add a Google +1 button to your web application to allow users to recommend the content to their circles and drive traffic to your website, so simply include a +1 button on the web page via a JavaScript resource and add a +1 button tag. The script must be loaded using the HTTPS protocol. Here is the code of the changed web page:
<!DOCTYPE html>
<html>
<head>
<meta charset="utf-8">
<meta name="viewport"
content="width=device-width, initial-scale=1">
<title>Cookie</title>
<script type="text/javascript"
src="https://apis.google.com/js/plusone.js"></script>
<link type="text/css" href="index.css">
</head>
<body>
<p>This is a test page for CSP. <g:plusone></g:plusone></p>
</body>
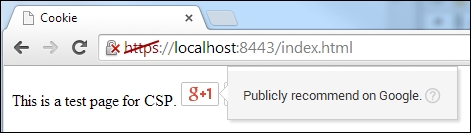
</html>Let's run the server and open the modified web page in Dartium. In a moment, you will receive the following CSP violation message about loading an untrusted script:

To make the +1 button work, you need to add different policies to the server code to allow trusted resources on your web page, as shown in the following code:
Future<bool> filter(HttpRequest request) {
  HttpResponse response = request.response;
  response.headers.add("Content-Security-Policy",
    "default-src 'self';" +
    "style-src 'self' 'unsafe-inline';" +
    "script-src 'self' https://apis.google.com;" +
    "frame-src https://*.google.com;" +
    "img-src https://*.gstatic.com;"
  );
  return new Future.value(true);
}
The result of the preceding code is as follows:
CSP is very flexible and useful when it is used properly. This header is supported by the following browsers:
- Chrome 25 (from v14 with the prefix
webkit) - Firefox 23 (from v4 with the prefix
moz) - Safari 7 (from v5 with the prefix
webkit) - Opera 15
- Internet Explorer 10 only supports the
sandboxdirective with the prefixms
JSON with padding (JSONP) is a client-side technique used to request data from a server in a different domain. This is possible because web browsers do not enforce the same-origin policy on the HTML script tag. The parameters of the JSONP request are passed as arguments to a script. The format of a JSONP result is different from the format of JSON, so the server must know how to respond to it. JSONP supports only the GET request method and accepts the callback function as the recipient of data, as shown in the following code:
<script src="http://my.com/data?format=jsonp&callback=cb"></script>
A web browser will call a cb function at the end of the request. With this script, we will get the JavaScript code and the web browser will run it as a normal script file. This could be a big risk because the server from which we are getting this script could be compromised and easily cause an XSS attack. Cross-origin resource sharing (CORS) can be used as a modern alternative to JSONP, which allows cross-domain communication from the web browser. As opposed to JSONP, CORS supports all the HTTP methods and allows you to do the following tasks:
CORS headers must be returned in the header of the requested web server. To initiate a cross-origin request, we need to add new HTTP headers that allow the web browser to communicate freely with the API on another domain. The cors project contains two servers. The first one, located in the server.dart file is a web server listening to the secure connection on port 8443 from our previous topic, as shown in the following code:
import 'dart:io';
import 'dart:async';

import 'package:route/server.dart';

import 'urls.dart';
import 'files.dart';

main() {
  var pkcertDB = Platform.script.resolve('pkcert').toFilePath();
  SecureSocket
  .initialize(database: pkcertDB, password: 'changeit'),

  HttpServer
  .bindSecure(InternetAddress.ANY_IP_V6, 8443,
      certificateName: 'localhost_cert')
  .then((server) {
    new Router(server)
    ..filter(allUrls, filter)
    ..serve(allUrls).listen(serveDirectory('', as: '/'))
    ..defaultStream.listen(send404);
  });
}

Future<bool> filter(HttpRequest request) {
  HttpResponse response = request.response;
  response.headers.add("Content-Security-Policy",
    "default-src 'self';" +
    "style-src 'self' 'unsafe-inline';" +
    "script-src 'self' https://apis.google.com;" +
    "frame-src https://*.google.com;" +
    "img-src https://*.gstatic.com;"
  );
  return new Future.value(true);
}
The second server, located in cors_server.dart, is the CORS web server listening on port 8080 and is not using HTTPS, as shown in the following code:
import 'dart:io';
import 'dart:async';

import 'package:route/server.dart';

import 'files.dart';

final allUrls = new RegExp('/(.*)'),
final productUrl = new UrlPattern('/product'),

main() {
  HttpServer
  .bind(InternetAddress.ANY_IP_V6, 8080)
  .then((server) {
    new Router(server)
    ..filter(allUrls, filter)
    ..serve(productUrl).listen(serverProduct)
    ..defaultStream.listen(send404);
  });
}

Future<bool> filter(HttpRequest request) {
  return new Future.value(true);
}

serverProduct(HttpRequest request) {
  return serveFile('products.json')(request);
}
The function filter in the second web server intends to set the header with CORS and allows any client to make cross-domain requests to this server. Our client will now look like the following code:
import 'dart:html';
import 'dart:convert';

void main() {
  onloadHandler();
}

onloadHandler() {
  var xhr = new HttpRequest();
  xhr.open('GET', 'http://localhost:8080/product', async:true);
  xhr.onLoad.listen((e) {
    Map repos = JSON.decode(xhr.response);
    var reposHTML = "";
    for (int i = 0; i < repos["repositories"].length; i++) {
      reposHTML += "<p>" +
          repos["repositories"][i]["name"] + "<br>" +
          repos["repositories"][i]["description"] + "</p>";
    }
    document.getElementById("allRepos").setInnerHtml(reposHTML);
  }).onError((e) {
    print('error making the request. ${e.toString()}'),
  });
  xhr.send();
}
The client code makes a cross-domain request and prints the markup with the result. Let's run both the servers and open our web page in Dartium on the address https://localhost:8443/index.html. It immediately comes with the cross-domain violation exception, as shown in the following screenshot:

Let's add connect-src in the following server code for a quick fix:
Future<bool> filter(HttpRequest request) {
  HttpResponse response = request.response;
  response.headers.add("Content-Security-Policy",
    "default-src 'self';" +
    "style-src 'self' 'unsafe-inline';" +
    "script-src 'self' https://apis.google.com;" +
    "frame-src https://*.google.com;" +
    "img-src https://*.gstatic.com;" +
    "connect-src http:/localhost:8080/product"
  );
  return new Future.value(true);
}
Restart the server and refresh the web page, and you will get the following exception:

Our request cannot pass the border of origins, so we will change the filter method in the CORS web server, as follows:
Future<bool> filter(HttpRequest request) {
  HttpResponse response = request.response;
  response.headers.add("Access-Control-Allow-Origin", "*");
  return new Future.value(true);
}
The preceding code will give the following result:
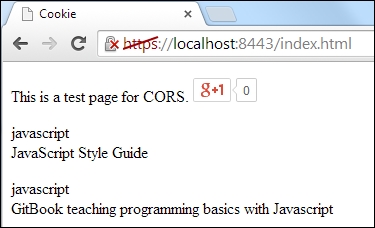
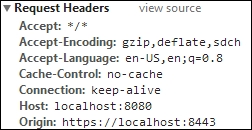
This was a simple demonstration of how we can use CORS on data provided by the web server. Dartium sends an initial request to the CORS server with an Origin HTTP header that matches the origin of our web page, as shown in the following screenshot:
We intend to specify Access-Control-Allow-Origin in the CORS server to allow all domains and a server-sent response with an asterisk symbol (*), as shown in the following screenshot:
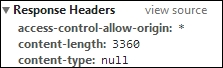
This pattern is widely used to organize accessible resources by anyone who knows the secret. The asterisk symbol is special as it tells the web browser that it doesn't allow requests without the following credentials:
- HTTP authentication
- Client-side SSL certificates
- Cookies
In order to include the credentials from the preceding list, you can use the other CORS header as follows:
Future<bool> filter(HttpRequest request) {
  HttpResponse response = request.response;
  response.headers.add("Access-Control-Allow-Origin", "*");
  response.headers.add("Access-Control-Allow-Credentials", "true");
  return new Future.value(true);
}
It works in conjunction with the credentials on HttpRequest, as shown in the following code:
var xhr = new HttpRequest();
xhr.open('GET', 'http://localhost:8080/product'),
xhr.withCredentials = true;
…
It will also include any cookies from a remote domain in the request.
The CORS server can set any header, but the getResponseHeader method of the HttpRequest class can read only the following simple headers:
Cache-ControlContent-LanguageContent-TypeExpiresLast-ModifiedPragma
If you need access to other headers, you must expose them via the Access-Control-Expose-Headers header as follows:
Future<bool> filter(HttpRequest request) {
HttpResponse response = request.response;
response.headers.add("Access-Control-Allow-Origin", "*");
response.headers.add("Access-Control-Expose-Headers",
"session-id");
response.headers.add("session-id", "123456");
return new Future.value(true);
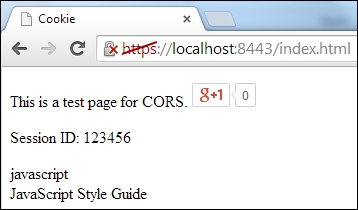
}We added a sessionId span element to the web page as follows:
<p>This is a test page for CORS. <g:plusone></g:plusone></p>
 Session ID: <span id="sessionId"></span>
<div id="allRepos"></div>
The following web page source code was updated as well:
var xhr = new HttpRequest();
xhr.open('GET', 'http://localhost:8080/product'),
xhr.onLoad.listen((e) {
  var sessionId = xhr.getResponseHeader("session-id");
  document.getElementById("sessionId").text = sessionId;
Now, restart the CORS server and reload the web page to get the following result:
CORS is supported across the following well-known web browsers:
- Chrome 3
- Firefox 3.5
- Opera 12
- Safari 4
- Internet Explorer 8
Completely Automated Public Turing test to tell Computers and Humans Apart (CAPTCHA) is a program whose main purpose is differentiating a human from a machine. Actually, CAPTCHA is a reverse Turing test because it is administrated by a computer. It is a barrier that prevents bots from using web services or collecting certain types of sensitive information. One of the ways of using CAPTCHA in Dart is using the free service reCAPTCHA of Google, so I decided to create a project with a sensible name, captcha, that contains one web page for user registration. We can follow several simple steps to add the reCAPTCHA solution into our project, but first we need to sign up for the API keys for our website with the following steps:
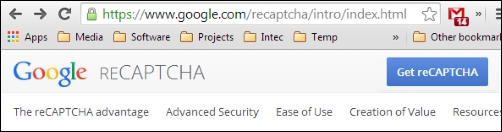
- Visit https://www.google.com/recaptcha and click on the Get reCAPTCHA button, as shown in the following screenshot:
- On the Get reCAPTCHA page, click on the Sign up Now! button and type your web server name in the Domain field, as shown in the following screenshot:
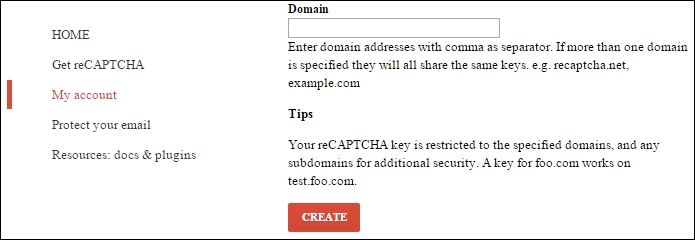
You can type as many domain names as you need; just separate them with commas. You can also use
localhostor127.0.0.1as the name of your server, because all the API keys work on it and you can develop and test your solution on your local machine. - Click on the CREATE button to create new API key. The server move you to the list of your domains, as shown in the following screenshot:
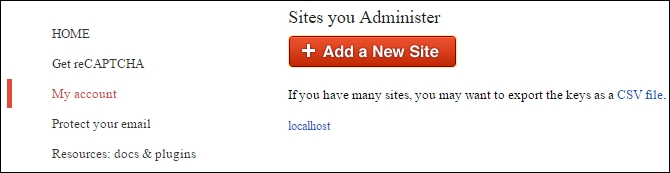
- Choose your domain to see the following details:
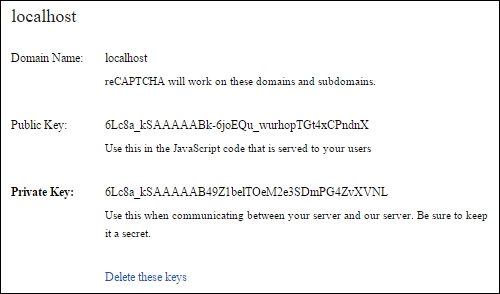
There are public and private keys that we will use in our solution. To integrate the reCAPTCHA solution in the captcha project, we used the small library recaptcha created by me and which is available on the https://pub.dartlang.org/ server. So, we can add it in the pubspec.yaml file under the dependencies packages. Open the captcha project in Dart Editor and navigate to index.html, which is shown in the following code:
<!DOCTYPE html>
<html>
  <head>
    <title>Registration</title>
    <meta charset="utf-8">
    <meta name="viewport"
      content="width=device-width, initial-scale=1">
    <link type="text/css" href="index.css">
  </head>
  <body>
    <H1>Registration form with CAPTCHA</H1>
    <form name="captcha_form" method="post" action="/register">
      <label for="username">Username:</label>
      <input type="text" name="username"><br>
      <label for="password">Password:</label>
      <input type="password" name="password">
      <script type="text/javascript"
        src="http://www.google.com/recaptcha/api/challenge?k=6Lc8a_kSAAAAABk-6joEQu_wurhopTGt4xCPndnX">
      </script>
      <noscript>
        <iframe src="http://www.google.com/recaptcha/api/noscript?k=6Lc8a_kSAAAAABk-6joEQu_wurhopTGt4xCPndnX"
          height="300" width="500" frameborder="0"></iframe><br>
         <textarea name="recaptcha_challenge_field" rows="3"
           cols="40"></textarea>
         <input type="hidden" name="recaptcha_response_field"
           value="manual_challenge">
      </noscript>
      <button type="submit" value="Submit">Submit</button>
    </form>
  </body>
</html>
Copy and paste the public key of the domain registered on reCAPTCHA as the parameter for JavaScript and the parameter for the source of the iframe tag. You need to change these values for your public key. Now, let's open the server.dart file and move to line 10 where we created an instance of the ReCaptcha class. Again, copy and paste a pair of private and public keys of your domain here so that the class instance can pass them via the free service reCAPTCHA on Google in order to ensure that the sender is correct and has a registered domain, as shown in the following code:
…
final ReCaptcha reCaptcha = new ReCaptcha(
  '6Lc8a_kSAAAAABk-6joEQu_wurhopTGt4xCPndnX', // public key
  '6Lc8a_kSAAAAAB49Z1belTOeM2e3SDmPG4ZvXVNL'), // private key
Then, create a map of the error code and human-readable text as shown in the following code:
final Map MESSAGES = {
    'invalid-site-private-key':'Incorrect private key',
    'invalid-request-cookie':'The challenge parameter of the verify script was incorrect',
    'incorrect-captcha-sol':'The CAPTCHA solution was incorrect',
    'captcha-timeout':'The solution was received after the CAPTCHA timed out',
    'recaptcha-not-reachable':"Unknown error in CAPTCHA"};
Then, read the POST method parameters in the serverRegister function and convert them into a map to easily access them later. All the parameters follow the reCAPTCHA verification via the checkAnswer method of ReCaptcha, as shown in the following code:
serveRegister(HttpRequest request) {
  HttpResponse response = request.response;
  request.listen((List<int> buffer) {
    String strBuffer = new String.fromCharCodes(buffer);
    Map data = postToMap(strBuffer);
    //
    String userName = data.containsKey('username') ?
      data['username'] : '';
    String password = data.containsKey('password') ?
      data['password'] : '';
    String cptChallenge =
      data.containsKey('recaptcha_challenge_field') ?
      data['recaptcha_challenge_field'] : '';
    String cptResponse =
      data.containsKey('recaptcha_response_field') ?
      data['recaptcha_response_field'] : '';
    reCaptcha.checkAnswer(request.uri.host, cptChallenge, cptResponse).then((ReCaptchaResponse cptResponse) {
      response.statusCode = HttpStatus.OK;
      setCORSHeader(response);
      if (cptResponse.valid) {
        response.write("Registration success.");
      } else {
        response.write(MESSAGES[cptResponse.errorCode]);
      }
      response.close();
    });
  });
}
In the setCORSHeader function, add the CORS headers to allow the POST requests from the cross-origin web resources as follows:
setCORSHeader(HttpResponse response) {
response.headers.add('Access-Control-Allow-Origin', '*'),
response.headers.add('Access-Control-Allow-Methods', 'POST, OPTIONS'),
response.headers.add('Access-Control-Allow-Headers',
'Origin, X-Requested-With, Content-Type, Accept'),
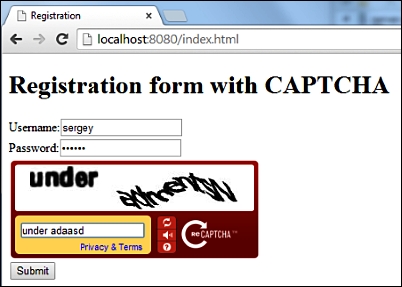
}Let's run the server and open http://localhost:8080/index.html in Dartium to get the following result:
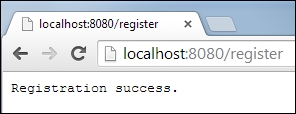
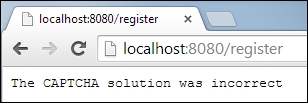
Try to input a wrong CAPTCHA solution and submit the form. After submitting it, you will see the following error message:
Let's go back quickly and type the correct CAPTCHA solution. After submitting, you will see the following success message: