
The World Wide Web (WWW) is one of the most commonly used services on the Internet. The Hypertext Transfer Protocol (HTTP) is a text-based application layer protocol that makes it work. All web browsers and web service applications use HTTP to communicate with each other over the Internet. A web browser or standalone application opens a connection and sends a request to the web server. The web server services the request and closes the connection to the web client.
You cannot find any information about persistent connections in the HTTP 1.0 specification. However, in essence, it was unofficially added to an existing protocol via the following additional header to the request:
Connection: Keep-Alive
So, if a client supports Keep-Alive, it adds the preceding header to his request. A server receives this request and generates a response includes this header.
Starting from HTTP 1.1, all the connections are considered persistent unless declared otherwise. A HTTP persistent connection does not use external Keep-Alive messages. Multiple requests could be sent to use a single opened connection.
We can use the HTTP protocol for communication purposes via the following different libraries:
- The
dart:iolibrary from the Dart SDK contains theHttpClientclass, which communicates with the server over the HTTP protocol. - The
dart:htmllibrary from the Dart SDK has theHttpRequestclass uses a client-sideXMLHttpRequestto obtaining data from the URL. It also helps in obtaining data from HTTP or FTP, or updating page content via AJAX. - The http package from the pub server written by the Google development team contains a future-based library to create HTTP requests. It is platform independent, so we can use the
http.dartlibrary to generate HTTP requests from standalone applications or thebrowser_client.dartlibrary for web browser-based applications.
Let's see how we can organize communication between the web browser or standalone application on one side and the web server on the other side.
In this chapter, we will create a simple web server that can be used for all examples as follows:
import 'dart:io';
import 'package:route/server.dart';

import 'urls.dart' as urls;
import 'files.dart';
main() {
  final allUrls = new RegExp('/(.*)'),

  HttpServer.bind(urls.serverAddress, urls.serverPort)
  .then((server) {
    print("Server runs on ${server.address.host}:${server.port}");
    new Router(server)
      ..serve(urls.dataUrl, method:'GET').listen(processParams)
      ..serve(urls.dataUrl, method:'DELETE').listen(processParams)
      ..serve(urls.dataUrl, method:'POST').listen(processBody)
      ..serve(urls.dataUrl, method:'PUT').listen(processBody)
      ..serve(allUrls).listen(serveDirectory('', as: '/'))
      ..defaultStream.listen(send404);
  });
}
In the preceding code, we intentionally used the route package from the pub server to reduce the number of code wraps around the main functionality. Our code serves the client's request to match dataUrl. Depending on the method of request, the code invokes the processParams or processBody functions. We keep serverAddress, serverPort, and dataUrl inside the urls.dart file. We especially move them away to the external file to share this data with client code. We set the shared headers in the setHeaders method as shown in following code:
setHeaders(HttpRequest request) {
  request.response.headers.contentType =
    new ContentType("text", "plain", charset: "utf-8");
}
The following method processes the query parameters:
processParams(HttpRequest request) {
  setHeaders(request);
  request.response.write(
    "${request.method}: ${request.uri.path}");
  if (request.uri.queryParameters.length > 0) {
    request.response.write(", Params:" +
        request.uri.queryParameters.toString());
  }
  request.response.close();
}
The following method processes the requested message body. Depending on the amount of the content, we write the content in the output stream or just return the message with the method name and path, as follows:
processBody(HttpRequest request) {
  setHeaders(request);
  if (request.contentLength > 0) {
    request.listen((List<int> buffer) {
      request.response.write(
          "${request.method}: ${request.uri.path}");
      request.response.write(", Data:" +
          new String.fromCharCodes(buffer));
      request.response.close();
    });
  } else {
    request.response.write(
        "${request.method}: ${request.uri.path}");
    request.response.close();
  }
}
Our server doesn't do anything special. It responds with the method's name, query parameters, or the message body, which is represented as a string per request. The server must always be online to handle our requests. Dart Editor can run different Dart programs simultaneously. To do this, just right-click on the server.dart file and run it as shown in the following screenshot:

Let's start from the standard dart:io library and the HttpClient class to organize communication from the standalone client to the web server. Any method of the HttpClient class that is used for communication is a two-step process. The first time we call the original method, it returns Future with HttpClientRequest. From now, the underlying network communication is opened but no data is sent yet. You can set the HTTP headers or body on the request and finally return the results of the request's close method. Take a look at the following code based on the HttpClient class from the dart:io library:
import 'dart:io';
import 'dart:convert';
import 'urls.dart' as urls;

var url = "http://${urls.serverAddress}:${urls.serverPort}${urls.dataUrl}";
var name = "HttpClient Standalone";
// The following method processes all responses:
responseHandler(response) {
  if (response is HttpClientResponse) {
    response.transform(UTF8.decoder).listen((contents) {
      print("${response.statusCode}: ${contents}");
    });
  } else {
    print("Readed: " + response.toString());
  }
}
// We send data to a server via this method:
sendData(HttpClientRequest request, data) {
  request.headers.contentType =
        new ContentType("application", "json", charset: "utf-8");
  List<int> buffer = JSON.encode(data).codeUnits;
  request.contentLength = buffer.length;
  request.add(buffer);
}

main() {
  // We need to encode name before sending it:
  String query = "name=" + Uri.encodeQueryComponent(name);
  // We create the client instance to send multiple requests:
  HttpClient client = new HttpClient();
  // Make a GET request with query:
  client.getUrl(Uri.parse("$url?$query"))
  .then((HttpClientRequest request) {
    return request.close();
  }).then(responseHandler);
  // Here we send a map with data via the POST request:
  client.postUrl(Uri.parse(url))
  .then((HttpClientRequest request) {
    sendData(request, {'post name': name});
    return request.close();
  }).then(responseHandler);
  // The PUT request is very similar to the POST one:
  client.putUrl(Uri.parse(url))
  .then((HttpClientRequest request) {
    sendData(request, {'put name': name});
    return request.close();
  }).then(responseHandler);
  // Here is the DELETE request:
  client.deleteUrl(Uri.parse("$url?$query"))
  .then((HttpClientRequest request) {
    return request.close();
  }).then(responseHandler);
}
Run the server code as explained in the Web server section and then run the code in standalone_dart_io.dart via the context-sensitive menu. Refer to the following client output:
200: GET: /data, Params:{name: HttpClient Standalone}
200: DELETE: /data, Params:{name: HttpClient Standalone}
200: POST: /data, Data:{"post name":"HttpClient Standalone"}
200: PUT: /data, Data:{"put name":"HttpClient Standalone"}
The HttpClient class provides a set of methods to create HTTP requests but a two-step process is a real disadvantage.
Let's see how the http library from the http package can improve the client-side development experience. Before using the http library, we should add the http package in a group of dependencies in the pubspec.yaml file of our project. We create a standalone_http.dart file with the help of the following code:
import 'package:http/http.dart' as http;
import 'dart:async';
import 'urls.dart' as urls

var url = "http://${urls.serverAddress}:${urls.serverPort}${urls.dataUrl}";
var name = "Http Standalone";
// We process all responses in this method:
responseHandler(response) {
  if (response is http.Response) {
    print("${response.statusCode}: ${response.body}");
  } else {
    print("Readed: " + response.toString());
  }
}

main() {
  // We need to encode name before sending it:
  String query = "name=" + Uri.encodeQueryComponent(name);
  // Static functions such as GET, POST, and so on create new instances of the Client interface per request:
  // All static functions such as get from the http library always create
  // new instance of the Client class
  http.get("$url?$query").then(responseHandler);
  var client = new http.Client();
  Future.wait([
  client.get("$url?$query").then(responseHandler),
  client.post(url, body: {"name": name}).then(responseHandler),
  client.put(url, body: {"name": name}).then(responseHandler),
  client.delete("$url?$query").then(responseHandler)])
.then((list) {
  client.close();
});
}
A huge advantage of using the Client class from the http library over HttpClient from the dart:io library is less verbose code with a similar result:
200: GET: /data, Params:{name: Http Standalone}
200: GET: /data, Params:{name: Http Standalone}
200: POST: /data, Data:name=Http+Standalone
200: PUT: /data, Data:name=Http+Standalone
200: DELETE: /data, Params:{name: Http Standalone}You cannot use the dart:io library to write a web browser-based application because this library was written especially for standalone and server applications. Instead, we will use the HttpRequest class from the dart:html library to achieve the same result. This class can be used to obtain data from the HTTP or FTP application protocols as well as AJAX polling requests, as shown in the following code:
import 'dart:html';
import 'dart:convert';
import 'urls.dart' as urls;

var url = "http://${urls.serverAddress}:${urls.serverPort}${urls.dataUrl}";
var name = "HttpClient Browser";
// We save the response text in a DIV element and append it to the
// DIV container:
responseHandler(DivElement log, responseText) {
  DivElement item = new DivElement()
  ..text = responseText.toString();
  log.append(item);
}

void main() {
  DivElement log = querySelector("#log");
  // Here we prepare query to send:
  String query = "name=" + Uri.encodeQueryComponent(name);
  String data = JSON.encode({"name": name});
  HttpRequest request = new HttpRequest();
  // We open a connection to the server via HttpRequest:
  request.open("GET", "$url?$query");

  request.onLoad.listen((ProgressEvent event) {
    responseHandler(log, request.response);
  });
  // Now send data via call the send method:
  request.send();

  request.open("POST", url);
  request.onLoad.listen((ProgressEvent event) {
    responseHandler(log, request.response);
  });
  request.send(data);

  request.open("PUT", url);
  request.onLoad.listen((ProgressEvent event) {
    responseHandler(log, request.response);
  });
  request.send(data);

  request.open("DELETE", "$url?$query");
  request.onLoad.listen((ProgressEvent event) {
    responseHandler(log, request.response);
  });
  request.send();
  // HttpRequest supports less verbose code:
  HttpRequest.request("$url?$query")
  .then((HttpRequest request)
    => responseHandler(log, request.response));

  HttpRequest.request(url, method: "POST", sendData: data)
  .then((HttpRequest request)
    => responseHandler(log, request.response));

  HttpRequest.request(url, method: "PUT", sendData: data)
  .then((HttpRequest request)
    => responseHandler(log, request.response));

  HttpRequest.request("$url?$query", method: "DELETE")
  .then((HttpRequest request)
    => responseHandler(log, request.response));

  // The getString method is the absolute champion of size
  // if you need a simple GET request:
  HttpRequest.getString("$url?$query")
  .then((response) => responseHandler(log, response));
We now create a launch target to run the index.html file via the Manage Launches item from the Run menu, as shown in the following screenshot:
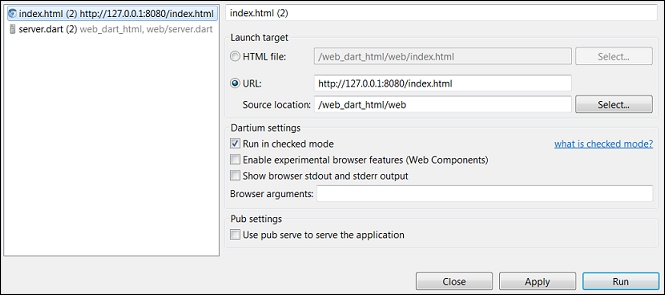
This Dartium launch configuration opens the index.html file in the default web browser. Take into account the fact that the Use pub service to serve the application option is unchecked because we are using our own server to serve all the browser requests. You could set breakpoints and debug code if necessary. Run the server code as mentioned in the Web server section and index.html through the launcher. The following is the result of our requests when printed on the web page:
DELETE: /data, Params:{name: HttpClient Browser}
DELETE: /data, Params:{name: HttpClient Browser}
DELETE: /data, Params:{name: HttpClient Browser}
DELETE: /data, Params:{name: HttpClient Browser}
DELETE: /data, Params:{name: HttpClient Browser}
GET: /data, Params:{name: HttpClient Browser}
POST: /data, Data:{"name":"HttpClient Browser"}
DELETE: /data, Params:{name: HttpClient Browser}
PUT: /data, Data:{"name":"HttpClient Browser"}
GET: /data, Params:{name: HttpClient Browser}As mentioned earlier, the http package combines two sorts of libraries to help in client-to-server communication. Let's see how the BrowserClient class from the http package can help us achieve the same result with less effort:
import 'dart:html' as dom;
import 'package:http/browser_client.dart';
import 'package:http/src/request.dart';
import 'package:http/src/streamed_response.dart';
import 'dart:convert';
import 'urls.dart' as urls;

var url = "http://${urls.serverAddress}:${urls.serverPort}${urls.dataUrl}";
var name = "HttpClient Browser";
// The response handler is as follows:
responseHandler(dom.DivElement log, StreamedResponse response) {
  dom.DivElement item = new dom.DivElement();
  response.stream.transform(UTF8.decoder).listen((contents) {
    item.text = contents;
  });
  log.append(item);
}

void main() {
  dom.DivElement log = dom.querySelector("#log");
  String query = "name=" + Uri.encodeQueryComponent(name);
  String data = JSON.encode({"name": name});

  BrowserClient client = new BrowserClient();
  Request request = new Request("GET", Uri.parse("$url?$query"));
  // We organize request via call the send method of BrowserClient
  // class:
  client.send(request).then((StreamedResponse response)
      => responseHandler(log, response));

  request = new Request("POST", Uri.parse(url));
  request.body = data;
  client.send(request).then((StreamedResponse response)
      => responseHandler(log, response));

  request = new Request("PUT", Uri.parse(url));
  request.body = data;
  client.send(request).then((StreamedResponse response)
      => responseHandler(log, response));

  request = new Request("DELETE", Uri.parse("$url?$query"));
  client.send(request).then((StreamedResponse response)
      => responseHandler(log, response));
}
Create a Dartium launch configuration and open the index.html file in a web browser. Run the server and launch the new configuration to see the following expected result:
GET: /data, Params:{name: HttpClient Browser}
POST: /data, Data:{"name":"HttpClient Browser"}
DELETE: /data, Params:{name: HttpClient Browser}
PUT: /data, Data:{"name":"HttpClient Browser"}
You now know how to easily create client-to-server communication via the BrowserClient and Request classes from the http and html packages.