
In this section, we will build a working algorithmic trading platform that will authenticate with Interactive Brokers (IB) and log in, retrieve the market data, and send orders. IB is one of the most popular brokers in the trading community and has a long history of API development. There are plenty of articles on the use of the API available on the Web. IB serves clients ranging from hedge funds to retail traders. Although the API does not support Python directly, Python wrappers such as IbPy are available to make the API calls to the IB interface. The IB API is unique to its own implementation, and every broker has its own API handling methods. Nevertheless, the documents and sample applications provided by your broker would demonstrate the core functionality of every API interface that can be easily integrated into an algorithmic trading system if designed properly.
The official page for IB is http://www.interactivebrokers.com. Here, you can find a wealth of information regarding trading and investing for retail and institutional traders. In this section, we will take a look at how to get the Trader WorkStation X (TWS) installed and running on your local workstation before setting up an algorithmic trading system using Python. Note that we will perform simulated trading on a demonstration account. If your trading strategy turns out to be profitable, head to the OPEN AN ACCOUNT section of the IB website to open a live trading account. Rules, regulations, market data fees, exchange fees, commissions, and other conditions are subjected to the broker of your choice. In addition, market conditions are vastly different from the simulated environment. You are encouraged to perform extensive testing on your algorithmic trading system before running on live markets.
The following key steps describe how to install TWS on your local workstation, log in to the demonstration account, and set it up for API use:
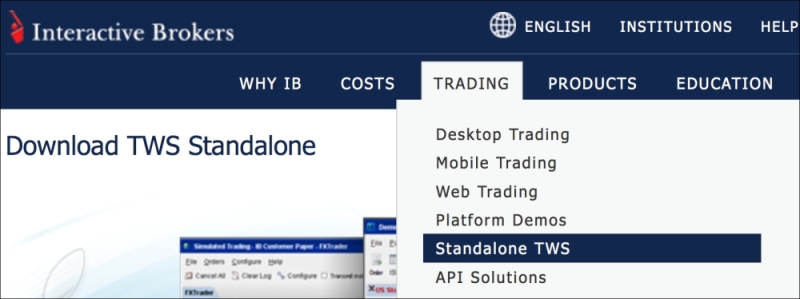
- From IB's official website, navigate to TRADING, then select Standalone TWS. Choose the installation executable that is suitable for your local workstation. TWS runs on Java; therefore, ensure that Java runtime plugin is already installed on your local workstation. Refer to the following screenshot:
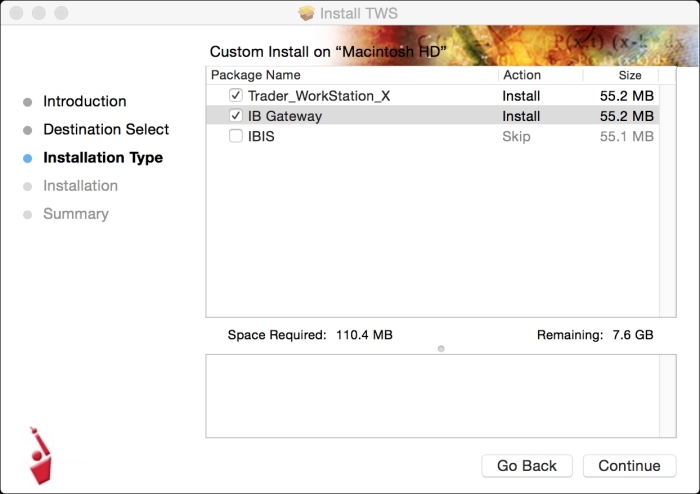
- When prompted during the installation process, choose Trader_WorkStation_X and IB Gateway options. The Trader WorkStation X (TWS) is the trading platform with full order management functionality. The IB Gateway program accepts and processes the API connections without any order management features of the TWS. We will not cover the use of the IB Gateway, but you may find it useful later. Select the destination directory on your local workstation where TWS will place all the required files, as shown in the following screenshot:
- When the installation is completed, a TWS shortcut icon will appear together with your list of installed applications. Double-click on the icon to start the TWS program.
- When TWS starts, you will be prompted to enter your login credentials. To log in to the demonstration account, type
edemoin the username field anddemouserin the password field, as shown in the following screenshot: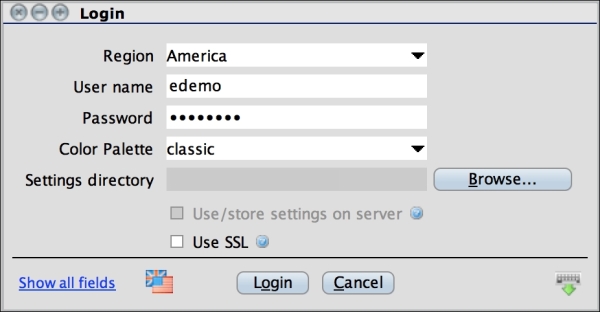
- Once we have managed to load our demo account on TWS, we can now set up its API functionality. On the toolbar, click on Configure:
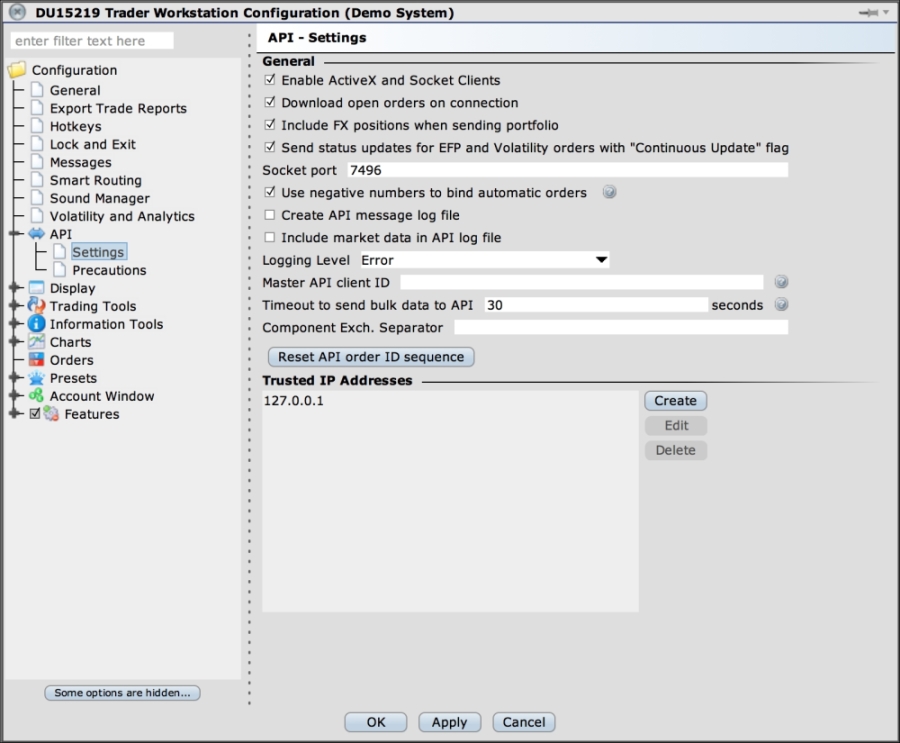
- Under the Configuration tree, open the API node to reveal further options. Select Settings. Note that Socket port is 7496, and we added the IP address of our workstation housing our algorithmic trading system to the list of trusted IP addresses, which in this case is 127.0.0.1. Ensure that the Enable ActiveX and Socket Clients option is selected to allow the socket connections to TWS:
- Click on OK to save all the changes. TWS is now ready to accept orders and market data requests from our algorithmic trading system.
IbPy is an add-on module for Python that wraps the IB API. It is open source and can be found at https://github.com/blampe/IbPy. Head to this URL and download the source files. Unzip the source folder, and use Terminal to navigate to this directory. Type python setup.py install to install IbPy as part of the Python runtime environment.
The use of IbPy is similar to the API calls, as documented on the IB website. The documentation for IbPy is at https://code.google.com/p/ibpy/w/list.
In this section, we will start interacting with TWS using Python by establishing a connection and sending out a market order to the exchange.
Once IbPy is installed, import the following necessary modules into our Python script:
from ib.ext.Contract import Contract
from ib.ext.Order import Order
from ib.opt import Connection
Next, implement the logging functions to handle calls from the server. The error_handler method is invoked whenever the API encounters an error, which is accompanied with a message. The server_handler method is dedicated to handle all the other forms of returned API messages. The msg variable is a type of an ib.opt.message object and references the method calls, as defined by the IB API EWrapper methods. The API documentation can be accessed at https://www.interactivebrokers.com/en/software/api/api.htm. The following is the Python code for the server_handler method:
def error_handler(msg):
    print "Server Error:", msg
def server_handler(msg):
    print "Server Msg:", msg.typeName, "-", msg
We will place a sample order of the stock AAPL. The contract specifications of the order are defined by the Contract class object found in the ib.ext.Contract module. We will create a method called create_contract that returns a new instance of this object:
def create_contract(symbol, sec_type, exch, prim_exch, curr):
    contract = Contract()
    contract.m_symbol = symbol
    contract.m_secType = sec_type
    contract.m_exchange = exch
    contract.m_primaryExch = prim_exch
    contract.m_currency = curr
    return contract
The Order class object is used to place an order with TWS. Let's define a method called create_order that will return a new instance of the object:
def create_order(order_type, quantity, action):
    order = Order()
    order.m_orderType = order_type
    order.m_totalQuantity = quantity
    order.m_action = action
    return order
After the required methods are created, we can then begin to script the main functionality. Let's initialize the required variables:
if __name__ == "__main__":
    client_id = 100
    order_id = 1
    port = 7496
    tws_conn = None
Note that the client_id variable is our assigned integer that identifies the instance of the client communicating with TWS. The order_id variable is our assigned integer that identifies the order queue number sent to TWS. Each new order requires this value to be incremented sequentially. The port number has the same value as defined in our API settings of TWS earlier. The tws_conn variable holds the connection value to TWS. Let's initialize this variable with an empty value for now.
Let's use a try block that encapsulates the Connection.create method to handle the socket connections to TWS in a graceful manner:
try:
    # Establish connection to TWS.
    tws_conn = Connection.create(port=port,
                                 clientId=client_id)
    tws_conn.connect()

    # Assign error handling function.
    tws_conn.register(error_handler, 'Error')

    # Assign server messages handling function.
    tws_conn.registerAll(server_handler)

finally:
    # Disconnect from TWS
    if tws_conn is not None:
        tws_conn.disconnect()
The port and clientId parameter fields define this connection. After the connection instance is created, the connect method will try to connect to TWS.
When the connection to TWS has successfully opened, it is time to register listeners to receive notifications from the server. The register method associates a function handler to a particular event. The registerAll method associates a handler to all the messages generated. This is where the error_handler and server_handler methods declared earlier will be used for this occasion.
Before sending our very first order of 100 shares of AAPL to the exchange, we will call the create_contract method to create a new contract object for AAPL. Then, we will call the create_order method to create a new Order object, to go long 100 shares. Finally, we will call the placeOrder method of the Connection class to send out this order to TWS:
# Create a contract for AAPL stock using SMART order routing.
aapl_contract = create_contract('AAPL',
                                'STK',
                                'SMART',
                                'SMART',
                                'USD')

# Go long 100 shares of AAPL
aapl_order = create_order('MKT', 100, 'BUY')

# Place order on IB TWS.
tws_conn.placeOrder(order_id, aapl_contract, aapl_order)
That's it! Let's run our Python script. We should get a similar output as follows:
Server Error: <error id=-1, errorCode=2104, errorMsg=Market data farm connection is OK:ibdemo>
Server Response: error, <error id=-1, errorCode=2104, errorMsg=Market data farm connection is OK:ibdemo>
Server Version: 75
TWS Time at connection:20141210 23:14:17 CST
Server Msg: managedAccounts - <managedAccounts accountsList=DU15200>
Server Msg: nextValidId - <nextValidId orderId=1>
Server Error: <error id=-1, errorCode=2104, errorMsg=Market data farm connection is OK:ibdemo>
Server Msg: error - <error id=-1, errorCode=2104, errorMsg=Market data farm connection is OK:ibdemo>
Server Error: <error id=-1, errorCode=2107, errorMsg=HMDS data farm connection is inactive but should be available upon demand.demohmds>
Server Msg: error - <error id=-1, errorCode=2107, errorMsg=HMDS data farm connection is inactive but should be available upon demand.demohmds>
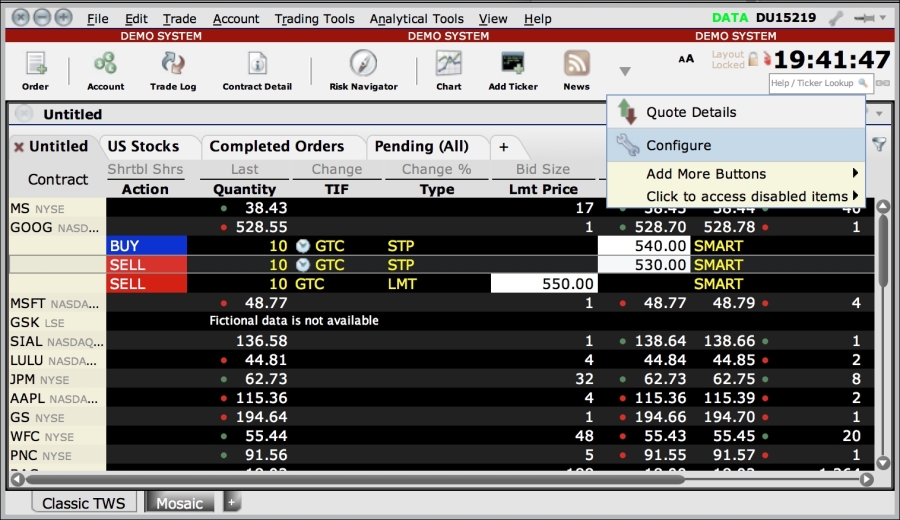
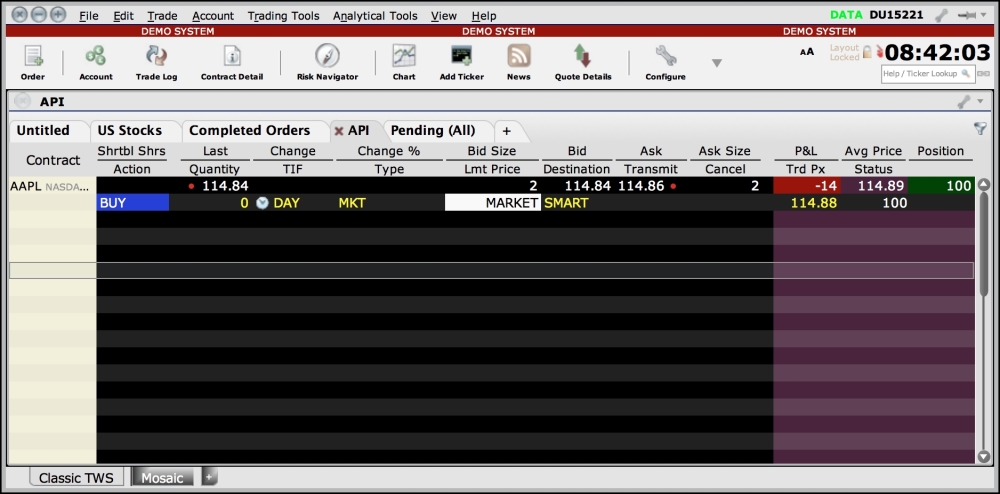
Basically, what the error messages say is that there are no errors and the connections are OK. Should the simulated order be executed successfully during market trading hours, the trade will be reflected in TWS:
The full source code of our implementation is given as follows:
""" A Simple Order Routing Mechanism """
from ib.ext.Contract import Contract
from ib.ext.Order import Order
from ib.opt import Connection

def error_handler(msg):
    print "Server Error:", msg

def server_handler(msg):
    print "Server Msg:", msg.typeName, "-", msg

def create_contract(symbol, sec_type, exch, prim_exch, curr):
    contract = Contract()
    contract.m_symbol = symbol
    contract.m_secType = sec_type
    contract.m_exchange = exch
    contract.m_primaryExch = prim_exch
    contract.m_currency = curr
    return contract

def create_order(order_type, quantity, action):
    order = Order()
    order.m_orderType = order_type
    order.m_totalQuantity = quantity
    order.m_action = action
    return order

if __name__ == "__main__":
    client_id = 1
    order_id = 119
    port = 7496
    tws_conn = None
    try:
        # Establish connection to TWS.
        tws_conn = Connection.create(port=port,
                                     clientId=client_id)
        tws_conn.connect()

        # Assign error handling function.
        tws_conn.register(error_handler, 'Error')

        # Assign server messages handling function.
        tws_conn.registerAll(server_handler)

        # Create AAPL contract and send order
        aapl_contract = create_contract('AAPL',
                                        'STK',
                                        'SMART',
                                        'SMART',
                                        'USD')

        # Go long 100 shares of AAPL
        aapl_order = create_order('MKT', 100, 'BUY')

        # Place order on IB TWS.
        tws_conn.placeOrder(order_id, aapl_contract, aapl_order)

    finally:
        # Disconnect from TWS
        if tws_conn is not None:
            tws_conn.disconnect()