
9
Reconciling Uploaded Bank and Credit Card Transactions
In Chapter 4, Customizing QuickBooks for Your Business, we showed you how to connect bank and credit card accounts to QuickBooks Online (QBO) to reduce the amount of time you spend manually entering data. In this chapter, we will show you how to manage bank and credit card transactions that have been uploaded to QuickBooks.
When bank and credit card transactions are uploaded, they are organized in the Banking Center. This area serves as a holding place where transactions can be reviewed before they are recorded in your books. Before these transactions can be recorded in QuickBooks, you must review them. This includes matching them with transactions that have already been entered into QuickBooks, adding payee or category information, and providing any additional details to help identify each transaction. We will also show you how bank rules can help to reduce the number of transactions requiring manual review. Last but not least, we will show you how to reconcile your accounts. Reconciling is the process of making sure your QuickBooks data matches the monthly statements provided by your financial institution. By reconciling often, you can catch errors made by the bank or credit card company and catch fraudulent transactions a lot sooner.
In this chapter, we will cover the following topics:
- Overview of the Banking Center
- Matching transactions
- Editing banking transactions
- Creating and using bank rules
- Reconciling accounts
By the end of this chapter, you will have a solid understanding of how the Banking Center works. You will know how to match transactions, and how to edit transactions by adding a memo or changing the category. You will be more efficient with managing banking transactions by using bank rules. Finally, you will be confident in reconciling your accounts with the statements received from your financial institution. We will start by giving you an overview of the Banking Center, which is where you will find uploaded bank and credit card transactions.
The US edition of QBO was used to create this book. If you are using a version that is outside of the United States, results may differ.
Please note that the screenshots in this chapter have been taken using the Accountant view menu. In Chapter 1, Getting Started with QuickBooks Online, we introduced a new menu called Business view. If you are in Business view, you will need to switch to the Accountant view menu so that your screen resembles the images shown throughout this book. To do this, click on the gear (settings) menu (located in the upper-right corner) and select Switch to Accountant view as shown in Figure 9.1 below:

Figure 9.1: Switching views in QBO
Overview of the Banking Center
The Banking Center is where you can manage bank and credit card transactions that have been uploaded into QuickBooks from your financial institution. These transactions require your review before they are recorded in your books.
At the very top of the page, you will see tiles that represent bank and credit card accounts you have added to QuickBooks. On each tile, you will find the name of the account, the current balance (per your financial institution), the current balance (per QuickBooks), and the number of transactions that require review before they can be recorded in the QuickBooks check register.
Follow these steps to navigate to the Banking Center:
- Click on the Banking tab, located on the left menu bar, and select Banking, as indicated in Figure 9.2:

Figure 9.2: Navigating to the Banking Center
- The Banking Center will appear, as indicated in Figure 9.3:
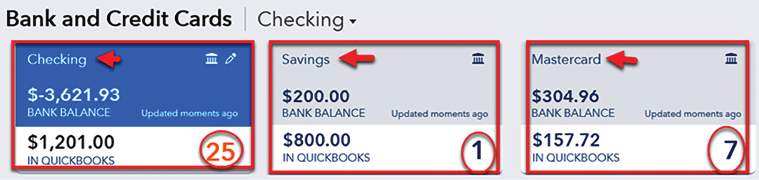
Figure 9.3: Bank and credit card accounts in the Banking Center
Pro Tip: If you have not connected a bank or credit card account to QuickBooks, your screen will not appear as it does in Figure 9.3. Instead, you will be given the option to connect accounts or upload transactions, as shown in the screenshot below:

Figure 9.4: Option to connect accounts in the Banking Center
The following is a brief description of the information you will find in the Banking Center:
- Bank account name: At the very top of each tile, you will find the name of the account (for example, Checking, Savings, or Mastercard).
- BANK BALANCE: The balance of the account, per your financial institution, will be displayed below the bank account name.
- IN QUICKBOOKS: The balance of the account, per QuickBooks, will be displayed right below the bank balance.
- Transactions for review: Transactions that have been uploaded from your financial institution and are pending your review will be indicated in the lower-right corner of each tile. In the preceding screenshot, these numbers are 25, 1, and 7.
Pro Tip: If the bank balance and the balance in QuickBooks match, this means all uploaded transactions have been reviewed. As a result, you will not see a number in the lower-right corner of the tile. If the balances do not match and you don’t have any transactions in the For Review tab, that does not necessarily mean that you are missing something. A difference in the two balances can be from outstanding items that have not yet cleared the bank due to timing differences, or transactions that have not yet uploaded to QBO.
If you imported your transactions into QuickBooks from a CSV file instead of connecting your bank and credit card accounts to QuickBooks, you will only see a QuickBooks balance (not a bank balance) for each account. I recommend reviewing transactions on a daily or weekly basis so that you don’t get too far behind.
Now that we have shown you how to navigate the Banking Center so you can review and manage bank and credit card transactions, you are ready to take action on the uploaded transactions. In the next section, we will show you how QuickBooks can save you time by matching uploaded transactions with transactions previously entered into QuickBooks.
Matching transactions
In this section, we will cover a process called matching transactions. QuickBooks will automatically attempt to match transactions that have been uploaded into QuickBooks with transactions that have already been recorded in QuickBooks. This process can help you to save time you would normally have spent trying to match transactions manually. We will show you how this process works by going through examples.
In the For review tab, we can see that QuickBooks has attempted to match three transactions that were previously entered into QuickBooks:

Figure 9.5: Banking transactions in the For review tab
The following is a brief explanation of the preceding three transactions for which QuickBooks has found a match:
- Deposit for $868.15: QuickBooks has found a deposit in the file for $868.15 (dated 09/03/21), which matches a deposit the bank has uploaded to the Banking Center for $868.15. If these transactions are one and the same, simply click Match in the far-right column.
- Check for $228.75: QuickBooks has identified Check #75 for $228.75, which matches a withdrawal uploaded from the bank for the same amount. If these transactions are one and the same, simply click Match in the far-right column.
- Bill Payment for $114.09: QuickBooks has found a bill payment for $114.09, which matches a withdrawal uploaded from the bank for the same amount. If these transactions are one and the same, simply click Match in the far-right column.
Pro Tip: Transfers between bank accounts are also very common. If both bank accounts are connected to QuickBooks, it will most likely automatically match these bank transfers for you. Be sure to verify the accounts are correct before recording in QuickBooks.
When you click Match, these items will move from the For review tab to the Categorized tab in the Banking Center. These items will also be marked as cleared in QuickBooks, which will be important when we get ready to reconcile these accounts later on. If QuickBooks has not found the right match, you can replace it with the correct match.
To change the match recommended by QuickBooks, click on the transaction, and then click on the Find other matches button, as indicated in Figure 9.6:
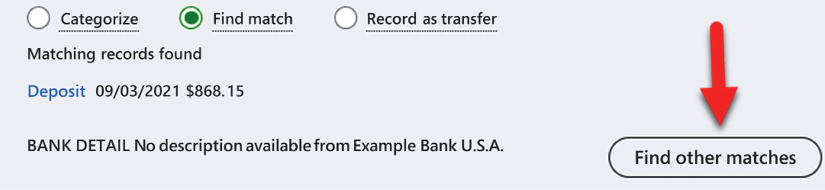
Figure 9.6: Matching transactions in the Banking Center
In addition to matching transactions, you will need to provide additional information, such as the payee and category (the account), before the transaction can be recorded in QuickBooks. Banking transactions that have not been matched will remain in the Banking Center to be categorized and added to your books. Some examples are debit card and Automated Clearing House (ACH) transactions, and manual or handwritten checks.
Now that we have shown you how matching transactions works and how you can post a matching transaction with just a few clicks, we will cover how to make any necessary changes to recorded transactions. In the next section, we will cover how to edit banking transactions.
Editing banking transactions
When you first start adding banking transactions to QuickBooks, you will need to review each transaction to ensure it has a proper payee (vendor) or customer and account category assigned to it. As you begin to repeat transactions, QuickBooks will remember how a transaction was recorded previously, and it will automatically assign the payee (vendor) and account category for expenses. Be sure to verify everything is correct before recording the transaction in QuickBooks.
Follow these steps to edit banking transactions in the Banking Center:
- From the left menu bar, select Banking, as indicated in Figure 9.7:

Figure 9.7: Navigating to the Banking Center
- Click on the For review tab, as indicated in Figure 9.8:

Figure 9.8: The For review tab in the Banking Center
- Click anywhere within the edit banking transaction window to make any necessary changes, as indicated in Figure 9.9:

Figure 9.9: Editing a transaction in the Banking Center
You will find the following information in the edit banking transaction window:
- Vendor/Customer: For withdrawals, select the payee (vendor) from the dropdown menu. For deposits, select the customer. If it is a new vendor or customer, you can click Add new from the dropdown menu and add them here. It is important to complete this field for reporting purposes such as 1099 preparation.
- Category: From the dropdown menu, select the category (account) that best describes the transaction you are recording (that is, Fuel, Office Supplies, or something else).
- Tags: Use tags to earmark or flag specific types of income or expenses you choose to keep tabs on.
- Memo: The bank details will generally appear in this field. This could be the name of the merchant. You can edit this information as needed so be sure to do so since this info will appear on reports.
- Split transaction: To the left of the Add button is a Split transaction button. A split transaction allows you to assign more than one category (account) to a transaction. For example, let’s say you purchased an office chair that cost $300. The total bill was for $325, which includes a shipping charge. You can split this bill by putting the $300 into the office expenses category and the $25 into the shipping/freight expenses category.
- Add: Once all fields are complete, click on the Add button to record this transaction in the check or credit card register in QuickBooks.
Watch this Intuit video tutorial for a recap of how to categorize banking transactions: https://quickbooks.intuit.com/learn-support/en-us/bank-transactions/adding-transactions-from-your-bank-credit-card/00/344865.
As discussed, QuickBooks will automatically recall the vendor or customer and category (account) that was previously used.
If you realize that a transaction that you previously accepted and moved over to the Categorized tab needs to be adjusted, you can easily edit this transaction as follows:
- Click on the Categorized tab, locate the transaction, and click on the Undo option in the far-right column, as indicated in Figure 9.10:

Figure 9.10: Editing a transaction previously accepted in the Banking Center
- The transaction will move back to the For review tab as follows:

Figure 9.11: The For review tab in the Banking Center
- You can Assign a category (account) by clicking on the link indicated in the preceding screenshot, or click the Review button to edit other fields in the transaction.
Pro Tip: Next to the Categorized tab is the Excluded tab. This tab is used to handle transactions you do not want posted in QuickBooks. For example, if a duplicate transaction was uploaded into QuickBooks (which is rare, but does happen), you would only want to post one of the transactions that were uploaded. Since you are not able to delete uploaded transactions, simply mark it as excluded and it will move from the For review tab to the Excluded tab. Please note that transactions that appear in the Excluded tab are not recorded in your books and therefore have no impact on the financial statements.
Now that we have shown you how to modify banking transactions and utilize the auto-recall feature, we will introduce you to bank rules in the next section. Using bank rules is the best way to ensure the accuracy of transactions recorded. We will discuss how to create and use bank rules in the next section.
Understanding bank rules
Bank rules are a list of conditions that must be met in order for QuickBooks to automatically assign a payee, account (category), class, and a location to upload banking transactions to. Bank rules will apply only to bank or credit card transactions in the For review tab of the Banking Center. Since most businesses have the same transactions that take place month after month, using bank rules can save you time you would have spent reviewing transactions in the Banking Center before they can be recorded in QuickBooks.
Follow these steps to create a bank rule:
- Click on Banking from the left menu and select Rules, as indicated in Figure 9.12:

Figure 9.12: Navigating to bank rules
- Click on the New rule button, as indicated in Figure 9.13:

Figure 9.13: Creating a new bank rule
- The following screen will appear:

Figure 9.14: Completing the fields required to create a new bank rule
The following is a brief explanation of the fields to complete for a new bank rule:
- What do you want to call this rule?: The first field allows you to assign a name to the rule. In our example, we are using
Monthly Cellphone Expense. - Apply this to transactions that are: You can apply rules based on Money out or Money in, and choose to apply this to All bank accounts or a specific bank account. If you have multiple accounts, you can set up rules that are specific to a bank account even when a vendor is paid using multiple bank accounts.
- Conditions: You can create several conditions based on the Bank text, Description, or Amount. In our example, we have selected Bank text.
- Contains/Doesn’t contain/Is exactly: In the next field, you can select whether the transaction contains, doesn’t contain, or is exactly the information that you enter into the next field.
- Text box: This field contains text that will appear either in the bank text or description field when the transaction is uploaded into QuickBooks. If you selected the amount as part of your criteria, then you will enter an amount in this field. In our text box, we have entered
T-Mobile, which is the name of the payee. - You can click the Add a condition link to add multiple conditions. Based on the conditions you have set, QuickBooks will automatically assign a category to the transaction using the information in the next section.
- Transaction type: From the dropdown menu, select the type of transaction for which you are creating this rule. In our example, this is an Expense.
- Payee: From the dropdown menu, select the payee for this rule. In our example, the payee is T-Mobile.
- Category: From the dropdown menu, select the category (account) that best describes the purchase. In our example, we have selected Utilities: Telephone Expense.
- Add a split: If the transaction should be split between two or more accounts (categories), you can click the Add a split link and indicate the accounts that should be used.
- Memo: This field is optional, but can be used to provide additional details about the transaction. In our example, we have used Monthly cellphone bill.
- What do you want to call this rule?: The first field allows you to assign a name to the rule. In our example, we are using
Now that you have a better idea of how bank rules work and how to create them, in the next section we will show you how to apply these bank rules to banking transactions.
Pro Tip: If you have multiple bank and credit card accounts that use the same vendor, and you need to record the transactions to different office locations, then you will need to set up rules specific to that bank or credit card account. For example, while the category might be the same, such as “telephone expense”, you would still need to set up a rule to categorize one bill to the Texas office and one bill to the California office.
How do you want to apply this rule?
At the bottom of this page is the option to Automatically confirm transactions this rule applies to. By selecting this auto-confirmation option, QuickBooks will automatically assign the category (account) based on your selections at the top of the page and will automatically record the transaction in QuickBooks without the need to review it first. If you would prefer to review all transactions before they are recorded, turn this feature off.
Pro Tip: I recommend that you review all banking transactions before they are recorded in QuickBooks. After reviewing transactions for the first couple of months, once you are comfortable they are being categorized correctly, you can always change the bank rules to Auto-categorize and auto-add later on.
If set up properly, bank rules can automatically categorize and record 80% or more of your bank and credit card transactions. If you have a lot of transactions coming through, this will save you hours of time, which you can spend on other aspects of your business.
Pro Tip: You can sort the transactions by column. It can be beneficial to sort by description or payee, to group similar transactions and categorize them in a batch.
Start with one bank rule to see how it works, and then add more as you get comfortable with using them. Using bank rules will also help to expedite the reconciliation of bank and credit card accounts. We will discuss this in more detail in the following section.
Reconciling accounts
Reconciling is the process of making sure your QuickBooks records agree with your bank and credit card statements. At a minimum, reconciling should take place on a monthly basis, if not more often. One of the benefits of using cloud-based accounting software such as QBO is that your banking information is uploaded on a daily basis. This means that you could reconcile as often as weekly, or even daily. There is no need to wait until the bank statement arrives at the end of the month to reconcile your accounts.
Follow these steps to reconcile a bank or credit card account:
- From the gear icon, select Reconcile, as indicated in Figure 9.15:

Figure 9.15: Navigating to Reconcile in QBO
- The start reconciliation window will appear, as indicated in Figure 9.16:

Figure 9.16: Initial reconciliation window
If a transaction that was previously reconciled has been changed, QuickBooks will include a message on this screen. Be sure to follow the onscreen instructions to troubleshoot the out of balance. This issue must be addressed before proceeding with the current reconciliation.
The fields that need to be completed in the reconciliation window shown in the preceding screenshot are as follows:
- Account: From the dropdown menu, select the bank or credit card account you want to reconcile.
- Beginning balance: This field will automatically be populated with the ending balance of the previous month. If you have never reconciled the account before, the balance in this field will be the opening balance entered when you created the account in QuickBooks.
- Ending balance: Enter the ending balance of the bank or credit card statement you are reconciling.
- Ending date: Enter the ending date on the bank or credit card statement you are reconciling.
Click the Start reconciling button once all fields have been completed.
- On the next screen, the following information will appear. The following is a snapshot of the header information when reconciling accounts:

Figure 9.17: Header information in the reconciliation window
A brief description of the information found in the header window is as follows:
- STATEMENT ENDING BALANCE: This field will automatically be populated with the statement ending balance entered on the preceding start reconciliation screen.
- CLEARED BALANCE: This field will summarize all the transactions that have cleared on your bank or credit card statement.
- BEGINNING BALANCE: This field will automatically be populated from the prior month’s reconciliation. If you have not reconciled this account previously, it will display the beginning balance entered when the account was created in QuickBooks.
- PAYMENTS: This field will summarize all of the payments/withdrawals that have cleared on your bank or credit card statement.
- DEPOSITS: This field will summarize all of the deposits that have cleared on your bank or credit card statement.
- DIFFERENCE: The difference between the statement ending balance and the cleared balance will appear in this field. The goal is to reach a difference of zero. Zero indicates all items that have cleared your bank or credit card statement have been recorded in QuickBooks.
Pro Tip: If you are having trouble reconciling to a difference of zero, compare the deposit total in the header window to the deposit total on your bank statement. If it matches, then you know there is an issue with withdrawals. If it doesn’t match, then you know there is an issue with deposits. Do the same comparison on the withdrawal side. You could be out of balance with both, or with just one transaction type. In addition, if your difference is divisible by nine, it could be a transposition error.
- Once your difference equals zero, you can click the Finish now button to generate the bank reconciliation reports. Click on the dropdown arrow next to the Save for later button as indicated in Figure 9.18:

Figure 9.18: The Finish now button
Pro Tip: Do not click the Finish now button if you don’t have a difference of zero. Instead, click the Save for later option. You can always come back and resume the reconciliation from where you left off.
- The following is a snapshot of the bank and credit card information that appears after the header information:

Figure 9.19: Bank and credit card details listed in the reconciliation window
The following is a brief explanation of the details in the reconciliation window shown in the preceding screenshot:
- Transaction type: At the top of the screen, there are three tabs: Payments, Deposits, and All. You can click on one of the first two tabs to filter by a specific transaction type, or you can select All.
- Transaction details: The date, transaction type, reference number, category (account), payee, memo, and amount of each transaction that has been recorded in QuickBooks are listed in the details section.
If a transaction appears on your bank or credit card account, you need to put a checkmark in the radio button (located in the far-right column) to mark it as cleared in QuickBooks. Each time you mark a transaction as cleared, it will be included in the cleared balance in the header section shown previously. As discussed, after marking all items that have cleared your bank or credit card statement, you should have a difference of zero. If you do not, you are either missing a transaction in QuickBooks or you may have marked a transaction as cleared that does not appear on your statement.
- After successfully reconciling accounts, be sure to save the summary and detail bank reconciliation reports. They will be made available after you complete the bank reconciliation. Bank reconciliation reports are one of several reports that auditors will request during an audit, so it is very important to save these reports to your computer. If you forget to save the reports, you can always access them from within the Banking Center. You can also keep copies of your monthly statements saved in QBO.
For a step-by-step recap of how to reconcile an account, watch this Intuit video tutorial: https://quickbooks.intuit.com/learn-support/en-us/banking-topics/reconcile-an-account-in-quickbooks-online/00/186470.
After reconciling an account, you may discover that you need to edit a transaction that was previously reconciled. Be sure that you don’t change the amount, otherwise your account will be out of balance. However, you can edit the category (account) and description fields easily:
- Navigate to the chart of accounts and click on the View register link next to the bank account, as indicated in Figure 9.20:

Figure 9.20: Editing a transaction that was previously reconciled
- Make the necessary edits and save your changes.
As discussed, reconciling your accounts will help to ensure you haven’t accidentally omitted recording any transactions. Plus, it will help you to ensure that your books agree with your financial institution’s records. It’s important to reconcile all of your bank and credit card accounts on a monthly basis (or more frequently, if possible), in order to catch errors made by the bank or to identify fraudulent transactions.
Summary
In this chapter, we have discussed how to manage uploaded bank and credit card transactions. You have learned how to match uploaded transactions with transactions previously recorded in QuickBooks. You now know how to make changes to transactions so that the correct payee and category (account) are recorded. You have also learned how to create bank rules in order to reduce the number of transactions you need to review in the Banking Center, which will save you time. Finally, you know the importance of reconciling bank and credit card accounts on a frequent basis to ensure your records are in sync with your financial institution.
We have met our goal of giving you the knowledge to successfully manage your uploaded bank and credit card transactions. Having this knowledge will help you to save the time you would normally have spent manually entering bank and credit card transactions into QuickBooks.
Reconciling your accounts will also help you to become familiar with how much money you are spending, as well as what you are spending it on. Remember, having the ability to control your expenses will help to improve your bottom line.
In the next chapter, we will show you how to generate reports in QuickBooks. There are a number of preset reports in QuickBooks, which means you never have to create a report from scratch. You will learn how to customize existing reports, and then export them as Excel/PDF files or send them as attachments via email.
Share your thoughts
If this book is helping you improve your skills, we’d strongly suggest leaving a review on Amazon.com. This helps us know if you like our work and if the chapter content has been valued, and also helps the buyers on Amazon know if the book is right for them.
So, everyone else benefits from your review - we wouldn’t want you to miss out. You can now reach out to [email protected] with a screenshot of your review and the book URL, and we’ll send you a $5 voucher for your next Packt purchase. Thank you in advance for engaging with us, we are excited to see your review!
Learn more on Discord
To join the Discord community for this book – where you can share feedback, ask questions to the author, and learn about new releases – follow the QR code below:
https://packt.link/businesscenter
