
8
Recording Expenses in QuickBooks Online
Managing expenses incurred by a business is one of the primary reasons why many businesses decide to use QuickBooks. Most businesses know when they are generating income, but when it comes to where their money is going, it’s a whole different story. For a business to be profitable, it must be able to control expenses that directly affect the bottom line.
In this chapter, we will show you four ways to record expenses, also known as money-out transactions: (1) entering and paying bills, (2) managing recurring expenses, (3) writing and printing checks, and (4) capturing and categorizing receipts and bills.
Entering a bill is ideal for suppliers who have extended credit to you. You receive your purchases immediately and payment is due sometime in the future. However, expenses that require immediate payment should be paid via check. Entering a check allows you to record both the expense and the payment at the same time.
Using one or more of these methods will give you access to detailed reports that will give you insight into all of your money-out transactions. This is a key component in having the ability to control expenses.
In this chapter, we will cover the following topics:
- Entering and paying bills
- Managing recurring expenses
- Writing checks
- Printing checks
- Editing, voiding, and deleting expenses
- Capturing and categorizing receipts and bills
By the end of this chapter, you will know how to enter and pay your bills, and how to create recurring expenses for rent, utilities, and other recurring costs. Plus, you will understand how to write a check and print it directly from QuickBooks, and you will become familiar with the various ways in which you can upload receipts and bills in QuickBooks.
The US edition of QBO was used to create this book. If you are using a version that is outside of the United States, results may differ.
Entering and paying bills
For purchases made on account, entering bills into QuickBooks and paying them a few days before they become due is the best way to manage your cash flow. If you enter bills into QuickBooks as you receive them, you can run reports that will show you which bills are due, or are nearly due, so that you can plan ahead and ensure you have sufficient cash on hand to pay them. Unpaid bills are also referred to as accounts payable, or A/P for short. In the following sections, we will first cover how to enter bills, and then we will discuss how to pay a bill in QuickBooks Online (QBO).
Pro Tip: There are a number of apps available to help automate the bill entry process. From the left navigation bar, select Apps. In the search box, type the keyword bill pay and several options such as Bill Pay for QuickBooks Online and bill.com will display. To learn more about the Intuit Apps marketplace, refer to Chapter 16, Finding Apps and Handling Special Transactions in QuickBooks Online.
Entering bills into QuickBooks Online
Entering your bills into QuickBooks before they come due will help you to manage your cash flow. You can easily run reports, such as the Unpaid Bills report or the A/P Aging report, to see which bills are coming due or are past due.
To enter bills into QuickBooks Online, you will need to complete the following steps:
- Click on the + New button and select Bill in the Vendors column, as indicated in Figure 8.1:
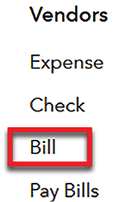
Figure 8.1: Navigating to Bill from the Vendors menu
- Complete the key fields in the Bill form, as indicated in Figure 8.2:

Figure 8.2: Completing the Bill form for a vendor
The following is a brief description of the key fields in the Bill form. All fields must be completed, except for the DESCRIPTION field:
- Vendor: Select a vendor from the dropdown menu, or add a new vendor if they have not been previously set up in QuickBooks. You can do this by selecting Add New from the dropdown menu. In our example,
A+ Printingis the vendor. - Mailing address: This field will automatically be populated for vendors you have previously created in QuickBooks. If this is a new vendor, you can enter the address in this field. In our example, the address is
123 Printers Way, Van Nuys, CA 91405. - Terms: This field will automatically be populated with the vendor terms you have set up. If you have not previously set up vendor terms, you can select the appropriate payment terms from the dropdown menu. The payment terms should be Net 30 for A+ Printing.
- Bill date: Enter the date that appears on the vendor bill. Our bill date is
09/17/2022. - Due date: The due date will be calculated automatically based on the payment terms selected. If payment terms were not selected, you can also enter the due date directly in this field. The due date in our example is
10/17/2022. - Bill no.: The bill number is the invoice number assigned by the vendor supplier. If the bill does not include a unique number, create one. Having a unique bill number is very important so QuickBooks can track bills and alert you if there is a duplicate bill number used. If a bill does not include a bill number, utilize the bill date, or something unique, for each bill. The bill number in our example is
876543. - Category details: Complete this section if you have purchased services from the vendor. Since we have purchased workbooks that are tracked in our inventory, we will complete the Item details section right below Category details.
- Item details: Complete this section if you have purchased an item from QuickBooks for which you need to keep track of quantity and/or costs. From the dropdown menu, select the product/service purchased. If the item has not been added to QuickBooks, you can do so in this screen by selecting the Add new option. The new item window will display so that you can complete the item setup. For more information on adding a new item to the products and services list, see Chapter 5, Managing Customer, Vendor, and Products and Services Lists.
- DESCRIPTION: Enter a brief description of what was purchased in this field. For this example, the description is
Workbooks for QBO Training. - QTY: Enter the quantity of the item purchased. In our example,
200workbooks were purchased. - RATE: The rate field should automatically populate with the rate entered when setting up the item. If no rate was added, you can enter it directly in this form. The rate is
5in our example. - AMOUNT: QuickBooks will automatically calculate the total amount by multiplying the quantity entered by the rate. In our example, the total amount calculated is $1,000.00.
- Save or Save and schedule payment: You have the option to save the bill and schedule payment at a later date, or schedule payment now. We will save the bill for now and cover how to schedule payment later in this chapter.
- Vendor: Select a vendor from the dropdown menu, or add a new vendor if they have not been previously set up in QuickBooks. You can do this by selecting Add New from the dropdown menu. In our example,
In our example, this bill only has an impact on the balance sheet. There is no impact to the profit and loss (income statement) reports. Inventory (which is an asset) increases by $1,000.00, and A/P also increases, which in turn increases current liabilities on the balance sheet report.
The journal entry that is recorded in QuickBooks for the preceding bill is shown in Figure 8.3:

Figure 8.3: Journal entry to record a vendor bill
If you are recording the purchase of an expense (i.e. consultation services or office supplies), instead of inventory, an expense account such as Consulting expense or Office supplies would be in place of inventory in our example. This would increase expenses on the profit and loss report. Accounts payable would still increase by the amount that was purchased.
In order to stay on top of your bills, it’s a good idea to enter them as soon as you receive them. Be sure to enter a due date, so that QuickBooks can alert you when a bill is coming due.
Entering vendor credits into QuickBooks Online
If you overpay a vendor or receive a credit for damaged or returned merchandise, you can enter the credit memo into QuickBooks and apply it to future purchases. However, if you don’t plan to order from that vendor again, you should request a refund. In our example, we received a credit on the order for the workbooks because the shipment was short by 10 workbooks.
To enter vendor credits into QuickBooks Online, you will need to complete the following steps:
- Click on the + New button and select Vendor Credit in the Vendors column, as indicated in Figure 8.4:

Figure 8.4: Navigating to the Vendor credit form
- Complete the key fields in the Vendor Credit form, as indicated below:

Figure 8.5: Complete Vendor Credit form
The following is a brief description of the key fields in the Vendor Credit form. All fields must be completed, except for the DESCRIPTION field:
- Vendor: Select a vendor from the dropdown menu. In our example, A+ Printing is the vendor.
- Mailing address: This field will automatically be populated for vendors you have previously created in QuickBooks. If this is a new vendor, you can enter the address in this field. In our example, the address is
123 Printers Way, Van Nuys, CA 91405. - Payment date: Enter the date that appears on the vendor credit memo. Our payment date is
09/24/2022. - Reference no.: The reference number is the credit memo number assigned by the vendor supplier. If the credit memo does not include a unique number, create one. Having a unique credit memo number allows QuickBooks to track vendor credits and alert you if there is a duplicate number used. If a credit memo does not include a number, I typically use the letters “CM”, short for credit memo, and the original bill number paid. The credit memo number in our example is
CM876543. - Category details: Complete this section if you have purchased services from the vendor. Since we have purchased workbooks that are tracked in our inventory, we will complete the Item details section right below category details.
- Item details: Complete this section if you have purchased an item added on QuickBooks that you need to keep track of quantity and/or costs for. From the dropdown menu, select the product/service purchased. If the item has not been added to QuickBooks, you can do so in this screen by selecting the Add new option. The new item window will display so that you can complete the item setup. For more information on adding a new item to the products and services list, see Chapter 5, Managing Customer, Vendor, and Products and Services Lists.
- DESCRIPTION: Enter a brief description of what was purchased in this field. In our example, the description includes
Ordered 200 workbooks, only 190 received. - QTY: Enter the total number of items the credit is for. In our example, the quantity is
10. - Rate: This field should automatically populate with the rate that was setup for the item. If not, enter the rate in this field.
- AMOUNT: QuickBooks will multiply the QTY field by the Rate field to get to the total amount of the credit. The total amount is $50 for the vendor credit from A+ Printing.
If you receive the credit before paying the original bill, then the A/P account will be reduced by the credit, and the inventory will be reduced by the same amount. Both of these accounts will only impact the balance sheet report. There is no impact to the income statement.
The journal entry that is recorded in QuickBooks for the preceding vendor credit is shown in Figure 8.6:

Figure 8.6: Journal entry to record a vendor credit
In our example, the debit to Accounts payable decreases the current liabilities on the balance sheet report by $50, and the credit to Inventory decreases total inventory on the balance sheet by $50.
Paying bills in QuickBooks Online
After you enter a bill in QuickBooks, you will need to pay it before the due date. Paying bills in QuickBooks will ensure that the A/P balance is always up to date. It will also allow you to run reports, and to see which bills have been paid or need to be paid.
Follow these steps to pay bills in QuickBooks Online:
- Click on the + New button and select Pay Bills in the Vendors column, as indicated in Figure 8.7:
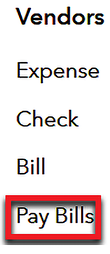
Figure 8.7: Navigating to Pay Bills from the Vendors menu
- Complete the key fields in the Pay Bills form, as indicated in Figure 8.8:

Figure 8.8: Completing the Pay Bills form
The following is a brief description of the fields in the Pay Bills form; all fields must be completed:
- Payment account: Select the bank or credit card account from which you want to deduct this bill payment. Business Checking is the account selected in our example.
- Balance: The amount next to the payment account is the current balance per QuickBooks. Please note if you have banking transactions that have not been reviewed and added to QuickBooks, this balance will not match your actual bank account. Be sure to double-check your actual bank balance before making payments.
- Payment date: Select the date on which you will pay for this bill. If writing a check, this will be the check date. The payment date is
09/17/2022in our example. - Starting check no.: If you are writing a check, make sure the check number is the next available number. The starting check number is
1in our example. - Print later: Put a check in this box if you don’t plan to print the check now, but will print it later on. We will show you how to print checks later in this chapter.
- PAYEE: This field will include a list of the payees with open bills. To select a bill for payment, put a checkmark in the box to the left of the PAYEE field. In our example, we have selected two payees: Staples and A+ Printing.
Pro Tip: If you have more than one invoice for a vendor and your vendor prefers separate checks for each invoice, select the first invoice and save it, and then select each individual invoice one at a time, clicking Save in-between each. Then, when you print checks, there will be separate checks for each invoice. An example where this might be useful is paying utility bills. Many utility companies prefer separate checks per account for which you are paying a bill.
- REF NO.: This field will include the invoice number (or bill number) that was entered when the bill was saved in QuickBooks. In our example,
12345is the reference number for the Staples bill and876543is the reference number for the A+ Printing bill. - DUE DATE: This field will automatically be populated with the due date that was entered when the bill was saved in QuickBooks. In our example, the due date for the Staples bill was 08/05/2022 and since it is past due a red exclamation mark is indicated next to this date. The due date for the A+ Printing bill is 10/17/2022.
- OPEN BALANCE: This field will automatically be populated with the unpaid amount of the bill. The open balance for the Staples bill is $125.00 and the open balance for the A+ Printing bill is $1,000.00.
- CREDIT APPLIED: If you have open credits for a vendor, you will see them listed in this column. In our example, A+ Printing has an open credit of $50.00. This will reduce the total amount due from $1,000.00 to $950.00.
- PAYMENT: Enter the amount you would like to pay in this field. You can pay the bill in full or make a partial payment. If you make a partial payment, QuickBooks will keep the remaining balance due on file for you to pay in the future. The payment amount is $125.00 for the Staples bill and $950.00 for the A+ Printing bill. However, if you wish to pay less than the bill amount, you can do so by entering the amount you want to pay in this field.
- TOTAL AMOUNT: This column is automatically calculated for you. You cannot edit this field.
- New account balance: In the lower-right corner, QuickBooks calculates the new balance in the business checking account after deducting the amount of the total bill payment. In our example, the new balance in the business checking account is $6,052.38.
- Schedule payments online: You have the option to pay your bills online using your bank account or debit/credit card information. To do so, you would select the schedule payments online button and follow the on-screen prompts to sign up for bill payment services. However, if you prefer to manually write checks or print them from QuickBooks, click on the arrow to the right of schedule payments online and select Save. We will cover how to write checks in QuickBooks later in this chapter.
Pro Tip: To reinforce the steps covered for entering and paying bills in QuickBooks, watch this Intuit video tutorial, How to manage your bills in QuickBooks Online: https://youtu.be/p4FPKQ8Bf5M.
When you pay a bill in QuickBooks, it only has an impact on the balance sheet report. The A/P balance goes down because you no longer owe your vendor for the bill, and the business checking account goes down because a payment has been made. If you paid the bill with a credit card, the credit card balance goes up, which increases liabilities.
The following screenshot shows the journal entry recorded for the preceding bills:

Figure 8.9: Journal entry to pay bills
In our example, the debit to A/P decreases total liabilities on the balance sheet report by $1,075. In addition, the credit to the business checking account decreases total assets on the balance sheet report by $1,075. Paying bills in QuickBooks will give you access to detailed information about your expenses. You can run reports to show how much you are spending, which vendors you purchase from, and how often. These reports will help you to control what you are spending your money on, which allows you to properly manage your expenses. In Chapter 13, Vendor and Expenses Reports, we cover reports in detail.
Creating recurring expenses in QuickBooks can save you a lot of time. We will cover how to manage recurring expenses next.
Managing recurring expenses
In this section, we will show you how to create a template for recurring (repeat) expenses. Most businesses purchase goods and services from the same vendors. For example, rent and utilities are examples of recurring expenses that are generally paid monthly. Instead of creating these expenses from scratch each month, you can create a recurring expense, which is a template you can save with the vendor, amount, account, and other pertinent information.
When you are ready to pay a recurring expense, you can schedule the expense to be recorded automatically on a certain day. You can manually generate the expense when you need to pay it, or have QuickBooks send you an alert when it’s time to make a payment. Using recurring expense templates will save you time and will reduce the amount of manual data entry required.
Follow these steps to create a recurring expense in QuickBooks:
- Navigate to the gear icon and select Recurring Transactions from the Lists column, as indicated in Figure 8.10:

Figure 8.10: Selecting Recurring Transactions from the Lists menu
- Click the New button in the upper-right corner, as indicated in Figure 8.11:

Figure 8.11: Clicking New to create a new recurring transactions template
- Select the transaction type from the dropdown menu, as indicated in Figure 8.12, and click the OK button:

Figure 8.12: Selecting the Transaction Type for a recurring transactions template
You can create a recurring transaction for a number of different types of transactions besides a bill. The other options available from the dropdown include Check, Credit card credit, Credit memo, Deposit, Estimate, Expense, Invoice, and Journal entry. While the screens may differ slightly, they will be very similar to what you see in this example.
- A blank recurring transactions template will appear, called Recurring Bill. Complete the fields as indicated in Figure 8.13:

Figure 8.13: Completing the recurring transactions template
The following is a brief description of the information required to complete the recurring transactions template:
- Template name: This field should include the type of expense or the payee’s name.
Monthly Telephone Expenseis the template name in our example. - Type: From the dropdown menu, you can select Scheduled, Reminder, or Unscheduled. Scheduled is the type of template we are setting up.
- Create X days in advance: QuickBooks will create the transaction in advance of the due date.
2days in advance is selected in our example. - Vendor: Select the payee from the drop-down menu. If you have not added vendors to QuickBooks, you can add a new vendor by selecting Add new in the dropdown field.
The Telephone Companyis the vendor in our example. - Interval: This field refers to how often you would like to create this recurring transaction. The options are Daily, Weekly, Monthly, or Yearly. Monthly is the interval selected in our example.
- Start date/End: Select the date on which you would like to start using the recurring transaction and, if applicable, you can select an end date, or select None. The start date is
10/01/2022and the end date is None in our example. - Mailing address: If you plan to mail your payment, you need to add a mailing address to this field. However, if the payment is automatically deducted from your business checking account or made using a credit card, you can leave this field blank. The mailing address for The Phone Company is
123 Telephone Way, Mansfield, Tx 76063. - Terms: Include the payment terms for the vendor in this field. Payment terms are Net 30 in our example.
- CATEGORY: From the dropdown menu, select the account that accurately describes the type of purchase made. The category is Utilities: Phone Service for our example.
- DESCRIPTION: Include a brief description of the expense in this field.
Monthly cellphone billis the description in our case. - AMOUNT: Enter the amount of the expense in this field. The amount is
$150.00in our example.
- Template name: This field should include the type of expense or the payee’s name.
- Be sure to Save the template when you are done. After saving the template, the Recurring Transactions template list will appear, as indicated in Figure 8.14:

Figure 8.14: Recurring Transactions template (Expense)
In the Recurring Transactions template list, you will see the information previously entered in the template. The following info appears in Figure 8.14 above:
- TEMPLATE NAME:
Monthly Telephone Expense - TYPE: Scheduled
- TXN TYPE: Bill
- INTERVAL: Every Month
- NEXT DATE:
10/01/2022 - CUSTOMER/VENDOR:
The Telephone Company - AMOUNT:
150.00 - ACTION: From the dropdown menu in the Action column, you can choose to Edit, Use, Duplicate, Pause, Skip, or Delete. Edit simply allows you to make changes to the template; Duplicate allows you to create a template with the same information; Pause allows you to stop the recurring transaction temporarily; Skip allows you to skip a recurring transaction; and Delete allows you to delete the template.
- TEMPLATE NAME:
In addition to creating recurring transactions such as bills to pay expenses, you can also create the following types of recurring transactions:
- Check: Payments made via check for products or services purchased.
- Credit card credit: Credit card credit is money that was refunded to you from a previous credit card charge. This could also be a cashback rebate given to you by your credit card merchant for meeting a certain spending threshold.
- Credit memo: A credit memo is issued to customers for a product they have returned or for services that were not provided.
- Deposit: A deposit is money received from customers, which is then deposited into your bank account. If you have customers who pay via wire transfer or Automated Clearing House (ACH) bank transfer on a periodic basis, you could set these deposits up as recurring.
- Estimate: An estimate is a bid or quote, created to provide customers with an approximate cost of your products or services.
- Expense: An expense is a payment for services received from a vendor/supplier.
- Invoice: An invoice is a sales form, used to record the sale of products or services provided on credit.
- Journal entry: A journal entry form is used to make adjustments to the financial statements before closing the books.
- Refund: A product returned by you or your customer will result in a refund of the payment that was made for the returned goods or unfulfilled services.
- Sales receipt: A sales receipt is used to record sales whereby payment is made immediately by the customer (for example, businesses such as clothing stores or restaurants).
- Transfer: A transfer is used to move money between bank accounts, such as business checking and savings accounts.
- Vendor credit: A vendor credit is a refund issued to you by a vendor supplier for a product you have returned or for services that were not performed.
Pro Tip: Recurring transactions are ideal for loan payments or other cash disbursements that you may not receive a monthly bill for.
Pro Tip #2: If you need to pay a bill that was unexpected or past due, you don’t need to enter it as a bill and then pay it. Instead, you can go directly to the check register and write a check. We will cover writing checks in the next section.
Writing checks
So far, we have discussed how to pay expenses by entering them as bills and paying them at a later date, and how to set up recurring expenses. A third way in which you can record expenses for your business is by writing checks. The benefit of writing checks directly in QuickBooks is that you don’t have to waste time manually writing a check. Instead, you can create checks and print them directly from QuickBooks. This is ideal for vendors that typically don’t accept debit or credit card payments.
Follow these steps to write checks in QuickBooks Online:
- Click on the + New button and select Check in the Vendors column, as indicated in Figure 8.15:

Figure 8.15: Navigating to Check
- The following screenshot shows the fields of information to be completed in the Check form:

Figure 8.16: Completing the Write Checks form
The following is a brief description of the information in the Check form:
- Payee: From the dropdown menu, select the vendor to whom you are making a payment. If you have not added vendors, you can do so by selecting Add new from the dropdown menu. ABC Property Management is the payee in our example.
- Bank Account: This field will automatically be populated with your business checking account. However, if you have more than one checking account, be sure to select the correct account from the dropdown menu. Business Checking is the bank account in our example.
- Balance: Based on the bank account selected, you will see the current balance (per QuickBooks) of the business checking account you have selected. The current balance in the business checking account is $7,127.38 in our case.
- Mailing address: This field will automatically be populated with the information on file for the payee. In our case, the mailing address is 123 Property Management Rd, Bedrock, Tx 76063.
- Payment date: This date should reflect the check date. In our example, the payment date is 09/17/2022
- Check no.: The check number will automatically be populated with the next available check number. The check number is 1000 in our example.
Pro Tip: You can also use the Write Checks form to record expenses paid with a debit card. Instead of entering a check number in the Check no. field, you would use
DBorDebit, indicating the expense was paid with a debit card. To record ACH transactions, you would putACHin the check number field. - CATEGORY: Select the category (account) that best describes the items purchased. In our example, the category is Home office:Rent.
- DESCRIPTION: Enter a detailed description of the items purchased.
September Rentis the description in our example. - AMOUNT: Enter the amount of the purchase. The amount in our example is
1,500.00.
When entering a check into QuickBooks, it can have an impact on accounts that appear on both the balance sheet and the profit and loss (income statement). The balance sheet will always be affected because the bank account is included in the assets section of the balance sheet. However, the profit and loss will only be affected if you purchase an expense. Otherwise, if you purchase a product for resale (inventory), it will only have an impact on the balance sheet.
Figure 8.17 shows the journal entry recorded for the preceding check in Figure 8.16:

Figure 8.17: Journal entry to record payment of a bill by check
In our example, Rent expense increased by $1,500, which increases expenses on the profit and loss (income statement). The Business Checking account decreased by $1,500, which means assets have gone down on the balance sheet report.
After entering a check, you can choose to print the check immediately, or wait and print a batch of checks later on. In the next section, we will show you how to print checks.
Printing checks
In order to print checks, you must purchase check stock that is compatible with QuickBooks Online. You can order checks from a variety of places, such as your financial institution, or directly from Intuit. Visit the Intuit Checks and Supplies (https://intuitmarket.intuit.com/checks) website to learn more.
Follow these steps to print checks:
- Click on the + New button and select Print Checks in the Vendors column, as indicated in Figure 8.18:
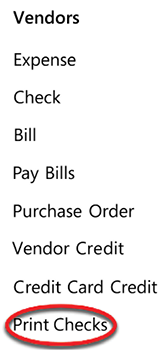
Figure 8.18: Navigating to Print Checks
- Follow these steps on the next screen to ensure that your printer is set up properly:

Figure 8.19: Selecting the check type for printing checks
The following is a brief description of the steps:
- Select the type of checks you use: There are two types of checks, Voucher and Standard. The Voucher check includes one check per page, and two printed vouchers (one for you and one for the payee). The Standard check has three checks per page, and no voucher.
- Load blank paper in your printer: Before loading real check stock, run a test using blank paper. Draw an arrow on the top of the first sheet of paper to see how the information will print so that you know how to load the check stock in your printer.
- View preview and print sample: You can preview a sample check to see whether it is aligned properly. If not, follow the onscreen instructions to fix any issues before using real check stock. Checks will print to a preview screen where you can select your printer.
Pro Tip: To recap the steps on writing and printing checks in QuickBooks, watch this Intuit video tutorial: https://quickbooks.intuit.com/learn-support/en-us/write-checks/how-to-record-print-checks/00/344866.
As discussed, printing checks directly from QuickBooks will save you time when you reconcile your bank account. Since expenses paid with a check are automatically recorded in QuickBooks when you save the check, you won’t have to worry about manually entering them later on. One way to have quick access to source documents is to attach receipts and bills to transactions by using the capture and categorize receipts feature. We will discuss this shortly.
Pro Tip: Imagine you have pizza delivered to the office and you need to quickly print one check. Click the + New button, select Check, enter the payment details, and select Print check at the bottom of the screen.
Editing, voiding, and deleting expenses
Like most transactions in QuickBooks, you can edit bills up until they are paid. However, after you have paid a bill you will need to either record a credit memo if you overpaid or request a new bill if you underpaid. To edit a bill, you need to go to the Vendor Center, select the vendor, and then click on the bill you wish to make changes to. After making the necessary changes, save the bill and close out of it. You can also edit checks in a similar manner. As long as you have not printed the check, you can make any changes necessary. Navigate to the check register, locate the check, and make the necessary changes. After you have printed a check, you will need to void it if it is incorrect. From the check register, select the check that needs to be voided. Click the Edit option and the check will display on your screen. At the very bottom of the page, you will see a tab that says More, click on it and the following menu will appear:
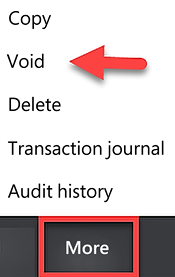
Figure 8.20: Reaching the option for voiding an expense from the More button
For expenses in general, if you have not closed the books or reconciled the bank account for the period, you can make changes to expenses that were previously recorded. If you have closed the books or reconciled the bank account for the period, you cannot make changes to the transaction date or amount. If a correction to the books is required, you will need to consult with your accountant to discuss recording a journal entry. See Chapter 15, Closing the Books in QuickBooks Online, to learn more about journal entries.
Capturing and categorizing receipts and bills
Receipt capture allows you to attach receipts and bills to transactions in QuickBooks. As a result, you will be able to quickly access source documents when needed. This feature works in two different ways. First, you can attach receipts and bills to transactions previously entered into QuickBooks Online. Second, you can use a receipt capture to record a transaction for the first time. Of course, you can use both methods interchangeably.
Perform the following steps to capture a receipt or bill:
- Navigate to Banking (or Bookkeeping | Transactions, if you are in the Business view) and select Receipts.
- The following screen will appear. (Make sure you are on the Receipts tab, as indicated here):

Figure 8.21: Uploading receipts to QBO
There are three options available to capture receipts:
- Upload from computer: If the bill or receipt is saved to your computer, select this option and navigate to where the receipt or bill is located on your computer.
- Upload from Google Drive: If the receipt/bill is located in your Google Drive account, you can access it by clicking on this icon and follow the onscreen instructions to locate the file in Google Drive.
- Forward from email: By selecting this option, QuickBooks will take you through a few setup screens to create a custom email address that can be used to forward receipts and bills to QuickBooks.
Pro Tip: Keep in mind that for each of the receipt capture options, there should only be one receipt per file. If you try to include more than one receipt in a file, QuickBooks will not be able to process the receipt capture.
- Once you add receipts to QuickBooks, they will show up in the For review section just below the receipt capture options, as follows:

Figure 8.22: Reviewing receipts uploaded in QBO
- You can click on the review link in the Action column located on the far-right and the following info will display:

Figure 8.23: Reviewing a selected receipt in QBO
- Complete any empty fields and review the information for accuracy in the fields that QuickBooks has automatically completed. Once you are satisfied with the information, you can save it and it will record in your books.
To summarize, we have covered how to use the capture and categorize receipts and bills feature, which allows you to attach source documents such as bills to existing transactions. In addition, you can create new transactions using this feature, which will save you the time you normally would have spent entering the data manually.
Pro Tip: You can also add receipts to transactions using the paperclip (Attachments) feature located at the bottom of the screen when you have an individual transaction open such as a bill:

Figure 8.24: Button for attaching a receipt to a transaction
Summary
In this chapter, we have shown you how to enter and pay your bills, how to enter vendor credits, how to manage recurring expenses, how to write checks, and how to print checks. We also covered the three ways in which you can upload bills and receipts to QuickBooks.
As a result, you will be able to stay on top of your cash outflow.
In the next chapter, we will show you how to reduce or eliminate the need to manually enter bank and credit card transactions by uploading transactions automatically into QuickBooks using bank feeds.
The primary difference between expense transactions and bank feed transactions is that expense transactions are typically entered manually through bills, checks, recurring expenses, and receipt capture, whereas bank feeds do not require manual data entry. Instead, your bank account is connected to QuickBooks and bank transactions automatically “feed” into the Banking Center in QuickBooks, saving you time.