
6
Managing Sales Tax
In this chapter, we will cover how to manage sales tax in QuickBooks Online. In the United States, sales tax is typically applied to the sale of products. However, some states and local tax jurisdictions also apply sales tax to certain types of services. You need to consult with your CPA or accountant to determine which laws apply in your geographical location. While you cannot pay sales tax directly from QBO, we will cover how to record the payment in QBO after you have paid your tax authority.
We will cover the following topics in this chapter:
- Setting up sales tax in QuickBooks Online
- Creating an invoice that includes sales tax
- Sales tax reports
- Paying sales tax when it comes due
The US edition of QuickBooks Online was used to create this book. If you are using a version that is outside of the United States, results may differ.
Please note the screenshots taken in this chapter have been taken using the Accountant view menu. In Chapter 1, Getting Started with QuickBooks Online, we introduced a new menu called Business view. If you are in Business view, you will need to switch to the Accountant view menu so that your screen resembles the images shown throughout this book.
To do this, click on the gear (settings) menu (located in the upper-right corner) and select Switch to Accountant view as shown in Figure 6.1 below:

Figure 6.1: Option for switching between Business view and Accountant view
Setting up sales tax in QuickBooks Online
If you are required to collect sales tax from customers, it is important to complete the sales tax setup in QuickBooks prior to invoicing customers. If you create an invoice without sales tax, you will ultimately underpay the sales tax you are required to submit to your local tax authority. This could lead to additional taxes and penalties, which can add up quickly. Setting up sales tax in QuickBooks from the start allows QuickBooks to automatically calculate and keep track of the amount of sales tax that you owe.
Perform the following steps to set up sales tax:
- Click Taxes on the left menu bar, as indicated in the following screenshot, to navigate to the Sales Tax Center:

Figure 6.2: Navigating to the Sales Tax Center
- The following message will appear. Click the Use Automatic Sales Tax button, as indicated in Figure 6.3:

Figure 6.3: Sales Tax Center welcome page
- The following window will appear:

Figure 6.4: Entering the business address used to calculate sales tax
Your business address should automatically populate the fields (as indicated in Figure 6.4). If it does not, click the pencil icon and type the information into the appropriate fields.
Click Next.
- The following screen will appear:

Figure 6.5: Sales tax information outside of your state
If you are required to collect sales tax outside of your state, select Yes to the question on this screen; otherwise, select No, and click Next.
- Click Next and the following screen will appear, indicating that the automatic sales tax setup is complete:
Figure 6.6: Confirmation that automatic sales tax is set up
- Click X in the upper-right corner of the screen to bypass the preceding message and navigate to the How often do you file sales tax? screen:

Figure 6.7: Filing frequency for sales tax
Based on the state where your business is located, the Agency field will automatically be populated.
From the dropdown menu, select the frequency with which you file sales tax. The options are Monthly, Quarterly, and Yearly.
Pro Tip: If you are not sure how often you need to submit sales tax, refer to the chart that appears below the Filing frequency field or contact the tax agency directly.
Click the Save button to keep your changes.
- The following sales tax window will appear:

Figure 6.8: Sales tax due
This window is where you can find the amount of sales tax that is currently due, or coming due. You can change the time period you wish to look at in the from/to fields.
Since we don’t currently have any taxable sales recorded, we will create an invoice with sales tax next.
Creating an invoice that includes sales tax
After completing the setup for sales tax, you are ready to create invoices and sales receipts with sales tax. In this section, we will create an invoice and show you how to include sales tax.
Perform the following steps to create an invoice with sales tax:
- From the left menu bar, click on Sales and then select Invoices, as indicated in Figure 6.9:

Figure 6.9: Navigating to Invoices
- Click the Create invoice button, located on the right side of the screen:

Figure 6.10: Creating an invoice
- A blank invoice template will appear. Complete the fields as follows:

Figure 6.11: Invoice template
- Customer: From the dropdown, select the customer/client you are invoicing (in our example, George Jetson). Then, press Tab; the email, billing address, payment terms, and due date fields will be populated automatically.
- Location of sale: This field automatically populates with your business address that was entered in step 3 of Setting up sales tax in QuickBooks Online. It will be used to calculate the sales tax for this invoice. This is very important for determining your sales tax state, rate, and filing requirements.
- PRODUCT/SERVICE: From the dropdown, select the product/service you are invoicing the customer for (in our example, workbooks for business plan training).
- If you have previously added products and services to QuickBooks, the DESCRIPTION and RATE fields will automatically be populated. For a review on how to add products and services to QuickBooks, refer back to Chapter 5, Managing Customer, Vendor, and Products and Services Lists.
- QTY: Enter the quantity sold in this field (in our example,
10). - AMOUNT: QuickBooks will automatically multiply the quantity by the rate to calculate the total amount.
- TAX: To mark this item as taxable, put a checkmark in the TAX column if it does not already appear. If you marked items as taxable when you set them up, this field will automatically be populated.
Based on the city/state for your business, the sales tax rate for that geographical location will be applied. In the bottom-right corner, you can see that sales tax of $12.38 was calculated on this sale of $150.00. The total amount due with tax is $162.38.
- Click the Save button to save the invoice, and click X in the upper-right corner to close out of the invoice.
- Navigate back to the Sales Tax Center by clicking on Taxes from the left menu bar. The following window will appear:

Figure 6.12: Sales Tax Center with updated sales tax amount
As you can see, the tax of $12.38 now shows up as upcoming sales tax that will be due sometime in the future. Once the sales tax becomes due, the status will change to Due. Next, we will cover the sales tax reports you can generate to determine how much sales tax you owe and when it is due. Sales tax reports are also used to complete the sales tax return.
Sales tax reports
QuickBooks makes it easy to stay on top of the sales tax collected, which will ensure that you pay the correct amount when it comes due. There are two reports available to help you stay on top of the sales tax you owe: a tax liability report and a taxable customer report.
Within the Sales Tax Center, click on the Reports link to access the sales tax reports, as indicated in Figure 6.13:

Figure 6.13: Sales tax reports
- Tax liability report: This report will show you the sales tax collected as of a specific period of time. The report will show gross sales, taxable sales, non-taxable sales, and the tax amount.
In the report shown below, there are four columns: GROSS TOTAL, NON-TAXABLE, TAXABLE AMOUNT, and TAX AMOUNT. The gross total amount is $150.00, the non-taxable amount is $0, the taxable amount is $150.00, and the total tax amount is $12.38:
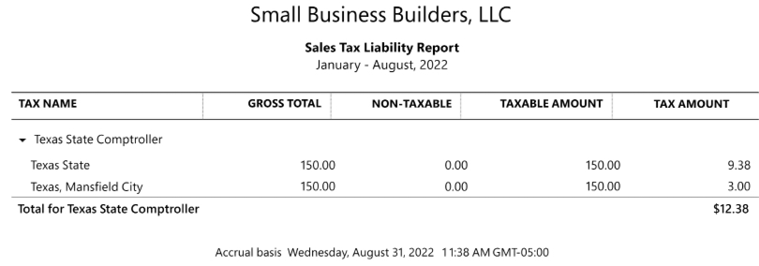
Figure 6.14: Sales tax liability report
- Taxable customer report: This report will list all customers who are subject to sales tax, along with their billing address, shipping address, taxable sales, and tax rate. Below is a snapshot of what this report looks like:

Figure 6.15: Taxable customer report
As you can see, it is easy to keep track of sales tax in QuickBooks. You can use the tax liability report and the taxable customer report to prepare your sales tax return. In addition, you will use these reports to determine the amount owed.
Pro Tip: Be sure to select the correct accounting method (cash or accrual) before running your reports. Refer back to the Small Business Bookkeeping 101 section of Chapter 1, Getting Started with QuickBooks Online, to learn the difference between cash and accrual accounting.
Paying sales tax when it comes due
Unfortunately, you cannot pay sales tax within QuickBooks Online. You must visit the website of your state tax authority and submit payment online, or mail a check before the due date. The following Intuit video tutorial provides a recap of what we have covered in this chapter, plus the steps you need to take to make a payment and record it in QuickBooks Online: https://youtu.be/Rns_R4fRros.
Summary
In this chapter, we have discussed the importance of setting up sales tax in QuickBooks so it can automatically calculate sales tax for you. We have shown you how to create an invoice and include sales tax, and we have covered the key reports available to help you stay on top of your sales tax liability. Since you cannot make sales tax payments in QuickBooks, we have also included a video that explains how to make your sales tax payments outside of QuickBooks. It’s important to make sure you set up sales tax and use the correct sales tax rate. This will help you to avoid penalties or fees for under-reporting and underpaying sales tax to your state tax office. In the next chapter, we will cover how to record invoices and sales receipts in QuickBooks Online.