
7
Recording Sales Transactions in QuickBooks Online
In Chapter 5, Managing Customer, Vendor, and Products and Services Lists, you learned how to customize QuickBooks by adding customers, vendors, and the products and services you sell to QuickBooks. Now that you have completed your QuickBooks setup, it’s time to learn how to record transactions. In this chapter, we will focus on recording sales transactions in QuickBooks Online (QBO). We will cover the three types of sales transactions, when you should use them, how to record each transaction, and the behind-the-scenes accounting that QuickBooks does for you. We will also show you how to record customer payments and how to issue credit memos and refunds to customers. Recording sales transactions will allow you to keep track of how much money your business is making. This information is important and will help you to determine whether or not your business is profitable.
In this chapter, we will cover the following key concepts:
- Entering sales forms—sales receipts, deposits, and sales invoices
- Recording payments received from customers
- Recording payments to the payments to deposit account
- Issuing credit memos and refunds to customers
The US edition of QBO was used to create this book. If you are using a version that is outside of the United States, results may differ.
Entering sales forms
Recording income for a business can be accomplished in a variety of ways. There are three primary ways to record income in QuickBooks Online. First, a sales receipt is used when you receive payment at the same time you provide products and/or services to your customers. Second, you can use a deposit to record income for a specific customer or to record income from multiple customers at any one time. Third, you can use a sales invoice, which allows you to bill a specific customer, who will pay you based on payment terms that are agreed upon upfront.
In the following sections, we will cover when and how to record income using a sales receipt, a deposit, and a sales invoice. We will also show you the accounting that takes place behind the scenes for each transaction. This will include the debits and credits recorded for each transaction.
Recording income using a sales receipt
A sales receipt is used when the sale of a product or service and receipt of the customer payment take place simultaneously. For example, retail businesses such as restaurants or clothing stores will receive payment at the same time they provide their service (for example, serving food to customers) or products (for example, clothing items for purchase). You can record a sales receipt in QuickBooks by completing a couple of simple steps.
Follow these steps to record a sales receipt:
- From the + New menu, select Sales receipt, as indicated in Figure 7.1:
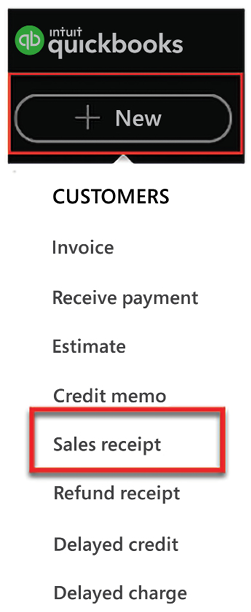
Figure 7.1: Navigating to the Sales Receipt form
- The following screenshot shows a snapshot of a completed sales receipt:

Figure 7.2: Completing the Sales Receipt form
There are several fields of information that need to be completed on the Sales Receipt form. The following is a brief description of the information you need to include in each field:
- Customer: Select the customer you sold the product or service to by clicking on the dropdown arrow in this field. George Jetson is the customer in our example. If you have not added any customers yet, you can add a new customer by typing the customer’s name in this field.
Pro Tip: If you need to record sales for an event for multiple customers at once, you can enter the event name and date or the week instead of a specific customer; for example, Sales for the week of 2/1/22 to 2/7/22.
- Email: This field will automatically be populated with the email address you have on file for the customer. The email address in our example is
[email protected]. If the field is blank, you can type an email address directly in this field. - QuickBooks will email the sales receipt to the email address you include in this field.
- Billing address: This field will automatically be populated with the billing address you have on file for this customer. The billing address in our example is 321 Jetson Dr., Jetson, CA 90210. If you don’t have an address on file, you can enter one directly in this field.
- Sales Receipt date: Enter the date of the sale in this field, which is
09/02/22in our example. - Payment method: Select the payment method by clicking the dropdown arrow. We have selected Check in our example.
- Reference no.: If your customer paid by check, enter the check number in this field. If payment was made by cash or credit card, you can enter a reference number, or leave this field blank. The reference no. is
43567in our example. - Deposit to: From the dropdown menu, select the bank account to which you will deposit this payment. In our example, the funds will be deposited into the Business Checking account.
Pro Tip: If you plan to deposit payments for multiple customers on the same day, select the Payments to deposit account (formerly Undeposited funds), instead of the Business Checking account as the Deposit to account. Later on, you will be able to select the specific deposits made on each day. This will make it much easier to reconcile the bank account.
- Sales Receipt no.: QuickBooks will automatically generate this number, which is 1003 in our example.
- Location of sale: For sales tax purposes, this field will automatically be populated with the business address of our sample company. The business address in our example is 3540 E Broad St, Mansfield, Tx 76063.
- PRODUCT/SERVICE: From the dropdown menu, select the type of service (or product) sold to the customer. In our example, it is a bookkeeping service. Monthly Bookkeeping Services has not been added, so you will select Add New and complete the following fields to add it to the list:
- Name:
Monthly Bookkeeping Services - Category:
Consulting services - Description:
Bookkeeping for the month of September 2022 - Rate:
$500.00 - Account:
Consultation Income
- Name:
- DESCRIPTION: This field will automatically be populated based on the product/service selected. In our example, the description is Bookkeeping for the month of September 2022.
- QTY: Enter the quantity of items sold or the total hours of service provided. In our example, the quantity is
1. - RATE: Enter the hourly rate for your services or the unit cost of the product sold. This field should automatically populate with the rate that was setup. In our example, the rate is
$500. - AMOUNT: You don’t need to enter anything in this field. QuickBooks will multiply the quantity by the rate to automatically calculate the total amount of the sales receipt. In our example, the total amount is $500.
- Tax: This box may automatically be turned on. Remove X from this field since this service it not taxable.
- Customer: Select the customer you sold the product or service to by clicking on the dropdown arrow in this field. George Jetson is the customer in our example. If you have not added any customers yet, you can add a new customer by typing the customer’s name in this field.
Pro Tip: This Intuit video tutorial summarizes the steps we have covered on How to create a sales receipt: https://quickbooks.intuit.com/learn-support/en-us/sales-receipts/how-to-record-a-sales-receipt/00/344860.
As mentioned in Chapter 1, Getting Started with QuickBooks Online, one of the benefits of using QuickBooks is that you don’t need to have knowledge of debits and credits to use the software. QuickBooks will automatically debit and credit the appropriate accounts for you. However, it is important for you to understand the impact of recording transactions in QuickBooks.
The following screenshot shows the journal entry that is recorded behind the scenes in QuickBooks for the sales receipt displayed previously in Figure 7.2:

Figure 7.3: Automatic journal entry recorded for a sales receipt
When you create a sales receipt in QuickBooks, it has an impact on the balance sheet and the income statement. You can find both of these reports in the Report Center. In Chapter 11, Business Overview Reports, we show you how to generate these reports. In our example, the checking account is increased by $500, which increases the total assets on the balance sheet report. Consultation Income has also increased by $500, which increases the total income on the profit and loss (income statement).
Now that you know how to use a sales receipt to record income, we will show you how to record income using a deposit, and the impact deposits have on financial statements.
Recording income using a deposit
Another method used to record income in QuickBooks is that of a deposit. The downside to using this method is that you won’t have a detailed record of the type of service that was performed, since there is no field to select the service or product provided. This method should be used if you don’t need to record your sales by the type of product or service that was sold. An example of a business that might use this method is a real estate agent recording commission income. You can record a lump-sum deposit amount for multiple sales, or you can record deposits for a specific customer. Recording a deposit in QuickBooks can be done in just a couple of steps.
Follow these steps to record income in QuickBooks using a deposit:
- From the + New menu, select Bank deposit in the OTHER column, as indicated in Figure 7.4:
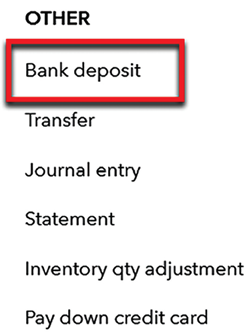
Figure 7.4: Navigating to Bank Deposit
- The following screenshot shows a snapshot of the Bank Deposit form:

Figure 7.5: Bank Deposit form
Brief descriptions of the fields that need to be completed in a deposit slip are given here. All fields are required except for the DESCRIPTION, PAYMENT METHOD, and REF NO. fields:
- Account: Use the dropdown arrow to select the bank account to which the deposit will be made. In our example, we have selected the Business Checking account.
- Date: Enter the date on which you will make the deposit with your bank. This deposit was made on
09/08/2022. - RECEIVED FROM: Click in this field and select the customer from whom you received the payment. If you prefer not to track income according to the customer, you can leave this field blank. Our deposit was received from Astro Jetson.
- ACCOUNT: From the dropdown menu, select the appropriate account to which this income should be categorized. This should be based on the type of product or service provided. The account in our example is Sales: Consultation Income.
- DESCRIPTION: This field is optional. You can type a brief description of the product or service provided. The description in our example is
Social media marketing plan. - PAYMENT METHOD: In this field, you can indicate the method of payment received (that is, by credit card, cash, or check). The payment method in our example is Check.
- REF NO.: If the payment method was Check, enter the check number in this field. For all other payment methods, you can leave this field blank. The reference number is
9876in our example. - AMOUNT: Enter the amount of the sale in this field. The total amount of the above deposit is
$250.
When you create a deposit transaction in QuickBooks, it affects the balance sheet and profit and loss (income statement) reports. The bank account where the deposit will be made goes up, which increases the assets section of the balance sheet report. The profit and loss report is increased by the product or service that was sold.
The following screenshot shows the journal entry recorded for the deposit transaction displayed in Figure 7.5 previously:

Figure 7.6: Automatic journal entry to record bank deposit
In our example, the business checking account increased by $250, which will increase the total assets on the balance sheet report. Consultation Income also increased by $250, which will increase the total income on the profit and loss (income statement).
Pro Tip: This method can also be used to record miscellaneous deposits, such as a refund check from a vendor or the IRS. In addition, if you receive a rewards check from a credit card company, that can be recorded as a deposit.
Now that you know how to record income using a deposit, we will show you how to record income using a sales invoice.
Recording income using a sales invoice
A sales invoice is used to record income from customers who have been given extended payment terms. This means the customer does not pay at the time the product is sold or services are rendered; instead, they pay you sometime in the future. The most common payment term is net 30, which means the invoice is due 30 days from the sales date or the invoice date.
Unlike the sales receipt and deposit forms, which record both the sale and the receipt of payment in a single transaction, recording a sales invoice and payment is done in two steps. In this section, we will cover the first step: recording a sales invoice. We will cover recording customer payments in the next section.
To record a sales invoice in QuickBooks Online, follow these steps:
- Navigate to the + New menu and select Invoice under CUSTOMERS, as indicated here:

Figure 7.7: Navigating to the Invoice form
- The following screenshot shows a snapshot of the sales invoice form, along with an example of what information should be included:

Figure 7.8: The Invoice form
Here are brief descriptions of the fields that need to be completed in a sales invoice. All fields are required except for the DESCRIPTION, QTY, and Message on invoice fields:
- Customer: Select the customer from the dropdown menu. George Jetson is the customer selected in our example.
- Customer email: This field will automatically be populated with the email address on file for the customer. If you want to be able to send the invoice directly to the customer via email, you will need to enter the email address in this field. The email address for George Jetson is
[email protected]. - Billing address: This field will automatically be populated with the address information you have on file for your customer. If you have not set up the address information, you can type it directly in this field. The billing address in this field is
321 Jetson Drive, Jetson, CA 90210. - Terms: This field will automatically be populated with the payment terms you have set up for your customer. In our example, we have set payment terms of Net 30, which means the invoice is due 30 days from the invoice date. If you have not set up payment terms, you can select these from the dropdown menu.
- Invoice date: Enter the date of the sale in this field. The invoice date is
09/08/2022in our example. - Due date: This field is automatically calculated by QuickBooks. Since the payment terms are Net 30, it adds 30 days to the invoice date in order to compute the date payment is due. The due date is 10/08/2022 in our example.
- Invoice no.: QuickBooks will automatically populate this field with the next available invoice number. In our example, the invoice number is 1004.
- Location of sale: This field will automatically be populated with the address of your business in order to calculate the sales tax, if applicable. The address in this field is 3540 E Broad St, Mansfield, Tx 76063.
- PRODUCT/SERVICE: From the dropdown menu, select the product and/or services provided to the customer. In our example, the product sold is Tax planning and preparation. Select Add new from the dropdown menu to add this service to the list.
- DESCRIPTION: This field will automatically be populated based on the product/service selected in the previous field. The description of the product sold in our example is Tax planning and preparation.
- QTY: Enter the quantity of the product, or the total hours to bill the customer. In our example, the fee is a flat amount, so the QTY field will automatically populate with a
1. - RATE: This field will automatically be populated based on the product/service selected. However, if you don’t have a rate set up, you can enter the price per unit or the hourly rate in this field. In our example, the rate for tax planning and preparation is $1,000.00.
- AMOUNT: QuickBooks will automatically calculate the total invoice amount by taking the quantity and multiplying it by the rate. In our example, the total amount due is $1,000.00.
- Message on invoice: This field is optional. You can type a personal thank you message to your customer and it will appear on the invoice. In our example, we have entered the following message:
Thank you for your business!
You have the option to print the sales invoice, email it, or save it as a PDF document. If you would like to allow customers to pay their invoices online, you can sign up for the Intuit Payments service. This service allows you to accept payments from customers via credit card, debit card, or ACH bank transfer. Using Intuit Payments is a fast and efficient way to get paid.
Pro Tip: You can now send invoices in one of six languages: English, French, Spanish, Italian, Portuguese (Brazil), and Chinese (Traditional). To select the preferred language for a customer, navigate to the customer profile and click on the Language tab.
This Intuit video tutorial summarizes the steps we have covered on How to create an invoice in QuickBooks Online: https://www.youtube.com/watch?v=o56z2OjLzas.
When you create a sales invoice in QuickBooks, it has an impact on the balance sheet as well as the profit and loss statement. The accounts receivable account will increase, which will result in an increase in the total assets on the balance sheet report. Income will also increase the profit and loss statement.
The following screenshot shows the journal entry that will be recorded in QuickBooks for our sample sales invoice shown in Figure 7.8:

Figure 7.9: Automatic journal entry recorded for invoice
The amount owed by customers—also known as accounts receivable—goes up by $1,000.00, and consultation income is increased by $1,000.00. In the next section, we will show you how to apply payments to open accounts receivable balances.
Now that you know how to record income using a sales invoice, we will cover the second step, which is receiving customer payments. You must correctly apply customer payments to outstanding sales invoices to ensure that your accounts receivable balance is always up to date.
Recording customer payments
If you record income using a sales invoice, you will receive payment based on the terms you have agreed with your customer. When customer payments are received, you must apply payments to an outstanding sales invoice to reduce the accounts receivable balance. You can accept multiple payment methods in QuickBooks, including check, cash, and credit card. To learn more about managing credit card payments, refer to Chapter 16, Finding Apps and Handling Special Transactions in QuickBooks.
Follow these steps to receive payment from a customer:
- Click on the + New menu.
- Navigate to Receive payment, located below CUSTOMERS, as indicated in Figure 7.10:

Figure 7.10: Navigating to Receive payment
- Complete the fields, as indicated in the following screenshot, to record the customer payment:

Figure 7.11: The Receive Payment window
The following are brief descriptions of the key fields for receiving customer payments:
- Customer: Select the customer by clicking the dropdown arrow. George Jetson is the customer selected in our example.
- Payment date: Enter the date payment was received. The payment date is
09/12/2022in our example. - Payment method: From the dropdown menu, select the payment method received (that is, by credit card, check, or cash). The payment method is Check in our example.
- Reference no.: If payment was made by check, enter the check number in this field. If another payment method was used, you can leave this field blank. The reference number is
12345in our example. - Deposit to: Select the bank account to which you will deposit this payment. Payments to deposit (formerly “undeposited funds”) is the Deposit to account in our example.
- Amount received: Enter the amount of the payment received. The amount received in our example is
$1,162.38. - Outstanding Transactions: A list of unpaid invoices will appear in this section. Based on the amount entered in the Amount received field, QuickBooks will select the invoice that matches that amount and is closest to the date of the transaction. In our example, invoice #1001 for $162.38 and invoice #1004 for $1,000.00 are the invoices that payment has been received for. If QuickBooks selects the wrong invoice, you can remove the checkmark and manually select the invoices to apply the payment to.
Recording customer payments affects the balance sheet report but not the income statement. Since income was recorded at the time the invoice was created, there is no impact on profit and loss (income statement).
The following screenshot shows the journal entry that will automatically be recorded in QuickBooks for a customer payment of $1,162.38:

Figure 7.12: Automatic journal entry recorded for customer payment received
The payments to deposit account is increased by $1,162.38, which will result in an increase in the assets section of the balance sheet report. Accounts receivable will decrease by $1,162.38, which will result in a decrease in the assets section of the balance sheet report.
Pro Tip: The Receive payments method should be used when an invoice has previously been issued. Using Receive payments without an invoice will result in a credit balance on the customer account. The Accounts receivable aging summary should be reviewed periodically to capture any credits on customer accounts.
Recording payments to the payments to deposit account
In the previous examples, each of the payments that have been recorded from customers, whether on a sales receipt, deposit slip, or invoice, were all deposited to the business checking account. This is ideal if you don’t deposit more than one check (customer payment) at a time.
However, like most businesses you will probably wait until you have multiple checks before you head to the bank to make a deposit. In that case, you will need to record all customer payments to an account called payments to deposit (formerly “undeposited funds”).
The payments to deposit account is an account that is automatically created by QuickBooks. It acts like a cash drawer, where all customer payments are held until you record a deposit in QuickBooks.
After you make a deposit with the bank, you need to record that deposit in QuickBooks. Follow the steps below to record a deposit that includes multiple checks (customer payments):
- Click on the + New button and select Bank deposit, as shown below:
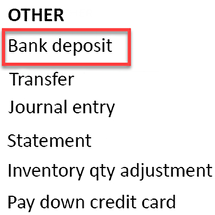
Figure 7.13: Navigating to Bank deposit
- The Bank Deposit form will appear:
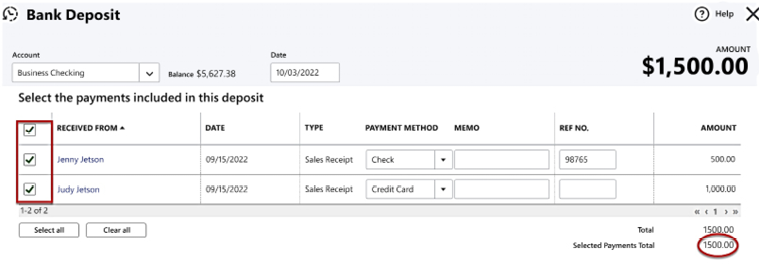
Figure 7.14: The Bank Deposit form
- Select the bank account to which the deposit will be made. Business Checking is the account selected in our example. In the Date field, select the date of the deposit; in our example, it is 10/03/2022.
- Below the Select the payments included in this deposit heading, put a checkmark next to each payment included in this deposit. In our example, there are two payments from two different customers (Jenny Jetson and Judy Jetson), which total $1,500.00.
- Click the Save button to record the deposit.
When this deposit is recorded in QuickBooks, the following journal entry is created behind the scenes:

Figure 7.15: Journal entry to transfer payments from payments to deposit to the checking account
Pro Tip: You can also print a deposit slip from the screen shown in Figure 7.14, which you can take to your bank along with the checks you are depositing.
When this deposit is recorded in QuickBooks, it only affects the balance sheet report. The business checking account (an asset) increases by the total deposit amount, and the payments to deposit account (also an asset) decreases by the total deposit amount. To ensure you are in balance when you reconcile your bank accounts, always make sure that you have recorded all deposits in QuickBooks. If you have any payments sitting in the payments to deposit account (and they were actually deposited), you will be out of balance. To learn more about how to reconcile bank accounts, head over to Chapter 9, Reconciling Uploaded Bank and Credit Card Transactions.
Now that you know how to record income and apply payments to outstanding customer invoices, we will show you how to handle customer returns and refunds in the next section.
Issuing credit memos and refunds to customers
There may be times when a customer returns merchandise, or you need to refund a customer due to an issue with the services or products you have provided.
When that happens, you can create a credit memo in QuickBooks that can be applied to a future invoice, or you can refund the customer instead by clicking on + New, selecting Refund receipt, and following the onscreen instructions.
Follow these steps to create a credit memo in QuickBooks Online:
- Click on the + New menu and select Credit memo below CUSTOMERS, as indicated in Figure 7.16:
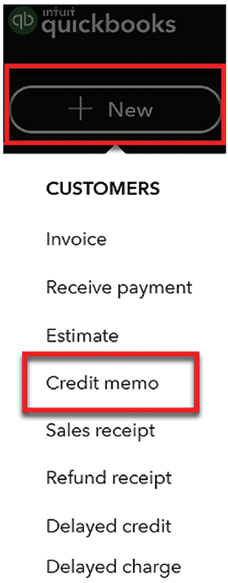
Figure 7.16: Navigating to the Credit Memo form
- Complete the key fields indicated here for the credit memo:

Figure 7.17: Credit Memo form
The following are brief descriptions of the key fields to complete for a credit memo. All fields are required except for the QTY, DESCRIPTION, and Message displayed on credit memo fields:
- Customer: From the dropdown menu, select the customer you need to refund. George Jetson is the customer selected in our example.
- Email: This field will automatically be populated with the email address you have on file. If you don’t have an email address on file, you can enter the email address in this field if you would like to email the credit memo to the customer. The email address for George Jetson is
[email protected]. - Billing address: This field will automatically be populated with the billing address you have on file. If you don’t have a billing address on file, you can enter it directly in this field. The billing address for George Jetson is 321 Jetson Drive, Jetson, CA 90210.
- Credit Memo Date: Enter the date for which you are creating this credit memo. The credit memo is dated
09/30/2022. - PRODUCT/SERVICE: From the dropdown menu, select the product or service for which you are providing a refund. The product is Website development.
- DESCRIPTION: This field will be populated automatically, but you should edit this to specify the reason for the credit as well as the original invoice number used to bill the customer. In our example, the description is:
Partial credit for invoice #1005 due to website was not delivered by promised due date. - QTY: Enter the number of items or hours for which you are refunding the customer. The quantity is
1. - RATE: This field will automatically be populated based on the product/service selected. However, if there is no rate set up, you can enter the rate in this field. The rate is
$250in our example. - AMOUNT: This field is automatically calculated by multiplying the quantity by the rate. You do not have to enter anything in this field. The total amount to be credited to the customer is $250.00 in our example. Since the customer has not paid the invoice yet, we will apply this credit to the open invoice. However, if the invoice had already been paid, you would have issued a refund to the customer.
- Message displayed on credit memo: In this field, you can add the original invoice number for which you are providing a full or partial credit, or a brief description of the reason for the credit. The message on our credit memo is:
The website was delayed by 10 days so partial credit issued for invoice #1005.
Recording a credit memo in QuickBooks will have an impact on the balance sheet and income statement reports. The income account (sales) will decrease, which will reduce the total income on the profit and loss report. If the original invoice has not been paid, the credit memo can be applied to that invoice to reduce the total amount due from the customer. The accounts receivable account will decrease since the amount due from the customer has been reduced.
The journal entry for the preceding credit memo will automatically be recorded in QuickBooks as follows:

Figure 7.18: Automatic journal entry recorded for credit memo
Pro Tip: This Intuit video tutorial recaps the steps we’ve covered on How to give customers credit in QuickBooks Online: https://www.youtube.com/watch?v=oi3WaGrUHK0.
Applying a credit memo to an open invoice
After recording a credit memo for a customer, the credit will immediately be applied to the open balance for that customer. Let’s assume that Astro Jetson has sent a payment in for invoice #1005. Navigate to the Receive Payment window, select Astro Jetson from the customer dropdown and the following screen displays:

Figure 7.19: Astro Jetson invoice
As you can see in Figure 7.19, the original invoice amount was $2,000.00, and now that the credit has been recorded the open balance has been reduced by the $250 credit amount (shown in Figure 7.18) to $1,750.00.
Pro Tip: If you do not invoice customers through QuickBooks, you can issue a refund check by going to + New and selecting Check, listed below the Vendors column.
Summary
In this chapter, you have learned how to record sales transactions for the sale of products and services using a sales receipt, a deposit, and a sales invoice. You now know when to use each sales transaction and how to record them in QuickBooks Online. We have also covered the journal entry that is recorded behind the scenes by QuickBooks for each transaction. In addition, you have learned how to record customer payments so that they are correctly applied to open invoices, and how to issue credit memos and refunds to customers. In the next chapter, we will look at how to record the money that flows out of your business to cover expenses.