Managing Customer, Vendor, and Products and Services Lists
Now that you’ve created your company files, it’s time to add the people you do business with on a regular basis. This includes your customers to whom you sell your products and services, and the vendors from whom you purchase services and supplies. We will also cover how to create your products and services list in QuickBooks Online so that you can keep track of your sales.
In this chapter, we will cover the following key concepts:
Managing customer lists in QuickBooks Online
Managing vendor lists in QuickBooks Online
Managing products and services lists in QuickBooks Online
By the end of this chapter, you will understand how to add, edit, delete, and merge customers, vendors, and products and services that you sell.
The US edition of QBO was used to create this book. If you are using a version that is outside of the US, results may differ.
Please note the screenshots taken in this chapter have been taken using the Accountant view menu. In Chapter 1, Getting Started with QuickBooks Online, we introduced a new menu called Business view. If you are in Business view, you will need to switch to the Accountant view menu so that your screen resembles the images shown throughout this book.
To do this, click on the gear indicating the settings menu (located in the upper-right corner) and select Switch to Accountant view, as shown in Figure 5.1 below:
Figure 5.1: Option to switch between the Accountant and Business views
Managing customer lists in QuickBooks Online
A customer is anyone that you sell products or services to. A customer can be an individual or a business.
Some of the information QuickBooks Online allows you to keep track of in relation to customers includes contact information, such as their telephone number and email address, payment terms, invoicing, and payment history. You can enter customer information manually or import it from an Excel spreadsheet. If you need to make changes to the contact information for a customer, you can do so easily. If you stop doing business with a customer, you can make customers inactive so that they no longer appear in the customer listing. You can also merge customers if you have duplicates. In this section, we will show you how each of these works, beginning with manually adding customers.
Manually adding customers in QuickBooks Online
In order to add new customers to QuickBooks Online (QBO), you need to have the basic contact details of your customer. This includes their company name, billing address, business telephone number, and the first and last name of the primary contact. You should also know what payment terms you will extend to customers (for example, net 30 days or net 60 days).
Follow these steps to add a new customer in QuickBooks Online:
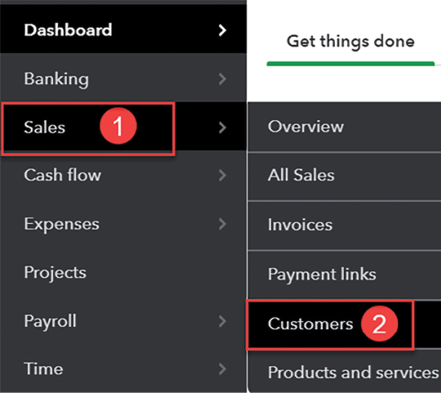
Navigate to Customers by selecting Sales from the left menu bar and then Customers, as shown in Figure 5.2:
Figure 5.2: Navigating to Customers
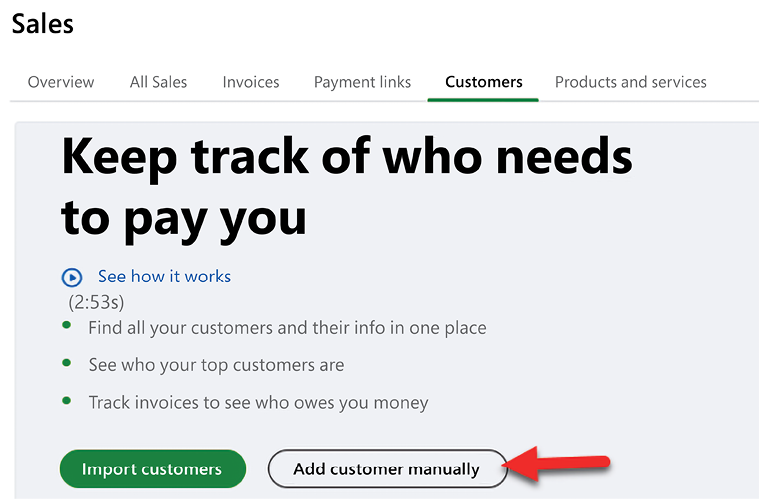
The following screen will appear:
Figure 5.3: The Add customer manually button
Click on the Add customer manually button. Note that this button will not appear if you have added customers previously to QuickBooks.
Fill in the fields on the Customer information screen, as shown in Figure 5.4:
Figure 5.4: Filling in customer information
When adding a new customer, there are 5 key areas that need to be completed: name and contact, addresses, notes and attachments, payments, and additional information. You can navigate to each area using the icons located in the top-right corner of the screen as indicated in Figure 5.4.
The following is a brief description of the 11 fields of information you can enter in the Name and contact section. While the only required field is the Customer display name field, I recommend that you take the time to add as much information as you can about your customers:
First name and Last name (1): If the customer is an individual, enter their first and last names in these fields. If the customer is a business, leave these fields blank. Note: If a business is a sole proprietorship or a single member LLC and you want to keep track of the name of the business owner and the legal business name, complete both fields.
Company name (2): If the customer is a business, enter the business name in this field. If the customer is an individual, leave this field blank.
Customer display name (3): There is no need to input anything in this field; it will automatically populate with the information you entered in the Company name or First name and Last name fields. This field is important because the information will be displayed in the customer list found in the Customer Center.
Email (4): Enter the business email address for customers in this field.
Phone number (5): Enter the business telephone number for customers in this field.
Mobile number (6): Enter the mobile number for customers in this field.
Fax (7): Enter the fax number (if applicable) for customers in this field.
Other (8): Enter an additional contact phone number in the Other field.
Website (9): Enter the website address for the business if you have one.
Name to print on checks (10): Similar to the Customer display name field, this field will automatically populate with the information that you entered in the Company name or First name and Last name fields. If you need to change the payee name, enter the name you would like to appear on checks. Typically you would issue a check to a customer in the case of a refund, so it is important to have the correct payee name in this field.
Is a sub-customer (11): If you have more than one job or project you are working on for the same customer, you can create sub-customers to keep track of the income and expenses for each job separately. For example, if a contractor is working on a kitchen remodel and a bathroom remodel for the same customer, each of these jobs can be set up as a sub-customer so you can track income and expenses for each job (sub-customer) separately. This will allow you to easily run reports by sub-customer (job, project) so that you can see the profitability of each one.
Pro Tip: Before you can create a sub-customer, the main customer must be added to QuickBooks first. Going back to our contractor example, the customer must be added to QuickBooks first before adding kitchen remodel and bathroom remodel as sub-customers.
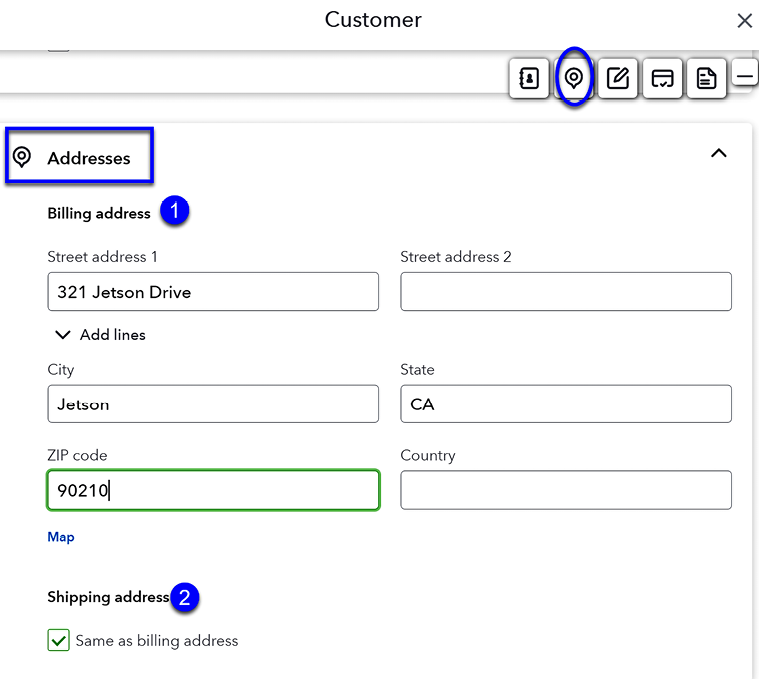
Complete the following fields in the Addresses section:
Figure 5.5: Addresses section of the Customer information screen
The following is a brief description of the fields of information you can enter in the addresses section:
Billing address (1): Enter the address where your customers would like their invoices to be mailed to and/or where correspondence should be sent. Even if you plan to email all the invoices and other correspondence, we recommend that you keep an address on file for all customers.
Shipping address (2): The address entered in the Billing address field will automatically be copied to the Shipping address field. This can be edited if necessary. The billing address will be used to mail invoices to customers and the shipping address is where products are shipped, if applicable.
Complete the following fields in the Notes and attachments section:
Figure 5.6: Descriptive note and button to add an attachment
Notes: This field can be used to enter additional information about your customers, such as any preferences they have, or even to document previous incidents or issues. This information is for internal use only and is not visible to the customer.
Attachments: You can store important documents such as contracts, engagement letters, or proposals in QuickBooks. Simply scan the document into your computer and attach it to the customer with whom it is associated.
Complete the following fields in the payments section:
Figure 5.7: Payments section of the Customer information screen
There are four fields in the payments section, Primary payment method, payment Terms, Sales form delivery options, and Language to use when you send invoices:
Primary payment method (1): Choose from the dropdown the payment method used most often by the customer. Cash, check, and credit card are the options available but you can also add new payment methods, such as Cashapp or Zelle.
Terms (2): Select the payment terms for customers in this field. For example, Net 30 means the customer has 30 days from the invoice date to remit payment. If payment is not received by the due date, QuickBooks will flag the invoice as past due. You can set QuickBooks up to automatically send a reminder email to customers when invoices are coming due or past due. Refer to Chapter 2, Company File Setup, to learn how to do this.
Sales form delivery options (3): From the dropdown, you can select the method in which typically provide customers their invoices (Email, Printed copy, Default method, or None are the options).
Language to use when you send invoices (4): From the dropdown, you can select the language you would like to invoice customers in. Currently, the choices are English, French, Spanish, Italian, Chinese (Traditional), and Portuguese (Brazil).
Complete the following fields in the Additional info section:
Figure 5.8: Additional info screen of the Customer information screen
Customer type (1): If you need to categorize your customers into different types (for example, wholesaler or retailer), you can create custom types and assign each customer to a type. This will allow you to run reports and filter by customer type to get detailed information, such as sales by customer type.
Taxes (2): Enter the details for tax-exempt customers such as their resale certificate number. In addition, you should request a copy of the certificate and attach it in the notes and attachments section. This will cover you if you ever have a sales tax audit and need to provide supporting information on why you did not charge a customer sales tax.
Opening balance (3): Generally, you wouldn’t use this field unless converting from other accounting software. This field is useful for recording the existing accounts receivable balance that customers have with you at the time of converting from your old accounting system to QuickBooks. However, if you plan to enter unpaid invoices into QuickBooks, leave this field blank.
As of (4): If you entered an opening A/R balance in step 3, enter the effective date in this field. This would typically be the date you start using QuickBooks to track your business finances.
Be sure to click the Save button at the very bottom of the screen to save the customer information in QuickBooks.
If you have more than a handful of customers to add to QuickBooks, I recommend you put the customer information into an Excel spreadsheet and import the data into QuickBooks.
Importing customers into QuickBooks Online
You can import all of your customer details from a CSV file into QuickBooks. This template can be found here: https://packt.link/MQ23chapter5.
Follow these steps to import customers into QuickBooks Online:
Navigate to Customers by selecting Sales from the left-hand menu bar and then Customers, as shown in Figure 5.9:
Figure 5.9: Navigating to Customers
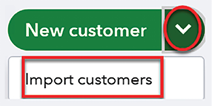
Click the dropdown arrow next to the New customer button located in the upper-right corner and select Import customers, as shown in Figure 5.10:
Figure 5.10: The Import customers option
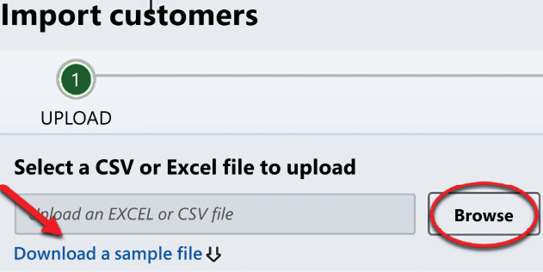
On the Import customers screen, click the Browse button to upload the CSV file from your computer, as shown in Figure 5.11:
Figure 5.11: Uploading a CSV or Excel file
You can click on the blue link to download the sample file (shown in the preceding screenshot). This file includes all of the fields of information you can upload for customers. Save this file and use it as your template.
Follow the onscreen instructions to import your customer data into QBO.
Pro Tip: A common error made when importing data is the use of special characters. QuickBooks will not accept the use of special characters (for example, &, !, $), so be sure to avoid doing this. For additional tips on troubleshooting errors during import, you can download the troubleshooting guide using this link: https://packt.link/MQ23chapter5
Making changes to existing customers in QuickBooks Online
There may be times when you need to correct or update a customer’s information. For example, if a customer’s address changes or their primary contact changes, you will need to update your records with the new information. Updating customer information is easy to do in QuickBooks – all you need to do is navigate to the Customer Center and select the customer that you need to make changes to.
Follow these steps to edit an existing customer in QuickBooks Online:
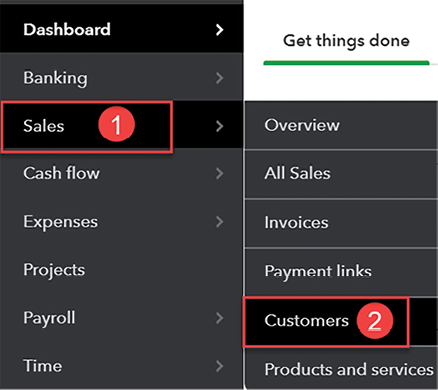
Navigate to Customers by selecting Sales from the left-hand menu bar and then Customers, as shown in Figure 5.12:
Figure 5.12: Navigating to Customers
The Customer Center will appear on the next screen. Click on the customer name, as indicated in Figure 5.13:
Figure 5.13: Editing customer details
The following screen appears. Click the Edit button shown in Figure 5.14 and make the necessary changes:
Figure 5.14: Edit button for a customer listed in the Customer Center
You can update the information you have on file for your customers at any time. Having up-to-date information will ensure that invoices, sales receipts, and other documents contain the most recent contact information, such as billing and shipping address information, on file.
Inactivating customers in QuickBooks Online
Unlike QuickBooks Desktop, which allows you to delete customers, vendors, or products as long as you have not used them in a transaction, you cannot delete customers, vendors, or products in QBO. However, similar to accounts on the chart of accounts, you can inactivate customers, vendors, and products, which will keep the existing transactions recorded in QuickBooks, but “hide” the customer, vendor, or item from the dropdown list.
Follow these steps to inactivate customers in QuickBooks Online:
Navigate to Customers by selecting Sales from the left-hand menu bar and then Customers, as shown in Figure 5.15:
Figure 5.15: Navigating to Customers
Put a checkmark next to the customer you want to inactivate, click the arrow next to Batch actions, and select Make inactive, as shown in Figure 5.16:
Figure 5.16: The Make inactive option
Similar to accounts and customers, you can inactivate vendors and items that have been used in a transaction from their dropdown lists. This action is called Make inactive and it will prevent someone from selecting customers, vendors, and items you no longer wish to use, while preserving the historical transactions that have been recorded for each customer, vendor, and item at the same time. We will cover how to make vendors and items inactive later on in this chapter.
Pro Tip: To review the steps we have covered in this section, watch this Intuit video tutorial, How to add customers to QuickBooks: https://www.youtube.com/watch?v=49yRB6zgBg4.
Merging customers in QuickBooks Online
A common issue that you may encounter is duplicate customers. If you have more than one person setting up customers in QuickBooks or you don’t have an established way of adding new customers, you will have this issue. The best way to avoid having duplicate customers is to establish a specific process for adding new customers. For example, have only one person who is responsible for adding customers in QuickBooks and establish whether you will enter customers by first name, last name, or last name, first name.
If you do encounter duplicate customers, you can combine the information entered for the duplicate customers to create one customer profile.
Follow the steps below to merge customers:
Navigate to the Customer Center and identify the duplicate customers:
Figure 5.17: Identifying duplicate customers in the Customer Center
In Figure 5.17, Astro Jetson and Jetson, Astro are the same customer. Since the owner would like all customer information entered as first name, last name, the customer profile we want to keep is the one at the top of the list, Astro Jetson.
Click once on the customer profile you plan to remove. In our example, this is Jetson, Astro.
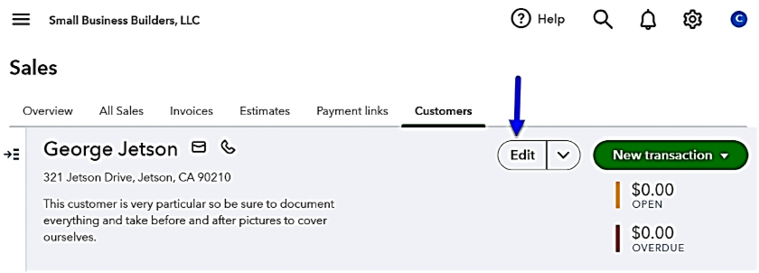
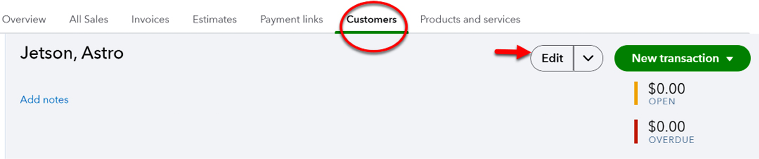
The following appears once we click on Jetson, Astro:
Figure 5.18: Viewing customer information
Click the Edit button as indicated in Figure 5.18.
The Customer information screen will appear:
Figure 5.19: Editing information for an existing customer
Click once in the Customer display name field and type the name exactly as it appears in the customer profile that you wish to keep. In our example, this would be Astro Jetson, as shown below:
Figure 5.20: Editing the Customer display name field
Click the Save button in the lower-right corner.
The following message will appear:
Figure 5.21: Confirming the merging of customers
Click Yes and the customer profiles will be combined into one:
Figure 5.22: The Customer Center with both profiles combined
As you can see, the duplicate profile (Jetson, Astro) is no longer on the customer list. All of the transactions recorded for that customer have been moved to the Astro Jetson profile.
In this section, we have shown you how to manually add, import, edit, inactivate, and merge customers. In the next section, we will show you how to add, import, edit, inactivate, and merge vendors.
Managing vendor lists in QuickBooks Online
A vendor is an individual or a business that you pay. Vendors can be 1099 contractors, utility companies, or businesses you purchase products from. Similar to customers, you can keep track of all vendor information, such as the company’s address, telephone number, email address, and federal tax ID number for 1099 reporting. 1099 reporting is required for contractors that you have paid $600 or more to within a calendar year.
In this section, we will show you how to add new vendors, edit existing vendors, inactivate vendors, and merge vendors in QuickBooks.
Manually adding vendors in QuickBooks Online
To add new vendors to QBO, you need to have each vendor’s contact details. This includes a business telephone number, remit to address, email address, and tax ID number (or social security number) for 1099 vendors. You can also enter the payment terms your vendor has extended to you. Entering these payment terms will allow QuickBooks to remind you when bills are due or past due.
Follow these steps to manually add vendors in QuickBooks Online:
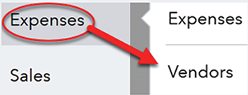
Navigate to Vendors by clicking on Expenses on the left-hand menu bar and selecting Vendors, as shown in Figure 5.23:
Figure 5.23: Selecting Vendors
Click the New Vendor button located in the upper-right corner, as shown in Figure 5.24:
Figure 5.24: The New Vendor button
If this is the first time you are accessing the Vendors Center, you will see the option to Add vendor manually instead of the New Vendor button.
Fill in the fields in the Vendor window, as shown in Figure 5.25:
Figure 5.25: Filling in the Vendor window
The following is a brief description of the 10 fields of information you can enter for new vendors:
Company name (1): Enter the name of the business that you are purchasing from. If the vendor is an individual, such as a 1099 contractor, leave this field blank and complete the First name and Last name fields instead.
Pro Tip: If you have an existing customer who is also a vendor, you will need to set them up as a vendor in QuickBooks. Since QuickBooks does not allow you to use duplicate names, we recommend you add additional verbiage after the name, such as V or Vend, to differentiate between the customer profile and the vendor profile. For example, if Cameras-R-Us is already set up in QuickBooks, we would set it up as a vendor as Cameras-R-Us-V or Cameras-R-Us-Vend.
Vendor display name (2): This field will automatically populate with the company name that was entered in step 1.
First name and Last name (3): If purchasing from an individual and not a business, enter the name of the individual you are purchasing goods or services from. If the vendor is a sole proprietorship or LLC and you want to keep the name of the business owner, enter both.
Email (4): Enter the primary email address for the vendor in this field. This email address will be used to send purchase orders and other vendor-related documents directly from QuickBooks.
Phone number (5): Enter the vendor’s telephone number in this field.
Mobile number (6): Enter the vendor’s cell phone number in this field.
Fax (7): Enter the vendor’s fax number in this field.
Other (8): Enter any additional contact information in this field.
Website (9): Enter the vendor’s website information in this field.
Name to print on checks (10): The information entered in the company name (1) or the first and last name (3) will automatically appear in this field. If necessary, you can edit this information.
Enter the address where you mail your payments. If you don’t mail payments, you still want to complete these fields if you have the info:
Figure 5.26: Adding vendor address details
Pro Tip: If you make your payments online or via credit card, it’s still a good idea to keep an address on file for each vendor. This is especially important to do for 1099 contractors because you are required to mail a 1099 form to them at the end of the year for tax reporting purposes.
Complete the Notes and attachments section as shown in Figure 5.27:
Figure 5.27: Notes and attachments section of the Vendor information screen
Like customers, you can add notes about your vendors and suppliers that are for internal purposes only. Any information added to this section is not visible to vendors. In addition, you can attach contracts, files, emails, and other pertinent documents in the section labeled Add attachment, as shown in Figure 5.27.
Complete the fields in the Additional info section:
Figure 5.28: Additional info section of the Vendor information screen
Business ID No. (1): Enter the social security number or federal tax ID number for all 1099 vendors in this field. If a business is incorporated, there is no need to obtain this information.
Pro Tip: It’s good practice to request a W9 form from all 1099 contractors before you remit payment. A W9 form includes the individual’s first and last names, their Doing Business As (DBA) company name, mailing address, business entity (for example, sole proprietor, LLC), and social security or federal tax ID number. This form will give you all of the information you need to add them to QuickBooks as a new vendor and complete 1099 reporting at the end of the year.
Track payments for 1099 (2): Select this checkbox for any individuals you purchase goods and services from that are not incorporated. By marking this box, QuickBooks will flag these vendors so that they appear on the 1099 report at the end of the year.
Pro Tip: In the US, if you pay $600 or more to a 1099 contractor during the year, you are required to provide that contractor with a 1099 form at the end of the year. If total payments during the year do not equal $600 or more, you are not required to provide a 1099 form.
Billing rate (3): If you have an agreed-upon billing rate that does not change, enter that information in this field. However, if the billing rate varies, leave this field blank.
Terms (4): Select the payment terms the vendor has extended to you (for example, net 30 days, net 15 days, or due upon receipt). It’s important to select payment terms so that QuickBooks can use this information to remind you when bills are due or past due.
Account no. (5): If your vendor has given you an account number, enter it in this field. Otherwise, you can leave this field blank.
Default expense category (6): If you use the same category for all payments to a vendor, you can select the category from the dropdown. This will allow QuickBooks to automatically populate the category field each time you record a new transaction for this vendor. If the category varies, leave this field blank.
Opening balance (7): If you are converting from other accounting software to QuickBooks, you can enter the outstanding accounts payable balance for suppliers in this field. However, if you plan to manually enter unpaid bills into QuickBooks, leave this field blank.
As of (8): If you entered an opening balance in step 7, enter an effective date in this field. In general, this date will be the same as the date you start tracking your income and expenses in QuickBooks.
Similar to customers, you can include a wealth of information in QuickBooks pertaining to your vendors. By including this information in QuickBooks, you can easily create purchase orders, bills, and other forms and documents without needing to enter this information over and over.
Importing vendors into QuickBooks Online
If you have more than a few vendors to add to QuickBooks, you may want to consider importing the information instead of manually inputting it into QuickBooks. Similar to customers, you can import your vendor details from a CSV file. This template can be found here: https://packt.link/MQ23chapter5.
Follow these steps to import vendors into QuickBooks Online:
Navigate to Vendors by clicking on Expenses on the left-hand menu bar and selecting Vendors, as shown in Figure 5.29:
Figure 5.29: Selecting Vendors
Click on the arrow to the right of the New vendor button located in the upper-right corner and select Import vendors, as shown in Figure 5.30:
Figure 5.30: The Import vendors option
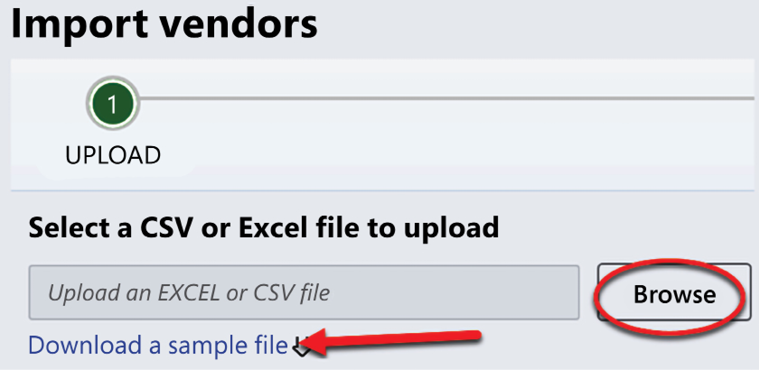
On the Import vendors screen, click the Browse button to upload the CSV file from your computer, as shown in Figure 5.31:
Figure 5.31: Uploading a CSV or Excel file
You can click on the blue link to download the sample file (shown in the preceding screenshot). This file includes all of the fields of information you can upload for vendors. Save this file and use it as your template.
Follow the onscreen prompts to import your vendors into QBO.
Review the vendor information to ensure accuracy. If you do find errors, you can easily fix them.
Making changes to existing vendors in QuickBooks Online
Similar to customers, the information that you have on file for vendors can change. For example, the remitaddress where payments are mailed could change, or the telephone number may need to be updated. When it does, you can quickly update your records in QuickBooks. You will need to navigate to the Vendors Center and select the vendor that you need to make changes to.
Follow these steps to edit an existing vendor in QuickBooks Online:
Navigate to Vendors by clicking on Expenses on the left-hand menu bar and selecting Vendors, as shown in Figure 5.32:
Figure 5.32: Selecting Vendors
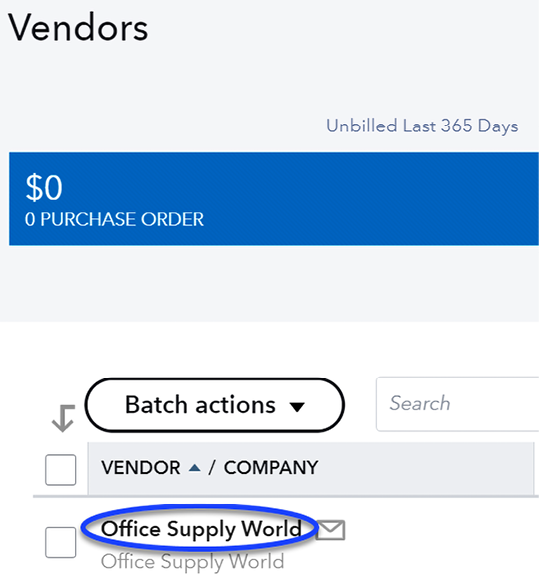
Select the vendor you want to edit by clicking on the vendor’s name, as shown in Figure 5.33:
Figure 5.33: Clicking on a vendor name
The Vendors Center will be displayed on the next screen. Click on the Edit button to make changes:
Figure 5.34: Editing a vendor
QuickBooks makes it easy to update vendor contact information. Having up-to-date vendor information will ensure that all purchase orders, bills, and reports are accurate. If you decide you no longer want to do business with a vendor, but you have existing transactions in QuickBooks, you can inactivate vendors. We will look at this next.
Inactivating vendors in QuickBooks Online
Similar to customers, you cannot delete vendors, but you can inactivate any vendors you no longer do business with. This will maintain your existing vendor transactions that were previously recorded but remove the vendor from the Vendors Center.
Follow these steps to inactivate vendors in QuickBooks Online:
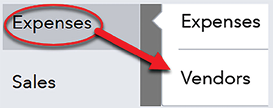
Navigate to Vendors by clicking on Expenses on the left-hand menu bar and selecting Vendors, as shown in Figure 5.35:
Figure 5.35: Selecting Vendors
Put a checkmark in the box next to the vendor you want to inactivate and select Make inactive, as shown in Figure 5.36:
Figure 5.36: Making a vendor inactive
When you inactivate a vendor, QuickBooks will preserve the existing historical transactions but remove the vendor from the dropdown list so that it cannot be used in future transactions, such as purchase orders and bills.
Pro Tip: To review the information covered in this section, watch this Intuit video tutorial, How to add vendors to QuickBooks Online: https://www.youtube.com/watch?v=U-Y7Vf0sBnE.
Merging vendors in QuickBooks Online
Similar to customers, you could run into an issue where you have inadvertently added a vendor twice. Like customers, you can easily merge duplicate vendors. Follow the steps below to merge two vendor profiles:
Navigate to the Vendors Center and identify the duplicate vendors:
Figure 5.37: Duplicate vendors in the Vendors Center
Notice we have one vendor that includes a period after each letter in U.S.A. and the other vendor without the periods in-between. These are duplicate vendors, and we will keep the vendor that does not include the periods, Bank of the USA.
Click once on the vendor you do not wish to keep. In our example, that would be Bank of the U.S.A.
The following appears after clicking once on Bank of the U.S.A.:
Figure 5.38: Viewing vendor information
Click on the Edit button as indicated above.
The Vendor Information window will appear:
Figure 5.39: Editing information for an existing vendor
Click once in the Company name field, and type the name exactly as it appears in the vendor profile that you wish to keep. In our example, this would be Bank of the USA. Repeat these steps for the Vendor display name field, as shown below:
Figure 5.40: Editing the Company name and Vendor display name fields
Click the Save button in the lower-right corner.
The following message will appear:
Figure 5.41: Confirming the merge of duplicate vendors
Click Yes and the two vendor profiles will be combined into one:
Figure 5.42: The Vendors Center with the vendors merged
As you can see, the duplicate profile (Bank of the U.S.A.) is no longer on the vendor list. All of the transactions recorded for that vendor have been moved to the Bank of the USA profile.
In this section, we have covered how to manually add vendors, how to import vendors, how to make changes to vendors, and how to inactivate and merge vendors. Next, we will cover how to add, import, edit, inactivate, and merge products and services that you sell.
Managing products and services lists in QuickBooks Online
The products and services that you sell are referred to as items in QuickBooks. You can track all of the products and services that you sell in QuickBooks Online. This includes the product name, product (item) number, product description, cost, selling price, and quantity on hand. It’s important to set up products and/or services so that you can easily invoice customers for their purchases. In addition, these items are linked to an account on the chart of accounts so that QuickBooks can do the accounting behind the scenes for you. Once you have added products and services to QuickBooks, you will be able to run detailed reports on the products and services you sell.
In this section, we will cover how to manually add items, how to import items, how to modify existing items, how to inactivate items, and how to merge items in QuickBooks Online. You will need to create items in order to invoice customers.
Pro Tip: Keep in mind that you must have a QuickBooks Plus or QuickBooks Advanced subscription to track inventory items.
Manually adding products and services in QuickBooks Online
In order to add products and services in QuickBooks, you need to have a list of the products or services you plan to sell, along with the cost, sales price, and a brief description that you want to appear on invoices.
Follow these steps to add a new item in QuickBooks Online:
Navigate to the Products and Services list by clicking on the gear icon and selecting Products and Services, as shown in Figure 5.43:
Figure 5.43: Selecting Products and Services
Click on the New button, as indicated here:
Figure 5.44: The New button
If this is your first time adding a product/service, you will see the Add an item button instead, as shown in Figure 5.45:
Figure 5.45: Button for adding an item for the first time
On the next screen, select the appropriate item type, as shown in Figure 5.46:
Figure 5.46: Selecting an item type
There are four item types to choose from. A brief description of each item type follows:
Inventory: Products that you buy and sell and want to track in inventory should be set up as Inventory items; for example, a retail T-shirt store that purchases T-shirts and resells them or a grocery store that needs to keep track of the items they’ve purchased and sold.
Non-inventory: The Non-inventory type is used to track items you sell but don’t keep in inventory. For example, a photographer may purchase photo paper to print pictures, but does not keep track of the quantity of photo paper they’ve purchased.
Service: Service is typically used for services that you sell; for example, bookkeeping services, photography services, or landscaping services.
Bundle: A bundle is a collection of products that are sold together; for example, a gift set that includes all the James Bond movies.
Fill in the following fields to add a new Service item:
Figure 5.47: Adding a new product or service
A brief description of the six fields you will complete in order to add a new service item in QuickBooks Online follows:
Item Type (1): This is the item type selected in the previous screen. In our example, Service is selected.
Name (2): Enter the name of the service you will be selling to customers.
SKU (3): A stock-keeping unit (SKU) is a scannable bar code printed on product labels in a retail store. If applicable, enter the SKU for the product you are selling. In general, an SKU applies to products and not service items.
Category (4): This field is optional. If you want to categorize the products and services you sell, you can do so by creating categories. For example, in addition to general consulting, Small Business Builders offers a variety of coaching services such as business plans, marketing plans, bookkeeping, and tax planning. They would like to track their sales by each category. In our example, the initial consultation is a complimentary service that will be tracked in the Consulting Services category. To create a category, just type the name of the category in the field and save it.
Description (5): Enter a brief description of the item in this field. In our example, it is Complimentary Initial Consultation. This description will appear on all customer invoices and sales receipts. However, you can always change the information directly on the invoice/sales receipt if needed.
Sales price/rate (6): Enter the sales price for the item if it generally is the same for all customers. However, if the price varies by customer, you can leave this field blank and complete it when you create an invoice to bill your customers. Since the service we are setting up is complimentary, there is no charge, so we will leave this field blank.
Income account (7): This is a required field. From the dropdown, select the appropriate income account where you want sales for this item to be recorded on the financial statements. In our example, we have selected consultation income.
Pro Tip: Every item you create in QuickBooks will be mapped to an account. Using this information, QuickBooks will record the debits and credits for you in the background so that you don’t have to.
Purchasing information (8): If you are setting up an item that you purchase from a vendor/supplier, you will need to enter this information to track the cost of each item.
Fill in the following fields to set up an Inventory item:Figure 5.48: Adding an inventory item
Brief descriptions of the fields you will fill in when setting up an Inventory item are as follows:
Item type (1): Select the type of item you are setting up. In our example, it is an inventory item.
Name (2): Enter the name of the product or item.
SKU (3): In general, an SKU applies to products and not service items, so it is more likely to be relevant here than when we covered service items previously.
Category (4): This field is optional. If you want to categorize the products and services you sell, you can do so by creating categories. In our example, we have created a category called workbooks. You can easily create a category by simply typing the name of that category in this field and clicking save.
Initial quantity on hand (5): This should represent the total quantity for each item you have in your inventory as of the date the inventory was counted.
Pro Tip: You need to perform a physical inventory count before setting up inventory items in QuickBooks Online. If you don’t have the inventory quantity when setting up the item, you won’t be able to add it to this screen later on. Instead, you will have to create an inventory adjustment journal to record the inventory. You will learn how to record inventory adjustments in Chapter 15, Closing the Books in QuickBooks Online.
As of date (6): Enter the date when the inventory was counted.
Reorder point (7): The reorder point is the minimum you want your inventory count to go down to before QuickBooks alerts you to place an order. In our example, when the inventory goes down to ten workbooks, QuickBooks will alert us to place an order.
Inventory asset account (8): All inventory is recorded as an asset and the default account is Inventory Asset, as indicated in our example.
Description (9): Enter the description that you want to appear on customer sales receipts and invoices. In our example, it is Workbooks for Business Plan Training.
Sales price/rate (10): Enter the price you sell the item for. If it varies, leave it blank and you can complete it when you create the customer invoice. In our example, the sales price is 15.00 per workbook.
Income account (11): Enter the account you want to track all sales of for this product. In our example, we are going to use the Sales of Product Income account.
Purchasing information (12): Enter the description that you want to appear on purchase orders when placing an order with your supplier. In our example, that is Workbooks for Business Plan Training.
Cost (13): Enter the amount that you pay your vendor/supplier for this item. The cost reflected here is for information purposes only and will be determined by QuickBooks after bills are entered. In our example, the cost of each workbook is 5.00.
Expense account (14): The default expense account is the Cost of Goods Sold for products. However, if you prefer to track these costs in a different account, you can click on the dropdown and add a new account.
Preferred Vendor (15): This field is optional. If you choose to use it, you can add the vendor that you purchase this item from most often. If the vendor is not in the drop-down menu, you can select Add to set up the vendor in QuickBooks.
Product Image (16): You can add a picture of the product for easy reference by clicking on the pencil icon and selecting the image saved on your computer.
If you don’t have the time to enter your products and services manually, you can import this data into QuickBooks, as we have demonstrated already for accounts, customers, and vendors.
Importing products and services in QuickBooks Online
Similar to customers and vendors, you can import a products and services list in QuickBooks. This can save you a lot of time if you have a sizeable list of products or services that you sell. You can import this information from a CSV file into QBO. This template can be found here: https://packt.link/MQ23chapter5.
Follow these steps to import products and services into QuickBooks Online:
Navigate to the Products and Services list by clicking on the gear icon and selecting Products and Services, as shown in Figure 5.49:Figure 5.49: Selecting Products and Services
Click on the arrow next to the New item button located in the upper-right corner and then click on Import, as shown in Figure 5.50:
Figure 5.50: The Import option
Click the Browse button to upload the CSV file from your computer, as shown in Figure 5.51:
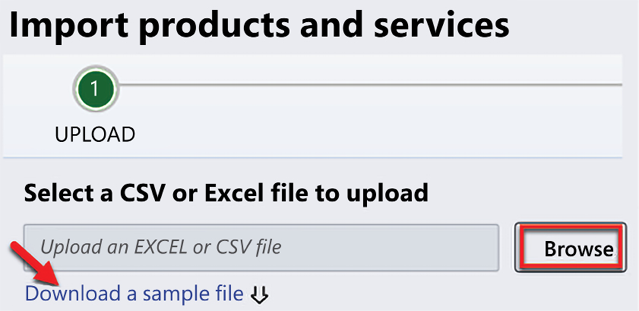
Figure 5.51: Uploading a CSV or Excel file
You can click on the blue link to download the sample file (shown in the preceding screenshot). This file includes all of the fields of information you can upload for items. Save this file and use it as your template.
Follow the onscreen prompts to import your products and services into QuickBooks Online.
Be sure to review the data imported to ensure accuracy. If you do find that corrections are needed, you can easily make them.
Making changes to existing products and services in QuickBooks Online
You can change any fields in existing products and services except the item type. If you have already used an item in a transaction, QuickBooks will not allow you to change the item type. Instead, you will need to inactivate the old item and add a brand-new item with the correct item type.
Follow these steps to make changes to existing products and services in QBO:
Navigate to the Products and Services list by clicking on the gear icon and selecting Products and Services, as shown in Figure 5.52:
Figure 5.52: Selecting Products and Services
Select the product or service you would like to make changes to by clicking on the Edit button in the far-right column, as shown in Figure 5.53:
Figure 5.53: Editing a product or service
As we mentioned previously, you can change an item type if you haven’t used it in a transaction in QuickBooks. However, if you have used an item in a transaction and the item type is incorrect, you will need to create a new item with the correct item type and inactivate the old item.
Inactivating products and services in QuickBooks Online
As we discussed when we talked about customers and vendors, you cannot delete products and services in QBO once you have created them; however, you can inactivate them. This will preserve the existing transactions and remove the product or service from the items list so it cannot be used in new transactions.
Follow these steps to inactivate a product or service in QuickBooks Online:
Navigate to the Products and Services list by clicking on the gear icon and selecting Products and Services, as shown in Figure 5.54:
Figure 5.54: Selecting Products and Services
Scroll down the items list to the product (or service), click on the Edit button, and select Make inactive, as shown in Figure 5.55:
Figure 5.55: Making a product or service inactive
Similar to customers and vendors, inactivating a product or service will remove it from selection for future transactions. However, the existing data will remain intact to ensure reports are accurate for tax and other reporting purposes.
Pro Tip: To recap the steps covered in this section, watch this Intuit video tutorial, How to create inventory products in QuickBooks Online: https://www.youtube.com/watch?v=PkKKZwtkNeM.
Merging products and services in QuickBooks Online
Like vendors and customers, you can also merge duplicate services that have been entered into QuickBooks by mistake. Unfortunately, you cannot merge duplicate inventory items because of the complexity of inventory tracking. Instead, you will need to inactivate one of the duplicate inventory items and record inventory adjustments to manage the transactions that have been recorded. Consult your accountant before making any inventory adjustments.
Follow the steps below to merge duplicate services:
Navigate to the Products and Services list and identify the duplicate items:
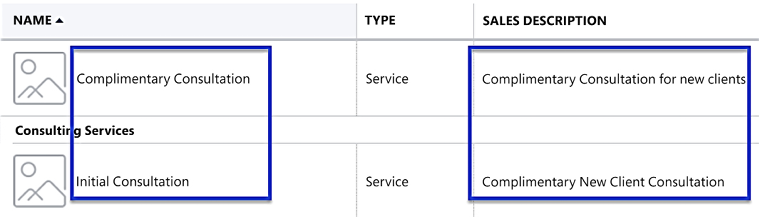
Figure 5.56: Identifying duplicate services in the Products and Services list
As you can see in the image above, there is an item called Complimentary Consultation and a duplicate item called Initial Consultation. To maintain accurate records, we must merge them into one. The item we will keep in our example is Initial Consultation.
Click on the item that you wish to remove – Complimentary Consultation in our example.
After you click on Complimentary Consultation, the Product/Service information window will appear:
Figure 5.57: Displaying products and services information
Click once in the Name field and type in the item name you want to merge with – Initial Consultation in our case. Select Consulting Services in the Category field. Type Complimentary New Client Consultation in the Description field, as shown below:
Figure 5.58: Editing product and services information
Click the Save and Close button in the lower-right corner.
The following message will appear:
Figure 5.59: Confirming the merging of duplicate service items
Click Yes and the two service items will be combined:
Figure 5.60: The Products and Services list with the merged item
Notice the Complimentary Consultation item is no longer shown because it has been merged with Initial Consultation.
We have now covered how to manually add products and services, import products and services, make changes to existing products and services, inactivate products and services (also known as items), and merge items.
Summary
In this chapter, we covered how to manage customer data by manually adding and importing the information, editing existing customers, and inactivating customers you no longer do business with.
In addition, we covered how to manage vendor data by manually adding and importing the information, editing existing vendors, inactivating vendors you no longer do business with, and merging duplicate customer and vendor records.
Finally, we showed you how to manage products and services, also referred to as items, including how to add and import data, how to edit existing products and services, how to inactivate products and services, and how to merge service items in QuickBooks Online.
Now that you understand how to manage your customers, it’s time to learn how to set up and manage sales tax. In the next chapter, we will show you how to set up sales tax, create an invoice that includes sales tax, and run sales tax reports.
Share your thoughts
If this book is helping you improve your skills, we’d strongly suggest leaving a review on Amazon.com. This helps us know if you like our work and if the chapter content has been valued, and also helps the buyers on Amazon know if the book is right for them.
So, everyone else benefits from your review - we wouldn’t want you to miss out. You can now reach out to [email protected] with a screenshot of your review and the book URL, and we’ll send you a $5 voucher for your next Packt purchase. Thank you in advance for engaging with us, we are excited to see your review!
Learn more on Discord
To join the Discord community for this book – where you can share feedback, ask questions to the author, and learn about new releases – follow the QR code below: