Finding Apps and Handling Special Transactions in QuickBooks Online
So far, we have covered the most common transactions for which small businesses use QuickBooks. However, there are a few more topics that we would like to share with you. While some of these may not apply to your business when you are starting out, it’s a good idea to be aware that they exist.
First, we will start by using apps in QBO. Apps are a great way to help you streamline day-to-day business tasks that can be time-consuming. Next, we will show you how to record credit card payments from customers. This is an excellent way to get paid faster. Third, we will show you how to create professional-looking sales templates. If you have several expenses that you pay weekly, monthly, or quarterly, you should set them up as recurring transactions. We will also cover how to create and manage recurring transactions in this chapter. If you have a business loan or line of credit, you need to keep track of payments and overall outstanding balances in QuickBooks. Petty cash is often used for small purchases such as stamps or lunch for the office. Due to this, we will show you how to keep track of petty cash. While you always hope it doesn’t happen to you, there may come a time when you need to record a bad debt, so we will show you how to properly record bad debt expense. Finally, we will show you how to record delayed charges. Delayed charges are used to keep track of the services you have provided to customers that you will invoice at a later date.
In this chapter, we will cover the following topics:
Using apps in QuickBooks Online
Managing credit card payments
Customizing sales templates
Setting up business loans and lines of credit
Managing petty cash
Recording bad debt expense
Tracking delayed charges and credits
We will begin by learning how to search for apps in the QuickBooks app store and locate apps that are ideal for your business.
The US edition of QBO was used to create this book. If you are using a version that is outside of the United States, results may differ.
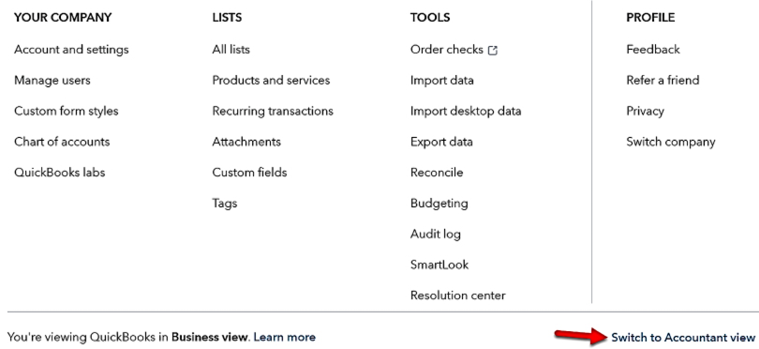
Please note the screenshots in this chapter have been taken using the Accountant view menu. In Chapter 1, Getting Started with QuickBooks Online, we introduced a new menu called Business view. If you are in Business view, you will need to switch to the Accountant view menu so that your screen resembles the images shown throughout this book. To do this, click on the gear (settings) menu (located in the upper-right corner) and select Switch to Accountant view as shown in Figure 16.1 below:
Figure 16.1: Switching to Accountant view
Using apps in QuickBooks Online
There are many benefits and a few risks of extending functionality through apps. Some of the benefits of using apps in QBO are:
The ability to expand the functionality of the software so you can have what you need to run all aspects of your business
Access to more than 700 apps that integrate seamlessly with QBO, allowing you to manage your inventory, accept online payments, pay your bills, and manage your eCommerce transactions
The companies featured in the QuickBooks app store have gone through an extensive vetting process and were approved by Intuit to create apps that will help you simplify tasks, streamline data entry, and sync with QuickBooks
A couple of the risks involved with using apps are:
The apps are not free, which means the fees charged to use the app will be in addition to what you pay for your monthly QBO subscription, so be sure to do a cost/benefit analysis to ensure you can take on the additional cost.
You will need to give permission for your data in QBO to be shared with any company whose app you wish to use. You can be confident that your data is secure, since that is also a requirement to become a partner with Intuit.
The app store is organized into categories based on app functionality. Customer reviews are included, along with short video demonstrations to show you how the app works and customer service information if you have additional questions. In this section, we will provide you with an overview of the App Center, show you how to find apps that are relevant to your business needs, and show you how to add apps to QuickBooks Online.
Pro Tip: Because of the large number of apps that are available, it’s impossible for ProAdvisors and accountants to be familiar with all apps. Therefore, you will need to reach out to the technical support team for the app that you choose for assistance with setup, implementation, and training needs.
Overview of the QuickBooks App Center
The layout of the App Center is very simple. You can easily search for apps, see a list of the apps you have added, and check out apps that have been recommended based on the type of business you have. Let’s take a look at the layout of the App Center:
On the left menu bar, click on Apps to navigate to the App Center, as follows:
Figure 16.2: Navigating to the QuickBooks App Center
The App Center will be displayed, as shown in Figure 16.3:
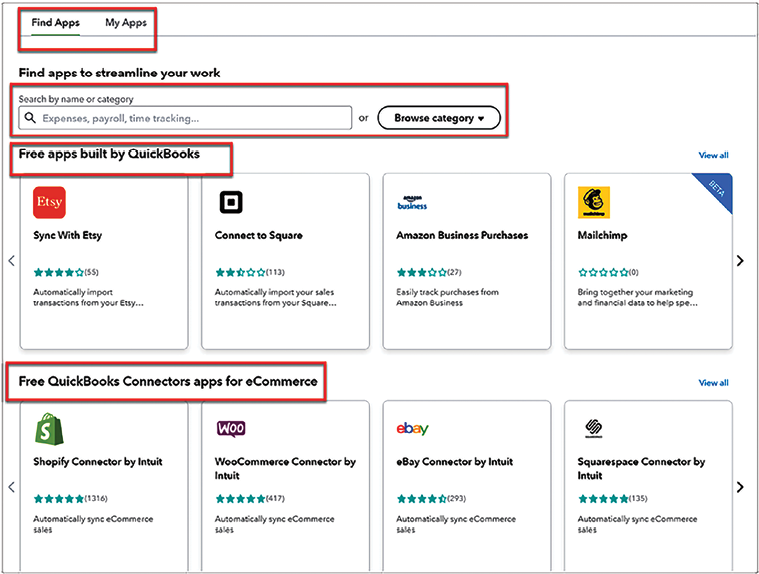
Figure 16.3: QuickBooks App Center
The five key areas of the QuickBooks App Center featured in the preceding screenshot are as follows:
Find Apps: If you are looking for an app, you want to make sure that you are on this tab. You can search for apps in two ways, by typing in the name of the app or browsing by category.
My Apps: Click on this tab if you want to see which apps are currently connected to your QuickBooks data.
Search options: If you know the name of the app you are searching for, you can simply type the name of the app into the search box shown in the preceding screenshot. However, if you don’t know the name of the app and simply want to search by category, you can do so by clicking on the Browse category button.
A few of the categories you can search by include get paid, manage workers, make payments, manage customers, manage projects, and many more. This will greatly assist in finding apps for the purpose you are looking for.
Free apps built by QuickBooks: In this section, you will find apps that were created by QuickBooks.
Free QuickBooks Connectors apps for eCommerce: This section will feature apps that are ideal for eCommerce businesses. Shopify, WooCommerce, eBay, and Squarespace are just a few of the eCommerce apps that integrate with QuickBooks.
If you’re not sure which app to choose, I recommend that you schedule a live demo with the app company so that you can see how the app works and get your questions answered. Many companies offer a trial period of 14 days or more so that you can try the app before you buy it. Like QBO, there are no contracts, so you can cancel your subscription at any time. Let’s now walk through an example of how to find apps for your business.
Finding apps for your business
As we mentioned previously, there are more than 700 apps in the QuickBooks App Center. While it can be overwhelming at first, you should focus on the needs of your business. There is a lot of information in the center about each app, which will save you the time you would have normally spent doing research. Let’s take a look at an app to see what kind of information you can expect to find here.
Scroll down to the Most Popular category and click on the Bill.com app. You will be greeted with the following screen:
Figure 16.4: The app profile for the Bill.com app
The following is a brief description of the information you will find in the app profile:
Overview: The Overviewtab includes a list of the key benefits the app has, how the app works with QuickBooks Online, and additional details. Like Bill.com, most apps will include a short video to demonstrate how the app works, along with additional screenshots of the user interface.
Pricing: Unfortunately, these apps are not free. Pricing will vary and is usually subscription-based, like QuickBooks Online. However, you will be billed by the third-party company (in this case, Bill.com), not QuickBooks. The good news is that most apps will offer a free trial period of at least 14 days.
Reviews: Like most products, you will see a rating of the app based on customer reviews. Click on the link to see what customers are saying about the app. The more reviews an app has, the better the chance of getting a broad perspective.
Similar: The Similartab shows a list of apps that have similar functionality to the one you are looking at.
FAQs: A list of the most frequently asked questions and answers can be found on this tab.
Once you have decided which app(s) to go with, it’s easy to get started. Simply click on the Get app nowbutton located on each app profile. Follow the onscreen instructions to complete the app’s setup.
Pro Tip: Reaching out to an industry-specific professional organization is a great way to find out the most popular apps used for your industry. This may help narrow down your search for the right fit.
There are several apps that allow you to accept credit card payments from customers. If you sign up for one of these apps, it will make managing credit card payments that much easier in QuickBooks. Next, we will explain how to manage credit card payments.
Managing credit card payments
In addition to traditional payments such as cash and checks, you should accept credit cards as another form of payment. While there are fees associated with accepting credit card payments, there are several benefits. First, you can get paid faster with a credit card than waiting to receive a check in the mail.
Second, if you sign up for a QuickBooks Payments account (https://quickbooks.intuit.com/payments/?sc=seq_intuit_pay_click_ft), you can email customers their invoice, which includes a payment link. They can click on the link, enter their payment information, and pay their invoice in a matter of minutes, which is much faster than waiting to receive a check in the mail. Best of all, QuickBooks will mark the invoice as paid, which automatically reduces your accounts receivable balance. As we discussed in Chapter 7, Recording Sales Transactions in QuickBooks Online, you can send your customers payment reminder emails, which will include a copy of the open invoices, along with a payment link.
If you decide to go with a third-party credit card processor, you can manually record these payments in QuickBooks. In this section, we will show you how to record credit card payments that have been received from customers via QuickBooks Payments and a third-party credit card processing company.
Before you can perform the steps, you will need to have an active QuickBooks Payments account that is connected to your QBO account. Visit QuickBooks Payments (https://quickbooks.intuit.com/payments/?sc=seq_intuit_pay_click_ft) to learn more about how this works. If you are using a third-party processor, you may be able to connect your account to QuickBooks. Contact your credit card processor to find out if they are compatible with QuickBooks Online.
Follow these steps to record a credit card sale:
Click on the + New button and select Sales receiptfrom the Customers column, as shown in Figure 16.5:
Figure 16.5: Navigating to sales receipt
Fill in the fields in the sales receipt form, as shown in Figure 16.6:
Figure 16.6: Completing the sales receipt form
After selecting the customer from the dropdown menu, the Email and Billing address fields will automatically be populated with the information you have on file.
Next, select a payment method from the dropdown menu. When you select Credit Card as the payment method and you have a QuickBooks Payments account, you will see an option to enter credit card details directly below the Payment method field.
The following screen will appear so that you can enter the required credit card information, as shown in Figure 16.7:
Figure 16.7: Completing the credit card payment information
In Figure 16.7, the credit card number has been removed for security reasons. Be sure to complete all of the necessary fields and click the Use this info button to save the information.
Pro Tip: After entering the customer’s credit card information, QuickBooks will keep this information on file. You won’t have to enter it again unless your customer would like to use a different payment method or the credit card expires.
This will take you back to the sales receipt form, where you can fill in the details of the services provided and the amount. When you click the Save button, the credit card payment will be processed and an email with the sales receipt attached will be sent to the customer.
Pro Tip: If you don’t have a QuickBooks Payments account, you can still enter the credit card information and save it. However, you will need to process the credit card payment outside of QuickBooks using your third-party merchant company. When the payment is deposited into your bank account, you will need to match it up with the sales receipt in the Banking Center. To learn more about matching transactions, read Chapter 9, Reconciling Uploaded Bank and Credit Card Transactions.
You now know the benefits of accepting credit card payments from customers and how to manage these payments in QuickBooks. You can impress your customers further by creating invoices, estimates, and sales receipts that include your company logo and branding style. We will show you how to customize sales templates next.
Customizing sales templates
QuickBooks allows you to create custom sales forms to match your brand and style. Taking the time to customize sales templates will allow you to create professional-looking forms so your customers can easily see what they owe and make payments online in just a few minutes. You can customize invoices, estimates, and sales receipt templates. Follow these steps to learn how to customize these sales templates:
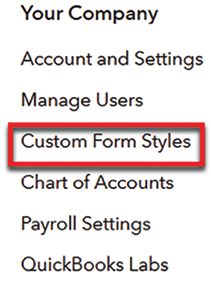
Click on the gear icon and select Custom Form Stylesfrom the Your Companycolumn, as shown in Figure 16.8:
Figure 16.8: Navigating to Custom Form Styles
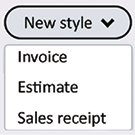
Click on the New stylebutton and select a sales template to customize:
Figure 16.9: Clicking the New style button
The following window will display three areas you can customize for sales templates:
Figure 16.10: Three customization options for sales templates
The following is a brief explanation of the information you can customize in each of these areas:
Design: The Design section allows you to create your template style and format. You will select a template design, add your company logo, add your brand colors, and choose the font size and style.
Content: For Content, you can select what information you would like to appear on the sales template, including your basic contact information, such as business telephone number and mailing address. You can also add your website and email address to the form. In the billing section, you can determine how much detail you would like to include in the sales form. For example, an invoice should include a list of each product or service you are billing the customer for.
Emails: QuickBooks allows you to email a sales form directly to customers. In this section, you can decide whether you want any details of the form to be included in the body of the email. Also, you can choose to have a PDF document attached to the email.
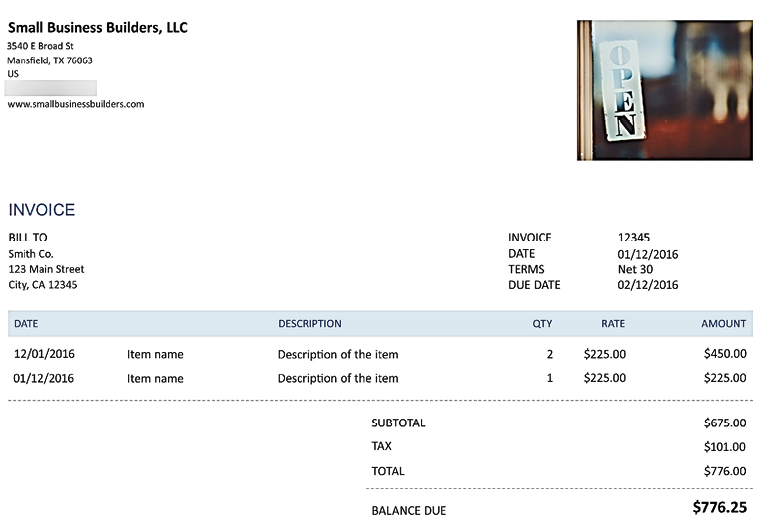
After completing each section, click the Done button at the bottom of the screen to save your changes. A preview of your customized sales form should appear, as shown in Figure 16.11:
Figure 16.11: Sample custom invoice for Small Business Builders, LLC
You can create an unlimited number of templates for various types of sales and customers. It is easy to make changes to them anytime. The best part is that you don’t have to create any templates from scratch.
Now that you know how easy it is to customize sales templates, you can use one of these templates to create a recurring transaction. We will show you how to create and manage recurring transactions next.
Setting up business loans and lines of credit
If you take out a business loan or line of credit, you need to track the payments that have been made, as well as the outstanding balance owed in QuickBooks. This will ensure that your financial statements include the money that is owed to all creditors. If this information is not included in QuickBooks, it will not show up on your financial statements. If this information is not reported in your financial statements, you will have inaccurate reports and you could miss out on legitimate tax deductions.
In this section, we will cover how to set up a business loan or line of credit, how to track payments, and how to stay on top of the outstanding balances owed.
Adding a business loan or line of credit to the chart of accounts
The first step to properly tracking loans and lines of credit in QuickBooks is to set them up on the chart of accounts. We will do this next. Follow these steps:
Navigate to Accounting and select Chart of Accounts, as shown in Figure 16.12:
Figure 16.12: Navigating to Accounting
Click on the New button located to the left of Run Report, as shown in Figure 16.13:
Figure 16.13: Clicking the New button
Fill in the fields, shown in the following screenshot, to add a new business loan or line of credit account:
Figure 16.14: Adding a new business loan account
A brief description of the fields in the preceding screenshot is as follows:
Account Type: Business loans and lines of credit is money that is owed to a creditor, also known as a liability.
Save account under: There are two types of liabilities; current liabilities and long-term liabilities. Current liabilities have a term of less than one year, while long-term liabilities have a term greater than one year. Depending on the type of loan that you have, you can type in the keyword loan and you will have the option to select Short-term business loan (as we have done) or Long-term business loan from the dropdown menu.
Tax form section: QuickBooks will automatically populate this field for you, based on the information entered in the previous field.
Account name: In this field, enter the name of the account. This will generally include the type of liability (loan or line of credit) and the name of the financial institution (Business Loan - Bank of the USA, in our case).
Description: In this field, you can simply copy and paste the name or include a more detailed description, such as the account number of the loan or line of credit.
Starting date and opening balance: Select from the dropdown the date you received the loan along with the amount in the field below that. This information will be used to keep track of the balance of the loan as you make payments.
Pro Tip: Another way to record a beginning balance for a line of credit (or loan) is by categorizing the transaction to the loan account (created above) when you receive the funds in your bank account.
Click the Save and Close button to add the loan or line of credit account to your chart of accounts list.
If you haven’t done so already, you will need to repeat these steps to add an interest paid or interest expense account to the chart of accounts list. You will track the interest portion of your payments in this account. Now, we’ll cover how to make payments on a loan or line of credit.
Pro Tip: It is very important that you track the interest in loans and lines of credit in a separate expense account. The reason for doing this is interest expense for most liabilities such as this is tax-deductible. If the amount is buried with the principle payments, it will be difficult to go back and calculate later on.
Making payments on a loan or line of credit
In general, you can make payments on a loan or line of credit in the same manner that you pay other creditors. You can write a check or have the funds automatically deducted from your bank account. Here, we will walk through how to record a payment.
Follow these steps to make payments on a loan or line of credit:
Click on the + New button and then select Check in the Vendors column, as shown in Figure 16.15:
Figure 16.15: Navigating to Check
Fill in the fields for the loan payment:
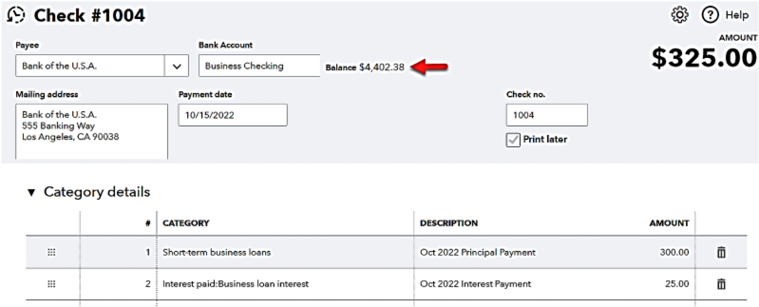
Figure 16.16: Completing the check form to record payment for loan
A brief description of the fields you need to complete in order to record a payment for a loan or line of credit is as follows:
Payee: From the dropdown menu, select the payee. If you haven’t added the payee to QuickBooks, you can do so here by selecting Add new from the dropdown menu.
Bank Account: If you have more than one bank account, you need to select the bank account that you want to write the check from in the dropdown menu. When you select the bank account, the current balance will appear to the right of the field, as indicated in the preceding screenshot.
Mailing address: This field will automatically be populated with the address on file for the payee you’ve selected. If you don’t have an address on file, you can type the information directly into this field. However, it’s best to go to the vendor profile and add the address information there. If you type it in this field, the address will not be saved to the payee’s profile.
Payment date: Enter the check date or the date the payment was deducted from your bank account.
CATEGORY: In this field, you need to select accounts that are affected by this payment. In general, that will be the loan payable account (principal) and an interest expense account. The portion of the payment that applies to the principal amount should be allocated to the loan payable account. The portion of the payment that applies to the interest should be allocated to the interest paid account.
DESCRIPTION: Type a brief description of what the payment is for in this field.
AMOUNT: Enter the amount you wish to pay in this field.
Pro Tip: In order to accurately record the proper amounts for the principal and interest accounts, you may need to refer to your loan statement to see how your payment was applied. Be sure to do this so that your books match up with those of the financial institutions.
One final step you should do to ensure that the business loans and lines of credit on your books match your statements is to reconcile these accounts on a monthly basis. The steps to reconcile business loans and lines of credit are identical to reconciling your bank accounts. Refer to Chapter 9, Reconciling Uploaded Bank and Credit Card Transactions, for step-by-step instructions on reconciling.
Remember, it’s important for your financial statements to be as accurate as possible. This means including all of the money that is owed to creditors, such as loans and lines of credit. In addition, in order to deduct the interest expense, you need to keep track of it in QuickBooks.
If you tend to pay cash for small incidentals for the office, such as a Starbucks run for the office or stamps, you need to set up a petty cash fund to keep track of these types of expenses. We will show you how to manage petty cash in QuickBooks next.
Managing petty cash
Petty cash is a small amount of money that’s used to cover incidentals such as postage, lunch for the office, or other items. Petty cash is generally no more than $500 and is kept under lock and key and managed by the business owner or someone designated by the owner. Like all business expenses, you need to keep track of all your receipts so that you can record the expenses in QuickBooks.
In this section, we will discuss how to track petty cash, record petty cash expenses, and reconcile the petty cash account. Let’s get started by creating a petty cash account.
Adding a petty cash account in QuickBooks
In order to track petty cash in QuickBooks, we need to add a petty cash account to the chart of accounts.
Follow these steps to add a petty cash account:
Navigate to the Accountingsection, as shown in Figure 16.17:
Figure 16.17: Navigating to Accounting
Select the Chart of Accounts and then click the Newbutton, as shown in Figure 16.18:
Figure 16.18: Clicking the New button
Fill in the new account setup window, as shown in Figure 16.19:
Figure 16.19: Completing the fields to add a new petty cash account
The following is a brief explanation of the information you will need to fill in:
Account Type: From the dropdown menu, select Banksas the account type. All petty cash accounts should be categorized as bank accounts and treated as such.
Save account under: Type the keyword Cash and select it from the dropdown menu.
Tax form section: QuickBooks will automatically populate this field based on the information entered in the previous field.
Account name: In this field, you can put Petty Cash as the name of the account and any additional details required.
Description: If there is additional information that will help you to identify this account, you can include it in this field or use the account name.
Starting date and opening balance: Enter the date that you establish the petty cash fund along with the amount.
Pro Tip: Instead of entering a starting balance in this account, you can record a transfer from a business checking account to the petty cash account in QuickBooks. In general, this is the most likely place that the cash will originate from.
Save your changes to add the petty cash account to the chart of accounts list.
Pro Tip: If you are using apps such as PayPal, Zelle, or Cash App, you will set these accounts up in the same manner as we have done the Petty Cash account. It’s important to treat these accounts like your bank account by recording all transactions and reconciling these accounts monthly or more often.
Now that you have created a petty cash account, you are ready to record the purchases that are made using petty cash.
Recording petty cash transactions
Receipts for petty cash expenditures should be kept in the same place the petty cash is kept: under lock and key. If possible, you should enter the petty cash receipts into QuickBooks on a weekly basis. If petty cash is not used that often, monthly should be sufficient.
Follow these steps to record petty cash transactions:
Navigate to the chart of accounts, as we did in the previous section.
Click on the View registerlink to the right of Petty Cash, as shown in Figure 16.20:
Figure 16.20: Clicking on the View register link
Click on the arrow next to Add check and select Expense, as shown in Figure 16.21:
Figure 16.21: Clicking the dropdown arrow next to Add check and selecting Expense
Fill in the remaining fields, as shown in Figure 16.22:
Figure 16.22: Completing the fields to record the expense
Explanations of the fields to fill in are as follows:
DATE: Enter the date of purchase in this field.
REF NO.: If you have a reference number such as an invoice number or account number, enter it in this field.
PAYEE: Select the payee from the dropdown menu. If the payee has not been set up in QuickBooks, begin typing the name of the payee. You will see an option to add the payee to QuickBooks.
ACCOUNT: Select the account the expense should be charged to from the chart of accounts dropdown menu.
MEMO: Type a brief description of what was purchased in this field.
PAYMENT: Enter the amount of the purchase in this field.
Be sure to click the Save button to record the transaction.
Repeat the preceding steps to record each petty cash receipt in QuickBooks.
Replenishing petty cash
Eventually, you will get to a point where you’ve run out of petty cash or you don’t have enough to pay for an item. Before replenishing petty cash, make sure you have entered all of the receipts for petty cash purchases that have been made thus far. Similar to a bank account, you can record a transfer in QuickBooks so that you can transfer money from a checking account to a petty cash account. Of course, to get the actual cash, you will need to make a withdrawal from your business checking account to replenish the actual funds.
To record a transfer from the business checking account to petty cash, follow these steps:
Navigate to the petty cash register by going to the chart of accounts and clicking View register to the right of Petty Cash, as you did in the previous section.
Click on the dropdown arrow and select Transfer, as shown in Figure 16.23:
Figure 16.23: Clicking on Add transfer and selecting Transfer
Fill in the fields shown in the following screenshot to record the transfer:
Figure 16.24: Completing the fields to record the transfer
Brief explanations of the fields you need to fill in to complete the transfer are as follows:
DATE: The date the funds will be deposited into the petty cash account.
PAYEE: Since you are the payee, you can leave this field blank.
ACCOUNT: Select the bank account where the funds will be drawn from. In our example, it is the business checking account.
MEMO: Include a brief description, such as Replenish Petty Cash Fund.
If you have recorded all the money that you have paid out of petty cash, this transaction will increase the balance back to the cash on hand in your petty cash box.
DEPOSIT: Enter the amount that is being transferred to the petty cash account.
Once you have completed all of these fields, click the Save button to complete the transfer.
Now that you know how to add the petty cash account to the chart of accounts, record petty cash expenses, and replenish the petty cash fund, you need to know how to ensure that it stays in balance. Like most bank accounts, this will require you to reconcile the petty cash account.
Reconciling petty cash
As we mentioned previously, petty cash is similar to bank and credit card accounts you track in QuickBooks. You need to ensure these accounts remain in balance. To do that, you must reconcile them. In Chapter 9, Reconciling Uploaded Bank and Credit Card Transactions, we showed you how to reconcile these accounts in QuickBooks. Refer to that chapter for step-by-step instructions on how to reconcile your petty cash account. I recommend that you reconcile your petty cash account before you replenish it. This will ensure that you have accounted for all the expenses that have been paid for using petty cash and that you have all the receipts to support these purchases.
While you will hope to avoid such a situation, there may come a time when a customer cannot afford to pay their outstanding balance. If this happens, you will need to write off the receivable as bad debt. We will discuss how to record bad debt expense next.
Recording bad debt expense
If you’re in business long enough, there will come a time when a customer is unable or unwilling to pay you. If you use cash basis accounting, you don’t need to record bad debt expense because you don’t have accounts receivable. However, if you do extend credit to your customers and, after attempting to collect the payment, you become aware that you will not be able to collect payment, you should write off the bad debt. This will ensure that your financial statements remain accurate and that revenue is not overstated.
There are three steps you need to follow in order to write off bad debt: first, you need to add a bad debt item to the products and services list; next, you need to create a credit memo; and finally, you need to apply the credit memo to the unpaid customer invoice. We will walk you through these steps in this section.
Creating a bad debt item
The first step of recording bad debt expense is to add an item to the products and services list for tracking.
Follow these steps to create a bad debt item:
Click on the gear icon and select Products and Services, as shown in Figure 16.25:
Figure 16.25: Navigating to the Products and Services list
Select the item type, as shown in Figure 16.26:
Figure 16.26: Selecting Service as the item type
As you can see, there are four item types to choose from. Service is the item type we will use for bad debt expense.
Fill in the following fields to add bad debt to the items list:
Figure 16.27: Completing the fields to add Bad Debt to the products/services list
Brief descriptions of the fields to fill in are as follows:
Name: Enter Bad Debt or Bad Debt Expense in the item name field.
Description: Enter a brief description of the types of transactions that will be recorded using this item.
Income account: From the dropdown, select Bad Debts. This should be an expense account on the chart of accounts list. If you did not create this account, click on the dropdown arrow, scroll up, and select Add new to create the bad debt expense account.
Now that you’ve set up the new bad debt expense item, you can use this item to record the bad debt on a credit memo form.
Creating a credit memo
A credit memo is generally used to refund a customer for items purchased that were returned or services that were not rendered in full. After creating the credit memo, we can apply it to the unpaid customer invoice.
Follow these steps to create a credit memo:
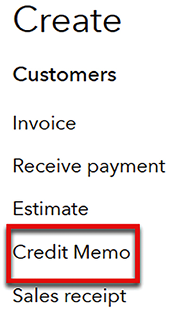
Click on the + New button and select Credit Memo, as shown in Figure 16.28:
Figure 16.28: Navigating to Credit Memo
Fill in the following fields, as shown in Figure 16.29:
Figure 16.29: Completing the fields in the Credit Memo form
Brief explanations of the fields to fill in to complete the credit memo are as follows:
Customer: Select the customer from the dropdown menu.
Email: The email address that you have on file will automatically populate this field. If you don’t have an email address on file, you can type one in directly.
Billing address: The billing address you have on file will automatically populate this field. If you don’t have a billing address on file, you can enter one in this field.
Credit Memo Date: Select the date you would like to record this credit memo for.
PRODUCT/SERVICE: Select the bad debt item you created in the previous section from the dropdown menu.
DESCRIPTION: The description field should automatically be populated with the description of the bad debt item.
QTY: Select 1.
RATE: Enter the amount of the invoice that you want to write off in this field.
AMOUNT: This field will automatically be populated with the amount you entered into the rate field.
Message displayed on credit memo: Provide a brief explanation for the bad debt to be written off in this field.
Once you’ve filled in all the fields in the credit memo, save it.
We will show you how QuickBooks applies the credit memo to the customer’s open invoice next.
Applying a credit memo to an outstanding customer invoice
The final step in writing off bad debt is to remove the open invoice from accounts receivable. This step is automatically done by QuickBooks for you. Follow these steps to see how the credit memo is automatically applied to the open customer invoice:
From the left menu, select Sales as shown in Figure 16.30:
Figure 16.30: Navigating to Receive payment
On the next screen, click on the Clients tab as shown below:
Figure 16.31: Selecting the invoices and/or credit memos to process
In Figure 16.31, we have selected the invoice that needs to be written off (Invoice # 1009) and above that, we have selected the credit memo to apply (Credit Memo # 1012). As you can as see QuickBooks has automatically marked the open invoice #1009 as Paid and the credit memo has been marked Closed. You can see this information in the STATUS column.
To summarize, it’s important that you write off accounts as soon as they become uncollectible. This will ensure that the accounts receivable balance is not overstated. If you are an accrual basis taxpayer, you will not want to pay tax on income that you will never receive.
Pro Tip: If the customer has already paid the invoice and you need to refund their money, do not create a credit memo. Instead, create a refund receipt. To do this, click on the +New menu, select Refund Receipt and complete the form as shown below.
Figure 16.32: Creating a refund receipt
If you provide ongoing services to customers on a weekly or bi-weekly basis but you don’t want to invoice customers that often, you should consider using delayed charges. Delayed charges allow you to accumulate charges in QuickBooks (without affecting the financial statements). Once you are ready to bill a customer, you can easily transfer the delayed charges to an invoice. We will discuss delayed charges and credits in detail next.
Tracking delayed charges and credits
Delayed charges and credits are used to keep track of services that are provided to customers so you can bill them sometime in the future. For example, if someone provides weekly pool maintenance to customers but does not want to bill them until the end of the month, delayed charges are ideal for keeping track of the services that are provided each week. These weekly services can easily be added to an invoice when it’s time to bill the customer.
Follow these steps to record delayed charges:
Click on the + New button and select Delayed charge, as shown in Figure 16.33:
Figure 16.33: Navigating to Delayed charge
Fill in the necessary fields to record the delayed charge, as shown in Figure 16.34:
Figure 16.34: Completing the Delayed Charge form
Brief descriptions of the fields to fill in are as follows:
Customer: Select the customer from the dropdown menu.
Delayed Charge Date: Select the date the services were provided.
PRODUCT/SERVICE: Select the type of service that will be provided from the drop-down menu.
DESCRIPTION: This field should automatically be populated with the description that was used to set up the product/service. However, you can also enter a description directly in this field.
QTY: Type a quantity into this field, if applicable.
RATE: Enter the total amount or the hourly rate for the service.
AMOUNT: This field is automatically calculated by taking the quantity and multiplying it by the rate.
Memo: Enter a brief description in this field.
When you save a delayed charge, it is a non-posting transaction, which means it doesn’t affect the financial statements. Next, we will show you how to add delayed charges to an invoice:
From the +New menu, select Invoice. Select a customer from the dropdown menu and you will see a drawer open to the far right, listing the delayed charges that haven’t been billed:
Figure 16.35: Selecting the delayed charges to bill the customer for
On this screen, click the Add button to add the charges to an invoice.
Save the invoice to record an increase to accounts receivable and income.
If you would like to review a list of unbilled charges before creating an invoice, you can do so by running an unbilled charges report. We will show you how to generate this report next:
Click on Reports, scroll to the Who owes you section, and select Unbilled charges, as shown in Figure 16.36:
Figure 16.36: Navigating to the unbilled charges report
The unbilled charges report will appear:
Figure 16.37: Sample unbilled charges report
That’s how delayed charges work. One last thing you need to know is that if you need to reverse a delayed charge, you can do so by recording a delayed credit. Similar to delayed charges, navigate to the +New menu and select Delayed credit. Follow the onscreen instructions to record the delayed credit. Delayed charges are used a lot in landscaping and maintenance industries for routine services that are billed monthly.
Summary
In this chapter, you have learned how to handle many special transactions in QuickBooks Online. You may be able to take advantage of a few of these now or keep them in your back pocket for later on when you need them. To recap, you now know how to locate apps in the QuickBooks app store and add them to QuickBooks. We have shown you how to manage credit card payments from customers and how to customize sales templates such as invoices to fit your business style and brand. For those expenses that occur often, you know how to add them to QuickBooks as recurring transactions and use them when needed. If you obtain a business loan or line of credit, you know how to set these up in QuickBooks and track payments. For those incidental purchases, you can create a petty cash account, track purchases, and reconcile the account, just like bank accounts. We also discussed the importance of recording bad debt expenses, which you now know how to record in QuickBooks to ensure that your financials are accurate. Finally, you learned how to record delayed charges and credits to track services that are provided to customers that will be billed sometime in the future.
In the next chapter, we will show you how to find apps to help streamline your daily tasks in QuickBooks Online as well as cover how to handle special transactions such as managing credit card payments, customizing sales templates, managing petty cash and much more!