In this section, we'll take a look at the following subtopics:
- How to save packet captures
- How to save selected sections of packets, individual packets, and ranges of packets
- How to export packets into other formats
- How to export raw packet data from the capture that you selected
Now that we have Wireshark up and running, let's capture some traffic. We'll select the Local Area Connection, and we could either double-click as I mentioned or we'll start the capture up at the top. And we will have some packets coming in. So now, if I want to save this capture (the entire capture—all the packets that I just captured) I'll go to File | Save As...; and from here, I can simply choose a filename. So, we'll call it packets. And you'll see in the Save as type, I chose the file as pcapng:

So, pcapng is the next generation of the pcap file extension. It was released with Wireshark 1.8, so it is relatively new and includes some additional features, which we'll get into in future sections. But you should know that the .pcapng file extension is the new standard, so if you see a .pcap file with no ng at the end, that's an older capture file, and you can certainly save it as .pcapng going forward since that's now the default. Just be aware, though, that if you take a pcapng file and save it as an original pcap file, you'll lose some of that functionality that comes with the ng format. So, my recommendation is to stick with the ng format. Almost all plugins and additional software that utilizes pcap files now support the ng format, so you might as well just use that going forward. You'll also notice long, different capture extensions here. You have .gz listed and with the pcapng you also have .gz, ntar.gz, and so on. In order to get that, you have to select the Compress with gzip option. So when you select Compress with gzip what that will do is, just like putting files into a ZIP file, it will take your capture file and try to compress it to make it smaller. So if it's a large capture, remember a packet capture includes all the data that's traversed your network from your network card that you're capturing on. So, if you're transferring a lot of data at the time that you're doing a capture, all of that will be saved in your capture. It's going to be a 1:1 ratio of the data that's been transferred, so it could be very large. Gzipping that might make sense to you, because then it would be a much smaller file on your hard drive. Additionally, if you're trying to transfer the file across to your network, then that could potentially save time with trying to transfer the file since it would be smaller to transfer. Most of the time it's not used, though, especially if you filter out what you only need to see in a capture and you end up saving only what you require, then they're usually very small.
Now, we will Save that capture. And speaking of filtering out just what you want to see and making a capture smaller, let's do exactly that.
So here we have some HTTP traffic, and we'll right-click on that and then click on Follow | TCP Stream. That way, we have some sort of stream here that's filtering out all of the other data that's in our packet capture. So we've got seven packets selected. If I want to save just these packets into a new file, I'll go to File | Export Specified Packets.... We'll call this packet small and you'll see here that we have a radio button to select between Displayed and Captured:
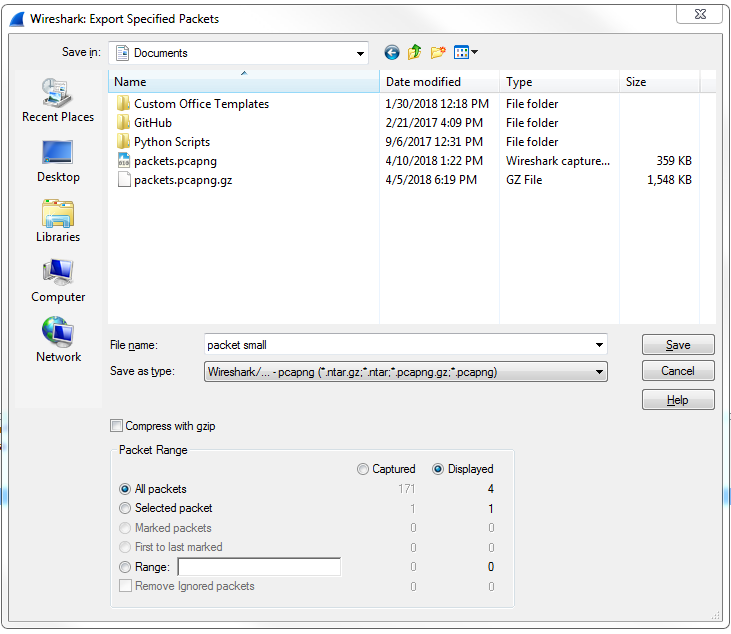
So Captured is the entire packet capture. This adds almost 2870 packets. Displayed is only going to save what's currently filtered and what's displayed in my packet list view. So if I have Displayed selected in all packets, that's going to export all seven of these packets into a new file. Additionally, I could select Selected packet. So you'll see here that I have packet number 16 currently selected; it's a slightly different color here. If I choose Selected packet, this will only save that one single packet into a new file:

I could also select a Range. Now, the range wouldn't show anything right now because we have our own little filter going, but what I can do is clear out this filter. And we'll go back to Export Specified Packets... and save the packets range. We could say packets 5 through 200. So there are 196 packets that will be saved into the packets range file:

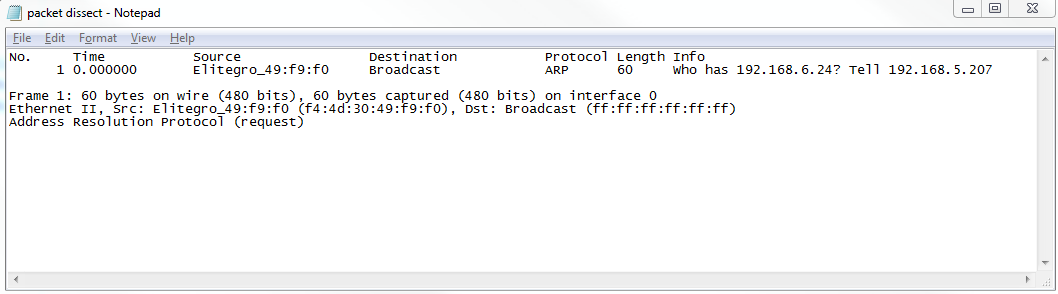
Additionally, you can export your packet dissections by going to File | Export Packet Dissections and then choose a format you'd like:

So we'll choose As Plain Text..., and we'll call it packet dissect. We'll do just the Selected packet, and so here we have our packet dissect text file, which you can see has the packet number, when the packet came in, source and destination IP addresses, what the protocol was, any information about the protocols within it, and then the basic information that you can see in the packet details section; this is all now saved in the text file as shown here:
If your packet capture happens to have captured any secured traffic such as any HTTPS, SSL, or SSH traffic, you can use File | Export SSL Session Keys..., and then save these SSL keys for future use in some other application, if you wish.
You might have noticed one additional export that's grayed out: Export Packet Bytes...:
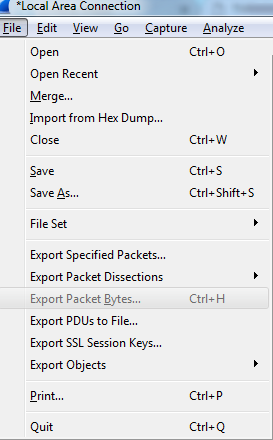
In order to get that to become selectable, you need to select the application data within your packet. So here, we've selected our HTTP packet data. If we go back to File, you'll see that Export Packet Bytes... is now selectable. If I select that, I can now export my data from my packet in a raw binary format. It is potentially useful if you're doing something with a hex editor or combining these pieces together for some other application.
In this section, you learned how to save and export packets: the entire packet capture, subsets of that packet capture such as filtered views, individual packets, as well as exporting raw data into different formats such as text files.