
Working with a Standard Snowflake Dimension
The Product dimension comes from a set of dimension tables, one for each level of the Product hierarchy. The Dimension Wizard asks you directly if you have multiple (snowflake) tables for the dimension. In the Dimension Editor, you must add the additional dimension tables yourself. In this section, you’ll create a new version of the Product dimension you created in Chapter 2. This time, however, you’ll use the Dimension Editor exclusively and you’ll utilize properties of a dimension that are not available by using the Dimension Wizard.
Create a Dimension from Multiple Tables
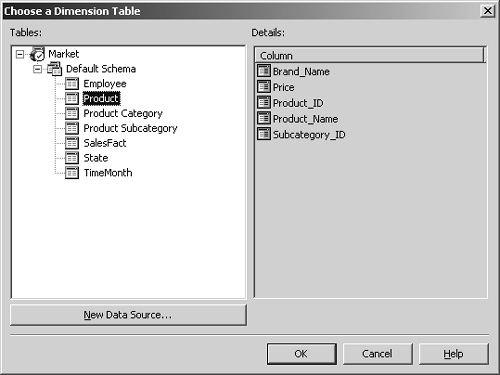
From within the Dimension Editor, you can create a new dimension in two ways: by using the Dimension Wizard or by using multiple dimension tables. You can click the New Dimension button to launch the Dimension Wizard. To create a new dimension without using the wizard, follow these steps:

Creating a dimension from multiple dimension tables is not much more difficult in the Dimension Editor than it is using the Dimension Wizard.
Allow Duplicate Names in a Dimension
In the Dimension Editor, you can browse the first 1000 rows of a warehouse table. Sometimes it’s instructive to compare the contents of a dimension table with the properties of a level in the Dimension Editor. For example, the Product table contains 200 products, with 200 unique Product_ID values. The Product_Name column, however, contains only 40 unique names since there might be more than one brand for a product name.
1. | Right-click the caption bar of the Product table, and click Browse Data. Products at row 3 and 43 both have Jack Cheese as the Product Name and 2 (Cheese) as the Subcategory_ID. Only the Brand Name differs between the products. Similarly, products at row 18 and 58 are both named Blueberry Yogurt.
|
2. | Close the Browse Data window, and double-click the Product_Name column in the Product table. Double-clicking a column name in a table is equivalent to dragging the column name onto the dimension name in the dimension tree—that is, it adds the column as a new bottom level. |
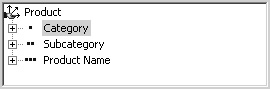
3. | Drag the Subcategory column from the Product Subcategory table onto the Product Name level in the dimension tree. Then drag the Category column from the Product Category table onto the Subcategory level.
|
4. | Select the Category level in the dimension tree, and switch to the Advanced tab of the Properties pane.
|
5. | Select the Subcategory level in the dimension tree, and look at the advanced property values.
|
6. | Select the Product Name level, and look at the advanced property values.
|
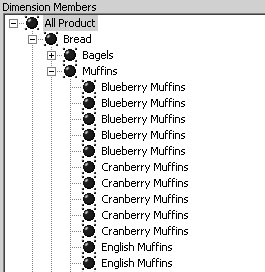
7. | At the bottom of the Schema pane, click the Data tab to preview the dimension. Expand All Product, Bread, and Muffins.
|


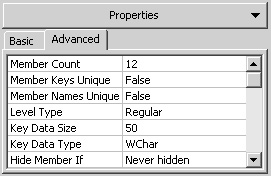

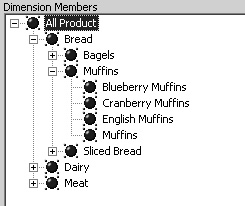
There are four muffin products listed. Each of these products represents several entries in the Product table because there are different brands for each product. For example, all the Blueberry Muffin products are lumped into a single member because the Member Key Column property for the Product name level points to the Product_Name column in the warehouse.
Create an Expression for a Member Name
You can keep the Analysis server from grouping the products together by setting the Member Key Column property to the Product_ID column, which is unique for each product, but first you must set a dimension property that allows the dimension to have duplicate names.
1. | In the dimension tree, select the Product dimension. On the Advanced tab of the Properties pane, change the Allow Duplicate Names property to True. |
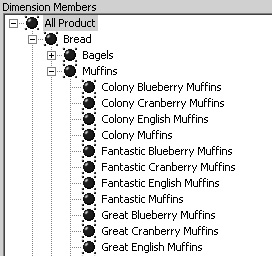
2. | In the dimension tree, select the Product Name level. On the Basic tab of the Properties pane, select the Member Key Column property, click the ellipsis button, select the Product_ID column in the Product table, and click OK. The dimension preview changes to show each of the individual products as separate, identically named members.
|
3. | In the Properties pane, select the Advanced tab. The Member Count property value changed to 200, reflecting the total number of products in the dimension table.
The values for the Member Key Column and Member Name Column properties can consist of more than a single column name. You can use any structured query language (SQL) expression that the relational data source understands, provided that the expression returns a number or a string. You can use expressions to avoid what would otherwise be duplicate member names. |
4. | Click the Basic tab, and change the value of the Member Name Column property to “Product”.“Brand_Name” + ’ ’ + “Product”.“Product_ Name”. Press Enter. Tip Clicking the ellipsis button displays the Select Column dialog box, which allows you to select only a single column; you must enter expressions by yourself. When working with a long expression, you can increase the size of the property box by dragging the right edge of the property pane, but there’s no “zoom” window that shows the entire expression. Also, if you make a mistake, the Dimension Editor puts the entire expression back to what it was before you started editing. When you create a complex expression, select the entire expression and press Ctrl+C to copy it to the clipboard before pressing Enter. Then, if there is an error in the expression, you can easily use Ctrl+V to paste the copied expression so that you can find and fix the problem. For a particularly difficult expression, you might want to get the syntax of the expression correct within your relational database system and copy the expression to the property box. Within the Dimension Editor, all table and column names must be enclosed in double quotation marks, regardless of whether they contain spaces or special characters. |
5. |

Each level of a dimension has a member key and a member name. The member key internally distinguishes one member from another. The member name appears on report captions. As a default, the member key is the same as the member name. If you make the member key different from the member name, you should make sure that the member names appear distinct on reports.
Specify a Default Member
Each dimension has a default member. This is the member that is used if the dimension is not included in a query. In the simple browser included in Analysis Manager, all dimensions are always included in a query—either as part of the data grid or as filter dimensions. In more sophisticated browsers, such as the PivotTable list browser you’ll learn about in Chapter 5, “Office 2000 Analysis Components,” you can omit a dimension from a query.
The standard default member is the All level member, but you can specify any default member you want. In this section, you’ll learn how to create a constant default member. You’ll also see how Member Keys Unique and Member Names Unique property settings for a level affect the way you specify a member. Suppose, for example, that you want the default member of the product dimension to be Colony Bagels—the first entry at the product level.
1. | In the dimension tree, select the Product dimension, and switch to the Advanced tab of the Properties pane. |
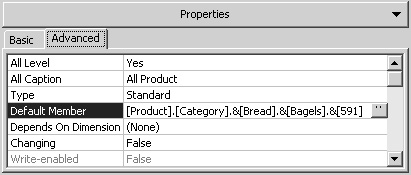
2. | Select the Default Member property, and click the ellipsis button. Expand the members All Product, Bread, and Bagels; select the Colony Bagels member; and click OK.
The name consists of individual dimension, level, and member names enclosed in brackets and separated by periods. [Product] is the name of the dimension. [Category] is the lowest level in the dimension that a value of True for either the Member Keys Unique property or the Member Names Unique property. [Bread] is the name of Colony Bagel’s ancestor on the Category level. The ampersand (&) in front of the name indicates a key value, rather than a name. For the Category level, the name and the key are the same, but only the key is flagged as unique, so Analysis Manager uses the ampersand to designate the member key. [Bagels] is the child of Bread. The ampersand again indicates the key (even though the key and the name are the same). Finally, [591] is the key value (from the Product_ID column) for Colony Bagels. This is much more complicated than it needs to be. The keys at the Product Name level are unique. If you change the Member Keys Unique property for the level to True, Analysis Manager can create a simpler unique member name for Colony Bagels. |
3. | In the dimension tree, select the Product Name level, and on the Advanced tab of the Properties pane, change the Member Keys Unique property to True. |
4. | In the dimension tree, select the Product dimension, select the Default Member property, and click the ellipsis button. Again select Colony Bagels, and click OK.
|
5. | Select the Product Name level, and change the Member Names Unique property to True. Then select the Product dimension, select the Default Member property, click the ellipsis button, select Colony Bagels, and click OK.
|
6. | Select the Product dimension, change the Member Keys Unique property to True, and press Enter. Click Yes when informed that this will change the property for all levels. Change the Member Names Unique property to True, press Enter, and again click Yes when informed that this will change the property for all levels.
|
7. | Select the Default Member property, click the ellipsis button, select Colony Bagels, and click OK.
|

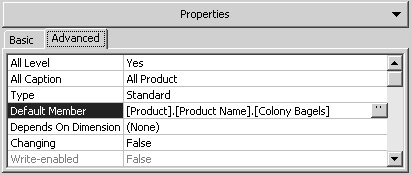


The unique name changes to [Product].[Colony Bagels]. This is the simplest possible unique member name. It is valid only if the Member Names Unique property is True for the entire dimension. If Member Keys Unique were True for the dimension but Member Names Unique were false, the simplest possible name would be [Product].&[591]. Some dimensions have unique members, some have unique keys, and some have neither. In general, if you specify that member names and member keys are unique as much as is true within a dimension, you’ll be able to use simpler unique member names when referring to a member in an expression.
Create a Detail-level Member Property
In the Market data warehouse, the Product table contains a Price column, which contains the list price of the product. The price of the product doesn’t make sense as a level in the product’s hierarchy; it’s simply an additional piece of information that’s available about the product. You can include this information within a dimension as a member property of the Product level.
1. | In the Dimension Editor, click the Schema tab to convert the right pane into the Schema pane. |
2. | In the dimension tree, expand the Product Name level so that you can see the Member Properties folder below it. 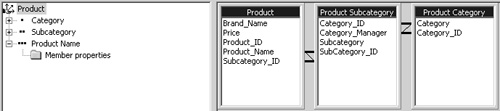
|
3. | Drag the Price column from the Product table onto the Member Properties folder for the Product Name level. You can see the member property as you browse the dimension. |
4. | Click the Data tab, and expand All Product, Bread, and Bagels. Select the Colony Bagels member to see its price displayed in the Member Properties list. 
|
A client application can determine how it will make use of member properties. In “Create a single-level virtual dimension” in Chapter 10, “Dimension Optimization,” you’ll learn how to make a member property appear as a dimension by creating a virtual dimension. In “Use an external function to convert a string to a number” in Chapter 6, “MDX Values,” you’ll learn how to use member properties in a formula for a calculated member.
Create a Summary-level Member Property
A member property can exist at any level of the hierarchy. In the Market warehouse, the Product Subcategory table contains a Category_Manager column. This is the name of the person assigned to manage sales for the products in that category. The category manager’s name doesn’t make sense as a new level in the hierarchy, but it can be a member property of the Subcategory level.
1. | |
2. | On the Insert menu, click Member Property. |
3. | In the Insert Member Property dialog box, double-click Category_Manager.
|
4. | In the Data pane, expand the All Product and Bread members and select Bagels. You can see the manager name in the Member Properties list. 
|
5. | Click the Save button to save the Product dimension. |

You can create a member property at any level, and a member property applies to only a single level. If products and families also had managers, you’d need to create a separate member property for each level.
Tip
In the source table or tables for a dimension, you can easily identify potential member properties: any column that isn’t a member name or a member key is a potential member property. When the dimension tables appear in a snowflake schema, where each level of the hierarchy has its own table, you can also easily identify the appropriate level for a member property: it’s simply the level that corresponds to the members from the same source table. When the dimension table is organized in a star schema, where all levels are combined into a single table, it can be tricky to identify the level for a member property. The best approach is to imagine breaking the table into a snowflake, with one table for each level, and to assign each member property to the highest possible table without having more than one value for a single key. The appropriate level for the property corresponds to the level of the imaginary snowflake table.