Creating Basic MDX Queries
You can create MDX queries to replicate the reports you create by using a browser such as the Office PivotTable list control.
Create a Minimal MDX Query
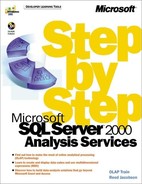
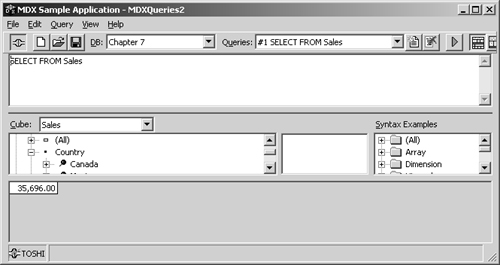
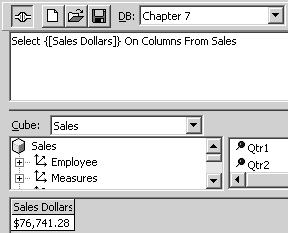
Start by creating the simplest possible query from the Sales cube.
This simple query retrieves a single value from the cube. You can create more interesting reports by adding sets of members to the column or row axis.
Note
In addition to using two sequential slash characters (//) to comment the remainder of the line, you can also use two sequential hyphen characters (--) for the same purpose. If you want to create a comment that either is a partial line or spans multiple lines, you begin the comment with a slash followed by an asterisk (/*) and end it with an asterisk followed by a slash (*/).
Add a Set to the Column Axis
To display more than one cell in the result grid, you must put a set of members on an axis. Before creating the new query, add a new query to the query file so that you can keep both queries intact.
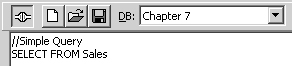
1. | Select the contents of the query pane, and press Ctrl+C to copy it. Click the New Query button, and press Ctrl+V. Change the comment to //Set on Axis. To display more than one member on an axis, you use a set of members, precisely as in the browser. MDX has a number of functions that return sets. To the right of the member list, in the metadata pane, there’s a tree labeled Syntax Examples. This list is the same as the Functions tree in the Calculated Member Builder. To get a set of members that you can put on an axis, select a function from the Set group. |
2. | Click immediately after the word SELECT, and type a space. In the Syntax Examples list, expand the Set group and double-click the Members - Level function. Then click after the Members function, and type a space and ON COLUMNS. 
|
3. | Click the word «Level». In the Metadata tree, double-click the Category level node in the Product dimension. The level name appears in the query. |
4. | Click the Run Query button to see the results of the query. The labels from the Category level appear as column headings in the report. The client application, however, can choose to put the “column” axis on either the columns or the rows. 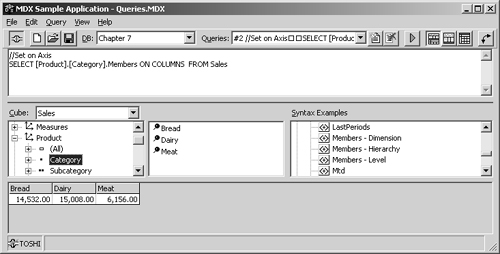
|
5. | |
6. | Click the Pivot Results button again to return the labels to the column headings, and save the query file. |

Note
The terms COLUMNS and ROWS are simply aliases for the true names of the axes, Axis(0), and Axis(1), respectively. The underlying names make it clearer to understand why a single-axis report must include a COLUMNS axis but not a ROWS axis. Technically, an MDX query can have up to 63 axes, with alias names for the first few. There are, however, essentially no situations in which it’s necessary to use more than two heading axes for a report.
The tokens in the function templates help you know what kind of item to add to a specific location of the query. You must replace the «Level» token with the name of a level. In various contexts, you might also see tokens «Member», «Set», «Tuple», «Dimension», and «Hierarchy». «Set» and «Tuple» are MDX constructs that do not exist in the OLAP database, so you typically replace them with functions from the appropriate groups. «Cube», «Dimension», «Hierarchy», and «Level» all are OLAP objects, so you typically replace these tokens with items from the Metadata tree. A «Member» is the place where MDX and the cube meet. You can replace the «Member» token either with a constant member from the Metadata tree or with a function from the Member group.
Add a Set to a Second Axis
You can also add a set to the row axis. In MDX, if you create a query that has only one axis, it must be the column axis. If you create two axes, one must be the column axis and one must be the row axis, although it doesn’t matter in which order they appear within the query.
1. | |
2. | |
3. | In the Syntax Examples list, look in the Set group and double-click the Children function. Then click after the Children function, and type ON ROWS.  The token that precedes the Children function name is «Member». A member has children.
 |
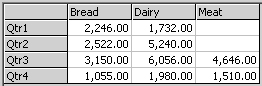
4. | Select the «Member» token, and in the Metadata tree, find and double-click the 1998 member. The formatted statement will look like this: //Two axes
SELECT
[Product].[Category].Members ON COLUMNS,
[Time].[Calendar].[All Time].[1998].Children ON ROWS
FROM Sales
This function will now add a set of all the quarters of the year 1998 to the row axis. |
5. | Click the Run Query button to run the query.
|
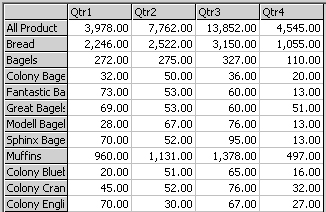
6. | Delete the Category level name and the period following it, but leave the dimension name. The function will now return all the members of the Product dimension. |
7. | Click the Run Query button to see the results of the query. Click the Pivot Results button to move the products to the row axis.
|
8. |
Note
One important rule for working with axes in an MDX query is that a dimension can be represented on only one of the three axes—column, row, and filter—because each axis contributes a member towards the complete tuple required to retrieve a value from the cube. If a single dimension is represented on more than one axis, the tuple will contain two members for a single dimension, which is invalid.
The Syntax Examples list shows three functions named members—one for levels, one for hierarchies, and one for dimensions. When a dimension has a dual hierarchy—as with the Time.Fiscal dimension—you must use the hierarchy version, not the dimension version, even if only one of the hierarchies exists in the current cube (as in the Basic Sales virtual cube created in Chapter 4, “Advanced Dimensions and Cubes”).
Create a Set by Using Explicit Member Names
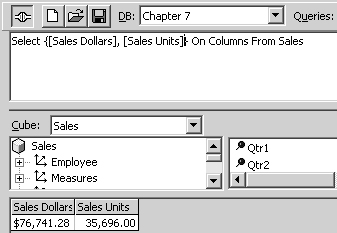
The only thing you can put on an axis is a set. A set function is one way to get a set to put on the axis. But sometimes, particularly with the Measures dimension, you want to be able to pick one or more individual members to put on an axis. You must be able to put the members into a set. To include members in a set, you must enclose the set in braces ({}). The braces aren’t necessary when you use set functions but are necessary when entering specific member names.
1. | |
2. | After the [Sales Dollars] measure, type a comma, a space to enhance legibility, and then [Sales Units]. Then run the query.
Note You can also manually create a set that includes tuples with multiple members. For example, the following is a legitimate set and could be placed on an axis in an MDX query: {([Bread],[California]),([Meat],[Oregon])}. It’s unusual, however, to create a set with constant member names in multimember tuples. You’re much more likely to use the CrossJoin function described in the following section to create a set with multiple members in each tuple. |
3. | Add a comment to the query, and save the query file. |
The terminology of an MDX query centers on sets, tuples, and members. A set includes one or more tuples, and a tuple includes one or more members. Sets appear on the axes. Tuples appear either in a set (on a column or row axis), or in the WHERE clause to create the filter axis. Aside from the cube name in the FROM clause, a member is the only object from a cube that appears directly in an MDX query.
Put Two Dimensions on One Axis
In “Use a PivotTable list to understand MDX terms” earlier in this chapter, you saw how the Office PivotTable list can put two dimensions onto the same axis, creating a set where each position in the set includes a tuple with more than one member. In an MDX query, to combine two sets from two dimensions into a single set that you can put onto a single axis, use the CrossJoin function.
1. | Click the New Query button. Type Select Country.Members on Columns, Category.Members On Rows From Sales. Click the Run Query button.
|
2. | Change the query definition to Select CrossJoin( Country.Members, Category.Members ) On Columns From Sales. Click Run Query to see the results. |
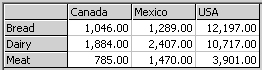
3. | After the Columns keyword, type a comma, and press Enter. Then type CrossJoin( [Calendar Year].Members, [Measures].Members) ON ROWS, and click Run Query to run the query.  This query contains four dimensions from the Sales cube—two on each axis. Remember that you can put a dimension onto only one axis in a single query.
 |
4. | Add a comment, and save the query file. |
The CrossJoin function is a powerful way to create reports that compare multiple dimensions. Because the function is so powerful, it’s easy to create sets that are extremely large, particularly when combined with the Members function of multiple dimensions.