
Built-in versus do-it-yourself AutoCorrect
Plaint text versus formatted AutoCorrect
AutoCorrect limits
Math AutoCorrect
AutoCorrect refers to Word's capability to automatically change what you type into something else. What's that? You thought that that was called editing? Nah. That's something else entirely.
AutoCorrect actually refers to a collection of features that all reside under one umbrella. At its most basic level, even without your doing anything, Word can correct typos just as quickly as you can type them. If you type "recieve," practically before you can blink, Word changes it into receive. Well, I lied. There is something you have to do for it to work. You have to press some kind of word separator, such as a comma, space, period, slash, dash, a quote, or any of a host of other characters, to signal to Word that you've finished typing that word. In fact, it took effort to keep the incorrect version of receive from being AutoCorrected. Let's hope the editors realize that it was deliberately misspelled and don't fix it!
Word comes with a host of built-in AutoCorrect pairs—common misspellings and their corrected counterparts. By default, Word uses them to correct your mistakes. For example, if you type "abscence," Word corrects it to absence.
Word has additional AutoCorrections it can perform as well. They are shown in Figure 14.1. To display this dialog box, choose Office
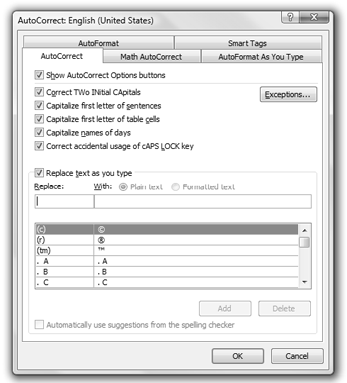
Show AutoCorrect Options buttons might not be perfectly obvious to you if either it never happens to you or you never notice it. Many users hardly ever even notice it. After an AutoCorrect occurs, if you hover the mouse over the correction, an AutoCorrect button appears at the left edge of the corrected word. It's a thin blue rectangle. Microsoft's aim was to make it unobtrusive. For some users, it's so unobtrusive that they hardly ever even notice the AutoCorrect buttons.
If you hover the mouse pointer over the rectangle, it suddenly sprouts a lightning bolt and a tooltip that says AutoCorrect Options. If you click the lightning bolt, you then see options similar to those shown in Figure 14.2.
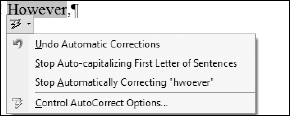
If Show AutoCorrect Options buttons is enabled, Word remembers the locations in the current paragraph where AutoCorrect actions occurred. You can click the button for any of them to undo a correction, to suppress a rule, or to access AutoCorrect Options. If AutoCorrect made multiple corrections at the same time (as shown in Figure 14.2), the top option, Undo Automatic Corrections, enables you to undo all of the corrections in one step.
Tip
If all this mousing around and hovering annoys you, you can always immediately press Ctrl+Z to undo the most recent correction. However, if you kept typing after the correction occurred, then it will take several presses of Ctrl+Z, as it will have to undo the typing before it can undo the AutoCorrection. You'll have to decide how much retyping you'd like to do.
The other option whose meaning might be a bit less than intuitive is the Correct keyboard setting option. This setting was present in Word 2003 as well, but most people never saw it. That's because in Word 2003, it's visible only if support for Korean is installed. If this box is checked, Word automatically corrects words entered in English mode that were meant to be entered in Hangul mode, and vice versa. If you don't have Korean installed, and you don't see this option, then the bug that makes it sometimes appear has been fixed.
The core AutoCorrect feature for most users is "Replace text as you type." Using hundreds of built-in AutoCorrect pairs, when this feature is enabled, it automatically replaces misspelled words with their correct counterparts. Common default AutoCorrect Replace/With pairs include accross/across, realative/relative, questiom/question, and teh/the.
To add a Replace/With pair to AutoCorrect, choose Office
Word doesn't just make corrections, though. It also replaces common substitutions for actual characters, such as (c)/© and (tm)/(tm).
Many Word power users capitalize on this feature to create shorthand for longer words and phrases that are tedious to type and retype. If you're a lawyer, you might have encountered such memorable phrases as party of the first part and party of the second part. One lawyer I know hates those phrases, but uses them because they're expected. She created AutoCorrect entries that automatically replace p1, p2, and p3, with party of the first part, party of the second part, and party of the third part, respectively. Now, when she needs one of those, she simply types p1, p2, or p3.
When I'm typing a book or a report, I frequently encounter longish words and phrases. Along about the third time, though, I press Ctrl+Alt+Shift+C (my shortcut key for AutoCorrect options; see "AutoCorrect" in Chapter 4), and add the tiresome item to my AutoCorrect list. For this book, for example, ac automatically expands to AutoCorrect, autt expands to AutoText, and qsg automatically expands to Quick Style Gallery. With each new concept I cover, the AutoCorrect glossary grows.
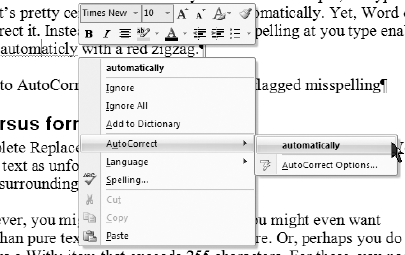
Another method for creating AutoCorrect entries is on-the-fly whenever you make a typing mistake that Word doesn't automatically correct. For example, if you type automaticly, it's pretty certain that you really mean automatically. Nonetheless, Word doesn't automatically correct it. Instead, assuming that "Check spelling as you type" is enabled, Word will underline automaticly with a red zigzag.
To convert typos to AutoCorrect entries, right-click the flagged misspelling. Word displays the context menu shown in Figure 14.3. In the menu, choose AutoCorrect
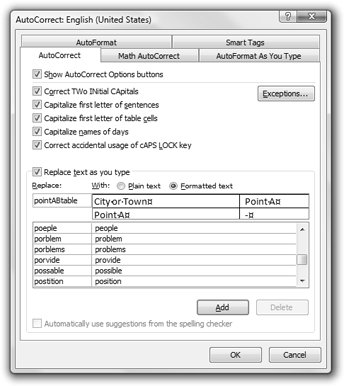
If you enter complete Replace/With pairs using the AutoCorrect dialog box, Word records the With text as unformatted. When the text expands, it takes on the formatting of the surrounding text.
Sometimes, however, you might want formatted text. You might even want something other than pure text, such as a table or a picture. Or, perhaps you do want plain text, but have a With item that exceeds 255 characters. For these, you need to use a formatted item.
To create a formatted Replace/With AutoCorrect pair (only the With item is formatted), first select what you want to use as the With item. Then display the AutoCorrect dialog box (Office
In the Replace box, type a name for the item. It can be up to 31 characters. Keep in mind that this name will automatically expand into the With item when you type it into a document, so don't make it so complicated that you can't remember it, but don't use existing words or common abbreviations or acronyms that you ordinarily use either.
Word 2007 does not have any arbitrary limits on how many AutoCorrect entries you can create. Nor are there arbitrary limits on how large a formatted With: entry can be. You are limited only by the amount of available memory and disk space. If Word runs out of either, it will tell you. However, few users run into limits, even when they include entire large documents as AutoCorrect entries.
On the other end of the spectrum, for plain text entries, as noted above, the size of the With item cannot exceed 255 characters. That is the usual limit on text box entries in Windows applications.
For both formatted and plain text entries, the Replace entry cannot exceed 31 characters. As a practical matter, it's hard to imagine why you'd ever want it to get anywhere nearly that large. Most AutoCorrect aficionados tend to prefer terse letter and number combinations that give some idea about the nature of the item as a mnemonic device for remembering what's what. Keep in mind that unlike Building Blocks, there is no dialog box or gallery mechanism for inserting AutoCorrect items, so keep it short enough to easily type.
Your Office 2007 AutoCorrect entries are stored in an .acl (AutoCorrect list) file. You do not have distinct lists for each Office 2007 application, nor for each Word template. Instead, there is a separate list for each language you use with Office.
Your .acl files are stored in C:Documents and Settings[user]Application DataMicrosoftOffice. For English (U.S.), you would back up MSO1033.acl. For other languages, replace the number with the appropriate Windows locale code. Other common locale codes are 1034 for Spanish (Traditional Sort) and 1036 for French (France). Additional locale codes can be found at:
www.microsoft.com/resources/documentation/wss/2/all/adminguide/
en-us/stsk09.mspx?mfr=true
Unfortunately, Word does not provide a built-in way to selectively copy AutoCorrect entries from one computer to another. You can, of course, copy your entire .acl list, but by replacing their own list with yours (or by you replacing yours with someone else's), each gains the other's entries but loses their own.
A better alternative, if you have access to the macros that came with Word 2003, is to use the AutoCorrect Backup macro. It still Works with Word 2007, and the procedure is described here:
http://support.microsoft.com/kb/826147
Are you getting the impression that whether you store document parts as AutoCorrect or Building Blocks (which include AutoText and Quick Parts) is largely up to you? If so, then you're correct.
As a practical matter, however, most users tend to limit their AutoCorrect entries to corrections and shortcuts that they use in routine typing, reserving Building Blocks for larger concepts, such as tables, lists, graphics, and boilerplate document sections.
Math AutoCorrect is a new feature in Word 2007. It works the same way that regular AutoCorrect does, but can be enabled or disabled independently. This feature provides what, to some, will be more intuitive access to math symbols than are available in Word through other means. It also interfaces directly with Word's equation editor.
To view Math AutoCorrect options, choose Office

For example, suppose you want the symbol for theta. Any idea what the character code for theta is? In the Math AutoCorrect dialog box, enable both "Use Math AutoCorrect rules outside of math regions" and "Replace as you type," and click OK. In the first option, Outside of Math Regions means in the body of your document. Math regions are the structures you get when you choose Insert
Now, having enabled Math AutoCorrect in the body of your document, type heta and press the spacebar. Instant theta.
Alternately, choose Insert
For most, typing heta is a lot faster. There are over 200 Replace/With pairs in the Math AutoCorrect list, and learning them all might be a bit of a chore. However, if you already speak math, then many of them will occur to you quite readily. If the built-in names aren't intuitive to you, you can change them to something that is more intuitive.
When using Word's equation editor, variables, such as x, y, z, a, b, and c, are italicized. However, functions, such as sin, cos, sec, tan, and other expressions that don't represent variables, are not italicized. When using Math AutoCorrect inside a math region (i.e., using the equation editor), Word maintains a list of expressions and functions that are not italicized, shown in Figure 14.6.
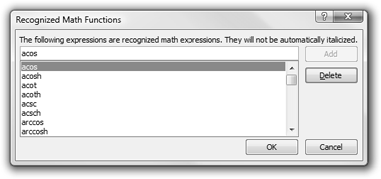
Figure 14.6. You can add or delete expressions you don't want italicized when editing in math regions.
For example, suppose for some insane reason, you suddenly want max to be italicized. Maybe you're doing it to create a circle-the-errors quiz for a math class. To remove max from the "do not italicize" list, click Recognized Functions. Scroll down to and select max, and then click Delete.
You can also add items to the Recognized Functions list. Type the expression you want to add just above the top of the list and click Add. Once done, click OK or Close—your choice. They both do exactly the same thing. For addition magical capabilities of the Recognized Functions list, see Chapter 20, "Symbols and Equations."
Like regular AutoCorrect entries, Math AutoCorrect entries are also stored in an .acl file in the C:Documents and Settings[user]Application DataMicrosoftOffice folder. If you modify the built-in list, you should back it up periodically. The Math AutoCorrect list file is named MSO0127.acl.
In this chapter you've seen how to use and create AutoCorrect Replace/With pairs to work more efficiently. You've also learned the limits of text-only AutoCorrect entries and how to get around those limits. This chapter has shown you all of the following:
How to create AutoCorrect entries from spelling mistakes
How to store formatted text and graphics as AutoCorrect entries
How to back up your AutoCorrect entries for safeguarding your investment of time, as well as for copying to another computer
The difference between AutoCorrect and Building Blocks and how to decide which one to use
How to enable and use Math AutoCorrect
How to suppress automatic italicization of math functions
How to back up Math AutoCorrect entries