
Welcome to Oz. Whether you're a brand-new user to Word or a veteran Word user, this chapter bids you welcome to Word 2007. If you're new to Office 2007, this chapter provides an overview of what very likely is a user interface unlike any you've encountered previously.
If you're completely new to Word and have been using another Windows word processor such as WordPerfect or OpenOffice, you're likely more accustomed to toolbars and menus than you are to Word 2007's ribbons, so when I contrast Word 2007's ribbons with Word's previous interface, you'll likely immediately grasp just how different Word 2007 is, even if you never touched Word 2003.
The ribbon is a completely new way of presenting tools and features to the Word user. Briefly, the ribbon is a set of contextual tools designed to put what you need where you need it when you need it. When you click one of the major tabs on the ribbon, the tools you need for specific tasks should mostly be right where you need them. The ideal result is that you don't need to go looking for what you want.
In fact, the ribbon might actually be considered a new kind of toolbar. Instead of a list of different toolbars accessed from the View menu, however, the different parts of the ribbon are organized into tabs and groups. The result is that more of the tools are exposed to you, making it more likely that you'll discover what you need.
If you've used other versions of Word in the past, Word 2007 will seem strange and different. Imagine that you left earth in the year 1994—the last time that Word's interface was overhauled—and returned in the year 2007. Over the ensuing thirteen years, Word for Windows 6 had gradually evolved into Word 12 (Word 2007), slowly morphing from menus and toolbars into the ribbon.
When considered from an evolutionary perspective, perhaps Word 2007 doesn't look so different. What you, the space traveler, do not realize, however, is that the radical changes occurred not slowly and gradually over more than a decade, but in one giant leap from Word 11 to Word 12, only fifteen minutes before you landed. Everybody who stayed right here on Earth is just as stunned as you are.
If past versions of Word were driven mostly by functionality and usability, Word 2007's catchwords are discoverability and results. Studies show that typical Word users use only a fraction of the myriad features contained in Word. Yet, the same studies show that users often employ the wrong feature. For example, rather than use an indent setting, a user might press the spacebar five times (gasp!) or press the Tab key once (again gasp, but not quite as loud).
Microsoft's challenge, therefore, was to design an interface that made discovering the right features easier, more direct, and more deliberate.
Have they succeeded? Well, you'll have to be the judge. To some, the new interface succeeds only in being different and in making Word novices out of those who previously were Word experts. Whether it makes things easier for beginners, ultimately easier for casual users, or simply more difficult for veteran users, remains to be seen.
Let's suppose you want to create a table. Assuming for the moment that you even know that a table is what you want, in Word 2003 and earlier you might choose Table
The point is that you had to navigate sometimes dense menus or toolbars in order to find the needed functionality—perhaps not even knowing what that functionality was called. It's akin to wandering through a hardware store looking for something that will twist a spiraling piece of metal into a piece of wood, without knowing whether such a tool actually exists. You don't even know what the piece of metal is called, so you wander about, and finally discover, to your utter delight, the perfect tool . . . a hammer. Oops! There's an old saying: When the only tool you have is a hammer, everything looks like a nail.
Like a hammer, the time-proven spacebar has been used countless times to perform chores for which it was never intended. Yes, a hammer can compel a screw to join two pieces of wood together; and a spacebar can be used to move text around so it looks like a table. However, just as a hammered screw makes for a shaky wooden table, a word processing table fashioned together using spaces is equally fragile. Add something to the table and it doesn't hold together. Which table? Take your pick.
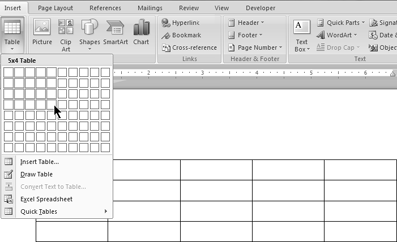
In Word 2007, there are no dense menus and toolbars. To insert a table—again assuming you even know a table is what you're looking for—you stare at the Home ribbon and see nothing that looks remotely like a table.
Thinking "insert" may be what you need, you click on Insert, and there you see a grid with the word Table under it. You click Table, move the mouse, and perhaps you see what's shown in Figure 1.1, as an actual table is previewed inside your document, changing as the mouse moves. Epiphany!
Epiphany? Perhaps, or maybe just a new wrinkle. Be that as it may, the new Word brings with it a number of improvements in performance, stability, design elements, interoperability, and document integrity that ultimately can improve the quality of your documents and make them faster and easier to create. Whether the new interface excites you or annoys you, the fact that the new format makes it harder to corrupt documents should make you smile.
If you've ever spent endless hours wrestling with a document because its numbering is haunted by ghosts that won't let you do what you need to do, you will find relief in Word 2007. More on this in Chapter 5, but for now, you might be happy to know that Word's proprietary .doc document format has been replaced by .docx, which uses XML (eXtensible Markup Language). XML is an open format in the public domain. At its heart are plain text commands that can be resolved by Word and a variety of other programs. The bottom line for the user is that the mysterious so-called binary format is gone, meaning that Word documents are now harder to corrupt. If they do get corrupted, your work is easier to salvage.
Note
If you're a glutton for punishment or you like taking risks, Word 2007 still supports its legacy formats. You can even tell Word to always save documents in earlier formats. This is a good option when you share your work with users of Word 2003 and earlier. For those same Word 2003 users (as well as Word 2000 and 2002 users), however, Microsoft provides a free compatibility pack that enables them to read and write Word 2007 documents (although Word 2007-specific enhancements will be lost in the translation). To find the compatibility pack, visit http://office.microsoft.com.
If you're like most users, when you begin a letter or a report, the first thing you do is check whether you've ever written a letter or report like the one you are about to write. If you have written something similar, then you very likely will open it and use it as a starting point.
When my daughter needs a written excuse for school, rather than write a brand-new letter each time, I search my stock of documents for whatever I have that is closest to the current need.
If you don't have a document to use as a starting point, then you check whether there's an existing template in Microsoft Word's repertoire. Failing there, you might search online. Indeed, it's not uncommon to come across questions in online communities or newsgroups asking if anyone has a particular type of template, e.g., "Does anyone have a template for a resignation letter?" I just love replying to that kind of request: Dear Meat for Brains Boss . . . but, I digress.
Knowing that most people don't prefer to begin documents with a clean slate, so to speak, Microsoft has redesigned Office to give users what they want. The goal is to offer users a collection of results they are probably seeking, to save time and guesswork.
They have done this in a variety of ways. One of the most prominent ways is the expanded use of galleries of already formatted options. Coupled with this is something called live preview, which instantly shows the user the effect of a given option in the current document—not in a preview window!
Rather than focus on a confusing array of tools, Word 2007 instead shows a variety of finished document parts or building blocks. It then goes on to provide context-sensitive sets of effects—also tied to live preview. These are designed to help you sculpt those into, if not exactly what you want, then something close. The objective at each step is to help you achieve results quickly, rather than combing through myriad menus and toolbars to discover possibilities. If nothing else, the new interface eliminates several steps in what necessarily has been a process of trial and error.
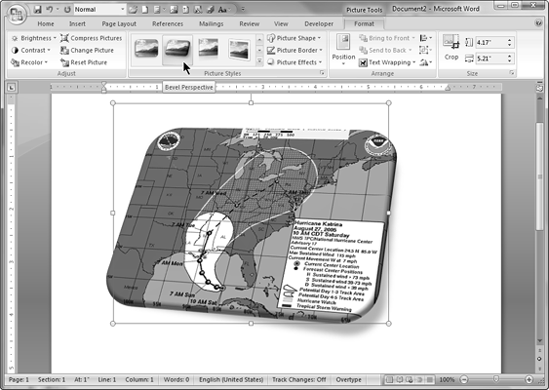
In addition, with each result, Word 2007's new context-sensitive ribbon changes to show you additional tools that seem most likely appropriate for or relevant to the current document part that is selected. For example, if a picture is selected, then the Picture Tools
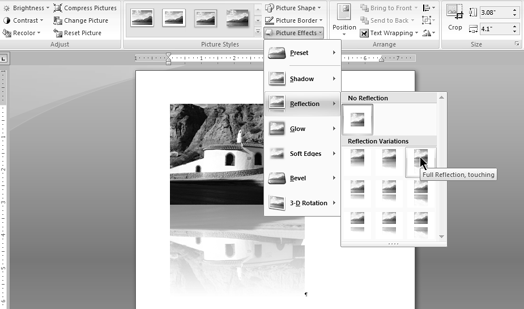
With each action, Word displays a likely set of applicable tools on the ribbon. As the mouse pointer moves over different gallery options, such as the picture styles shown here, the image in the actual document shows a live preview of the effect of that choice. As you navigate the ribbon to additional formatting options and special effects, the live preview changes to reflect the currently selected choice, as shown in Figure 1.3.
In addition to providing a live preview of many formatting options, Microsoft has also greatly enhanced and expanded the range of different effects and options. The result, optimally, is documents that look more polished and professional than was possible previously.
At the heart of Office 2007's results-oriented interface is the ribbon. The ribbon is the area above the document workspace, as shown in Figure 1.4. Technically, I suppose, the ribbon is just the area below the tabs for Home, Insert, and so on. The row with Home, Insert, Page Layout, and so on controls which ribbon is displayed.

Exactly what you see in any given ribbon is determined by a number of factors, including the size of your monitor, your screen resolution, the size of the current Word window, as well as whether you're using Windows' display settings to accommodate low vision. Hence, what you see might not always be what you see pictured in this book. If you have a very large monitor operating at comparatively high resolution, at most you will see the Home ribbon, shown in Figure 1.5.
Figure 1.5. At the highest resolution and largest screen size, Word's ribbon displays additional gallery options and text labels.
Note
This Home ribbon view shows 12 styles from the style gallery, as well as additional tools and text labels in the Clipboard and Editing groups. This is the maximum amount of information you will ever see in the Home ribbon. To "shoot" this picture, Word was stretched across two 19-inch monitors, and additional detail stopped appearing when Word was 35 inches wide. Therefore, if you're wondering whether you need a 52-inch monitor for Word 2007, you'll be happy to know that a 42-inch model would work just fine.
Tip
Ctrl+F1 toggles the ribbon on and off. At times—especially at first—the ribbon is going to look overly large to you. It will also seem imposing when you're simply reading a document or when you're trying to see a graphic and write about it at the same time. The ribbon might also be distracting if all you're doing is composing, and are fluent in the keystrokes you need to perform basic formatting. For those times, there is Ctrl+F1. To turn the ribbon off using the mouse, double-click the current tab; click any tab to turn it back on temporarily. It will automatically hide when you're done using it. Double-click any tab or press Ctrl+F1 to turn it back on full-time.
The top bar of the Word window is called the title bar, exhibited in Figure 1.6. Double-clicking the title bar toggles Word between maximized and restored states. It's the equivalent of alternately clicking the maximize and restore buttons.
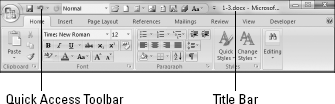
The title bar contains the Quick Access Toolbar (optionally), the name of the document in the current Word window, and what Windows calls the application control caption buttons. If you've told Word not to "Show all windows in the Taskbar" (Word Options
Tip
Right-click different areas of the title bar for available options. For example, if you right-click the Quick Access Toolbar (QAT), you'll see that it can be customized or placed below the ribbon; any tool on it can be instantly removed as well. If you right-click the middle area of the title bar, you'll see that the caption button options (Move, Size, Minimize, etc.) are available here as well. They can also be accessed from within Word by pressing Alt+spacebar.
Shown below the title bar in Figure 1.6, is the Home row. I'm not sure if that's the official name, but that's the name I'll use here. In addition to the tabs themselves, which control which ribbon is displayed, this line contains the Word document control button (the large W), the document control caption buttons, and the Help button (which replaces Help
As noted earlier, double-clicking the currently selected tab hides the ribbon. Double-click any tab to unhide it. Ctrl+F1 toggles the ribbons on and off as well. Once the ribbon has been turned off, you can temporarily turn it back on by clicking a tab (or pressing its hot key). Once you've used a tool in that tab, the ribbons automatically go back into hiding.
If there are no underlined letters, then how do you know which keys to press? Tap the Alt key. As shown in Figure 1.7, when you tap the Alt key, shortcut keys that work in the current context are displayed. "In the current context" might seem like an odd way to phrase it. Why context is relevant will become clear when we talk more about the Ribbon (described in the following section). For now, however, if you're working in a Word document, pressing Alt+H will display the Home ribbon, Alt+N displays the Insert ribbon, and so on.

Note that I've added some additional tools to the QAT shown in Figure 1.7, and that numbered hot keys are associated with them. In addition to the first nine being accessible using Alt+1 through Alt+9, the last three are accessible using Alt+09, Alt+08, and Alt+07.
The Ribbon is divided into a number of different tabs that ostensibly correspond to Word's former menu. Unlike Word 2003's menu, however, there are no expanded drop-down lists under each main menu item. Instead, each tab exposes a different ribbon. Note that in Figure 1.4, the Home ribbon is exposed. Contrast that with Figure 1.8, which displays the Insert ribbon.

Note that the number of ribbon tabs you see also varies according to user settings. In Figure 1.8 you can see the Developer tab. On your own setup, that tab might not appear. Why this varies is covered in luxurious detail in Chapter 47.
We've already talked about the Ribbon—now it's time to explore a few tricks and some odd nomenclature. At the bottom of the ribbon shown in Figure 1.7, note the names Clipboard, Font, Paragraph, Styles and Editing. These are known as chunks, or groups. Each chunk or group contains individual tools or controls.
If you're a veteran Word user—perhaps even if not—you've probably been wondering what to do, for example, if the Ribbon is displaying the Page Layout ribbon, and you really want to access the Home ribbon's Editing tools (the ones that contain Find, Replace, Go To, and Select).
In previous incarnations of Word, access to commonly used commands was always available via the menu, and often via the Standard and Formatting toolbars. Indeed, they are always available here as well, sort of. When the Page Layout ribbon is displayed, you can access any of the Home ribbon items simply by pressing Alt, H (in sequence), or by clicking the Home ribbon.
What if you want to remained focused on Page Layout?
Any item on the ribbon—individual tools, groups/chunks, and even dialog box launchers—can be added to the QAT. For example, right-click Bold and choose Add to Quick Access Toolbar. Now Bold will be available all the time, regardless of which ribbon is displayed. Did I mention that Q stands for Quick? Don't want Bold there? Right-click it and choose Remove from Quick Access Toolbar.
Let's try another navigation trick. Tap Alt+P (Page Layout ribbon). Now press the arrow keys. If you're unsteady with the mouse, you can use the four arrow keys to navigate. You can also use Tab and Shift+Tab to move forward or backward through all of the ribbon commands. When you get to a command you want to use, press either the spacebar or the Enter key.
Note
In the previous section, I mentioned that hot keys are context-sensitive. Shouldn't hot keys work the same way all the time? One would think so. Alas, Microsoft does not agree, so while 1 might activate the first QAT command when the Home ribbon is displayed, you cannot count on it always doing the same thing. If you press Alt+H, now the 1 key applies bold formatting. Hence, context is vital. If you're a touch typist who hardly ever looks at the screen, good luck. Meanwhile, press Alt+P and try not to laugh (or cry) when you notice that some commands have two—not one—hot keys. Any idea why AY means Rotate? Me neither.
In addition to the default set of seven main tabs, additional context-sensitive or contextual tabs appear depending on what kind of document part is selected. For example, if you choose Insert
Notice that because this particular header format is enclosed in a table, the Table Tools tab is also exposed. The Table Tools tab has Design and Layout subtabs, each of which is also available in the current view.
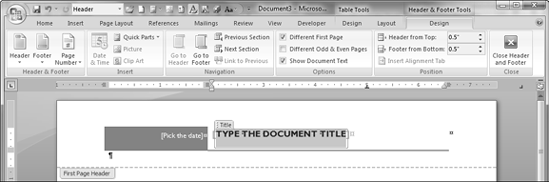
Figure 1.9. When a header is selected, the Header & Footer Design tab and associated ribbon are selected.
Tip
As you are becoming acclimated to Word 2007, whenever a new tab is exposed, you should click it to explore what it has to offer. Think of them as hidden drawers that might contain money! This is an aspect of Office 2007's discoverability. If you don't like the design choice in a given gallery, you very likely can change it (and even add new or changed items to the gallery for future use—more on this later).
If you are a veteran Word user, you might be asking, "Where have all the toolbars gone?" If you are a long-time veteran, in fact, you might be screaming that question at the top of your lungs, perhaps adding a colorful adjective or two. All of the toolbars have been collapsed into the single and less flexible Quick Access Toolbar, or QAT as it is rapidly becoming known. (The exact pronunciation is still under negotion.) Shown above the ribbon in Figure 1.10, the QAT can also be placed below the ribbon, where there is more room.
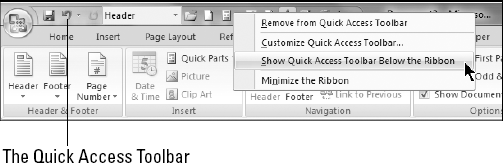
Figure 1.10. The Quick Access Toolbar (QAT) replaces all of Word's earlier user-customizable toolbars.
Note
If you have custom templates that rely heavily upon carefully crafted custom toolbars and menus, there's good news and bad news. The good news is that some of those toolbars might actually still work in Word 2007. Look for them in the Add-Ins ribbon. The bad news is that Word 2007 no longer contains customization tools that let you create and modify multiple toolbars.
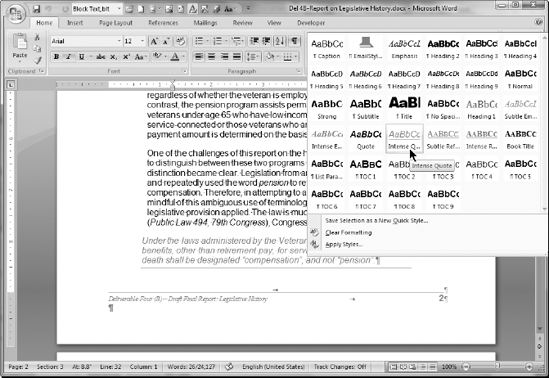
Live preview is a brand-new feature in Office 2007. This feature applies the highlighted gallery formatting to the selection in the current document, enabling you to instantly see the results without actually having to apply that formatting, as shown in Figure 1.11. As the mouse pointer moves among the different gallery options, the formatting displayed in the body of the document instantly changes.
Note that not all galleries and formatting options produce live preview results. For example, in the Page Layout ribbon, none of the Page Setup items produce live previews, nor do the paragraph settings on that ribbon.
Another time you won't see live preview is when working with dialog boxes, such as the Paragraph dialog box. Many of those offer internal Preview panels, but do not take advantage of Office 2007's new live preview capability.
A gotcha in all this newfangled functionality is that sometimes the gallery itself covers up all or part of the live preview. This gets old quickly, and can negate much of the functionality, unless you're blessed with unlimited screen real estate. Maybe that 52-inch monitor isn't such a bad idea after all.
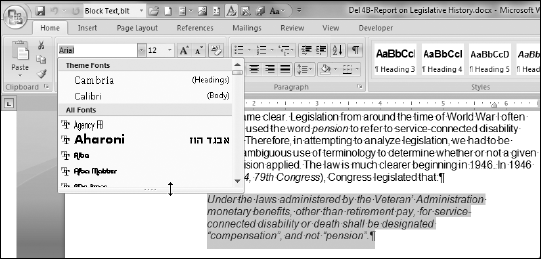
Fortunately, some galleries and controls have draggable borders that enable you to see more of what you're trying to preview, as shown in Figure 1.12. If a control's border is draggable, this is indicated by three dots. Notice the three dots in the lower-right corner of the Style gallery in Figure 1.11, and in the bottom border of Theme Fonts in Figure 1.12. On the lower-right corner, the three dots indicate that the border can be rolled up and to the left. On the bottom, the three dots indicate that the border can be rolled up.
Sometimes, however, it's easiest simply to go ahead and apply the formatting, rather than jump through hoops. If necessary, you can always use the venerable Ctrl+Z (Undo) if you don't like the result.
Warning
When using live preview, it's very easy to forget to click the desired gallery or formatting command when you come to it. Particularly in extensive lists (such as lists of fonts, colors, or styles), it's possible to get exactly the right effect without noticing what it's called. In the case of colors, you usually don't even have a name to use as a guide. Sometimes, the hand really is quicker than the eye. Once you move your mouse away from your selection, it's lost. You might have to re-inspect that entire list to find exactly what you already found, so once you find what you're looking for, don't forget to click! Ctrl+Z is your friend!
Up to now, I've thrown around the word gallery as if it were a common everyday word. Well, it is—but it's taken on expanded meaning in Word 2007. Simply put, a gallery is a set of formatting results or preformatted document parts. Virtually every set of formatting results or document parts in Word 2007 (indeed, in all of Office 2007) might be called a gallery, although Word itself does not use the word gallery to refer to every feature set. Some, such as the list of bullets, are called libraries instead.
Galleries include document styles, themes, headers, footers, page colors, tables, WordArt, equations, symbols, and more. The style gallery is shown in the previous section, in Figure 1.11. Galleries often work hand-in-hand with the live preview feature. Imagine paging through a coffee-table volume of paintings, and each time you point to a different painting, your own house and garden are transformed to reflect the style and period of the painting. Point at a different painting, and your house and garden are retransformed.
As noted earlier, however, not every gallery results in a live preview. As you begin to take advantage of this new feature, you will quickly start to miss it when it's not available. Perhaps galleries will become more prevalent in future releases!
Another new feature in Word 2007 is the MiniBar, more formally known as the Mini Toolbar. The MiniBar is a set of formatting tools that appears when you first select text. It is not context sensitive, and always contains the identical set of formatting tools. There is no MiniBar for graphics and other non-text objects.
When you first select text, the MiniBar appears as a ghostly apparition. When you move the mouse pointer closer to it, it becomes more solid, as shown in Figure 1.13. If you move the mouse pointer far enough away from it, it fades away completely.
Note
Once the MiniBar disappears, you cannot resurrect it by hovering the mouse over the selection. You can, however, display the MiniBar and the current context-sensitive pop-up menu by right-clicking the selection. Note also that only the mouse triggers the MiniBar. If you display the pop-up context menu by pressing Shift+F10 or by tapping the Menu button on a Windows keyboard, the MiniBar will not appear.
Some users will love the MiniBar, others will hate it. I recommend that you give it a try. It exists to provide convenient and discoverable access to commands that are otherwise less convenient and less accessible than they were in Word 2003 (with the disappearance of toolbars and menus).
When the Home ribbon is exposed, the MiniBar might seem superfluous, as all of the MiniBar's components are replicated in that ribbon. However, consider for a moment how far the mouse has to travel to access those formatting commands. With the MiniBar, the mouse pointer usually has to travel less than an inch or so. For those with repetitive motion injuries, this can save a lot of wear and tear on the wrist.
If you decide that the MiniBar gets in the way, you can turn it off. Even when turned off, however, it can still be summoned by right-clicking the current selection. To turn it off, see Chapter 6.
Note
Unlike many ribbon tools, the MiniBar tools do not produce live previews of formatting and other effects. If you need to see a live preview, use the ribbon instead.
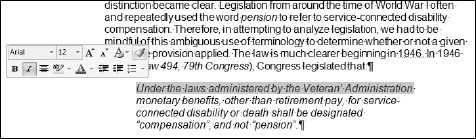
While Word's main menu system has been almost entirely replaced by ribbons, Word's context menus, often called pop-up menus, remain. Shown in Figure 1.14, context menus remain largely unchanged from Word 2003, except for the fact that when text is selected, the MiniBar accompanies the pop-up.
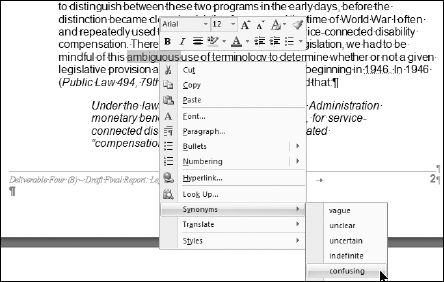
Figure 1.14. When you right-click a selection, a context-sensitive pop-up menu appears, along with the MiniBar.
Note
While context menus remain in Word 2007, the ability to customize them is gone.
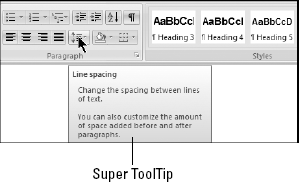
Another new addition to Word 2007 is super tooltips. The very name makes you want to leap over tall buildings! In Word 2003 and earlier, tooltips showed only the name of the command under the mouse pointer. Super tooltips, instead, are expanded feature descriptions designed to make features more discoverable, as well as to reduce the frequency with which you'll need to press the F1 key for Help. (As it turns out, this is a blessing, because Word 2007's Help system isn't exactly what the doctor ordered. I'll have more to say about that later.)
Shown in Figure 1.15, a super tooltip magically appears when you hover the mouse pointer over a tool. If you hover the mouse pointer over an exposed gallery item (such as a style), however, you will see a live preview of the gallery item instead of a super tooltip. Even better!
Even though Office 2007's new philosophy focuses on the results-oriented ribbon, some features and functions remain tied to traditional dialog boxes. Dialog boxes can be launched in several ways, including by direct keystrokes and what Microsoft calls launchers. Launchers are indicated by an arrow pointing southeast in the lower-right corner of ribbon groups, as shown in Figure 1.16.

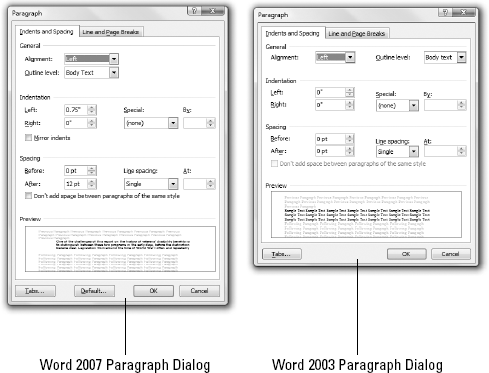
In many instances, Word's dialog boxes have not been overhauled or greatly enhanced for this release. However, if you look closely, you often will see a number of changes, some subtle and others not so subtle. Figure 1.17 contrasts the Paragraph dialog boxes from Word 2007 and 2003. Sometimes, if you look really closely, new features will leap out at you!
Word 2003 sported a collection of 14 task panes (or more, depending on what features are installed and in use). The task pane was activated by pressing Ctrl+F1, and included Getting Started, Styles and Formatting, Clipboard, Mail Merge, and others. As noted earlier in this chapter, in Word 2007, Ctrl+F1 now toggles the ribbon on and off.
If Ctrl+F1 is now used for something else, how do you activate the task panes in Word 2007? The short answer is that task panes, as a cohesive concept, has been mostly abandoned. Word 2007 still has some task panes, but you can't access them using a drop-down menu as you could in Word 2003, and you can't access the entire collection of task panes using a single keystroke. Instead, they will appear as needed (and possibly when you aren't expecting them). Think of them as dialog boxes that enable you to type while they're onscreen.
In the Home ribbon, click the Styles dialog launcher. This displays the Styles task pane. Now click the drop-down arrow to the left of the X in the upper-right corner of the task pane, as shown in Figure 1.18. Instead of a list of task panes, you get three options that control only this task pane. Like their counterparts in earlier versions of Word, task panes in Word 2007 can be dragged away from the right side of the Word window and displayed wherever it's convenient—including completely out of Word's window frame. Just move the mouse pointer over the Styles title bar and drag. To return it, just drag it back, or double-click the floating task pane's title bar.

Figure 1.18. Word 2007's task panes are independent of each other and can't be selected from a common pull-down control.
Note
Is there something missing from the Styles task pane? In Word 2003, the Styles and Formatting task pane always shows the style of the current selection. That doesn't always happen in Word 2007, because the Style gallery is limited in the number of styles it can display and it doesn't automatically scroll to the currently selected style. If you want a pre-Word 2007-like Style tool, there is a partial solution. See Chapter 9 for the details.
Other Word 2007 features that manifest as independent task panes include the Mail Merge Wizard, Clip Art, Protect Document, Research, Document Management, the Clipboard, and the Style Inspector. While it might seem a bit odd for Microsoft to have unbundled the task panes, a quick look at Figure 1.19 demonstrates a decided advantage of the new approach. While you probably won't need to have them all onscreen at the same time, it's nice to know that you're no longer limited to just one at a time.
Now we turn to the status bar, neglected until now. Shown in Figure 1.20, the status bar is the bar at the bottom of the Word window. The status bar provides more than 20 optional pieces of information about the current document. Right-click the status bar to display the status bar's configuration options.
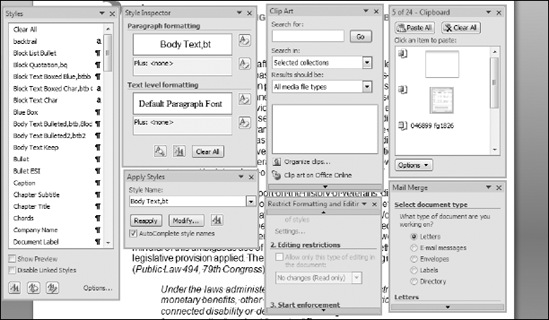
Figure 1.19. With Word 2007, you can display multiple task panes at the same time, should you feel a compelling need for clutter.
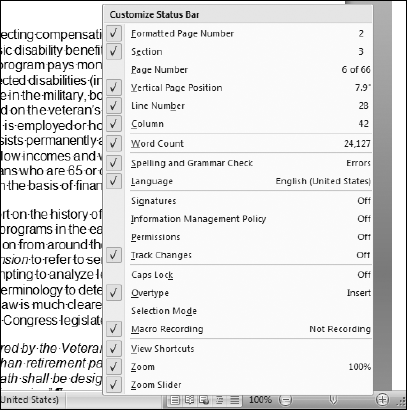
Do you need to keep track of the word count? Not only does Word 2007 update the Word count continuously, but if you select text, it tells you how many words are selected: 180/5,644 means that 180 words are selected out of a total of 5,644.
Note
The status bar configuration menu stays onscreen until you explicitly dismiss it. That means that you can enable/disable as many options as you want without having to repeatedly right-click the status bar. Notice also that the configuration menu displays the current status too, so if you just want to quickly refer to it to find out what language you're using—but don't really want Language on the status bar—you don't have to put it on the status bar and then remove it. Note additionally that the status items aren't just pretty pictures. For example, clicking the Page item takes you to the Go To Page dialog box. Clicking the Macro Recording item opens the Record Macro dialog box.
To dismiss the configuration menu, simply click on the status bar or in the document, or press Esc, Enter, or the spacebar.
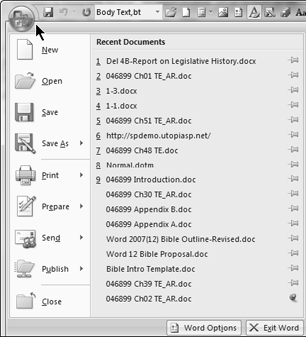
The Office button is that large, round control in the upper-left corner of some of Office 2007 applications. I say some because the Office button has not found its way into the 2007 version of the main Outlook window, the Office Picture Manager, InfoPath, or Publisher. The Office button, which has been clicked in Figure 1.21, displays a number of top-level commands that you ordinarily might expect to find in the File menu. Just in case you didn't notice, the Office button design is the Office logo, the detail of which might be hard to discern on some computers.
Why the Office button? Why not File? Microsoft was looking for a unifying new theme for Office 2007. It's as simple as that. Moreover, many of the functions contained therein really have nothing to do with files per se.
In Word's Office menu some of the commands—Save As, Print, Prepare, Send, and Publish—have right-pointing triangles. These triangles indicate the presence of additional subcommands.
As shown in Figure 1.22, it pays to explore in Word 2007. By clicking each of the expandable commands in Word's Office menu, the seasoned Word user will quickly discover a number of new features: PDF files, XPS files, the Document Inspector, the compatibility checker, and blogging, to name a few. You'll also find legacy features hiding there.
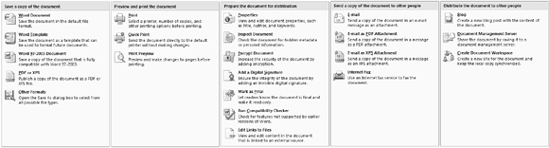
Figure 1.22. Save As, Print, Prepare, Send, and Publish reveal a number of capabilities new in Word 2007.
Note
Depending on what features are being used, your Office menu might include additional items. For example, if the current document is located on a SharePoint server, you'll also see a Server Tasks button, between Publish and Close.
In addition, because of a dispute between Microsoft and Adobe on the inclusion of PDF publishing in Word 2007, the capability to publish in PDF and XPS format is excluded from the default installation of Office 2007. However, you can download a free patch for Office 2007 that restores the functionality seen in the Save panel shown in Figure 1.22. See Chapter 29 for details.
When you wanted to change something about Word 2003 or earlier, you had multiple places to look, including Tools
Note
Figure 1.23 is a bit fraudulent, I have to admit. In order not to waste a lot of space, I've neatly resized it so it's no longer larger than the state of Rhode Island. That you can resize it is the good news. The bad news is that Word refuses to remember that you resized it, and the next time you open it, it's back just as big as ever. In fact, in some dual-monitor configurations, it's possible that Word Options won't obey Windows' normal rules, and Word Options will span both monitors each and every time you open it.
Although all of Word's options are now in one place, so to speak, that doesn't necessarily make them any easier to find. Navigating Word Options can be daunting.
Word Options has nine sections, or tabs, on the left. Do not be fooled by the labels. Note that one of the tabs is called Advanced. Microsoft's idea of Advanced might not be the same as yours. What's optional for someone else might be essential for you.
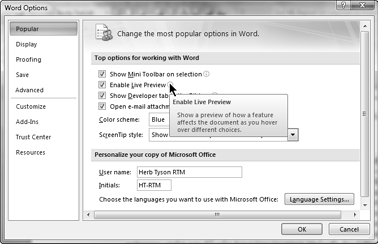
Microsoft's logic is to try to put at the top of the list the controls and options they think you are most likely to want to change. The first set, Personalize, is therefore the group they think will matter most to the typical user. If you're reading the Word 2007 Bible, however, you might not be a typical user. Keep this in mind as you look at the nine tabs.
Another "don't be fooled by the labels" caveat is that the labels aren't even objectively accurate. For example, there is a tab labeled Display. If you don't find the display option you're looking for there, don't give up. Some "Display" options actually reside in Personalize, such as Show Mini Toolbar on Selection, Enable Live Preview, Show Developer tab in the Ribbon, and Open e-mail attachments in Full Screen Reading View. Oh, wait. That's all of the top options!
A number of "display" options are also sheltered under the Advanced umbrella, including great favorites such as the Show Document Content options, the Display options (duh!) and Provide Feedback with Animation (under General). Still other display options are to be found hiding in various other dark corners and recesses. If you can't find something you know must be there, check the index in this book.
Options are covered in detail in Chapter 47, "Options and Settings." I urge you to click each of the nine tabs to explore the different options that are available. Mostly, this is so you can learn the answer to "Where did they hide it?" Additionally, however, it will enable you to learn about new options that correspond to new features.
If you're at all like me, you might be wondering "How did Microsoft decide what's advanced and what's not advanced?" We'll probably never know. More important than understanding the logic is simply becoming familiar with the lay of the land so you know where things are, rather than having to look all over the place each time you want to know how to change a setting.
The Advanced tab, partially shown in Figure 1.24, has ten major sections (depending on how you count them, of course). Also depending on how you count, the Advanced tab offers more than 150 different settings, including the Layout Options.
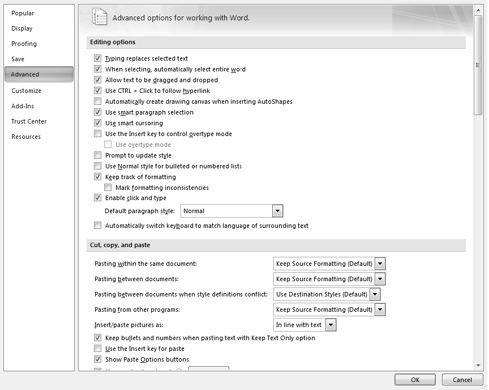
Remember those nice information icons so prevalent in the Personalize tab? The Advanced tab has only four of them! Out of more than 150 different settings, there are information icons for only four!
Scroll down a bit so you can see both the Save and Preserve Fidelity sections at the same time. Is there any doubt in your mind what "Prompt before saving Normal template" means? Not in mine either.
Now look at "Embed linguistic data." Do you really know exactly what that means? I didn't (I looked it up, so I know now, but there's no cute information button to tell you). Why, do you suppose, did Microsoft choose to provide cute little information buttons for the options whose meanings, for the most part, are already patently obvious? Clearly, they must not know what "Embed linguistic data" means either!
To find out what these advanced options are, simply select the option and press F1. Not much help, right? Okay, then, type "embed linguistic data" into the Search box (including the quotes) and click Search for the really helpful view shown in Figure 1.25.
Tip
In many instances, but not always, you can find Help on what you want by typing the exact feature name (e.g., "embed linguistic data") into the Search box, pressing Enter (which usually returns "No results"), and then clicking the Support Knowledge Base link.
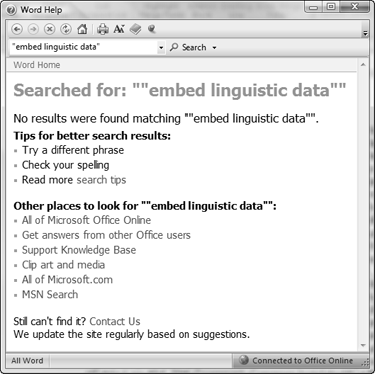
Clearly, Help needs Help. You will find useful help much more quickly by following the tip shown above, or simply by "Googling" the feature in question. Note that even when you can find Help in Microsoft's Knowledge Base, that help often is couched in Microsoftese, a clever circular kind of writing that repeatedly uses the mystery feature's name in lieu of actually telling you what the feature does or means. Searching other sources online often nets you more useful information because the very existence of such sources likely is the result of someone's frustration in trying to parse the "official" sources.
In this chapter, you've had a look at many of the exciting, new, and different facets of Word 2007. You've seen the philosophy behind the changes (discoverability) and the implementation (the ribbon). You've also learned a number of ways in which Word 2007 is similar to earlier versions, and a number of ways in which it's different. You should now know what people are talking about when they mention the following:
Ribbon tabs
The Quick Access Toolbar
Live preview
Super tooltips
Galleries