Using the Office 2007 Clipboard
Windows Clipboard versus the Office Clipboard
The Clipboard task pane
Managing Clipboard items
Paste Special
Alternatives to the Clipboard
The Microsoft Office Clipboard has grown and expanded well beyond its original single-item facility. For those of us who began computing life in the days before GUI and Windows, this single innovation revolutionized the way we used computers. It has no doubt saved millions of pieces of scrap paper.
The Clipboard is a temporary storage area you can use to transfer text, files, pictures, and other objects between different programs or different parts of a single program. You copy or cut text from one location, and then paste it in the destination location.
Windows itself has a Clipboard that you can use in just about any Windows program. Like the Office 2007 Clipboard, Windows' Clipboard can be used to transfer files, pictures, sounds, text, and so on. Unlike the Office version, however, the Windows Clipboard stores only a single item at a time.
The Office 2007 Clipboard can store up to 24 items (as could that of Office XP and 2003). Each time you add something new, it goes on top of the list. When the Clipboard reaches 24 items, adding another item causes the last item to disappear.
When you use the ordinary Paste command (Ctrl+V or clicking Paste in the Home ribbon), you access the first item, which is at the top of the list. You also get the top item when you use Paste in a non-Office program.
Using the Office Clipboard task pane, however, you're not limited to the top item in the list. You can access any of the (up to) 24 items in the Office Clipboard.
The Clipboard can contain all kinds of things—graphics, text, spreadsheet cells, PowerPoint slides, Word documents, sounds, and more. If there is an upper limit on the size of any given Clipboard item in Windows XP or Vista, I haven't found it.
The Office Clipboard, however, is not fully integrated into Windows itself. Each new copy or cut is added to the Office Clipboard, regardless of the program in which the copy or cut is performed. Only Office programs (and not all of those), however, can access all items in the Clipboard. As indicated, non-Office programs such as Notepad and Internet Explorer, for example, can only access the "top" item.
While it might be nice to copy a series of distinct items from the Clipboard into a series of fill-in fields in Internet Explorer, it's not (yet) possible. For that capability, you would need to explore the wonderful world of Windows add-ons, or venture into the future.
To use the Clipboard with the keyboard, select the text or other object you want to copy or move using standard Windows selection techniques. Then press Ctrl+C (Copy) to copy text, or press Ctrl+X (Cut) to move text. Use the cursor keys or other navigation keys to move to where you want the text copied or moved, or select what you want replaced. Then press Ctrl+V (Paste).
You should also know that the three main Clipboard keystrokes are redundantly assigned to legacy keys: Ctrl+Insert for Copy; Shift+Insert for Paste; and Shift+Delete for Cut.
Note
Cut works only in editable windows. If you try to cut text from a normal Internet Explorer window, for example, it won't work. You can't "cut" that 105(from the Weather Channel's forecast. If it's an editing window, such as a fill-in text area or a blogging composition window, then you likely can cut text for use elsewhere, or for moving around in the same editing window.
To use the Clipboard with the mouse, select what you want to copy, right-click the selection, and choose Copy or Cut. Click where you want the text to go, or select the text you want to replace. Then right-click and choose Paste.
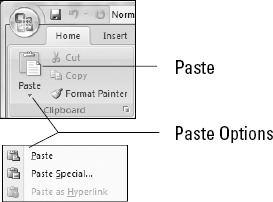
If you're more comfortable using Clipboard icons or tools, the traditional Clipboard tools are available in the Clipboard section of the Home ribbon, as shown in Figure 10.1. Select what you want to copy, click the Cut or Copy button, move to the desired location (or select what you want replaced), and click Paste. Note that the Paste button has an upper portion and a drop-down menu. To perform the default paste operation, click the upper portion of the button.
Tip
What do you do if the Home ribbon isn't active when you need the Clipboard? You can add it to the QAT. To add the entire Clipboard group, right-click the word Clipboard and choose Add to Quick Access Toolbar. To add just Cut, Copy, or Paste, right-click the individual button(s), and choose Add to Quick Access Toolbar.
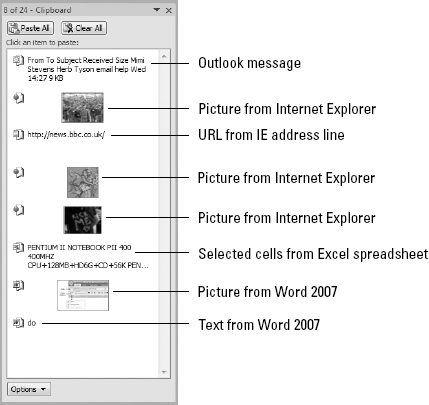
Clipboard refers not only to the storage location, but also to the Clipboard task pane, shown in Figure 10.2. Shown here, the Clipboard task pane contains an Outlook message, several pictures from Internet Explorer, a URL, some cells from an Excel spreadsheet, along with a picture and some text from Word.
Referring to Figure 10.1, notice the Paste Special option. Paste Special options offer alternative ways to interpret the top item in the Clipboard. With formatted text copied from Word to the Clipboard, typical options are shown in Figure 10.3.
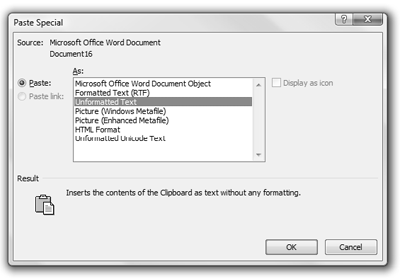
Figure 10.3. A formatted text Clipboard item from Word offers some perhaps unexpected options, such as Paste as Picture.
Note
Edit Paste Special can still be accessed using the legacy keystrokes Alt+E,S. It also is assigned to Alt+Ctrl+V.
Paste inserts the item in the format indicated at the insertion point. Paste Link creates an OLE bookmark around the selected text or object and inserts a LINK field code with a reference to the document name and bookmark where the source is located. You'll learn more about the LINK field in Chapter 21. Bookmarks are covered in Chapter 32.
If the source is ever deleted or otherwise unavailable when the document that contains the link is updated, Word will indicate that the source cannot be found, and the update will fail. This, of course, is a lot better than replacing the displayed item with an error message.
Warning
If you notice stray bookmarks with names like OLE_LINK3 in your document, don't delete them without considering possible consequences. If you know where the one in question came from and still want to delete it, that's fine. If its existence leaves you scratching your head, leave it alone, as something else in that document or another document probably depends on its presence there.
By default, if the Office 2007 Clipboard is open (i.e., if any Office 2007 program that uses it is open), then each time you copy or cut something in Windows, it is added to the Clipboard, regardless of the program of origin. This does not require that the Clipboard task pane be displayed. If no Office 2007 program is open, then the Clipboard reverts to Windows' one-item wonder.
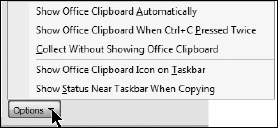
I said by default because this behavior can be changed. Display the Clipboard task pane by clicking the Clipboard launcher in the southeast corner of the Clipboard group on the Home ribbon. Click the Options button to display the options shown in Figure 10.4. The purpose for each option is described in Table 10.1.
Table 10.1. Clipboard Options
Show Office Clipboard Automatically | Automatically displays the Office Clipboard when copying items using the mouse, keyboard, or ribbon tools |
Show Office Clipboard When CTRL+C Pressed Twice | Automatically displays the Office Clipboard when CTRL+C is pressed twice (and sometimes just once) with a copyable item selected |
Collect Without Showing Office Clipboard | Automatically adds items to the Office Clipboard even if the Clipboard is not displayed |
Show Office Clipboard Icon on Taskbar | Show the Office Clipboard icon in the notification area of the Windows taskbar when the Office Clipboard is active (may be hidden) |
Show Status Near Taskbar When Copying | Displays a message near the Windows notification area when copying or cutting items to the Office Clipboard |
While the second option indicates that two presses of Ctrl+C causes the Clipboard to appear, that's not always the case. If no text is selected, the Clipboard won't appear. If text is selected, sometimes just a single press of Ctrl+C will cause the Clipboard to show.
In addition to pasting using the Paste tool, pop-up menu, and keystroke, you can also paste from the Clipboard task pane as well. You can paste all of the items from the Clipboard, or you can paste a single item.
To paste the entire contents of the Clipboard, move the insertion point to or select where you want the pasted item(s) to go, and choose Paste All at the top of the task pane.
To paste a single item from the task pane, move the insertion point to or select where you want the pasted item(s) to go, and then click the item in the task pane. You can paste from any location in the queue. Unlike Ctrl+V or clicking the Paste tool, you are not limited to the item at the top of the list.
Pasting from the Clipboard task pane does not affect the queue itself. To remove a single item from the Clipboard, right-click the item and choose Delete. Any items below that one in the list moves up. If the most recent Copy or Cut had caused a former twenty-fourth item to be removed from the list, deleting one above it will not restore that item. The Clipboard's limit really is 24 items—there is no invisible storage location for items 25 and beyond.
To empty the Clipboard, click Clear All at the top of the task pane. Another way to empty the Clipboard is to close all Office programs. Yes. That's the bad news. Office 2007 will not remember the Clipboard's items 2–24 after all Office programs are closed. The good news, at least for any individual Windows session, is that if you keep Outlook open all the time, which many users do so they can receive e-mail at any time, the Clipboard is maintained when you close Word. After all Office programs are closed and you reboot, however, the Clipboard's contents are lost. See "Copying and Moving Text without Using the Clipboard" later in this chapter for some less fragile alternatives to the Clipboard.
Tip
If you have to reboot but will need the Clipboard's contents in a later session, open a new document file and choose Paste All in the Clipboard task pane. Then save that document. Now the contents of the Clipboard, even if not actually on the Clipboard, can be accessed.
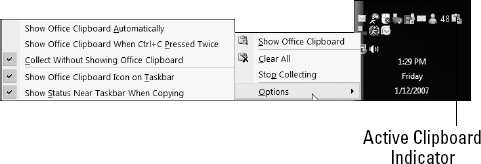
The fourth option shown in Figure 10.3 provides a method for knowing that the Office Clipboard is active, even when it's not displayed. Right-click the Clipboard icon in the Windows notifications area (the system tray) for the options shown in Figure 10.5.
The fifth option provides assurance when the Clipboard task pane is not displayed, by letting you know that something has been added to the Clipboard, as shown in Figure 10.6. The message appears close to the notification area.
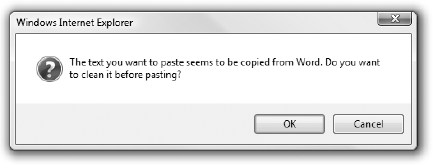
One of the more challenging nuances of pasting from Word into other programs, especially Internet Explorer, is the fact that Word's HTML sometimes contains more information than is needed. This sometimes is called TMI (too much information). HTML information overload can be the case even when pasting text, pictures, and formatting. One of the nicer benefits of the new Internet Explorer is that it now recognizes when Word is the source of the HTML and offers the prompt shown in Figure 10.7, providing a remedy for TMI.
Speaking of TMI, when working in Word there are a variety of ways of taming the Clipboard's pasting behavior. These include direct intervention, by choosing Paste Special, as well as changing Word's default pasting behavior. With a little bit of knowledge and effort, you should be able to carve out a solution that works for you in most cases, as well as an intervention strategy to help deal with the exceptions.
We've already looked at a favorite trick, which can give you a single keystroke to paste the Clipboard as unformatted, rather than having to go through the menu. See Chapter 4's Top Ten Power Tips for the particulars.
You might be wondering what happens when you use the Paste Unformatted keystroke when the Clipboard's target contains something Word can't handle. For example, suppose you copy a graphic to the Clipboard and then try to paste it as unformatted. If you use the menu, unformatted text will not be an option. If you use the macro from Chapter 4, however, you will get an error message indicating that the data type is unavailable. Either way, the Clipboard won't let you paste text from a graphic (although, you can paste a graphic from text; see "Picture This," coming up next).
While the Clipboard won't perform OCR (optical character recognition) for you, it will let you do the opposite—paste a picture of your text. This can be useful for a variety of reasons, including when you want non-editable text for use in a document, or when you want something that looks like text but can be manipulated as a graphic.
To paste a "snapshot" of text (which can include graphics, by the way), select the target section of the document and copy it to the Clipboard. Move to the destination, click the expansion arrow on the paste button and choose Paste Special (refer to Figure 10.3). Choose either Picture (Windows Metafile) or Picture (Enhanced Metafile). Sometimes one works, but not the other, and vice versa. Use whichever result works and looks best (assuming both work). Note, however, that the picture is limited to one page. If the text spans multiple pages, anything beyond one page will be truncated.
Now suppose you have a carefully assembled 24-item Clipboard that contains two years' worth of monthly data that you don't want to disturb, but you still have text, graphics, or something else you need to copy or move. What then? Word provides at least five different methods for copying and moving stuff without using the Clipboard. In fact, if you take a hint from one of the methods—the Spike—you'll see that there are myriad other ways as well.
The first you probably already know about, but you might not be aware that it doesn't involve the Clipboard. Select what you want copied (text, graphics, whatever) or moved. Do not press Ctrl+C or Ctrl+X or otherwise invoke the Copy or Cut commands. Instead, to move the selection elsewhere, simply drag it to the desired location. The Clipboard will never know the difference.
To copy the selection elsewhere, drag it to the desired location, but press the Ctrl key before you release the mouse button. As shown in Figure 10.8, the mouse pointer grows a + indicator, signifying that the action will copy rather than move the selection.
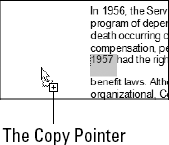
Figure 10.8. The + added to the pointer indicates that the Ctrl key is pressed and that you are copying text, rather than moving it.
Note that when dragging text from Word to another program, such as Internet Explorer, Word automatically copies, rather than moves, the text. For example, you can copy a phrase or a name from Word into the Google (or other) Search text fields in Internet Explorer. You do not need to press Ctrl in this case.
Tip
Another option is to drag a copy of the text to the Desktop. This creates a document scrap that can later be dragged either into another Word document or into some other application. Depending on the receiving application, the formatting is sometimes retained. For example, if you drag all or part of a table to the desktop, and then into another Word document, it looks pretty much the way it did in the original document (subject to different style definitions, of course). Word scraps dropped into Notepad are not usable, however, whereas dropping scraps into WordPad usually works fine. Scraps dropped into Excel become embedded Word objects. Before you rely on scraps, experiment; and by all means, ask your vet if they're safe for your pets. In addition, be aware that some antivirus programs think that scraps are viruses, so if you aren't able to access them, that's possibly why.
Another method might be one that you're not familiar with. It's a new trick that goes back to Word for DOS. Using the mouse or keyboard, select the text or other items you want moved or copied. To move the selection elsewhere, press F2. To copy it, press Shift+F2. The left end of the status bar now prompts "Move to where?" or "Copy to where?" as shown in Figure 10.9.
Next, using any method you choose, move the insertion point to where you want to move the selection (or select the text or other items you want the current selection to replace). Then press Enter. If you select text as the new destination, the destination text is indicated by a dotted selection underline that is distinct from Word's normal selection highlighting, as shown in Figure 10.10.
In addition to deleting and cutting, there is a third kind of deletion called the Spike. Named for those bureaucratic weapons that decorate the desks of receipt collectors, the Spike is used to collect text you delete, with an odd and sometimes useful twist. Word puts each spiked item into its own paragraph, adding the paragraph mark from which the spiked item resided before its spiky demise.
Like the physical spike, Word's Spike collects deletions in LIFO (last in, first out) order, with the oldest spiked deletion at the bottom and the most recent deletion at the top. Unlike the physical spike, however, Word's Spike won't let you remove one piece at a time—it's all or nothing.
The Spike is actually a special AutoText entry that Word creates for you on demand. To use the Spike, select the text you want to collect and press Ctrl+F3; this deletes the text, copying it to an AutoText entry named Spike. If you want to copy text rather than move it, immediately press Ctrl+Z. This restores the deleted text, but does not affect the copy of it already stored as Spike. Continue collecting pieces in this way.
When you're ready to use the contents of the Spike, move to the destination location. To insert the contents of the Spike and empty it at the same time (empty means deleting the Spike AutoText item), press Ctrl+Shift+F3. To simply use the Spike contents, type spike and press F3, or locate it among the Building Blocks.
Recall that the Office Clipboard's items 2–24 are lost when Office is closed. The Spike, because it is an AutoText entry, resides with your Building Blocks. As long as you don't use the Ctrl+Shift+F3 insertion method, the Spike continues to live on when you close Word, reboot Windows, and so on. Long live the Spike!
Tip
If you haven't guessed by now, Spike isn't the only AutoText or Building Block you can use to store text that can be retained between Office sessions. Moreover, you can also use AutoCorrect. The item can be deleted when it's no longer needed.
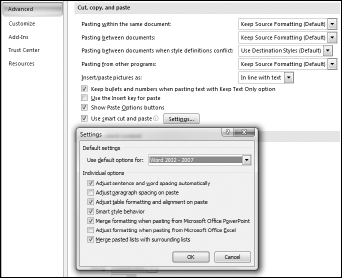
If you don't get the results you expect or want when you paste, it's possible that you can modify Word's default behavior. Choose Office
In this chapter, you've learned about the relationship between the Windows Clipboard and the Office Clipboard, as well as the differences. You've learned how to control when the Clipboard appears, as well as how to prevent it from appearing at all. You should now know how to do the following:
Accumulate items on the Clipboard without it being visible
Paste individual items from the Clipboard, or paste the entire Clipboard in one fell swoop
Use the Clipboard's Paste Special option to control the formatting of pasted text
Use alternatives to the Clipboard when the Clipboard's contents need to be preserved for another purpose
Find the options that control Word's default pasting behavior

