
The ins and outs of the Styles tool on the ribbon
Using, creating, and modifying styles
Using, creating, and modifying Quick Style sets
Managing styles
Inspecting styles
Styles are the seat of power in Word—any version, not just Word 2007. Word 2007 includes additional tools that make using styles for formatting more powerful and more flexible. The dizzying array of options might leave you scratching your head in wonder and amazement, but perhaps in confusion as well. In fact, much of how Word 2007 goes about its business might seem shrouded in mystery, since there are so many unfamiliar elements.
This chapter sorts things out, solving the mysteries, reducing the confusion, and giving you a handle on which tools to use for what. It looks at new concepts and tools, such as Quick Styles and Quick Style sets, the Style Inspector, the Apply Styles task pane, and the Styles task pane. It ties these features together and shows how they relate to legacy Word tools, such as the Modify Styles dialog box and the Organizer.
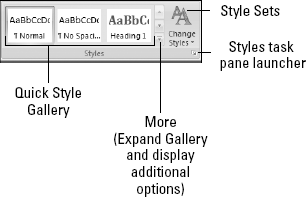
The most visible ribbon control for applying and changing styles is the Styles group (chunk) in the Home ribbon. Seemingly simple, the Styles group is the tip of a rather large iceberg.
On its face are four controls, shown in Figure 9.1: the Quick Style Gallery, Style Sets, Expand Gallery and the Styles task pane launcher.
Note
The word "quick" very likely will confuse many users. You might also notice that the term "Quick Style" also applies to the gallery used for SmartArt. These are not related. One way to deal with the disconnect is to think of them as different kinds of styles—one you apply to text elements, the other you apply to certain kinds of graphic elements. We will look at SmartArt "styles" in Chapter 18, "Pictures and SmartArt."
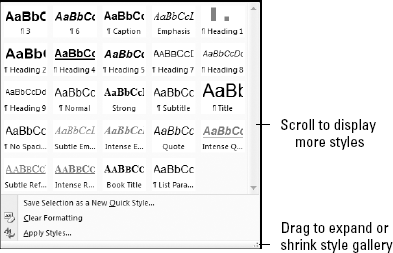
In a normal screen configuration and resolution, the Quick Style Gallery shows only three to five styles. In a very high resolution setup with a sufficiently wide monitor, it can show up to a dozen styles without having to use the Expand Gallery control. Clicking the More button shows more of the styles in the Quick Style Gallery, as shown in Figure 9.2. If there are still more styles in the gallery, they can be accessed using the vertical scroll bar or by dragging the right corner control to expand or shrink the size of the gallery.
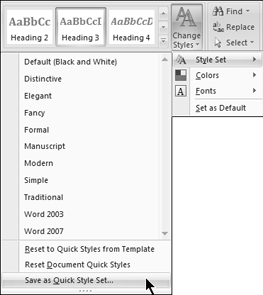
The Styles group also provides access to Style Sets. If you click Change Styles, you see additional new toys, shown in Figure 9.3. The options shown—Default (Black and White), Distinctive, and so on, are carefully constructed sets of styles that are coordinated to help you quickly change the look of your document. (you'll see where those style sets come from later in this chapter.)
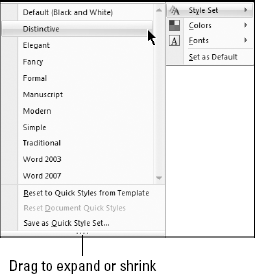
Figure 9.3. Style sets offer additional coordinated styles to help achieve a different "look" for your documents.
Notice also the Colors and Fonts controls. These tools work with themes, which aren't the same thing as styles. Like style sets, themes can be used to dramatically change the appearance of your document. Unlike style sets, however, they are tied to the use of theme elements in your document.
Note
Theme is a feature new to Word 2007, and does not work with compatibility mode documents. In the Change Styles list, Style Set is available, but Colors and Fonts are not. These features are available, however, not only when working with Word 2007 documents, but also when working with web-oriented documents (*.mht, *.htm, *.html, etc.). Themes are explored in Chapter 25, "Page Setup and Sections."
The effect of different style sets—indeed, seeing any effect at all—depends on your having used styles in your document. If you simply use the style Normal, then at most applying a new Style set will change the font. For maximum benefit from Word's new style features, you need to lay the proper foundation, which means using styles to differentiate different kinds of text (headings, body, captions, etc.).
When you first start typing in any Word document, you're automatically using the default style. Ordinarily, that would be Normal.
Note
The style named Normal is wholly independent of the fact that there is a Word template named Normal.dotm. Normal.dotm contains many different styles, and one of them happens to be named Normal. In fact, every Word template contains a style named Normal. This is nothing more than an unfortunate, confusing, and creativity-challenged choice of names. They could have named Word's default style Base or Body, and I really wish they had. It would make notes like this one unnecessary. Fortunately, Normal view has been renamed Draft view, so at least we no longer have to deal with that added bit of creativity-challenged confusion.
As you type different parts of any document, you should consider applying an appropriate style. For example, if you type a heading, consider applying a heading style to it, such as Heading 1, 2, or 3. To do this, click the heading style in the Quick Styles Gallery, as shown in Figure 9.4. If Heading 1 isn't showing, then click the More button to the right of the Styles, also shown in Figure 9.4.
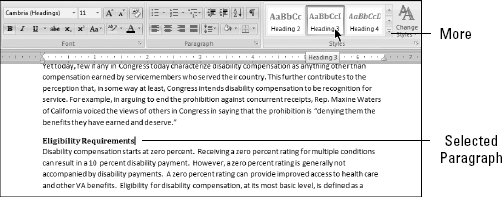
Figure 9.4. Click a style in the Quick Style Gallery to apply it to the current paragraph or selection.
If you're accustomed to Word 2003 or earlier, you can also apply a style in a way that's similar. In Word 2003, you could either click in the Style drop-down tool or press Ctrl+Shift+S. There is no default Style drop-down in Word 2007, but Ctrl+Shift+S activates the Apply Styles task pane, shown in Figure 9.5. Once the Apply Styles task pane is visible, it can be used in a way that's similar but not identical to Word 2003's Style tool.
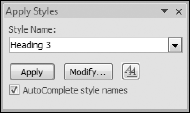
Figure 9.5. Press Ctrl+Shift+S to activate the Apply Styles task pane, which is Word 2007's substitute for Word's earlier Style tool in the Formatting toolbar.
Tip
In the preceding paragraph, I said there is no default Style drop-down tool. There isn't. However, there is one you can add to the Quick Access Toolbar. Unfortunately, you can't assign a keystroke to it, but you can at least use it for setting the style using the mouse. More important, it displays the style assigned to the insertion point all the time, unlike the Quick Style gallery.
To put this tool onto your QAT, right-click the QAT and choose Customize Quick Access Toolbar. Set Customize Quick Access Toolbar to For All Documents (default). Set "Choose commands from:" to "Commands Not in the Ribbon." Click in the list of commands and tap the T key. This displays the first command starting with T, but also exposes all of the commands beginning with "Style." Click on the command named just Style. When you hover the mouse over it, the tooltip says "Style (StyleGalleryClassic)." With Style selected, click Add to add it to the QAT. Click OK, and you're done.
Often, when you use a built-in heading style, it does not suit your needs. The font or point size might be wrong, or, the spacing might be off. No problem. Change it. Or, if you still need the existing style but want a slightly different version for another purpose, create a new style.
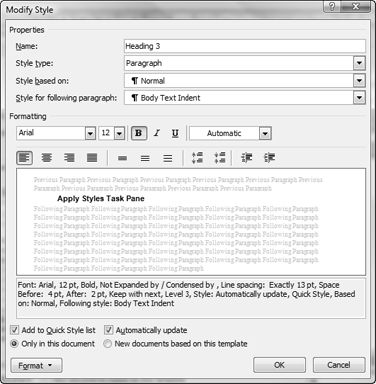
To change an existing style, right-click the style in the Quick Style Gallery and choose Modify. This displays the Modify Style dialog box shown in Figure 9.6. Make the desired change to the style. If the formatting you need to change isn't shown, click Format in the southwest corner and choose from the seven different categories of formatting.
Warning
Keep Automatically Update turned off unless you absolutely need it (for example, if your company's policy requires it be used). The Automatically Update setting can bring much joy or much sorrow. If enabled, when you make changes to Heading 3, for example, those changes are automatically incorporated in the style's definition. All other text in the document formatted using that style will automatically change to reflect the changes in the style's definition. If you're using styles correctly, this can bring great joy.
If, on the other hand, you've misused Body Text throughout the document, applying direct formatting in various locations to make it "look right," then you could be in for an unpleasant shock. Suppose a modified Body Text style sometimes is used on a heading, other times used for a caption, and other times for other purposes. Each time you modify the Body Text style in one place, all other instances in your document also change, undoing your careful direct formatting. This can happen without you realizing it, because the updated instances may be miles away in another part of the document. By the time you see what's happening, it might be too late for a Ctrl+Z miracle. On the bright side, the Automatically Update option does not exist for the Normal style. This option was the cause of much grief in Word 2003 and earlier. Its removal from the Normal style in Word 2007 will prevent a great many self-inflicted mishaps!
While there is a special New Style dialog box you can use (available from the bottom of the Styles task pane and the Manage Styles dialog box, for example), you aren't limited to that method. In Figure 9.6, where it says Heading 3, you can type a new style name. When you click OK, the style is created!
Another way to modify a style assumes that Automatically Update is not enabled, and that Prompt to Update Style is enabled. Choose Office
Use whatever formatting controls you like—ribbon, keyboard shortcuts, dialog boxes, and so on—to tweak text so that it looks the way you want. When you've got it looking just so, you can either create a new style or modify the current one. Note that you should modify a given style only if you want all other text formatted with that style to be formatted the same way.
To create a new style, type the new style name in the Style Name box in the Apply Styles task pane, and then press Enter to apply it.
To modify the existing style, click Reapply on the Apply Styles task pane. Or, reapply the current style using some other method such as the Quick Style Gallery or a keyboard shortcut. Word now prompts you with the dialog box shown in Figure 9.7. Note that you will never see this dialog box if the current style is Normal. Normal marches to a different drummer, and is designed to resist easy changes that might have major unintended consequences.
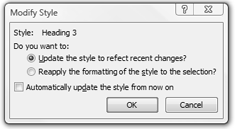
Figure 9.7. The Advanced Word option Prompt to Update Style tells Word to prompt you when you attempt to reapply a style (other than Normal) to text that contains formatting that differs from the current style's settings.
Choose the Update option to redefine the current style according to the formatting in the current selection (that's what "recent changes" really means—it doesn't mean "in the last week or two"). The Reapply opmtion will undo your direct formatting and reapply the original style. Note that "Automatically update the style from now on" enables (checks) the Automatically Update checkbox in the Modify Style dialog box. Think long and hard before you ever check that checkbox!
Another way to perform style-by-example is to use the RedefineStyle keyboard assignment trick. You learned about it in Chapter 4, "Making Word Work for You." This assignment, however, doesn't require that the Prompt to Update Style option be enabled.
Warning
Furthermore, RedefineStyle works on the Normal style! This can be good or bad. Consider, for example, that many styles are based on Normal. If you change the font, for example, every style that gets its font definition from Normal changes too. If you change the Before or After spacing, the indentations, the alignment, and so on, then every style that inherits those attributes from Normal will also change. Only rarely will that be exactly what you want.
Quick Style sets are a potentially confusing new addition to Word's formatting arsenal. Quick Style sets get their information from a set of .dotx (not macro-enabled) templates. In the Styles section of the Home ribbon, choose Change Styles
These sets correspond to .dotx files stored in C:Program FilesMicrosoft OfficeOFFICE121033QuickStyles, as shown in Figure 9.8.
Note
These .dotx files contain no text or other formatting, but only style information for 135 built-in styles (no, this is not the entire list; a few notable missing styles are footnote, endnote, header, and footer). To see a list of these styles, copy one of the .dotx files to another file and give it an extension of .zip. Using the technique described in Chapter 5, drill down to the word folder and take a look at styles.xml.
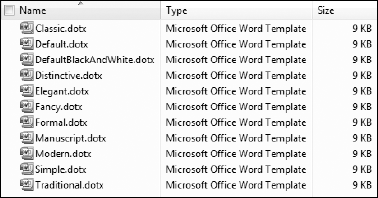
Figure 9.8. The Quick Style sets are stored as .dotx files and can be changed or customized by the user.
When you apply a new Quick Style set by choosing Change Styles
I emphasize style-formatted because if paragraphs have direct formatting applied, then that formatting will not be overridden. The attributes of the selected text that are applied only through a style are changed. For example, if you manually change the alignment of a series of paragraphs from centered to left aligned, then any alignment formatting in a Quick Style set you apply will be ignored.
Quick Style sets are not carved into stone. You can modify the ones that Microsoft provides, and you can create your own.
You should modify the ones that Microsoft provides, by the way, only when a built-in Quick Style set's original form is something you wouldn't be caught dead using. While you can recover the original, it's easier to simply use a different name, such as Classic Bert, so you recognize it as your own variation (assuming your name is Bert).
To easily modify a set that Microsoft provides, open a document that is affected by a Quick Style set, and apply the style set you want to use, using Change Styles
In the Save Quick Style Set dialog, specify the name of the built-in set you want to modify or override. Suppose, for example, that you want a custom version of the Elegant Quick Style Set. In File Name, type Elegant (you don't need to type the .dotx extension). Note that this will not actually modify or overwrite the original file. Then click Save. Or, to create your own Quick Style Set, type a new name (such as My Elegant) and choose Save.
If creating your own style set named Elegant doesn't overwrite Word's version, then how does Word know to use yours instead of its own? As indicated earlier in this chapter, Word keeps its own Quick Style sets in one of the Microsoft Office Program Files folders. It saves your Quick Style sets, however, to the C:Documents and Settingsuser nameApplicationDataMicrosoftQuickStyles folder. When you display the Quick Style sets list by choosing Change Styles
To revert to a Quick Style set that comes with Word, simply delete or rename your own. In general, however, you increase your options by not giving your Quick Style sets the same names as those that come with Word.
Tip
Do you have customized styles in your Normal.dotm file? If so, before working with Quick Style sets, protect your original Normal.dotm Quick Style set by saving it as a unique Quick Style set. To do this, press Ctrl+N to create a new document window based on Normal.dotm. Choose Change Styles
If you've been experimenting with Quick Style sets but now want to revert either to the document's own styles or to those of the underlying template, you probably can. To be able to revert to the document's own original styles, the document must not have been saved and closed. Even when the document has been saved, you can revert to the document's original styles as of when the document was opened.
To revert to the document styles that were in effect at the beginning of the current editing session, choose Change Styles
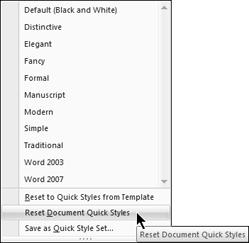
Figure 9.10. As long as the current document hasn't been saved and closed since the last Quick Style set change, you can revert to the document's original set of Quick Styles.
To be able to revert to the styles of the underlying template, you must not have saved Quick Style set changes to the template. Otherwise, reverting won't do anything other than reapply styles that are already in effect. Unlike the document itself, where a mere save doesn't prevent you from being able to go back to square one, a mere save to the underlying template does commit the style changes in that case. If you did that, see the tip at the end of the preceding section.
Assuming that you haven't saved a Quick Style set to your current document template, you can revert to its styles. Choose Change Styles
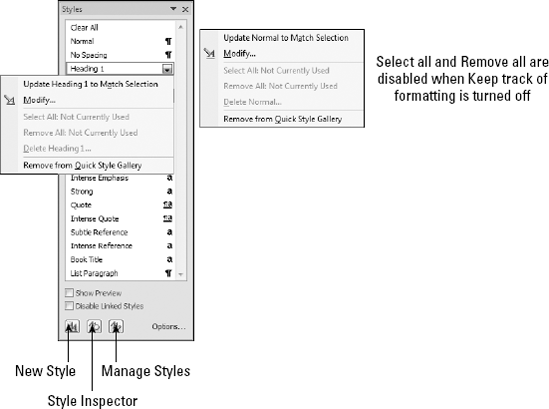
Conceptually, the Styles task pane is the replacement for Word 2003's Styles and Formatting task pane. Shown in Figure 9.11, the Styles task pane provides some of the same functionality, but not all. It also offers some new functionality that Word's earlier task pane didn't have.
Note
In Figure 9.11, notice that styles have three kinds of icons next to them: ¶, a, or ¶a.
The ¶ means that it's a paragraph style only. You cannot apply it to only part of a paragraph, and you can apply it by placing the insertion point anywhere in the target paragraph.
The a icon means that it's a character/text style. It is applied only to selected text. You can apply it to a single word (assuming that "When selecting, automatically select entire word" is enabled in the Editing Options section of Word Options). You can also apply it to a single character or an entire document.
The ¶a icon means that the style can be used as either a character style or a paragraph style. If nothing is selected or if parts of two or more paragraphs are selected, the style is applied to the entire paragraph(s) touched by the selection. If only part of a single paragraph is selected, the style is applied only to selected text.
Does this mean that Heading styles, which use ¶a, can be applied to something less than a full paragraph? You betcha! This can be exceedingly useful when you want to include headings at the beginning of paragraphs, particularly when you want to save vertical space in the document. This is not a new feature, by the way; you could do it as far back as Word 2000.
The options you get when you right-click or use the drop-down arrow vary according to Word's Options settings as well as to whether the selected style is a built-in style or a user-created style. In Figure 9.11, the built-in Heading 1 style excludes the Delete option. You cannot delete a built-in style. You can hide it, but you can't deep-six it.
The Update option at the top of the menu appears even if the option Prompt to Update Styles is not enabled (Word Options
Two extremely useful options, one of them new in Word 2007, are Select All # Instance(s) and Remove All # Instance(s). The Remove All option is new and extremely useful when cleaning up a document's extraneous formatting. Remove does not delete the text in question. Instead, it removes the style wherever it is used, and resets the formatting of those occurrences to the default style for the current document. Ordinarily, that would be Normal.
The Select option is equally useful. Typically, to change a given style to a different style, you might consider using Find and Replace. Indeed, that is an option. However, it's not necessary. Click Select All # Instances, and then click the desired style in the Styles task pane. Or, once the instances are selected, use manual/direct formatting to "sculpt" the text just the way you want it, and then choose New Style at the bottom of the Styles task pane.
Note
In Figure 9.11, why would Select All and Remove All say Not Currently Used when the style is in fact in use? This is an artifact of a Word Options setting. Click the Office button, then Word Options
Remove from Quick Gallery does not remove the style from the document. Instead, it removes the style from the Quick Gallery listing of styles. If the style is not currently in the Quick Style Gallery, the command in the pop-up will be Add to Quick Gallery instead.
Another option available from the Styles task pane is the Style Manager button. Shown in Figure 9.12, Manage Styles is your master control and grand central station for styles. Use this dialog box to create, modify, and delete styles (the latter, only user-created styles).
Use the manager also as a launch pad for the Organizer, via the Import/Export button, which enables you to copy styles between different templates and documents, as well as rename and delete styles (again, only user-created styles can be deleted).
The Recommend tab, shown in Figure 9.13, controls which styles show up on the list of recommended styles. The "recommended" option shows up in each of the style-related task panes, and applies to the styles that are displayed in the Quick Style Gallery. For any style, you can choose to Show, Hide Until Used, or Hide. It's a great way to focus the options when you want to exercise strong control over document formatting. It's better than a whip!

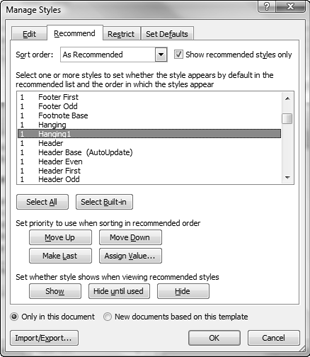
Figure 9.13. Use the Recommend tab to control what styles show up when you restrict style controls to displaying "recommended" styles.
In the recommended list of styles, you can apply your changes one at a time or by using standard Windows selection techniques to select multiple styles. Note the Select All and Select Built-in buttons, too, which enable you to quickly distinguish between Word's standard styles and user-created styles.
Use the Move Up/Move Down/Make Last/Assign Value tools to determine the recommended order. You can even alphabetize them, if that makes more sense to you!
You've heard of the style police? Well, grab your badge! For even stronger style enforcement, the Restrict tab lets you restrict which styles can be used. This is a good tool when designing templates and forms in which you want extremely tight control over the formatting of content. It's also useful in setting up training classes for Word, for which you might want to tame the options a bit to prevent the novice user from being overwhelmed.
Additionally, if you want to enforce the use of only styles—and not direct formatting—the restricted styles capability provides a way to do it. Use "Limit formatting to permitted styles," shown at the bottom of Figure 9.14, to accomplish this feat. This can be useful when setting up forms and templates for specific tasks in which the resulting document formatting must adhere to strict requirements.
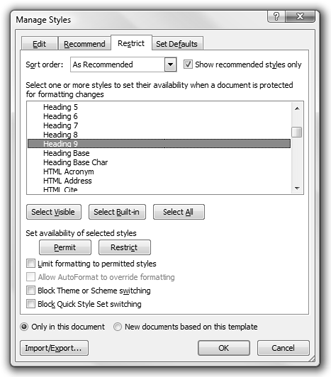
By restricting formatting only to certain styles, you effectively prevent the use of direct formatting tools. As shown in Figure 9.15, when formatting is restricted to Normal and Heading 1 through Heading 5, most of the ribbon Font and Paragraph controls are dimmed as unavailable.
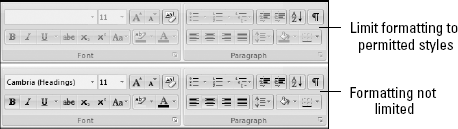
Figure 9.15. In this scenario, formatting is limited to Normal and Heading 1 through 5, which puts the Font and Paragraph direct formatting controls off-limits.
Note that not only can you limit formatting only to permitted styles; you can block Theme and Quick Style switching. If you want to tame "artistic" tendencies of users whose mission statement doesn't include using up all of the colored ink or toner, this provides an avenue of attack. Did I mention that this stuff is better than a whip?
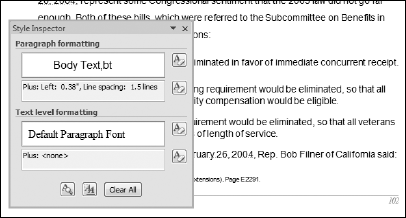
The Style Inspector enables you to quickly determine whether the current formatting is applied wholly through a style, or whether direct formatting is in effect. In Figure 9.16, notice that under the paragraph and text (character) styles there is a box with the word "Plus." In the lower panel, it says Plus: <none>, which indicates that no direct text/character formatting has been applied. In the upper panel, however, it shows that left alignment has been applied directly, along with a left indent of .38″, and line spacing of 1.5 lines. In the current mystery, it appears that someone mistakenly applied the Heading 3 style to regular body text, and then tried to compensate using direct formatting.
In this chapter, we've explored a variety of features, old and new, but mostly new. You now know how to apply Quick Styles, choose and modify Quick Style sets (as well as create your own), and how to create, modify, and delete user-created styles. In addition, when a style can't be deleted, you now know why. You should also be able to do the following:
Use the Manage Styles dialog box to hide and restrict styles and direct formatting
Use Apply Styles to apply, create, and modify styles
Use the Styles pane to quickly select all occurrences of any given style
Use the Style Inspector to solve formatting mysteries