
Creating a list of bibliography sources
Associating sources with a document
Citing sources in a document
Editing citations
Inserting and saving bibliographies
If you've been waiting for Microsoft to add a bibliographic source and citation manager to Word, your wait is over. If you are constantly having to open a dozen or more documents so you can copy sources into the current document, reusing your bibliographic resources, your life just got easier. Go ahead and open those documents, one last time. One last time because this time, you're going to add those sources to Word, and they'll always be available the next time you need them.
To develop this new feature, folks from Microsoft spent countless hours interviewing undergraduate students, graduate students, professors, and researchers in a variety of disciplines to see how they work and what their needs are. The result is a set of citation and bibliography tools that can save many academic and professional writers a very lot of time.
Note
To be honest, Word's new bibliographic capabilities, while being just the ticket for high school students, most college students, and a number of professionals with modest needs, won't please everyone. Among the significant gaps is the lack of an Abstract field for storing document abstracts. If you have hundreds or even thousands of sources, it's unlikely that you will remember what each and every article and book are about. Moreover, if you need external library interfaces, you'll have to wait until Microsoft's SDK (software development kit) trickles out into the broader resource community and libraries begin to make their resources available using the tools that Microsoft has developed. At this writing, not a single searchable online library could be found.
If you are working on your Ph.D. dissertation or are otherwise engaged in heavy-duty research, you likely will want to reach beyond Word's capability to something such as RefWorks or EndNote, products used by many graduate students and researchers.
In order for you to be able to use citations in your Word documents, you need the bibliographic specs for each source you want to cite. Word's new feature has several methods for getting that information into your document.
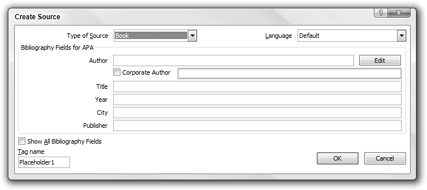
Insert a source from scratch using the Create Source dialog box. This inserts the source into your Master List as well as in your Current List. The Current List is just for the current document, and the Master List is all sources you've ever created.
Copy an existing source from the Master List to the Current List.
Import sources you exchange with colleagues (or even set up a shared source list that you and colleagues can all access and contribute to).
Search external online libraries using the Research and Reference pane. You can import data directly into the Master List in this way (once external libraries start using Microsoft's specifications).
The citation and bibliography features are available in the Citations & Bibliography group in the References ribbon, shown in Figure 36.1. You use the tools in this group to add sources, insert citations in the current document, initiate library searches, manage sources using the Manage Sources dialog box, choose the style for the references in the current document, and insert a bibliography into the current document.
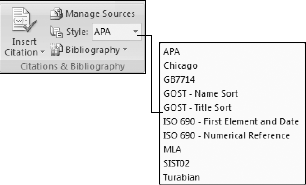
Figure 36.1. Create, use, and manage bibliographic sources from the Citations & Bibliography group in the References ribbon.
Before you begin to insert citations, it is helpful to first choose the Style you are using. This affects the way citations are inserted into the document. If you later need to change the style (for example, if an article or paper is being repurposed for a publisher that requires a different style), you can change styles on-the-fly. Because citations and bibliographies are inserted using field codes, when you change styles, all citations and bibliographical entries are reformatted to match the selected style.
To set the style, click the drop-down arrow next to Style in the Citations & Bibliography group in the References ribbon. As shown in Figure 36.1, Word has ten common styles from which to choose. Click to choose the style needed for the current document. If you've already inserted citations, they will automatically be reformatted to match the selected style.
There are two ways to insert a source from scratch. You can use Insert Citation
Note
Word's Citations & Bibliography tools can create only parenthetical citations. The tools are not geared to creating footnotes or endnotes. If you need a footnote or endnote, go ahead and insert the parenthetical citation, cut it to the Clipboard, insert a footnote/endnote, and paste the Clipboard contents into place, deleting the parentheses.
To add a new source and cite it at the same time, choose Insert Citation
Tip
Key fields to keep in mind are Author, Title, Tag name, and Year. In the Source Manager, which you'll see shortly, you can sort sources by those fields, which makes them useful organizational resources. This might not matter when you have a dozen sources. When you have hundreds, however, it will matter.
For entering authors' names, you can type them as you ordinarily would—for example, Joseph Priestly, Samuel F. B. Morse, or Susan B. Anthony. After you click OK, they will be changed to last name first, e.g., Priestly, Joseph; Morse, Samuel F. B.; and Anthony, Susan B. You can enter them as last name first as well. Word will "see" the comma and adjust as needed.
To enter multiple authors for a reference, separate them with semicolons. You can also use the Edit button, if you prefer, although many users find it somewhat clumsy. The easiest way to enter names is if you already have them available in another window. Copy them to the Clipboard and paste them using Ctrl+V or by right-clicking and choosing Paste. Note, however, that unlike many Windows text boxes, you cannot drag text into the Create Source dialog box's fields.
Click the checkbox next to Show All Bibliography Fields to display the full range of information you can enter. Unfortunately, this field does not "stick." Even if you always want this option enabled, you have to enable it each and every time you visit this dialog box.
Note
The Create Source dialog box also indicates the current style. With Show All Bibliography Fields enabled, red asterisks appear next to fields, indicating that they are recommended for the selected style. While the fields available for entry do not vary according to which style is selected, the presence of asterisks does change. Therefore, while it's not essential that you pick the style before creating a source, it is useful. Remember also that if you use the same source with a different style, different data elements might be emphasized. Therefore, as time permits, it pays to add as much information as possible when creating a source.
When you're done, click OK. Word does several things. Visibly, Word inserts the citation at the insertion point, including parentheses, using the selected bibliographic style (APA, Chicago, etc.). Less visibly, as shown in Figure 36.3, the added source is added to the Citation Gallery, and will be available the next time you choose Insert Citation from the References ribbon. At the same time, the source is added to both the Current List and the Master List in the Source Manager, which you'll learn about shortly.
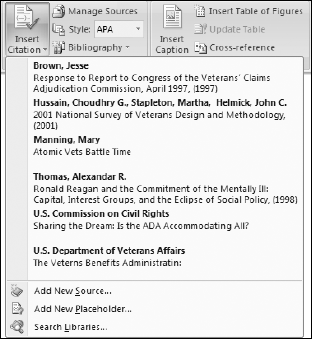
Unlike many other galleries in Word, the Citation Gallery lists only sources that are in the Current List. In other words, it lists only sources that are available for use in the current document. Otherwise, as you begin to add sources to it, the gallery would become hopelessly large, and finding sources in it would become increasingly difficult.
To create citations, Word inserts a citation field code. The Insert Field dialog box provides virtually no built-in support for inserting field codes using that approach. Therefore, you're better off using the Insert Citation tool in the References ribbon.
The syntax for the citation field is as follows:
| { CITATION tag [s pages y ] l language } |
Example: { CITATION Cooper s "p. 233" y l 1033 }
In the example, the tag name is Cooper. The citation will include, p. 233. The , y, and switches are used to suppress the author's name, the year, and the title, respectively.
Note
The CITATION field inserted by the Insert Citation command is locked programmatically so that you cannot edit it by hand. Using Ctrl+Shift+F11 (Unlock Fields) will not unlock it. If you want to experiment with the CITATION field, you'll need to insert one using Insert
You can also add sources using the Source Manager. From the Citations & Bibliography group in the References ribbon, click Manage Sources to display the dialog box shown in Figure 36.4. Click New to add a source. This opens the same Create Source dialog box shown in Figure 36.2. Once you add the new source, it now shows up in the Source Manager (Current and Master Lists) as well as in the Citation Gallery. It does not yet get inserted as a citation in the current document, however. Once the source has been added to the Current List, you can then choose Insert Citation from the Citations & Bibliography section of the References ribbon, and click the source in the Citation Gallery. Note that we are not yet finished with the Source Manager. We will return to it several more times in this chapter.
In addition to creating citations from scratch, as shown in the preceding section, you can use existing citations. As noted previously and shown in Figure 36.3, once you have created a source—either directly using Insert Citation
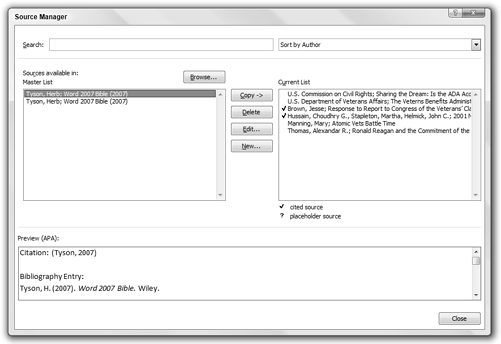
Figure 36.4. Use the Source Manager to create new sources as well as copy sources between the Master and Current Lists, among other things.
If a source exists in your Master List but not yet in the Current List, you can use the Source Manager to copy it. In the References ribbon, click Manage Sources to display the dialog box shown in Figure 36.4. In the Master List, click on the sources you want to copy. Use normal Windows techniques for selecting multiple items from the list. Notice that the arrow by Copy now points toward the Current List. Click Copy to add the selected items to the Current list, and then click Close.
Before you can cite a source, it has to exist in the list of sources for the current document. You can add sources to Word in several ways. Once sources have been associated with the current document, they appear in the Citation gallery (refer to Figure 36.3). To insert a citation for the source, move the insertion point to where you want it to appear, and then choose Insert Citation and click on the source.
When writing, if you stop to insert a citation, it often interrupts your train of thought. It's often more creatively efficient to insert a temporary placeholder, and then come back to it later. To insert a placeholder citation, choose Insert Citation
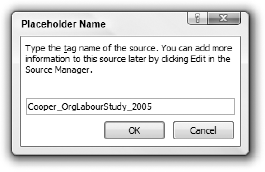
When you create a placeholder, Word doesn't add it to the Master List (although you can add placeholders using the Source Manager), but it does get added to the Citation Gallery.
If information about a source changes, or if you simply get new information, as happens when you are converting placeholders into ready-to-use sources, it is easy to edit the source. When you need to update the information about a source (or to convert the placeholder into an actual source), there are several ways to proceed:
Right-click any occurrence of the citation in the document and choose Edit Source.
Click the drop-down arrow at the right end of the citation container and choose Edit Source.
Open the Source Manager, select the source or placeholder, and choose Edit.
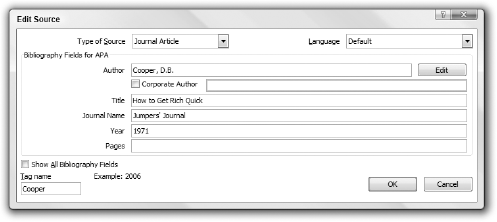
However you proceed, you'll see the Edit Source dialog box shown in Figure 36.6. Add the source information as described earlier in "Add New Source," and click OK. When you do this, all citations in the current document are updated.
If the identical source (identified by Tag Name) is included in both the Master List and the Current List, you will be prompted about which lists should be updated, as shown in Figure 36.7. Say No only if you want to update only the list associated with the method you used to access the Edit Source process. If you accessed Edit Source by using a citation in the document and now click No, then only the Current List version of the source will be updated. If, on the other hand, you selected the source in the Master List from the Source Manager and clicked Edit, then clicking No will update only the Master List version of the source.
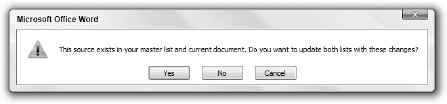
Figure 36.7. Click Yes to update both the Master List and the Current List. Click No to update just the Master List.
When and why might the two lists differ? The two versions of the source might be different, for example, if the Master List includes a whole book, while the Current List item includes only one chapter.
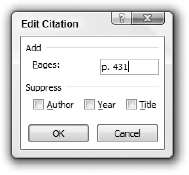
You might have noticed that when you insert a citation, you aren't provided with any options. A minimal citation is inserted based on the selected style. Suppose, for example, that you're using the same citation in different parts of a paper, and want to focus the reader's attention only on certain pages of a particular book or article. You could handle this by creating different sources, but that tends to make the list of sources rather unwieldy and confusing later. A better way is to edit the citation to add the additional information.
To edit a citation, right-click the citation or click the citation container's drop-down arrow and choose Edit Citation. In the Edit Citation dialog box, shown in Figure 36.8, type the page number, or click to check citation details you might want suppressed. Note that when adding page numbers, Word does not supply the p. or pp. in the resulting citation. You'll need to provide those yourself.
Note
When you edit a citation in this way, you're probably wondering what happens later when/if you edit the source. Because of the way that the edits are added—using field switches—the main citation itself can be updated independently of the edit. Hence, if you later edit the source, the citation will be updated, but any additional information provided or suppressed through editing is preserved.
Ordinarily, you probably won't need to delete sources from your Master List. Most collectors tend to keep resources they've acquired. However, if you acquire source lists from other people or over the Internet, you sometimes will discover that you have slightly different versions of the same source, with one being slightly more complete than the other or each having details that the other lacks. There is no built-in way to consolidate such "duplicates" into a single item that uses information from all available sources. Given that the quality of the information might vary as well as the quantity of information, it's not even clear that you would want Word making such decisions about which source to believe.
Therefore, you would need to sort through the information manually by inspecting the different sources, copying missing details to the pick of the litter, and then deleting the inferior versions. When you're ready to delete a source, choose Manage Sources, click the source(s) you want to zap, and then click Delete.
Note that you can delete from the Master List as well as from the Current List. You might want to delete from the Current List if you discover you have duplicates with different Tag Names. You might also want to delete from the Current List if you decide not to use a given source. Keep in mind, however, that Word is capable of distinguishing between sources consulted and sources cited (see "Inserting a Bibliography"), so don't delete sources you consulted but didn't cite. The fact that you consulted a source might ultimately prove useful, even if you don't include it in the list of sources cited that you include with the finished document.
As suggested earlier, you're not limited to sources that you develop and enter. You can exchange source lists with colleagues, download sources from libraries that adopt Word 2007's bibliographic standard, as well as establish source lists on local/organizational servers.
The process for actually getting external sources to "stay" in Word is unintuitive and a bit tricky. With a little bit of patience, however, it can be done. To load an external list of sources into Word, in the References ribbon, click Manage Sources
If you've created any sources, you should see a file named Sources.xml. Ordinarily, Word users would expect that additional source files copied to this folder would automatically be loaded by Word. Not this time. Word automatically loads only the Sources.xml file, so if you copied a file here expecting it to be automatically adopted by Word, click on it and then click Open. Or, if your list of sources resides elsewhere, navigate to it, and then click Open.
Back in the Source Manager, your added sources now display in the Master List. They're not there to stay, however. That's because they're just guests at the moment. When you close and reopen Word, the guests will have left. To get them to stay, you have to adopt them.
To adopt them, do the following:
Open a new blank Word document. Use the Source Manager to copy the "guest" sources from the Master List into the Current List. They should now be listed in both places.
Click Close to close the Source Manager.
Save and close the Word document that now has the "guest" sources associated with it.
Close Word.
Open Word and reopen the Word document into which you copied the sources. Click Manage Sources and verify that they're still there in the Current List. They should be missing from the Master List at this point. If they aren't missing, then stop. You're done.
In the Current List, select the sources, and then click Copy. Close the Source Manager.
Save and close the file, and close Word again. When you reopen Word, the Source Manager should now include those pesky sources. Check with the IRS, however, before declaring them as dependents.
Bibliographies, like citations themselves, are inserted using field codes. While Word lets you choose between a sources consulted and a sources cited list, it does not support both at the same time when you use the gallery to insert the bibliography. Therefore, you have to either choose one or the other or insert one from the gallery and the other using the Insert Bibliography command (or just use the field code directly). We'll look at that in a moment.
To insert a bibliography, click the Bibliography drop-down arrow in the References ribbon. Word offers the bibliography gallery alternatives shown in Figure 36.9, plus one more, which is scrolled out of view in this picture.
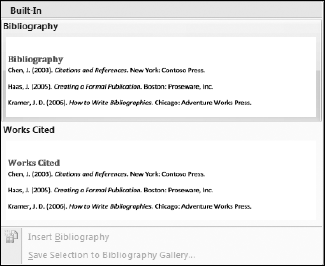
Bibliography—Inserts Bibliography as the title, and then lists of all sources associated with the document, whether cited or not.
Works Cited—Inserts Bibliography as the title, and then lists of all sources cited in the document.
In addition to the gallery items, you can choose Insert Bibliography. This option inserts a list of works cited, and does not include a title or a page break.
Ordinarily, there should never be a need to edit or update a bibliography inserted using Word 2007's Citations & Bibliography commands. When you add sources and/or cite them, any bibliographies are updated automatically. The only time you might need to update a bibliography would be if you need to fix an accidental edit.
If you need to have both works consulted and works cited lists in your document, the easiest way is to insert one of the items from the bibliography gallery, and use the Bibliography
To delete a bibliography, click the content control handle (upper left), and press the Delete or Backspace key. If only part of the bibliography field is selected, the text will be deleted. However, the next time any citation or source change occurs in the document, the edit will be undone. If you want to perform manual edits to a bibliography and have the edits survive updates, you would need to convert the bibliography into static text.
To convert a bibliography into static text, click the drop-down arrow at the end of the content control container and choose Convert Bibliography to Static Text, as shown in Figure 36.10.
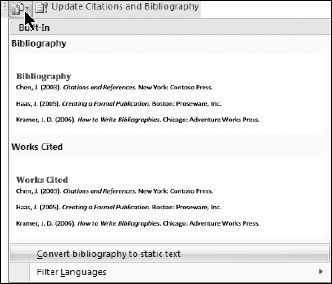
Figure 36.10. To copy a bibliography elsewhere, convert it to static text. (Filter Languages appears only if you have multiple languages installed on your computer.)
Note that once you convert the bibliography into static text, that does not completely divorce it from the process. For one thing, the static text version of the bibliography is still within the content control container. For another, note the control at the upper-left corner of the container, shown in Figure 36.11. If you click the drop-down arrow there, you will see the Bibliography Gallery options. If you choose one, the static bibliography is replaced with the corresponding bibliography field from the Gallery.
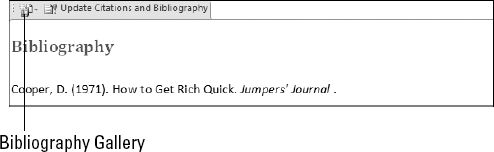
Figure 36.11. Even after being converted into static text, a bibliography is still connected to the citation process.
If you really want to remove a bibliography from the whole citation process, after unlinking it, copy the contents of the field to the Clipboard, making sure that no part of the container is selected. Then, paste it somewhere outside of the container, and delete the container.
You can save a bibliography for future use, and it will appear in the Bibliography Gallery along with the built-in items. To do this, select the bibliography and any formatting or other text (including page breaks, section breaks, etc.), and choose Bibliography
If the bibliography is saved as a field, then only its formatting will be used, not any source content. For example, the four built-in gallery items determine only two factors:
Whether the bibliography will contain all sources in the Current List or only sources cited
Whether the bibliography will be followed by a page break
If you determine that you need a title, a section break, special formatting, and so on, you can include it in gallery items you save. When you insert that gallery item, it will then determine how the Current List items in any given document will appear. It won't display the sources that were in the bibliography used to create the gallery item.
You can, however, convert a gallery to static text before saving it to the gallery. When you do that, the bibliography itself (along with title, formatting, text, etc.) is saved. When you insert the resulting gallery item, the actual sources themselves will appear, even if they aren't cited or otherwise sourced in the document in which they are inserted.
In this chapter, you've learned about Word 2007's new citations and bibliography tools. You should now be able to do the following:
Use the Style tool to apply a variety of different bibliography styles (APA, Chicago, etc.) to an article or paper
Insert properly formatted parenthetical citations to sources used in a research paper
Import sources from other source lists
Insert a bibliography that contains all sources consulted or sources cited
Reuse and repurpose sources in a variety of different documents