
Spelling
Thesaurus
Grammar
Research
Translation
Word provides a variety of proofing tools, including a spelling checker, a thesaurus, and a grammar checker. Another tool included under this umbrella is hyphenation. Although technically it's not really proofing, the hyphenation feature enables you to make sure that hyphens are where they're supposed to be and that you don't accidentally hyphenate proper names.
Proofing—short for proofreading—ultimately still is in your hands, but judicious use of the tools that come with Word can make the job quicker and easier. Of course, if you make tons of what Word considers to be mistakes, then grammar checking, spelling checking, and pausing to use the thesaurus can make the job more tedious and take a lot longer. Assuming you're right and Word is wrong, this chapter provides the information you need to temper Word's red, green, and blue editing pencils. If you don't know what's meant by that colorful sentence yet, you will by the end of this chapter!
Word can check the spelling of a word, a selection, or a whole document. Word can include not only the main built-in word list, but also word lists you create. It can also use third-party lists such as medical, legal, and technical dictionaries. You can also format your documents using Language, which is a character formatting attribute—proofing tools for Spanish and French come with Office 2007, making language settings (for those two, at least) more than a mere exercise.
By default, Word is set to check spelling as you type. So, in a sense, you're already checking spelling with every word that you type (unless you changed your defaults, which you'll read about shortly). There also is a formal spelling process that uses a dialog box. You can trigger that process in several ways:
Press F7
In the Review ribbon, click on Spelling & Grammar in the Proofing group (shown in Figure 12.1).
Right-click a flagged misspelling (marked with a red zigzag underline) and choose Spelling.
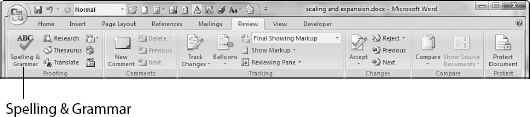
Figure 12.1. Click Spelling & Grammar at the left end of the Review ribbon to display the Spelling dialog box.
Many users prefer the right-click method, which invokes the Spelling dialog box. If you press F7 or click Spelling & Grammar on the Review ribbon, you'll get the Spelling and Grammar dialog box, instead.
Tip
In addition to the in-your-face spelling and grammar tools, there's an additional tool that's sometimes overlooked. Right-click the status bar and click to enable Spelling and Grammar Check (if it's not already checked). Now, when you're writing, a book appears, a pencil hovering above it as if it's writing. When you stop, you'll see either a green check, meaning that what you've typed is okay with Word, or you'll see a red X, meaning that Word thinks you goofed. Clicking the red X goes to the first error that Word "knows" about, and gives you a list of spelling and AutoCorrect options.
Note
Word assumes that you want to check spelling and grammar at the same time. If that assumption is wrong, you can place a separate tool on the QAT that enables you to check spelling independently of grammar. To do this, right-click the QAT and choose Customize Quick Access Toolbar. Set Choose Commands From to Commands Not in the Ribbon, and scroll down and click Spelling. Click Add
When you right-click a misspelled word and choose Spelling, the Spelling dialog box appears, as shown in Figure 12.2, and a variety of options are presented.

Figure 12.2. By default, Word uses a zigzag red underscore to flag words that aren't in its dictionary.
Spelling options available are detailed in Table 12.1. If multiple spelling suggestions are offered and one of them is right, select it before clicking on Change, Change All, or AutoCorrect.
Table 12.1. Spelling Options
Cancel | Click this option to discontinue the spelling process. If "Check spelling as you type" is enabled, Word will continue to flag misspelled words. |
Ignore Once | Skips to the next questionable spelling. Select this option if the word is acceptable to you in this context, but you still want to see future occurrences. |
Ignore All | Ignores this spelling for the rest of this spell check. Select this option if the spelling used is correct in all contexts in this document. |
Add to Dictionary | Adds the spelling highlighted in red in the Not in Dictionary box to the default user spelling dictionary. |
Change | Changes the spelling of the flagged word to the suggestion selected in the Suggestions box. Use this option if the suggestion is correct this time, but might not be correct for future instances. |
Change All | Changes the spelling of the flagged word to the selected suggestion throughout the current document. Use this option if you've reluctantly decided that Word is right, and you want to be spared any additional humiliation and embarrassment. |
AutoCorrect | Adds the flagged word and the selected suggestion as an AutoCorrect pair. Any time you type the flagged spelling in the future, it will be corrected automatically. |
Dictionary Language | If the selected language is incorrect for the flagged word, use the drop-down arrow to select the correct proofing set. |
Options | Choose this option if you want to change the settings in the main Word Options |
Note
If you make a mistake and click the wrong option (or instantly regret a choice), click in the document and press Ctrl+Z to undo it. In the case of the Ignore, Ignore All, Change, and Change All options, Ctrl+Z gets you back to where you were. If you mistakenly add the item to the dictionary or to AutoCorrect, however, then you will need to correct the personal spelling dictionary or the AutoCorrect list in order to completely revert.
If none of the suggestions are correct, or if the spelling or other errors are so convoluted that none of Word's suggestions can fix it, you have two options. First, if none of the suggestions are correct or if a minor edit is needed to set things back on course, you can perform the edit in the Not in Dictionary box. Note that you are not limited to changing just the word that was flagged. Anything in the Not in Dictionary box is fair game. Once you have things looking as they should, choose Change, Change All, or AutoCorrect. Or, if you've given up on that approach, click Undo Edit to restore the Not in Dictionary box to its pre-editing state.
Second, because the Spelling dialog box is nonmodal, you can click away from it to edit your document directly. This sometimes is necessary if the suggestions offered by Word don't accomplish the necessary correction, especially if formatting changes are needed. When you click away from the dialog box, the top button changes to Resume. Click Resume to continue the spelling process.
Word provides a variety of options to control proofing/spelling behavior not only in Word, but in other Office 2007 programs as well. Choose Office
Most of the settings are self-explanatory, but sometimes you need to be reminded that they exist. The first group of spelling options is shown in Figure 12.3. Of special use and interest to technical writers are the first three options: Ignore words in UPPERCASE (which handles many acronyms), Ignore words that contain numbers (which handles hexadecimal numbers and many variable names), and Ignore Internet and file addresses. The latter includes not only URLs and UNC computer/disk/folder/file names, but also e-mail addresses.

Figure 12.3. Word provides a number of Office-wide settings that make spelling nag you less frequently.
Note that the fourth option, Flag repeated words, is a new option in Word 2007. While I'm tempted to turn it off, hand-quicker-than-eye editing often leaves me with two copies of a word, and Word has bailed me out more times than I can count.
The last checkbox in Figure 12.3 might require a bit of explanation if you have only one custom dictionary, and you didn't even know about that one. You can have multiple custom dictionaries. Technical writers often have different "dictionaries" for different purposes and projects. While it might be okay generally to ignore words in uppercase or that contain numbers, it sometimes isn't, especially if the specification is important. Therefore, you might want to create lists of the correct acronyms or variable names, etc., so that if you type one that the list doesn't "know" about, it will alert you.
Note
I put "dictionaries" in quotes because these really aren't dictionaries. Dictionaries tell you how to pronounce words, and what they mean. Word's .dic files aren't dictionaries, they're word lists. You can't imagine how disappointed I was when I first discovered that Word didn't really have a dictionary. Even the main dictionary isn't a dictionary.
For users who have multiple dictionaries (word lists), the "main" dictionary refers to the one that comes with Word. That's the one that's used all the time (i.e., the one that lets you know that concieved is never correct). Optionally, Word can populate the Suggestion box with spellings from multiple lists. Using the Custom Dictionaries dialog box, shown in Figure 12.4, you can decide which one(s) you want.

If you mistakenly add a word to your custom dictionary during a spelling correction, you can remove it. To remove it while performing a spell check, choose Options

Figure 12.5. Be careful not to click Delete All! That deletes all of the words from the custom dictionary, and Ctrl+Z won't fix it!
You can add words while you're here as well. Type the new entry under Word(s); then click Add. When you're done, click OK, then OK again to close the Custom Dictionaries dialog box (assuming you're done).
Note that you can't remove words from the main dictionary this way. Instead, you would need to create an exception list. See "Exceptions," later in this chapter, for more on that fascinating topic!
Note the New button in Figure 12.4. If you need a specialized word list, click New, type a name for the list, and then click Save. Back in the Custom Dictionaries list, select the new list you just created, and click Edit Word List. Initially, it will be empty. Type new entries into the Word(s) box, and click Add.
Note that Word's .dic files are plain text files. Therefore, you don't need to use Word to open them and edit them. Instead, you can use Notepad or any other plain text editor. If you already have a word list, rename it, giving it a .dic extension, and tell Word to use it.
Tip
If you have a document that is loaded with unrecognized technical words, you can use it to create a custom .dic file. Open the file using Word. Next, in Office
Back, in Word Options, click to enable "Check Spelling as you type" and remove the checks next to "Mark grammar as you type" and "Check grammar with spelling." Make sure that "Hide spelling errors in this document only" is not checked. Click OK to save the settings.
Back in the document, press F7 to begin. At each word you want added, click Add to Dictionary. Otherwise, click Ignore All to proceed to the next word. When you're done, reopen Word Options and reset your default custom dictionary to what it was previously, and restore your preferred default spelling and grammar settings.
Our next stop on the Options tour reveals a familiar option (to most old hands at Word), as well as a brand spanking new option that you're going to love, when it works, both shown in Figure 12.6. Note that the grammar options are discussed a little later under "Correcting Grammar in Word."
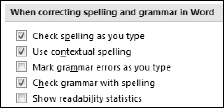
Figure 12.6. Word can check spelling as you type. It can also flag words that might be wrong for a given context.
The first option, "Check spelling as you type," governs whether Word decorates your documents with red zigzags each time you make a typo. Turn that option off if you never make mistakes and don't like it when Word second-guesses you. You can also turn it off if you like to check your spelling in one fell swoop after you've written your ideas.
The second option, "Use contextual spelling," optimally, would realize the problem with the sentence She kissed the towed. Unfortunately, it doesn't. It does realize the mistake in I will see you their. It doesn't reel eyes that there's a mistake in this sentence, either. This leaves me wandering what it takes to make Word sit up and take notice of miss takes.
In any case, "Use contextual spelling" is supposed to catch those kinds of mistakes. It sometimes does, but not nearly often enough too suit me. Too be or not two be. Aha! That time it did it (even though you don't see the blue zigzag in the book, you'll see it when you're working in Word). When Word thinks you've used the incorrect word for a given context, it underlines it using a blue zigzag. Right-click the flagged word, as shown in Figure 12.7, and click the correct word or ignore, whichever is appropriate.
Clearly, this feature has promise. Until it becomes a bit smarter, though, editors need not fear being put out of work.
Recheck Document resets all Ignore decisions for spelling and grammar. If you previously clicked Ignore Once, Ignore All, Ignore Rule, or Next Sentence, those decisions are all reset as if they hadn't occurred. Choose Recheck Document when you inadvertently tell Word to ignore or otherwise bypass something it questioned. You'll be rewarded with the message box shown in Figure 12.8.


Sometimes, for whatever reason, you might choose to hide all of the spelling and/or grammar errors in a particular document, while continuing to monitor spelling and grammar in other open documents. Or, you might typically have errors hidden, but selectively display them at other times. The Exceptions For settings, shown in Figure 12.9, give you independent control over grammar and spelling error display on a document-by-document basis.

Earlier, I noted that you cannot remove words from the main spelling dictionary that comes with Word. However, you can create an exception list, sometimes called an exclude dictionary. You place into that list words that Word considers correct, but which you want flagged as possible misspellings. When Word is opened, it checks whether there are entries in the exception list. If there are, then Word will flag those words as if they were misspelled, even if they aren't.
Note
Users of past versions of Word should note that this feature has changed slightly. The name and location of the exception file has changed.
During installation, Microsoft creates an empty file named ExcludeDictionaryEN0409.lex (for English U.S.) in a folder named C:Documents and Settings[user]Application DataMicrosoftUProof (where [user] is replaced by the user's name).
This file is plain text and can be edited using Notepad or any other plain text editor. You also can edit this file using Word, but you need to remember to save it as plain text in order for it to work.
If you have an existing exception list from previous versions of Word, you either can copy existing exceptions into the new file, or you can simply rename your existing .EXC list, giving it the new name. Once you're finished, save the file to the folder indicated above. The file will be incorporated into Word's spelling regimen the next time Word is opened.
If you installed additional sets of proofing tools with Word 2007, there will be one .lex file in the UProof folder for each language. For French and Spanish, the files are as follows:
ExcludeDictionaryES0c0a.lex

ExcludeDictionaryFR040c.lex
Note that no interface is provided in Word for automatically adding entries to the exclusion lists. Addition of entries is done through direct editing, and changes do not take effect until Word is closed and restarted.
Word provides a grammar checker to help you ensure that your writing is as clear and precise as possible. The grammar checker isn't always correct, but it's wrong infrequently enough that it can be useful. It's also flexible enough that you often can turn off specific rules that cramp your style.
For example, Word's grammar checker is pretty obsessive about passive voice. I grew up with passive voice, having been taught to write in the 1960s and having begun writing formal research articles and reports in the 1970s. Passive voice was de rigeur. Nobody did things. Things happened. It's an awfully hard habit to break, particularly when one has never become convinced that there's anything wrong with passive voice to begin with.
In any case, if you believe that passive voice is perfectly fine, you can force Word to suppress its schoolmarmish fanaticism. You can silence Word on a number of grammar and style issues, and force it to focus only on particular areas.
Running the grammar checker is a lot easier than putting up with its defaults, but because changing defaults is easy, it all works out in the end. By default, Word checks grammar as you type. If you prefer, you can turn that default off and instead have Word hold its tongue until you ask for its opinion.
Even if it's checking as you type, it's not forcing you to do anything. Instead, it underlines questionable grammar with a green zigzag. Just to quickly review, if Word doesn't like your spelling, it will zing you with a red zigzag. If it thinks you have the wrong word for the context in which you used it, it will badger you with a blue zigzag. Finally, if it doesn't like your grammar, it goads your prose with green zigzags.
To put Word's grammar engine into a more aggressive stance, press F7 or click the Spelling & Grammar tool in the Proofing group in the Review ribbon. Does that sound a lot like what you do to check spelling? Word does not have an independent keystroke or tool assigned for checking grammar, but just as with Spelling, you can right-click a green underline and choose Grammar to see the dedicated Grammar dialog box shown in Figure 12.10.
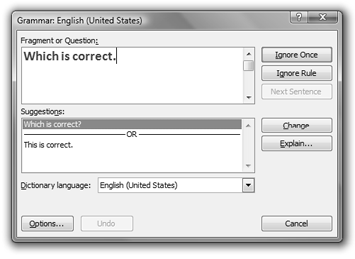
As with spelling, clicking Ignore tells Word to ignore this one occurrence. Ignore Rule means that it will stop using the particular rule for the rest of this document. If Next Sentence is available, you can tell Word to simply move along and not to worry about the current sentence. I often do that when the sentence contains an embedded quote that would challenge the best of grammarians.
If you agree that there is a problem and if Word's suggestion is clear and acceptable to you, then click Change. You can also perform an edit in the top box and then click Change. Or, if more aggressive intervention and surgery are needed, click in the document, perform the edit directly, and then click Resume.
In Figure 12.10, Word doesn't like the between-sentence spacing, possibly because there is just the one sentence and several spaces follow by the period. Usually, Word's grammar issues are clear. If you don't understand its objection, click Explain. Word displays the particular grammar rule using Word Help, as shown in Figure 12.11.

If as you're checking grammar you find that Word is checking things you'd rather it ignore, you can tell it to turn a blind eye. In the lower-left corner, click Options. Or, if Word is spilling entirely too much green paint as you're typing, you can intervene earlier by choosing Office
If you want Word to cease and desist with the green zigzags, remove the check next to "Mark grammar errors as you type," as shown in Figure 12.12. If you want Word just to stop marking grammar errors in the current document (e.g., if it's something your boss wrote), place a check next to "Hide grammar errors in this document only." The spelling options shown were discussed previously in "Checking Spelling in Word."
Word has two areas that come under the Grammar heading: Grammar and Style. The only two options are Grammar & Style or Grammar Only. You can get Style Only, but to do that, you need to click Settings and turn off the Grammar settings one by one.

Grammar Settings, shown in Figure 12.13, has 35 distinct settings you can make. Several versions ago, Word offered its grammar rules in three built-in sets: Strictly (all rules), Business (a lot of rules), and Casual (fewer rules). You could also create up to three custom sets for specific purposes.

Alas, that's no longer the case. Now, it seems that either you're expected to be able to use a single set of rules regardless of what you're writing, or you're willing to change them on-the-fly each time you edit a different document. Note that Word does not remember sets of rules on a per-document basis.
Note
I was prepared to tell you that you could create your own distinct sets of rules by recording macros to make the settings for you. However, when I went to confirm you could do that, I discovered (as I had feared) that the resulting macro was empty. Word 2007, it appears, doesn't "notice" those kinds of settings when recording a macro. If you want to go that route, you'll have to build the VBA macro from scratch. Or, if you still have Word 2003, you can record the macro there and then copy and paste it into the VBA editor in Word 2007.
If you don't go the macro route, scroll through the list and make some notes or take screen shots of your settings. Then, perhaps create some documents that show your settings for specific purposes. This at least might save you the effort of having to painstakingly trudge through the list each time you want to accommodate a different kind of writing project.
One of the most entertaining of Word's proofing tools is the Thesaurus. There's a version of Six Degrees of Kevin Bacon that you can play using Word's Thesaurus. I'll leave the details to you.
If you're ever at a loss for words, don't despair. Try Word's Thesaurus. It lists synonyms and the occasional antonym for a wide variety of words and phrases. Yes, I said phrases. That might come as a surprise to you. If you're looking for a concise substitute for a trite phrase, give it a try.
Select the phrase (or just a word) and press Shift+F7, or click Thesaurus on the Review pane (in the Proofing group). You might just be in luck, as shown in Figure 12.14.
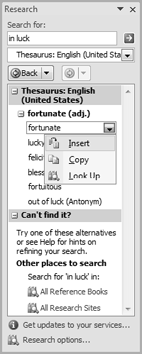
For any word the thesaurus finds, you can right-click to see the options shown. You can insert it to replace the selection or to insert it at the current location. You can copy it to the Clipboard for use elsewhere, or you can reinvest it by clicking Look Up.
If you're not a fan of task panes, you'll be happy to know that Word's legacy Thesaurus dialog box is still available. To access it, you'll need to assign the ToolsThesaurus command to a keyboard shortcut, or the Thesaurus command to the QAT (set the Choose Commands From box to Commands Not in the Ribbon).
You've already seen one manifestation of the Research task pane. Word's Research can look up a wide variety of concepts using a variety of different research resources. You can look up something that's in your document, or you can open the Research task pane and use the task pane as you would a small information browser.
To look up something that's in your document, select it and Alt+Click on it. It can be a word, phrase, or name—whatever. You might use it, for example, if you come across an unfamiliar name and want to see if it's someone you should know about. It's also useful for looking up unfamiliar places.
To open the Research task pane without reference to something in the current document, click Research in the Proofing section of the Review ribbon. Type what you're looking for in the Search For box, as shown in Figure 12.15. Below Search For, set the Research resource to one that is likely to provide the kind of information you're looking for, and then click the Start Searching button. Note that All Reference Books is an option, but it's seldom as satisfactory as a more targeted resource.
To set your overall research strategy, click Research Options at the bottom of the task pane. This opens the Research Options dialog box, shown in Figure 12.16.
Use Add Services to add a new research service. You can specify the URL of any you know about. Additionally, over time, the list of advertised services will be populated by research providers. Use Update/Remove to get the latest updates from specific servers or groups of servers, as well as to remove certain services. Note that a number of the built-in services cannot be removed, such as the Translation (Installed Dictionaries).
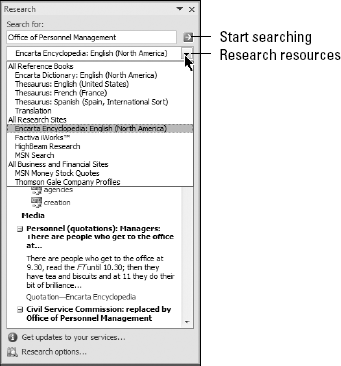

Figure 12.16. Use Research Options to add and remove services, as well as to exercise Parental Control over what research services can be accessed.
Parental Control enables you to limit the Research task pane to just those services that [claim to] filter content to block "offensive content." Shown in Figure 12.17, there are two levels. The first, "Turn on content filtering to make services block offensive results," is supposed to instruct all services to block offensive results (whether they claim to be able to or not). The second, "Allow users to search only the services that can block offensive results," limits services just to those that claim to be able to block offensive results. Using parental controls requires that you set a password.

Figure 12.17. If you forget or lose your password, it cannot be recovered, and you'll be stuck with Parental Controls!
Warning
If you use this feature, set a simple password that you can remember but which your children are unlikely to be able to guess. If you lose or forget the password, there is no guarantee that it can be recovered.
If both levels are set, then noncompliant services will be grayed out in the resource list. Because of the risk, I strongly recommend that you not use parental controls unless you absolutely have to.
Do you have a complete report, letter, or other document you need to have translated? Word can translate it!
"Yeah, right," you say, dripping with sarcasm.
Really. It can! If you gave up with this feature in Word 2002, and never checked it out in Word 2003, you probably missed this important and very cool capability. In Word 2002, if you tried to translate more than a single word or a simple phrase, the Translate task pane presented you with the results shown in Figure 12.18.

When Word 2003 rolled around, many users just assumed that it was equally limited. Indeed, in Word 2003 it at first appeared that it was similarly limited. However, if you took the trouble to scroll down a little, you would see what you see in Word 2007 without having to scroll, as shown in Figure 12.19. I don't know if the text is fully readable for you, but what's shown is the first full paragraph of the Declaration of Independence—translated into Russian! That's right—not just Spanish or French, but Russian, German, Italian, Japanese, Korean, Chinese (PRC and Taiwan), Dutch, Greek, and Portuguese as well! Note, however, that what I just said isn't entirely true. Read on.
Impressed? Maybe. But, get out the magnifying glass before you get too carried away. Up to " ... entitle them," the translation looks, well, Russian. Beginning with " ... a decent respect ..." however, the translation looks rather much like English. Don't give up. If you want the full document translated, just click the button next to Translate the Whole Document. The current document is sent to WorldLingo, and the translation quickly (depending on your connection speed) appears in your default web browser.
I won't pretend that the translation is meaningful to me; my Russian is pretty much limited to _, and _. However, the Spanish translation, which I can read, looks pretty darn good.
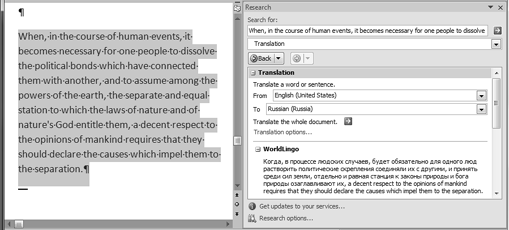
Figure 12.19. Word can translate whole sentences and paragraphs (up to about 50 words) in the Translation pane.
Don't be fooled into thinking that a quick machine translation is perfect or as good as a competent professional translation service. However, it's certainly a leap beyond what Word 2002 could do, and it might be just what you need to translate that parking ticket you got in Italy but never paid.
To translate, select the text you want translated, right-click the selection and choose Translate
For simple words and phrases translated among French, English, and Spanish, Word uses its own built-in Bilingual Dictionaries. For other western languages that use the standard Latin character set, Word uses its Online Bilingual Dictionaries. For more complex languages that use a different character set as well as longer passages and complete documents, Word uses the services of WorldLingo (which also provides a smart tags service you can add, as described in Chapter 16.
Word can also translate using tooltips, as shown in Figure 12.20.
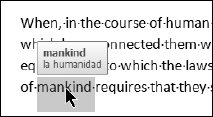
Figure 12.20. When Translation Tool Tips is enabled, Word translates the select word using a tooltip.
Translation Tool Tips are used only for proofing sets installed on your computer. In the default Office 2007 configuration for the U.S., those languages are English, French, and Spanish. To control the To language, click the Translation Tool Tip control shown in Figure 12.21. If you're typing in English and set the language to English, there will be no tooltip.

To set the default for Word 2007's translations, click the Translation Options link in the Translation section of the Research pane. As shown in Figure 12.22, for best performance, select the option to use the online dictionary only when the "installed" dictionary is "unavailable" (translation: when one of the dictionaries requested is not installed). Using local resources is almost always faster than the online counterparts.

Word's language tools provide a number of resources for writers, editors, and researchers. In this chapter, you've seen that Word includes strong tools for checking grammar, contextual spelling, performing sophisticated research, and even achieving useful translations. You should now be able to do the following:
Check spelling and grammar, as well as optimize options for the way you work
Create customized word lists for technical writing, as well as exception lists to flag selected "correct" words as wrong
Use Word's thesaurus to find the perfect word
Look up important names and dates using Word's Research task pane
Translate words, phrases, and even whole documents