
Data sources you can connect to Word
Data access and portability considerations
Data formats
Using data from Word, Outlook, Excel, Access, and the web
This section of the Word 2007 Bible deals with specialized output formats, such as envelopes, labels, form letters, mass e-mail, catalogs, and directories. It might seem odd to start with the data source, but that's the most important consideration, and often receives the least attention. Once you've identified and correctly dealt with your data source, the rest of what you do is made much easier.
In this chapter, we're going to focus on the Select Recipients aspect of a feature broadly yet shortsightedly known as Mail Merge. Why shortsightedly? If you glance back at the list of "specialized output formats," you'll see that it includes catalogs. While recipients are indeed the focus of mail merge in general, the set of tools is ideally suited to creating documents that use a variety of data sources, not just data containing names and addresses. Once you fully understand the process, extending it to include and use other data sources, such as inventory or even research data, isn't a long stretch. Rather than contribute to the misidentification of such documents as mail merge documents, it is more appropriate to refer to such creations as data documents.
When thinking about mail merge, our first instinct often is "Let's get this over with as quickly as possible." Most users find, however, that like a visit to the post office, it's not something you do just once. Therefore, if you're going to have to return repeatedly, you might as well try to find the shortest route and get there when the lines aren't long.
Some data considerations, such as usability (does the data set contain what you need?) and accuracy pretty much go without saying. Other considerations are equally important, such as whether the data source will be available when you need it, the ease of updating the data source, and access to the data source both for other data consumers as well as data producers.
Sometimes, your computer isn't the only data consumer. For some documents, access to data will be needed by you in other places (for example, on a notebook or laptop, for a presentation while traveling, on a different desktop computer at home, or elsewhere).
You can take several approaches to solving the need to either access data from multiple places or take the data with you. For the former, especially if the data source is large, unwieldy, or nonportable for other reasons, some kind of server solution will provide the answer. This might take the form of a data file residing on a SharePoint or other server. To see what's involved there, see Chapter 51, "Groove," and Chapter 52, "SharePoint." If you work in an enterprise, your company might have other kinds of server facilities that can serve as data sources for Word.
For portability, the answer often will be to extract a portion of a full data set—either a limited number of data records or a sample containing just the data fields you need. Every database has some unit or focus, such as individuals (for example, contact records) or products. Each person or product in a given database might be called a data record.
Each piece of information about a person or product is called a data field. For example, a person's name, telephone number, address, e-mail address, and date of birth each would be data fields. For a product, data fields typically include name, SKU, shipping weight, price, color, description, and cost.
Unless a data set was constructed explicitly for a single purpose, most data sets will contain more records than you need, as well as more data fields than you need for a specific data-driven Word document. Often, it's possible to extract just what you need and take it with you. There are a variety of ways of doing that, as you will see in this chapter.
Tip
To extract a portion of a larger database for use at a remote or inaccessible location, create a directory document using the mail merge feature, specifying only the records and fields you need. When you complete the merge, the resulting directory (or data document) will become the input data you need for associating with another data document.
Word enables you to use data from a variety of different formats. You can create a data source directly from Word as part of the mail merge process or use an existing source. If you use an existing source, your options include the following:
Outlook contacts
Office Database Connections (*.odc)
Access Databases (pre-version 12: *.mdb, *.mde)
Access 12 Database (*.accdb, *.accde)
Microsoft Office Address Lists (*.mdb)
Microsoft Office List Shortcuts (*.ols)
Access Projects (*.ade, *.adp)
Microsoft Data links (*.udl)
ODBC File DSNs (*.dsn)
Excel Files (*.xlsx, *.xlsm, *.xlsb, *.xls)
Web Pages ( *.htm, *.html, *.asp, *.mht, *.mhtml)
Rich Text Format (*.rtf)
Word Documents (*.docx, *.doc, *.docm, *.dot)
Text Files (*.txt, *.prn, *.csv, *.tab, *.asc)
Microsoft Works Databases (*.wdb)
Outlook Personal Address Books (*.pab)
Lotus 1-2-3 Files (*.wk?, *.wj?)
Paradox Files (*.db)
dBASE Files (*.dbf)
Database Queries (*.dqy, *.rqy)
As you can see, you have a broad array of options. Most of them work in a similar fashion, so there's no need to go through each and every type. However, we will go through the most common formats used. As they are presented, keep in mind that although the examples repeatedly use names and addresses, you're by no means limited to those. The idea is to use Word to present and format data in some fashion; it doesn't matter to Word what the data is used for.
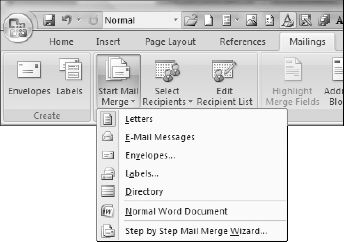
To begin, in the Mailings ribbon, click the Select Recipients tool, exposing the options shown in Figure 41.1.
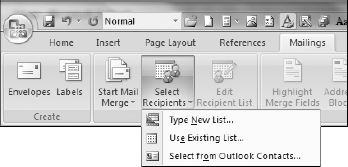
Figure 41.1. When selecting a data file, you can create it from Word, use a variety of other formats, or select data from Outlook Contacts.
To create a new list (a somewhat generic euphemism for that nasty word "database") in Word, choose Select Recipients
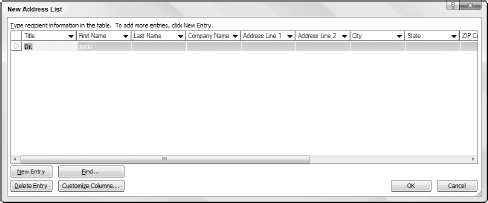
Figure 41.2. Although it says "New Address List," this form can be used to enter all kinds of data that might have nothing to do with addresses.
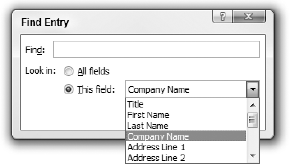
If you've entered a lot of data and need to find a particular entry, click Find to display the Find Entry dialog box shown in Figure 41.3. Type the search text into the Find field, and set Look In as desired. Use the This Field drop-down list to tell Word to search a particular field. Click Find Next (covered by the drop-down list in Figure 41.3) to find the next entry that matches the Find text in the field(s) specified. Click Cancel to dismiss the dialog box.
As noted elsewhere, the New Address List entry form can be used for addresses, but need not be. If the list of data elements or fields doesn't meet your needs, click Customize Columns, which displays the Customize Address List. As shown in Figure 41.4, you can use this list for entering entirely different kinds of data. To add a field, select the field above where you want to add the new field, and click Add. Type the field name in the space provided and click OK. To delete a field, select the field and click Delete. To rename a field, select it, click Rename, type a new name in the To field, and click OK. (To add a field at the beginning, select the first field and click Add, as before. The added field will be second on the list, not first. Select the added field and then click Move Up.)
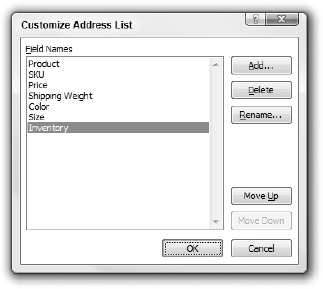
Figure 41.4. If you want to use the Customize Address List for something other than addresses, Word will never know the difference!
Tip
To save time, rather than delete all of the existing fields and create new ones, rename the existing fields. They are not tied to particular types of data, so it doesn't matter what they're called.
To rearrange the fields, click a field you want to move, and then click Move Up or Move Down, as needed. When you're done customizing the "address list," click OK.
When you're finished entering data, click OK. Word now prompts you to save the file as an .mdb (Access) database file. Note that this is the only Save as Type option. Type a name and click Save.
Note
After you click Save, behind the scenes, Word associates the new file with the current document. If you didn't set a document type using Start Mail Merge, Word sets it to Letters, as shown in Figure 41.5.
You can also use a Word document as your data source. Using a Word file as the data source usually works best when the data is stored in a table, but that is by no means essential. You can use a plain Word document in which the fields are separated by tabs, commas, slashes, and so on. Regardless of how the data file is formatted, Word assumes that the data file contains a header row or a header line. The header itself should be formatted the same way the data is formatted—separated by tabs, commas, in a table row, etc.
Because Word assumes that the first data record contains the column headers, if it doesn't, the first row of data is used as the header, as shown in Figure 41.6. David and Harold might not like being listed as Johns.

Unfortunately, once you've opened a headerless file as the data source, there is no simple and easy recovery. Because of a bug in the way Word handle's such files, Word keeps the data file open and unavailable for editing until Word is closed. One possible approach is to scrap the mail merge operation (if you haven't proceeded very far), close Word, reopen Word, edit the data file, and start anew. Other approaches are also possible, such as opening a read-only copy of the original data file, editing it, saving the changed file using a new name, and then switching to that file as your data file. At least this way Word doesn't need to be closed and reopened, although it does leave you with a useless data file that you'll need to remember to delete later, after Word is closed.
To associate a Word file as the data file, in the Mailings ribbon, choose Select Recipients
If your data file contains a Word table, control is returned to you, with the Edit Recipient List tool now available on the Mailings ribbon. If your data file is not in the form of a table, Word presents the Header Record Delimiters dialog box, shown in Figure 41.7. If Word guesses correctly, click OK. If not, then set the field and record delimiters so that they match the data file and click OK. Word now returns to the current document, with the Edit Recipient List tool available. You're now ready to begin building your data document. See Chapter 43 for the scoop on how to proceed.
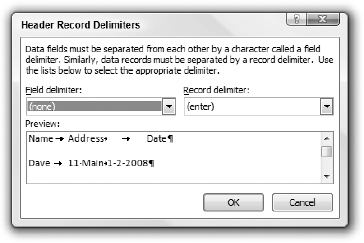
Figure 41.7. If the data file doesn't contain a table, Word asks you to confirm the nature of the field and record delimiters (separators).
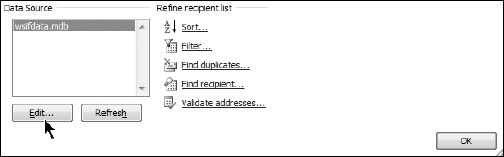
Once the data file has been associated and opened, it's a good idea to click the Edit Recipient list so you can verify that the data set looks the way it should. If something is amiss, in the Mail Merge Recipients dialog box, under Data Source, click the data file listed, as shown in Figure 41.8, and then click Edit. Note that you can fix erroneous data this way, but you cannot fix an erroneous header.
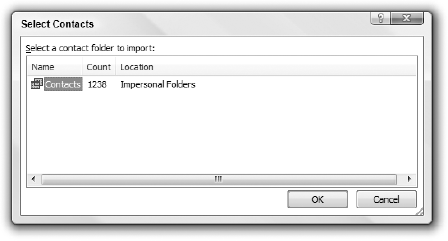
One of the most common sources used within Word is Outlook's contacts. To use data from Outlook, choose Select from Outlook Contacts. In Select Contacts, shown in Figure 41.9, if multiple contact folders are displayed, click the one you want to use and click OK.
After clicking OK, nothing more happens—you're ready to compose your data document. See Chapter 43 for details.
To use an Excel worksheet as your data source, in the Mailings ribbon, choose Select Recipients
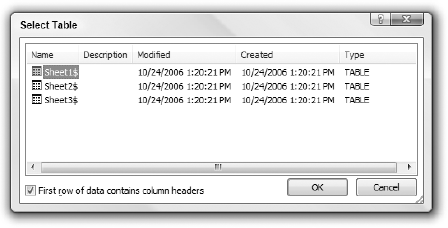
To use an Access database as the data source for a mail merge, in the Mailings ribbon, choose Select Recipients
When working with HTML files as data sources, note that they cannot reside on the Internet. You must first save the file to your local hard drive (or at least somewhere on your LAN or in your workgroup).
In addition, using HTML files as data sources almost never works unless the data has been carefully formatted. For best results, the data should be in a table and should contain a header row.
Once the data file is ready, so are you. In the Mailings ribbon, choose Select Recipients
A common problem occurs if Word can't recognize a consistent data pattern in the file. If Word prompts you about how the data fields and records are delimited, you might need to examine the file to see. Open the file using Office
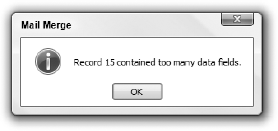
Another problem occurs when the data source is inconsistently formatted, such as when some rows (records) contain different numbers of columns (data fields). When that happens, the file is ostensibly attached okay, but when you click Edit Data Source to verify that the data set is correct, you might see an error like the one shown in Figure 41.11. Unfortunately, when this happens, the only recourse might be to edit the file to fix the problem, which ultimately means that the original data source is probably not going to be a reliable source of additional data or updates.
In this chapter, you've learned about data considerations when preparing a data document in Word. You now know how to connect a variety of data sources to Word and are aware of the kinds of information you will need and decisions you will have to make when responding to various prompts from Word. You also now know of a dozen or more different kinds of data you can connect to a Word data document. You should now be able to do the following:
Create a new data source, and customize it for entering information other than simple address data
Associate data contained in a Word file with a data document
Use Outlook contacts as a source for mail merge data
Attach HTML, Access, Excel, and other data files to a Word data document