
Document protection
Permissions
Information Rights Management and word
Using digital signatures
Using passwords to protect Word documents
Inserting comments
Tracking changes
Reviewing comments and changes
Not too terribly long ago, about the only way you could protect a Word document was to password-protect it using a password technology that was decidedly easy to crack. Password-cracking solutions abounded and were available free or practically free. Word has come a long way since then and now offers a variety of different kinds of protection that are a lot better than what was available for Word 97 and earlier, although nothing is 100% secure.
Not only does improved technology make protection stronger, but the variety of types of protection has expanded as well. This chapter looks at the types of document protection available to Word users, and describes how to use them. You've already learned how to use Word options and settings to enable and disable running macros and other add-ins, particularly in Chapters 47 and 48. In this chapter, however, the focus is on protecting the privacy and purposes of your documents.
One of the unfortunate things about a piece of software as complicated as Word 2007 is that privacy settings aren't centrally located. This makes discovering the full range of what's available a bit difficult. To save you the trouble of searching all over to find what you can control, here's the definitive list of the different types of protection (and pseudo-protection) Word 2007 offers, and where to find them:
Permission—Restrict a document so it can be opened and/or changed only by specific individuals. Select Office

Digital signature—Sign a document with a digital signature to provide assurance that you are the source of the document. Select Office
Inspect Document—Inspect the document to see if it contains private or sensitive information or data. Select Office
Mark as Final—Mark a document as final to let recipients know that the document is considered the final revision. This setting makes the document read-only and makes it unavailable for additional typing, editing, proofing, or tracking changes. Note that this setting is advisory only. Recipients with Word 2007 can remove the Mark as Final setting. Recipients with earlier versions of Word who have installed the Office 2007 Compatibility Pack won't even see the file as read-only. Hence, this kind of gentle protection would have to be combined with something more substantial to be meaningful. Select Office
Style formatting restrictions—Limit formatting to a selection of styles, as well as block Theme, Scheme, or Quick Style Set switching. Protection here is by password, and is therefore less secure and robust than when using permissions. Select Review ribbon
Editing restrictions-Read only—This offers password protection, which is not very secure, along with exceptions of specific areas of the document. Exceptions can be made wholesale, or you can limit them to individuals with specific .NET Passport–associated e-mail addresses. Select Review Ribbon
Editing restrictions-Tracked changes—This type of protection allows only tracked changes to be made. Select Review Ribbon
Editing restrictions-Fill-in forms—This type of protection allows filling in of form fields and content controls. Select Review Ribbon
Editing restrictions-Comments—This type of protection allows only comments. Exceptions can be made for selected areas of the document, for everyone, or for specific individuals (using .NET Passport–associated e-mail addresses). Select Review Ribbon
Password to open/modify—This type of protection lets you specify a password to open and/or modify the document. This protection is not the same as the Editing restrictions' No Changes setting. You must choose one or the other. Select Office
Note
A number of these controls are also available using the Protect Document tool on the Developer ribbon.
The rest of this section looks at each of these, showing how you enable protection and assessing the degree of protection provided.
A relatively new and strong way to protect your documents uses an Information Rights Management server to authenticate users who create or receive documents or e-mail that have restricted permissions. As noted in Figure 49.1, some enterprises have their own rights management servers. If you don't have access to one, you can use Microsoft's free trial Information Rights Management service.

Figure 49.1. If you don't already have access to an Information Rights Management service, you can sign up to use a free trial service.
To use this service, you and all users with whom you share rights-managed documents or e-mail must have .NET Passport-registered e-mail addresses. The biggest risk is that Microsoft might at some point end the free trial service. You'll then have three months in which to move to a different rights management server, subscribe to whatever service Microsoft offers (assuming they replace the free trial service with a for-pay service), or remove rights management protection from your documents so you don't lose access to them.
To restrict permission by using Information Rights Management, choose Office
If you are not logged on to the rights management server account you want to use, or if you need to specify, add, or remove a user account, choose Office

Figure 49.2. While most rights management users have only one rights management account, it is possible to have multiple accounts.
If credentials are already associated, and/or when you click OK in the dialog box shown in Figure 49.2, Word displays the Permission dialog box shown in Figure 49.3. Type the e-mail addresses of people with permission to read and change the document in the boxes provided. E-mail addresses should be separated with semicolons. Note that the Read and Change boxes use your Outlook e-mail address cache as a source of potential e-mail addresses to enter. When you type the first character of an address, cached addresses beginning with that character are listed.
Setting Up Information Rights Management
In the Service Sign-Up dialog box, choose "Yes, I want to sign up for this free trial service from Microsoft" and click Next. In the Welcome to the Windows RM Account Certification Wizard, choose "Yes, I have a .NET Passport." (They are so prevalent at this point that this section assumes that you have one. If you don't, then choose the No option and follow that detour, and then join back up with the next step once you've set up your .NET Passport account). Click Next.
In Specify Your E-Mail Address, type the address associated with the .NET Passport account you want to use for rights management, and then click Next. In Select Certificate Type, read the descriptions of Standard and Temporary, make your choice, and then click Next

To see more options, click More Options, not surprisingly, which displays the different Permission dialog box shown in Figure 49.4. Note that you can set an expiration date for permissions you grant. In addition, recipients of the document will not be able to print, copy, or access document content programmatically (for example, use a program to extract XML data) unless the corresponding options are checked. For additional protection, if you don't want to receive requests for additional permission, remove the check next to "Users can request additional permissions from." Once you've selected permissions, click Set Defaults to make the selected permissions the default for future documents on which you restrict permissions.
Click "Require a connection to verify a user's permission" to require that individuals to whom you are granting permissions be connected to the rights management server, either over the Internet or over the respective intranet. Note that if you have not installed the Windows RMS client for Rights Management Services, this option will be grayed out as unavailable.
When you click OK in either of the dialog boxes shown in Figure 49.3 or Figure 49.4, Word adds the Do Not Distribute bar at the top of the document window. Clicking Change Permissions redisplays the dialog box shown in Figure 49.5.
When and if there is no longer a need to restrict access to a document, choose Office
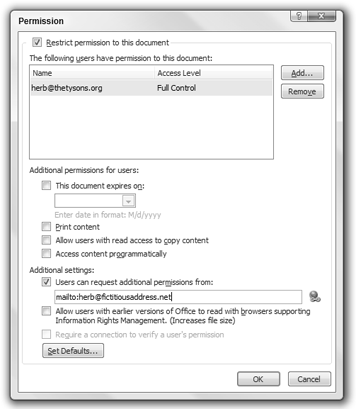
Figure 49.4. You can set an expiration date as well as restrict permission to copy or print a document.
Figure 49.5. The Do Not Distribute message bar is not affected by the Message Bar setting in the Trust Center, described in Chapter 47.
A digital signature is an electronic certificate that provides a way for recipients to verify that a document or e-mail actually came from the sender. Can these certificates really provide such verification? That's an article of faith, perhaps—an appropriate enough concept for a Bible, one supposes. Use and trust digital signatures according to your own personal beliefs. You assume any and all risks.
Note
Personally, I don't trust digital signatures. They seem like a gimmick to get potentially billions of Internet users to fork over a few dollars a year for something that, at present, provides no assurance at all (to skeptics, at any rate). When I receive e-mail containing a digital signature, warning bells immediately go off because nobody with whom I exchange e-mail actually uses digital signatures. Hence, the only e-mails I ever get that have digital signatures have been part of some scam to try to convince me to share various account numbers. The bottom line? If you receive something important and the validity of the signature is an issue, then you are going to pick up the telephone and call the sender to verify the contents. You aren't going to take a digital signature at face value, and neither am I.
To digitally sign a Word document, choose Office

Figure 49.6. If you don't already have a digital signing certificate, click Signature Services from the Office Marketplace to learn about for-fee and free services.
If you choose the Signature Services option, Word takes you to a Digital Signing site on the Microsoft Office website. There, you can use a commercial service to buy a digital certificate. As this is being written, at least one certificate authority is offering a free digital signature to private individuals (non-business).
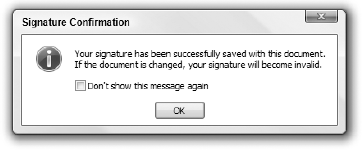
If you choose OK, and the document has not been saved, you are prompted to save the file as a Word document. Word then displays the Sign dialog box, shown in Figure 49.7. You do not need to provide a purpose for signing the document, but you can if you want. To see exactly what you are signing and what information is provided along with the signature, click the link at the top of the dialog box: See additional information about what you are signing. If the Signing As identity/certificate isn't the one you want to use, click Change. If everything is as you want it, click Sign, and the Signature Confirmation message appears, as shown in Figure 49.8.
Once you've signed a document, the document is locked against further changes until the signature is removed. Unlike document permissions, a digital signature can be removed from a Word document by anyone with the appropriate version of Word. Once removed, however, it can be signed only by the owner of a signing certificate. Hence, if you remove my signature, you can edit the file I sent you and make any changes you want to. However, you will not be able to restore my signature.

Figure 49.7. If you're not sure about the signing identity, click Change to see additional signing certificates as well as information about this one.
Warning
Let's be honest here. You can use a free service to obtain a certificate with my name on it and affix that signature to a document and claim that I signed it. However, if it comes from the same CA (Certificate Authority) I used, it can't be associated with my e-mail address, which proves it's not really my signature; and if it doesn't come from the same CA, I can use that as proof that it's not really my signature. Presumably, there are ways to determine whether a signature is valid, but there are ways to make a forged signature look valid, and not everyone is sufficiently skeptical. Forewarned is forearmed.
To remove a signature from a document, choose Office
Don't let the words "permanently" and "cannot be undone" throw you. This simply means that you can't remove someone's signature, change that $1,000 fee to $100,000, and then reaffix their signature. Once you remove someone's signature, only they can put it back.

You can use the Document Inspector to see what private or personal information resides in a file, and remove it. The Document Inspector checks for the kinds of information and content shown in Figure 49.10. To display the Document Inspector, choose Office
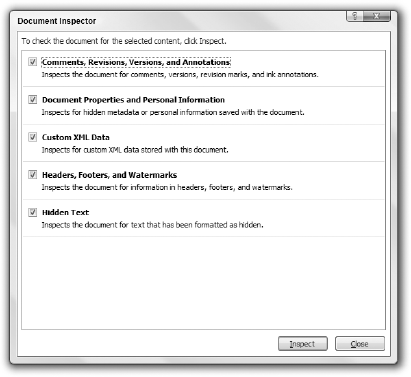
Figure 49.10. Use the Document Inspector to remove private/proprietary information before passing a document along to someone else.
The Document Inspector inspects the current document for each of the types of material or data indicated. If it finds any, the Document Inspector dialog box is redisplayed, with Remove All buttons next to each type of content that was found, as shown in Figure 49.11.
Warning
Make a backup copy of the document before using Remove All. Once you remove the content using the Document Inspector, you can't get it back using Undo. Particularly for comments and data, if they are content you need to preserve, make a backup copy of the document.
There is no facility in the Document Inspector for further inspecting to see exactly what it found. You have two options: click Remove All to do exactly that, or click Close and conduct a closer personal inspection. You can remove the content yourself manually or you can return to the Document Inspector and use Remove All once you're satisfied that you really want it removed.
Rights management represents one general area of document protection, and it is certainly more formidable and secure than most of what you can do using formatting and editing restrictions. However, if you choose not to install and use rights management software, the Restrict Formatting and Editing settings can provide a measure of protection.

Figure 49.11. A red exclamation mark means that the Document Inspector found potentially sensitive content, while the check mark indicates that the specified type of content was not found.
To limit formatting to certain styles, in the Review or Developer ribbons, choose Protect Document

Figure 49.12. With "Limit formatting to a selection of styles" checked, click Settings to choose those limits.
The Formatting Restrictions dialog box provides the following options:
Checked styles—Place a check next to each style you want to allow. Remove checks for styles you want to disallow. Note that the styles listed might be limited based on settings in the Manage Styles dialog box, discussed in Chapter 9. See Chapter 9 if you need to liberate additional styles from captivity before they will display here. Note that Normal is not included in the list. As much as you might like to, you can't deny access to the Normal style.
Recommended Minimum—If the list is too inclusive, click Recommended Minimum, and then add or remove checks as needed.
None—If the style list is way too inclusive, then choose None, and place a check next to just those you want to allow.
All—If the style list is way too restrictive, then click All and remove the check next to those you want to disallow.
Allow AutoFormat to override formatting restrictions—If AutoFormat's rules and practices are sufficiently rigorous for your purposes, click to allow this option.
Block Theme or Scheme switching—Choose this option to limit formatting to the currently applied theme or scheme.
Block Quick Style Set switching—Choose this option to use style definitions from the current document and template only.
When you're ready to proceed, click OK in the Formatting Restrictions dialog box. Word next displays the message box shown in Figure 49.13. Click Yes if you want disallowed styles or formatting removed. Note that if any styles are removed, text will be reformatted using Normal (even if the default paragraph style, set in Office

When you're ready to proceed, click Yes, Start Enforcing Protection in the Restrict Formatting and Editing pane. Optionally, you can password-protect your formatting restrictions. Even if the level of protection isn't as strong as rights management, it's still better than nothing, assuming the hapless users upon whom you are imposing the restrictions can't be trusted. Sniff. Click OK when you're done.
Note
Other than being an ornery cuss, why would you want to impose formatting restrictions? Some publishing processes depend upon only certain styles being used. There are macros or other programs that process files so that they can be fed into other parts of the publishing process. If other styles are used, then the process breaks down and requires manual intervention. Hence, it's better if only the allowed styles are used. In other cases, enterprise-wide formatting standards are strictly imposed to ensure that all documents have a consistent and professional look. Enforcing style restrictions is one way to do that.
With formatting restrictions in place, a number of formatting tools, commands, and keystrokes are grayed out as unavailable, as shown in Figure 49.14. Notice that the Change Case "formatting" tool isn't grayed out, however. That's because case is not formatting; it's simply a choice of which characters to use.

You can protect all or part of a document against changes. You can make different exceptions for different users. Suppose, for example, that you have a document that has been written by a group of people. You want each individual to be able to edit his or her own section, but not that of others. At the same time, you don't want to have to manage different documents.
The solution is to create a document with a specific area for each individual. You make the entire document read-only, but you make an exception for each individual's section so that the individual responsible can make changes as needed.
To set a document as read-only, click Protect Document
To make an exception, select the part of the document to which you want to allow changes by someone (or everyone). This selection can be any part of the document—a single letter, word, sentence, line, paragraph, and so on. If you want the exception to apply to everyone, click the check box next to Everyone. Or, if other groups are listed, you can place a check next to any of them.
To make an exception for individuals, if they are listed, click to place a check by their names. If the individuals aren't listed (or if no individuals are listed at all), click More Users. In Add Users, type the user IDs or e-mail addresses for the individuals you want to exempt from the read-only proscription, as shown in Figure 49.15. When you click OK, Word attempts to verify the names/address you added. If they are verified, then they are added to the list of individuals.

Back in the Restrict Formatting and Editing pane, you need to place a check by the name(s) and e-mail address(es) you added, and then click Yes, Start Enforcing Protection. Add and confirm a password if desired, as shown in Figure 49.16, noting that the document is not encrypted and is susceptible to hacking by malicious users. If you enabled User authentication, the top part of the dialog box becomes unavailable, and Word will use Information Rights Management to control the permissions. The document is encrypted, and users are authenticated using .NET Passport.

This protection option is identical to the No changes (Read only) type of protection except that all users can insert comments wherever they want to. Refer to the preceding discussion, adding to it that comments are enabled everywhere.
Another option is to allow editing, but only tracked changes. That way, you can see who changed what, and when. This is an important feature in controlling the editing/revision process. To protect a document for tracked changes, click Protect Document
To turn protection on, click Yes, Start Enforcing Protection. The Start Enforcing Protection dialog box appears, where you can set and confirm a password. Note that User authentication is not available for this kind of protection. When you click OK, protection is enabled, and the document switches into Track Changes mode. To turn protection off—which is necessary for accepting/rejecting tracked changes—click Stop Protection. If the Restrict Formatting and Editing pane has long since disappeared, and the time comes to turn protection off; you can toggle it back on using the Protect Document tool in the Review or Developer ribbon.
Forms protection is discussed in Chapter 44, "Forms." In particular, see the section "Forms Protection."
A final kind of protection is well hidden in Word 2007. It was a bit less hidden in Word 2003 and earlier, although still not overly conspicuous. This legacy feature offers the same weak protection already noted, in that passwords aren't impossibly difficult to hack and crack. It suffers from other fatal flaws, as well, described below. The bottom line: Use this kind of protection at your own risk. It is essentially worthless and offers minimal, if any, protection. Worse, it offers the illusion of protection, and thinking a document is well protected when it's not is perhaps worse than no protection at all, because you are unlikely to be as careful with the document as you would be if you knew it were completely unprotected.
You can set two different passwords: one that enables a user to open the document, and another that enables the user to make changes. To enable this kind of password protection, choose Office
The Read-only Recommended option applies only if there is no password for modifying the document. If this option is enabled, the user is provided a read-only recommendation when the file is opened, and an easy way to select read-only.
When you click OK, you are prompted to confirm any passwords and are returned to the Save As dialog box. Click Save to save the document with the password settings.
Note
The Protect Document button is really irrelevant to this dialog box, and serves mostly to let the user know that there are other and better protection options. If you click this button and the Restrict Formatting and Editing pane is not already showing, it is displayed behind the Save As dialog box, and the General Options dialog box goes away. If the Restrict Formatting and Editing pane is not already showing, clicking the Protect Document button simply causes the General Options dialog box to close, leaving users scratching their heads.
When you try to open the file, you are prompted for the relevant passwords. If you know the password to open but not the password to modify, you can click Read Only to open the document in "read only" mode. Why the quotes? Because it's only the file itself that is read only. The document window can be edited willy-nilly, unlike when using other kinds of protection discussed earlier. If you save the file under a new name, the new file will inherit the password settings, but if you copy the file to the Clipboard and save under a new name, the protection is history.

Comments and tracked changes are two ways Word provides for reviewing others' Word documents. Comments themselves are pretty easy to explain. They are notes, questions, suggestions, and other kibitzing that a reader engages in when reading a Word document. Comments are not integrated into the text as edits. They might suggest edits, and it's not unusual to copy the text of a suggestion from inside a comment and paste it into the text, but comments themselves aren't part of the flow.
Tracked changes, however, are part of the flow. Tracked changes are insertions and deletions made to a Word document. You can see what was inserted or deleted, by whom, and when. That way, if you have multiple edits, you can see which edit was made first. This can help in deciding how to integrate competing edits, as can "by whom" —especially if one "whom" is higher up the food chain than the other.
With comments and tracked changes, as with many Word features, there is the proverbial chicken-and-egg problem. Do you need to learn how to insert tracked changes and comments first, or how to view them first? If starting with viewing seems odd, a little explanation is in order.
If you're already familiar with comments and tracked changes, it doesn't really matter. You'll be reading these sections for nuance—looking for things you didn't already know. If you aren't familiar with tracking and comments, however, chances are good that your first exposure will come not from wanting to know how to insert them, but from encountering them and wondering how to deal with them. Is this the chicken or the egg? That depends on which comes first . . . .
Comments are much like footnotes. In fact, it's not at all unusual to convert comments into footnotes or endnotes. The point is that they are references in the text, but aren't part of the text themselves. Instead, they are like meta text. They comment about the text itself. It would interrupt the flow if comments displayed in line with the text.
There are two ways to display comments and tracked changes: in line and as balloons. Comments themselves aren't actually displayed in line, although indicators that a comment is present are. When Comments are displayed inline, they are indicated by initials and brackets in the text, as shown in Figure 49.18. When they are displayed in balloons, only the brackets show in line with the text.

Comment text itself displays in one of three ways:
ScreenTip, as shown in Figure 49.19. Comments display as ScreenTips regardless of whether display is set to inline or balloon. Hover the mouse over the bracketed area to display the ScreenTip.
Reviewing pane, as shown in Figure 49.20. Editing of Comments takes place in the Reviewing pane when display is set to inline.
Balloon, as shown in Figure 49.21. Editing of comments takes place in the margin when display is set to balloon.


To set comments to display as balloons, in the Reviewing ribbon, click the Balloons drop-down arrow and choose Show Revisions in Balloons, as shown in Figure 49.22. Alternatively, choose Show Only Comments and Formatting in Balloons. To set comments to display inline (which isn't really correct, as comments themselves do not display inline), choose Show All Revisions Inline.

To insert a new comment, click New Comment in the Comments section of the Review ribbon. If display is set to inline, type the comment in the Reviewing pane. If display is set to balloons, you'll type your comment inside a balloon in the margin of your document. When you're done, you can click in the text to return to normal editing. If you entered the text in the Reviewing pane, you can also click the X or press Alt+Shift+C to close the Reviewing pane.
To edit a comment, right-click the comment (brackets or initials) and choose Edit Comment. As above, where editing takes place depends on whether display is set to inline or balloons.
To delete a comment, right-click the comment in the text (brackets or initials), and choose Delete Comment. Or, if your wrist needs more exercise, click on the comment until Delete becomes available in the Comments section of the Review ribbon, and then click Delete.
Unlike comments, tracked changes can be displayed inline. You also have a variety of options regarding which aspects of tracked changes to display.
Too see the main set of tracking options, choose Track Changes
Markup—These control the formatting and colors to use when displaying insertions, deletions and comments, as well as how to display lines indicating where changes have been made. Default formatting is to use underlining for insertions and strikethrough for deletions. If Color is set to By Author, Word automatically chooses different colors for different authors. Note, however, that while your comments might display as green on your computer, they might display as magenta on somebody else's. Therefore, if you're describing a change in a phone conversation, don't assume the other party is seeing exactly what you're seeing.
Moves—These control the formatting and colors to use when displaying text that was moved from one location to another in the document. If you don't want to track moves, remove the check next to Track Moves.
Table cell highlighting—These options control the display of table edits—inserted, deleted, merged, and split cells.
Formatting—These control how formatting changes are represented. If you don't want to track formatting changes, remove the check next to Track Formatting. Note that this doesn't affect the display of tracked formatting. It controls whether formatting is tracked at all. When you turn this off, existing tracked formatting changes remain in the document, but subsequent formatting changes are not tracked at all. To hide tracked formatting changes, choose Show Markup and remove the check next to Formatting.
Balloons—The balloon settings here correspond to the Balloons settings in the Review ribbon. When set to Never, all of the additional settings in the Balloons section of the Track Changes Options dialog box are grayed as unavailable. When set to Always or Only for comments/formatting, you can set the width of balloons, which margin they appear in, and whether there are lines connecting tracked change balloons with the location of the changes in the text. Use the Paper orientation setting to rotate pages as needed (to landscape) if you want to fit the full text width in addition to showing tracked changes in balloons.
To enable tracked changes, click the Track Changes button in the Review ribbon. Notice that the upper and lower portions of that button are separate. Use the upper portion to toggle tracked changes, and use the lower portion to choose Track Changes, Change Tracking Options, or Change User Name.
Alternatively, if Track Changes is displayed in the status bar, you can click on it to toggle tracking on and off. If Track Changes is not displayed, right-click the status bar and click to place a check next to Track Changes. Once there, click Track Changes to turn tracking on or off. Track Changes can also be toggled using Ctrl+Shift+E.
If your comments don't display, it's possible that they are turned off. In the Review ribbon, click the drop-down arrow next to Show Markup to display the options shown in Figure 49.24.
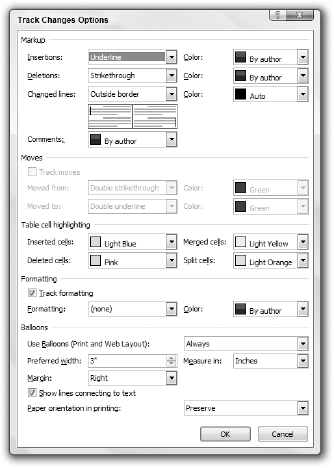
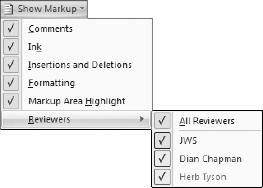
Figure 49.24. Click Show Markup in the Review ribbon to control the kinds of markup that Word displays.
Show Markup options affect only the display of markup. They do not affect whether changes are tracked. Display options are as follows:
Comments—Choose to display or not display comments.
Ink—When using a table or other system that supports pen annotations, use this option to choose whether to display the original ink markup (in addition to the text conversion thereof).
Insertions and Deletions—Use this setting to control the display of textual edits (insertions and deletions). Some users prefer to deal separately with textual and formatting edits. With this option enabled and Formatting display turned off, you can selectively focus.
Formatting—Use this setting to hide or show formatting changes.
Markup Area Highlight—Use this setting to turn shading of the markup area on or off.
Reviewers—Use this setting to selectively show or hide specific reviewers' edits and comments.
Use the Display for Review button to determine exactly what displays when a document contains tracked changes. The Display for Review button displays one of four button faces (shown in Figure 49.25):
Final Showing Markup—Inserts are shown in context with deletions shown either in balloons or in the Reviewing pane.
Final—All markup is hidden, and you see the document as it would appear if all changes were accepted.
Original Showing Markup—Inserts are shown in balloons or in the Reviewing pane, and deletions are shown in context with strikethrough (or whatever formatting is used to indicate deletion).
Original—All markup is hidden, and you see the document as it appeared before any markup occurred. This is how the document would appear if all changes were rejected.

Tip
It's often hard to gauge the effects of changes. It can be helpful to switch between Final and Original so you can properly assess the full impact of changes, especially when comparing paragraphs that have undergone substantial editing.
The Reviewing pane is potentially much more substantial than what's shown in Figure 49.20,. The Reviewing pane can be displayed horizontally, as shown there, or vertically as shown in Figure 49.26. In the latter, you see a cross-section of the different elements contained in the Reviewing pane.

Figure 49.26. The Reviewing pane shows comments, tracked changes, as well as changes in headers, footers, text boxes, footnotes, and endnotes.
To toggle the Reviewing pane, click Reviewing Pane in the Review ribbon. To choose between vertical and horizontal display, click the drop-down arrow next to Reviewing Pane, and choose Reviewing Pane Vertical or Horizontal, as shown in Figure 49.26.
The Reviewing pane is independent of balloons. If you prefer to edit some comments in the balloons and others in the Reviewing pane, the choice is yours. However, choosing one or the other will give you more screen real estate to work with.
Use the Changes section of the Review ribbon, shown in Figure 49.27, to review changes to determine whether you want to accept or reject them. Use Next or Previous to navigate to the nearest comment or change. Use Accept and Reject to integrate or remove changes. You can also right-click a change and choose Accept or Reject.

You cannot accept or reject a comment per se. Accepting a comment leaves it alone. Rejecting a comment deletes it.
When you accept a change, it is converted from a tracked change into regular text. When you accept a deletion, it is removed entirely from the document.
When you reject an insertion, it is deleted. When you reject a deletion, the original text is restored.
When you accept formatting changes, they are applied to the final version of the text. When you reject formatting changes, the formatting is removed.
Note that the Accept and Reject buttons in the Review ribbon both have upper and lower sections. The lower section of the Accept button features the options shown in Figure 49.27. Reject has similar options. Note that the third option, Accept All Changes Shown, is available only if one or more kinds of changes are hidden in the Show Markup tool.
When you send a document to someone, you can protect it so that any changes they make are marked as changes. You can protect it for Tracked Changes or for Comments, but not both at the same time. See the "Comments" and "Tracked Changes" sections earlier in this chapter in the material on document protection.
In this chapter, you've learned about the many different and potentially confusing kinds of document protection and security available in Word. You should now have a good idea about which forms of protection and security are useful, and which ones give only a false sense of security. You've also learned about tracking changes and commenting on Word documents. You should now be able to do the following:
Enable Track Changes in a document, and protect that document so that only that kind of editing can be performed
Use Information Rights Management to set strong protection for Word documents
Use Word's legacy password protection, while understanding that it's feeble protection at best
Set options that let you display a variety of different elements when tracking changes in a document