
Printing envelopes on-the-fly
Saving envelopes as part of a letter
Envelope address styles
Built-in and custom labels
In this chapter, we look at envelopes and labels. Word provides tools to facilitate printing both envelopes and labels, and it can be as simple as clicking just a few tools, typing an address, and clicking Print. Word can print directly to envelopes and labels, and it can add an envelope to a letter so that you can print new envelopes as needed (for example, when you have recurring correspondence with a recipient). Similarly, you can print directly to labels using Word's tools, or you can save the labels to a file. This can be useful when you have recurring needs—such as sending mail to a membership or employee roster—especially when the underlying database doesn't change often.
Word's Envelope addressing tool is available from the Mailings ribbon, in the Create section, shown in Figure 42.1. Before you click on the Envelope tool, however, if the current document contains the address, you often can save yourself some work by selecting it and copying it to the Clipboard.
If you're feeling lucky, type or paste the delivery address and return address and click Print. You'll get correct results more often than not, but it's the "not" part that ends up wasting envelopes. For help with Word's behavior and various options, keep reading.

With an address selected, when you click the Envelope tool, Word (usually) copies the selection into the Delivery Address field. Why usually? Because sometimes Word is contrary and decides to copy something else to the Delivery Address field. If nothing is selected, Word will try to guess where the address is, and often gets it right. The more complex the document (usually a letter), however, the worse Word's guesses are. For best results, pre-select the address and copy it to the Clipboard. If Word's guess is right, fine. If not, you can overrule Word and paste the contents of the Clipboard into the Delivery Address field, shown in Figure 42.2.

If you don't already have the address in the document you're writing but it is in your Outlook contacts list, you can insert an address from your contacts list, using the Insert Address tool. If you've previously inserted an address using this tool, the names of addressees previously used will be listed when you click the drop-down arrow.
Otherwise, click the Insert Address tool to display the Select Name dialog box, shown in Figure 42.3. With Search Name Only selected, the dialog box displays names that begin with the characters you type (under Search). With the Name Only option selected, the Go button is never available. To search all data fields, select More Columns. Type your search text and click Go. The Select Name dialog box displays the results in the same list. When you find the address you want, double-click it to copy it to the Delivery Address field.
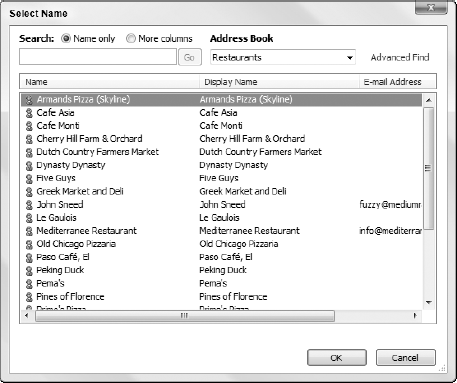
The Advanced Find feature is a variation on the Name Only search option. While the Name Only search option searches just the first letters of names in the Name field, Advanced Find summons the Find dialog box, shown in Figure 42.4. This feature enables you to search the entire Name field. For example, if your Name list begins with first names, you might need to resort to Advanced Find to locate everyone who has the same last name.

By default, for Return Address, Word uses the address provided in Office
Alternatively, you can use an address from your Outlook contacts, as shown under Delivery Address, above. Or, you can type an address or paste one in from the Clipboard. If you modify the Return Address field in any way (i.e., from the way it's supplied from the Advanced tab's Mailing Address field), Word prompts as shown in Figure 42.5. Although Word doesn't indicate this, clicking Yes to the prompt automatically copies this address to the Mailing Address field in the Word Options
Use the Options button to make changes to the way Word formats and positions text on the envelope (including envelope size), as well as how Word prints the envelope.

Figure 42.5. If you select Yes here, Word transfers this address to the Mailing Address field in the Advanced tab in Word Options.
Use Envelope Options, shown in Figure 42.6, to set the envelope size and to adjust the Delivery and Return Address fonts and positions on the envelope. Word provides over two dozen different preset standard envelope sizes. However, if you have something nonstandard, set Envelope Size to Custom Size to choose a different width and height, also shown in Figure 42.6.
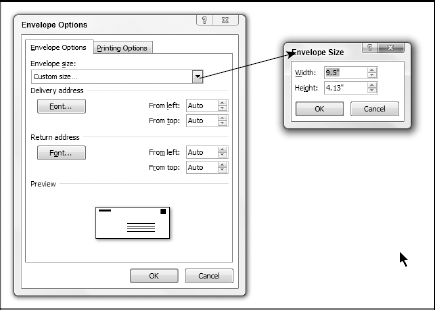
Figure 42.6. If Word's built-in list of 25 envelope sizes doesn't include yours, choose Custom Size to specify something different.
To change the fonts used for the Delivery or Return Addresses for this envelope only, click either of the Font buttons and make your changes. You can also change the position of both of the addresses by specifying the distance from the left and top. Choosing Auto leaves everything up to Word, which has preset distances based on the envelope size selected.
While Word doesn't let you change the default fonts for the Delivery and Return Addresses using the font options shown above, you can change them by modifying two styles. The methods for fully changing the Return Address and Delivery Address styles are different, however.
To modify the Return Address style, follow the instructions in "Add to Document," later in the chapter to add the envelope to the current document. Strictly speaking, this isn't essential, but it makes gaining access to the address style more straightforward. You can delete the envelope from the document once you've modified the style.
After the envelope has been added to the document, click in the Return Address and press Ctrl+Shift+S to activate the Apply Styles task pane, and note that the Envelope Return style displays under Style Name. In the Apply Styles task pane, click Modify. In the Modify Style dialog box, use the settings provided to change the Return Address style as needed. When you're done, enable the "New documents based on this template" option, and click OK.
If you want to change just the font or other formatting of the delivery address itself, the process just described will work. However, it will not let you save changes to the position of the delivery address. Did you notice that the delivery address is inside a frame, and that the frame can be used to position the delivery address? Thanks to this clever device, if you want to change the default position of the delivery address, a different method is needed.
Display the Envelopes tab in the Envelopes and Labels dialog box, and ensure that an address is contained inside the Delivery Address box. Click Options. Using the Delivery Address Font control, change the font settings as desired. Use the From Left and From Top fields to set the position to the desired location on the envelope. Click OK when you're done.
Back in the Envelopes tab, click Add to Document to add the envelope to the top of the document (you can zap the envelope when you're done, but you need it for now). In the Developer ribbon, choose Document Template
If prompted later to save changes to the underlying template, don't forget to say Yes. Now any envelopes you create in the future in documents based on that template will use your new Delivery Address settings.
The other tab in the Envelope Options dialog box is for Printing Options, shown in Figure 42.7. Note that you can also get to the Printing Options tab by double-clicking Feed in the main Envelopes tab of the Envelopes and Labels dialog box. Choose the options you need, set the Feed From source, and click OK.

If you installed electronic postage software, you can add electronic postage by clicking the Add Electronic Postage option, and adjust your options using E-Postage Properties. Different software packages feature different options. If you don't have electronic postage software, then you'll see the message box shown in Figure 42.8.

Use the Add to Document option if you want to save an envelope with a letter or other document. For example, suppose you routinely send an invoice once a month, and you're in the habit of using last month's invoice as a template for this month's. If you add the envelope the first time, you won't have to go through the envelope-creation process each time. If your printer trays are flexible, in fact, you can save additional work by having the envelope and letter print to different trays.
The Add to Document option is also useful if you want to change the default formatting (as shown above), or even if you simply want to preview the envelope before committing it to paper.
Word offers a wide variety of different label options that work with hundreds of labels from a number of different manufacturers. If you can find the box of labels in the office supply store, there's an excellent chance that Word's vast label repertoire can handle it. In those rare cases when you need a label Word has never heard of, there's an excellent chance that it has one that matches the dimensions. Even when that high probability isn't met, you can still use the custom label feature to create one that works.
To begin the process, click the Labels tool in the Mailings ribbon to display the Labels tab of the Envelopes and Labels dialog box, shown in Figure 42.9. If the current document contains something that Word thinks is an address, it will use that address in the Address field. Type or paste the address in the Address field as needed. Or, if you're creating return address labels, click to enable Use Return Address. If you've included your address in the Mailing Address field in the Advanced tab in Word Options, Word replaces the Address in the main block with your stored address.
Warning
Users often are confused by the Use Return Address option, thinking that it's a way to tell Word to use a return address in addition to a delivery address. Instead, this option tells Word to use your return address rather than a delivery address. If you want both return and delivery addresses, then you'll need to use the New Document option, described a little later in this chapter, and manually edit the contents of the label table once the Envelopes and Labels dialog box has finished its appointed mission.
As shown in Figure 42.9, Word can print a full page of the same label, or it can print a single label. What about a full page of different addresses? That's a different story and one that gets told in Chapter 43, as it requires using mail merge techniques and an associated database.
If you choose the Single Label option, Word lets you specify which row and column. If you're careful, you can print a single label from a sheet, use the next slot over for the next label (for example, at a later time), and so on. This helps you avoid wasting labels.
To select the label type, click the label icon in the Label section, or click the Options button. Both display the Label Options dialog box shown in Figure 42.10. Under Printer information, select the type of printer you have. While you might not have seen a tractor feed or continuous feed impact printer or matrix printer in the past ten years or so, they do still exist. Many shipping companies still use them precisely because they are an efficient way of having thousands of labels at the ready. Chances are good that most Bible readers, however, have single-sheet-oriented printers (which covers most laser and inkjet printers).
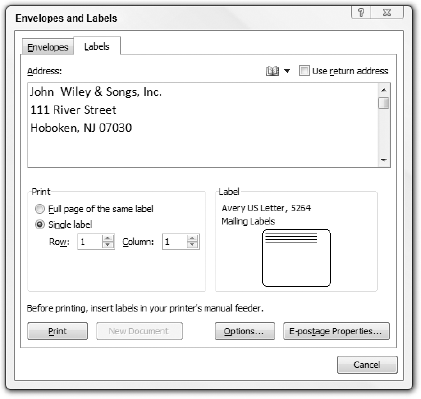
Figure 42.9. The word "Labels" doesn't even begin to touch on the full range of Word's Labels feature.

Under Label information, choose the label vendor, and then select the product number for the labels you are printing. Note that the size information is shown under Label information.
For additional information, as well as to modify the label if the default settings don't meet your needs, click the Details button to display the dialog box shown in Figure 42.11. Notice that when you change any of the settings, the Label name, which begins as grayed out, suddenly becomes available for editing. Type a new name. If you're using a given label, it's not a bad idea to make the new name a variation of the built-in name. If you know from the outset that you're going to create a custom label, you can use the New Label button instead of Details.

Use the New Document option to save the chosen labels and any contents in a new document. This is where you learn, if you didn't know it already, that the label feature relies heavily upon Word's table formatting, as shown in Figure 42.12. To make it perfectly obvious that this is a table, it might be necessary to turn on gridline display as well as nonprinting formatting marks. To turn on gridlines, in the Table Tools Layout ribbon, click View Gridlines. To turn on nonprinting formatting marks, press Ctrl+Shift+8. Now both gridlines and cell markers should be visible.
Note
As shown in Figure 42.9, when Single Label is selected, the New Document option is grayed out as unavailable. That's because the option doesn't make sense for a single label.
If you want to use multiple addresses on a sheet, this is the first step. You can, of course, type the addresses into the table cells shown. Or, you can convert the current file into a data document (a la mail merge), associate a data file with it, and populate the cells with Word merge fields. See Chapter 43 for the exciting details.

Tip
Rather than go through the steps of creating a new sheet of labels each time you need to print some, you can either save a labels document as a template or save the label table as a Quick Part or a Building Block. See Chapter 13 if you need a refresher course on saving Quick Parts or Building Blocks.
In this chapter, you've seen how to create envelopes and labels. You now know how to modify the address styles that Word uses when addressing envelopes. You also have an inkling of the kind of logic Word uses when trying to guess whether something you've typed is an address. You should now be able to do the following:
Print a single label
Save a sheet of labels or an envelope for future use
Customize and name a label for future use
Store your return address so that Word doesn't have to ask