To support compliance and reporting capabilities we will define a custom list that can be used for logging all of the delegation entries in a central list. This list can also be used to show a user what tasks were delegated on their behalf as we will see when we define the View Delegation History page referenced from the Task Delegation Web Part.
We will provision a List Definition and List Instance to store the notification content. This will make it easy to reuse the list, if necessary, in cases where you need to manage the notifications separately for sites that target different sets of users or in different farms.
To create the feature:
- Open Visual Studio 2010.
- Select File, then New Project.
- Browse the Installed Templates and select Visual C#, SharePoint 2010, and then List Definition as seen in the following screenshot:

- Enter the project details such as Name, Location, and Solution name.
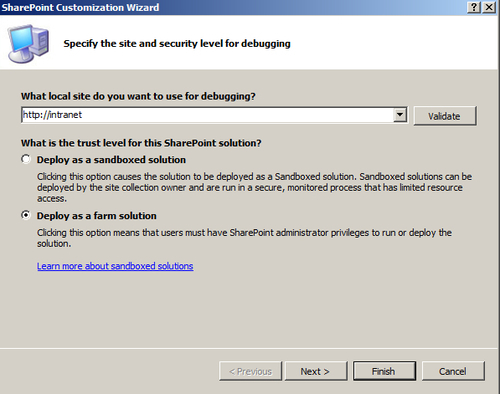
- Within the SharePoint Customization Wizard, provide a path to your SharePoint site and then be sure to select the option to Deploy as a farm solution as seen in the following screenshot:
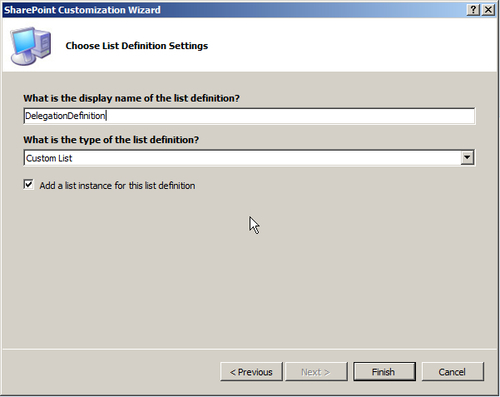
- Provide a display name for the List Definition, select the Custom List type, and click on the Finish button as shown in the following screenshot:
- Rename the ListDefinition1 item as
DelegationDefinition. - Rename the ListInstance1 item as
Delegation. - Edit the
DelegationDefinition/Elements.xmlfile and add in the content forElements.xml. - For the
SiteNamefield we would define aTextfield with the following elements:<Field Type="Text" DisplayName="Site Name" Required="TRUE" MaxLength="255" ID="{F0A3BFF6-F8F9-40E2-8031-2FEFD66FE8F3}" StaticName="SiteName" Name="SiteName" Group="Compliance Columns" /> - For the
ListNamefield we would define aTextfield with the following elements:<Field Type="Text" DisplayName="List Name" Required="TRUE" ID="{F6057985-C41D-4A30-8342-FF4E815BA51F}" StaticName="ListName" Name="ListName" Group="Compliance Columns" /> - For the
WorkflowNamefield we would define aTextfield with the following elements:<Field Type="Text" DisplayName="Workflow Name" Required="TRUE" ID="{4B57EC1E-C6CD-4197-ABEF-81754013DDD4}" StaticName="WorkflowName" Name="WorkflowName" Group="Compliance Columns" /> - For the
OrigUserfield we would define aUserfield with the following elements:<Field Type="User" DisplayName="Original User" Required="TRUE" ID="{68C1C89A-324D-48C3-AB1E-26AA7003A37F}" StaticName="OrigUser" Name="OrigUser" Group="Compliance Columns" /> - For the
DelegUserfield we would define aUserfield with the following elements:<Field Type="User" DisplayName="Delegate User" Required="TRUE" ID="{83856973-C1B3-401A-8687-52633D8B2ADC}" StaticName="DelegUser" Name="DelegUser" Group="Compliance Columns" /> - For the
LogDatefield we would define aDateTimefield with the following elements:<Field Type="DateTime" DisplayName="Log Date" Required="FALSE" ID="{EF890C5F-0DE6-44D6-B994-BC269E830E0E}" StaticName="LogDate" Name="LogDate" Group="Compliance Columns" /> - Next we define the attributes of the content type and set the field references to the IDs of the fields defined in the previous steps, along with the standard
IDfield associated with the base content type item:<ContentType ID="0x010089E3E6DB8C9B4B3FBB980447E313CE97" Name="Delegation Log Entry" Group="Compliance Content Types" Description="Delegation Log Content Type." Version="0"> <FieldRefs> <FieldRef ID="{fa564e0f-0c70-4ab9-b863-0177e6ddd247}" /> <FieldRef ID="{F0A3BFF6-F8F9-40E2-8031-2FEFD66FE8F3}" /> <FieldRef ID="{F6057985-C41D-4A30-8342-FF4E815BA51F}" /> <FieldRef ID="{4B57EC1E-C6CD-4197-ABEF-81754013DDD4}" /> <FieldRef ID="{68C1C89A-324D-48C3-AB1E-26AA7003A37F}" /> <FieldRef ID="{83856973-C1B3-401A-8687-52633D8B2ADC}" /> <FieldRef ID="{EF890C5F-0DE6-44D6-B994-BC269E830E0E}" /> </FieldRefs> </ContentType> - Next we will identify the attributes of the
ListTemplateelement which completes the configuration for the new List Definition:<ListTemplate Name="DelegationDefinition" DisallowContentTypes="FALSE" Type="12002" BaseType="0" OnQuickLaunch="FALSE" SecurityBits="11" Sequence="411" DisplayName="Delegation List Definition" Description="Delegation List Definition" Image="/_layouts/images/itgen.png"/> </Elements>
Since this list is primarily for administrative purposes, and not for general site content, it is a good idea to provide a link to the list on the Site Settings page. To add a link to any of the standard menus or ribbon, you will need to define a custom action. The groups of links are called action groups, and in order to distinguish this action from the other standard actions, we will also define a custom action group.
To create the custom action:
- Add New Item to the Visual Studio project.
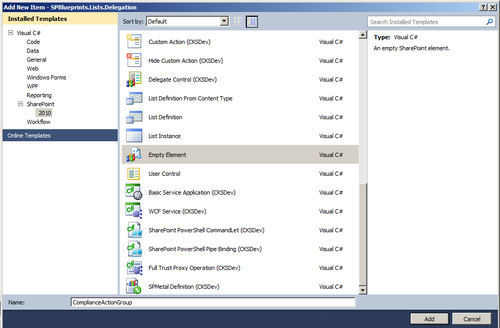
- Under the SharePoint 2010 category, select the Empty Element type and provide a name such as
ComplianceActionGroupas displayed in the Add New Item form in the previous screenshot. - Edit the
Elements.xmlto define the custom action group as follows:<CustomActionGroup Id="e5086212-6073-47e4-9f83-085e3d30d8df" Title="Compliance" Description="SPBlueprints Compliance Items" Location="Microsoft.SharePoint.SiteSettings" ImageUrl= "/_layouts/images/SPBlueprints/SPBlueprints_Bullet.png" />
With the action group defined, we can now define our custom action as follows:
- Add New Item to the Visual Studio project.
- Under the SharePoint 2010 category, select the Empty Element type and provide a name such as
ViewDelegationLogas displayed in the following screenshot:
- Edit the
Elements.xmlfile with the following content to complete the configuration of theCustomActiondefinition:<CustomAction Description="View Delegation Log" GroupId="e5086212-6073-47e4-9f83-085e3d30d8df" Id="cdbb5ebd-8599-41d2-8e54-c332d03242c1" Location="Microsoft.SharePoint.SiteSettings" RegistrationType="ContentType" RegistrationId="0x010089E3E6DB8C9B4B3FBB980447E313CE97" RequireSiteAdministrator="true" Rights="ManageWeb" Sequence="12001" Title="View Delegation Log"> <UrlAction Url="Lists/Delegation" /> </CustomAction>
With all of the project items created we can now finalize the SPBlueprints Delegation List Feature.
To configure the SPBlueprints Delegation List Feature:
- Rename the Feature1 item SPBlueprints Delegation List Feature.
- Select the
SPBlueprints Delegation List Feature.featureitem and provide a Title and Description. It should resemble the next screenshot. - To build the project, select Build, then Build
- To deploy to the local server, select Build, then Deploy
SPBlueprints.Lists.Delegation.
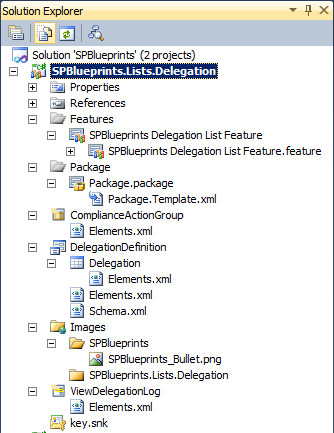
The completed project structure should resemble the following screenshot: