We will now create a custom Web Part for the task delegations to provide better visibility of the current delegation settings, simplify editing the settings, and also to view the delegation history for the given user. This Web Part can be used on the user profile page, or on any of the sites used to store workflows.
In order to determine the correct user profile to read, the Web Part must be able to check the URL for the accountname variable, and if not found, use the current user's information, which is how the user profile's Person.aspx page operates.
The Task Delegation Web Part and the referenced application pages will be added to a new project called SPBlueprints.Delegation.
To create the initial project:
- Open Visual Studio 2010.
- Select File, then New Project.
- Browse the Installed Templates and select Visual C# | SharePoint 2010, and then Empty SharePoint Project.
- Enter the project details such as Name, Location, and Solution name.
- Within the SharePoint Customization Wizard, provide a path to your SharePoint site and then be sure to select the option to Deploy as a farm solution.
- Right-click on the project file and select Add then New Item.
- From the template selection screen select the Web Part option.
- Provide the name
DelegationWebPartand click on the Add button. - Rename the Feature1 item
Web Part. - Select the
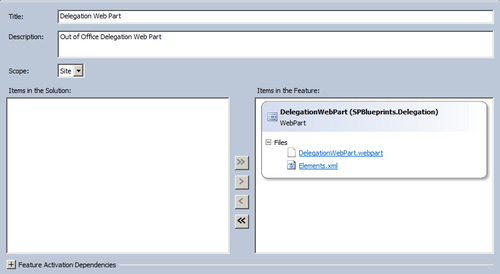
Web Part.featureitem and provide a Title and a Description.
The completed Web Part feature should look like the following screenshot:
We will now build the Task Delegation Web Part by editing the DelegationWebPart.cs class file.
First we will define the getAccountname() method, which will check the query string for a variable named accountname. If a value is not found, the current user will be used.
private string getAccountname(){
string queryString =
System.Web.HttpContext.Current.Request.QueryString.ToString();
int startPos = queryString.IndexOf("accountname=") + 12;
int valueLength;
if (startPos >= 12) {
int nextPos = queryString.IndexOf("&", startPos);
if (nextPos > 0){
valueLength = queryString.IndexOf("&", startPos) - startPos;
}
else {
valueLength = queryString.Length - startPos;
}
return HttpUtility.UrlDecode(queryString.Substring(startPos,
valueLength));
}
if(accountname == "") {
return
System.Web.HttpContext.Current.User.Identity.Name.ToString();
}
return String.Empty;
}
The Display method will be used to render the output for the Web Part. The formatted output will be maintained in the StringBuilder object named output. We will start by defining the needed variables and reading the current context, so that we can work with the current site's object, and then call the getAccountname() method, as previously explained.
void Display()
{
StringBuilder output = new StringBuilder();
string startDate;
string endDate;
SPContext context = SPContext.Current;
SPSite site = context.Site;
try{
accountname = getAccountname();
Next we will get the current service context based on the current site and use that to make a connection to the User Profile service, so that the user profile can be read, and the Out of Office delegation properties extracted.
SPServiceContext svcContext = SPServiceContext.GetContext(site);
UserProfileManager profileManager = new
UserProfileManager(svcContext);
UserProfile profile = profileManager.GetUserProfile(accountname);
DateTime dStartDate =
Convert.ToDateTime(profile["outStartDate"].Value);
startDate = dStartDate.ToShortDateString();
DateTime dEndDate =
Convert.ToDateTime(profile["outEndDate"].Value);
endDate = dEndDate.ToShortDateString();
string userDelegate = profile["outDelegation"].ToString();
// Lookup Display name for delegate
profile = profileManager.GetUserProfile(userDelegate);
string userDelegateDisplay = profile.DisplayName.ToString();
string userDelegateProfile = profileManager.MySiteHostUrl +
"person.aspx";
With the supporting data read from the user profiles, we can now format the output. The first step is to reference the Javascript file that is used to launch the Client OM's modal dialog windows. Next we will determine if there is a valid delegation in place, and display the appropriate output.
// Reference script
output.AppendFormat(@"<script type='text/ecmascript'
src='/_layouts/SPBlueprints.Delegation/Delegation.js'></script>");
// Determine if Active Delegation
if ((System.DateTime.Now >= dStartDate) && (System.DateTime.Now <=
dEndDate) && (userDelegate != "")){
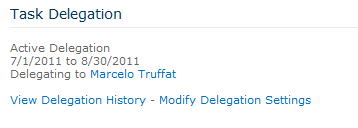
output.AppendFormat(@"<br /><div id='delegationContainer'>Active
Delegation<br />");
output.AppendFormat(@"{0} to {1} <br />", startDate, endDate);
output.AppendFormat(@"Delegating to <a
href='{0}?accountname={1}'>{2}</a><br /><br />",
userDelegateProfile, userDelegate, userDelegateDisplay);
output.AppendFormat(@"<a
href=""javascript:showDelegationHistory('{0}'),"");>View
Delegation History</a> - <a
href=""javascript:showDelegationForm('{0}'),"">Modify
Delegation Settings</a><br /><br />", accountname.Replace("\",
"\\"));
output.AppendFormat(@"</div>");
}
else {outputInactive(output);}
}
catch // properties could not be loaded
{ outputInactive(output); }
Once the output is complete we will set the value for the literal which renders the output of the Web Part.
this.EnsureChildControls();
this.literalMessage.Text = output.ToString();
Since the output for the inactive delegation could be called from more than one place, the code to display that version was moved to the outputInactive() method which is called in the previous code.
private StringBuilder outputInactive(StringBuilder output){
// Output Inactive Delegation
output.AppendFormat(@"<div id='delegationContainer'>No Active
Delegation<br />");
output.AppendFormat(@"<br /><br />");
output.AppendFormat(@"<br /><br />");
output.AppendFormat(@"<a
href='javascript:showDelegationHistory({0});'),>View Delegation
History</a> - <a
href='javascript:showDelegationForm({0});'>Modify Delegation
Settings</a>", accountname.Replace("\", "\\"));
output.AppendFormat(@"</div>");
return output;
}
When using Javascript within your custom Web Parts, it is often easiest to add the content to a file that is managed with the custom Web Part's feature. By mapping the Layouts folder in your Visual Studio project, it is possible to deploy files to a location within the Layouts virtual directory making it available to any site in the farm.
Best practice is to name the folder to match your project or feature name. In this case a folder named SPBlueprints.Delegation has been added and the following Delegation.js script was added to the project:
function showDelegationHistory(account) {
var _options = { url:
'/_layouts/SPBlueprints.Delegation/ViewDelegationHistory.aspx?
accountname=' + account, width: '800', title: 'Delegation
History for ' + account };
SP.UI.ModalDialog.showModalDialog(_options);
}
function showDelegationForm(account) {
var _options = { url:
'/_layouts/SPBlueprints.Delegation/EditDelegationSettings.aspx?
accountname=' + account, width: '800', title: 'Edit Delegaton
Settings'};
SP.UI.ModalDialog.showModalDialog(_options);
}