The Document ID service was added to the SharePoint Server 2010 to help with the retrieval of documents in large or complex systems. It adds a field to the Document content type that provides a unique identity to that document within the site collection. This is very helpful in cases where documents move around between libraries or sites within the site collection, perhaps via a workflow, or in cases like the solution here where there are perhaps tens of thousands of documents to be sifted through.
In addition to adding the additional field and maintaining the value assignment process, there is also an additional Web Part provided that supports a form that allows the user to provide the unique Document ID. It also sends it to a redirect service that will load the document no matter where it is stored within that site collection.
The feature is nearly flawless when used within a single site collection, but in most organizations, enterprise content cannot (and should not) be stored within a single site collection. In order to get the feature to work with multiple site collections, we need to direct the request to the appropriate site collection.
The enhanced DocID redirect Web Part will provide a simple mechanism to direct the user's lookup to the redirect page in the right site collection. The standard Doc ID redirection page is available here: /_layouts/DocIdRedir.aspx?ID=[Document ID].
A simple, but effective, way of maintaining the DocID destinations would be to use a simple linked list on the main Document Vault home site. That list can be created with a List Definition and List Instance in Visual Studio, or configured manually in the browser. In addition to the standard columns, an additional column was added named isActive to allow destinations to be deactivated if needed.
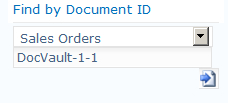
The Web Part will use the Client OM to read the DocumentIDLocations list and load all active locations into a drop-down box. The drop-down in combination with the Document ID textbox will form the link needed for the Document ID's redirect page.
As this will be done using the Client OM, we will create an HTML file to contain our script. Within that file we will start by adding a container for our code. The display for this Web Part is very simple, it includes a div container named DocIDRedirect, a span container named DocLocations that will contain the rendered drop-down with locations, a standard input box named DocumentID, and then an image link used for a Submit button.
<div id="DocIDRedirect" class="s4-search">
<span id="DocLocations">
</span>
<br />
<input type="text" id="DocumentID" value="" maxlength="20"
title="DocumentID" class="ms-sbplain" size="120"/>
<div style="float:right">
<a href="javascript:docRedirect();">
<img border="0" class="srch-gosearchimg" alt="Go"
src="/_layouts/images/DocIdLookup.png"></a>
</div>
We will now create the script block to hold our ECMAScript and add in the ExecuteOrDelayUntilScriptLoaded call which will wait for the page to fully load before calling the loadDocumentIDLocations method.
<script type="text/ecmascript" language="ecmascript">
ExecuteOrDelayUntilScriptLoaded(loadDocumentIDLocations,
"sp.js");
</script>
</div>
Within the script block we will now add in the referenced loadDocumentIDLocations() method. This method will connect to the list and execute a query to load any active Document ID locations.
function loadDocumentIDLocations() {
var listTitle = "DocumentIDLocations";
var context = SP.ClientContext.get_current();
var list = context.get_web().get_lists().getByTitle(listTitle);
var camlQuery = new SP.CamlQuery();
camlQuery.set_viewXml("<ViewFields><FielfRef Name='isActive'
/><FieldRef Name='URL' /></ViewFields><Where>
<Eq><FieldRef Name='isActive'/><ValueType='Boolean'>1</Value>
</Eq></Where><OrderBy>
<FieldRef Name='URLwMenu' Ascending='True' /></OrderBy>");
this.listItems = list.getItems(camlQuery);
context.load(listItems);
context.executeQueryAsync(ReadListItemSucceeded,
ReadListItemFailed);
}
If the query was successful, the ReadListItemSuceeded() method will be called. From here we can now create the docSelect drop-down and populate it with the returned options. When the control is fully populated, the resulting HTML will be set within the DocLocations container previously created.
function ReadListItemSucceeded(sender, args) {
comboContents = "<select id='docSelect' style='width:200px'>";
var items = listItems.getEnumerator();
while (items.moveNext()) {
var listItem = items.get_current();
listItem.get_item('URL').get_description());
comboContents += "<option value='" +
listItem.get_item('URL').get_url() + "'>" +
listItem.get_item('URL').get_description() + "</option>";
}
comboContents += "</select>";
document.getElementById("DocLocations").innerHTML =
comboContents;
}
If the query was not successful, the ReadListItemFailed() method will be called and an alert with the exception and stack trace will be displayed.
function ReadListItemFailed(sender, args) {
alert('Error: ' + args.get_message() + '
' +
args.get_stackTrace());
}
The final method is the docRedirect() method that is called when a user clicks on the image to submit the form. This is a simple call to redirect the user to the selected Document ID location and supplies the DocumentID value specified by the user.
function docRedirect() {
location.href= document.getElementById("docSelect").value +
document.getElementById("DocumentID").value;
}
When the file is complete, save it and upload it to a document library on the site. For the purpose of this example, I have uploaded the script to a library named Scripts.
With the script uploaded to the site, it is now available to be used within the Web Part on the page.
To add the Web Part to the Document Vault home page:
- Browse to the page you want to add the Web Part to.
- Click on the Site Actions menu and select Edit Page.
- Within the top-right zone, click on the Add a Web Part option.
- Within the Media and Content category, select the Content Editor Web Part.
- Click on the Add button.
- Provide a Title such as
Find by Document ID. - For the Content Link, provide a link to the script that was uploaded.
- After all of the desired properties are set, click on the OK button to apply the changes.