The SiteRequest form will be used to log the site requests with the related configuration settings and approval status. As we need this form to be available globally we will use an application page, which is deployed via our feature and available throughout the farm. This will also enable us to show or hide fields as needed and include advanced business logic, which provides significantly more flexibility than standard SharePoint list forms.
To get started we will need to map a folder within the Layouts directory.
To map the folder and create the files:
- Right-click on the project and select the Add node then select the SharePoint "Layouts" Mapped Folder option.
- Rename the newly created folder to
SPBlueprintsSiteCreationwithout the period. - Right-click on the folder and select the AddNewItem option.
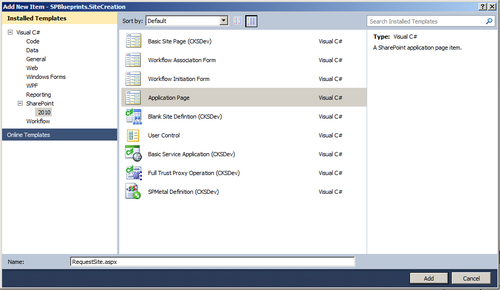
- From the SharePoint 2010 category, select the ApplicationPage option and provide the name
RequestSite.aspx. - Click on the Add button as shown in the following screenshot:
The standard application page is added to the project, which comprises two files we will now need to build. They are:
RequestSite.aspx:The design surface for controlsRequestSite.aspx.cs:The code behind file for control logic and events
The standard application page template includes the control and resource import statements at the top followed by the content placeholder controls.
To build the Request Site page:
- Add the page title
Request Site Collectionto thePlaceHolderPageTitlecontrol shown as follows:<asp:ContentID="PageTitle" ContentPlaceHolderID="PlaceHolderPageTitle" runat="server"> Request Site Collection </asp:Content>
- Add the page title
Request Site Collectionto thePlaceHolderPageTitleInTitleAreacontrol shown as follows:<asp:ContentID="PageTitleInTitleArea" ContentPlaceHolderID="PlaceHolderPageTitleInTitleArea" runat="server" > Request Site Collection </asp:Content>
- Next we will build-out the actual form within the
PlaceHolderMaincontrol. The format and referenced styles will render the form like the standard SharePoint list forms. A label control will be added to provide status and any error messages that need to be displayed.<table class="ms-formtable" style="margin-top: 8px;"border="0" cellpadding="0" id="formTbl" cellspacing="0" width="100%"> <tr> <td valign="top" class="ms-formbody" colspan="2" id="Td5"> <asp:LabelID="Status"runat="server"></asp:Label> </td> </tr>
- The formatting for a simple textfield such as the
Titleproperty is shown as follows:<tr> <td nowrap="true" valign="top" width="165px" class="ms- formlabel"><h3 class="ms- standardheader"><a name="SPBookmark_Title"></a> Site Title</h3> </td> <td valign="top" class="ms- formbody" width="450px" id="SPFieldFile"> <SharePoint:InputFormTextBox ID="Title" runat="server" ControlMode="New" Width="300"> </SharePoint:InputFormTextBox> </td> </tr>
- The formatting for a person field such as the
PriOwnerproperty is shown as follows:<tr> <td nowrap="true" valign="top" width="165px" class="ms-formlabel"><h3 class="ms-standardheader"> <a name="SPBookmark_PriOwner"></a>Primary Owner</h3> </td> <td valign="top" class="ms-formbody" width="450px" id="Td2"> <SharePoint:PeopleEditorID="PriOwner" runat="server" MultiSelect="false" MaximumEntities="1" Width="300"/> </td> </tr>
- Our form also requires a drop-down list, which will be used to help preset other list properties such as the managed path, site template, and quota template properties. A standard ASP.NET drop-down control is used as follows:
<tr>
<td nowrap="true" valign="top" width="165px"
class="ms-formlabel"><h3 class="ms-standardheader">
<a name="SPBookmark_Path"></a>Site Category</h3>
</td>
<td valign="top" class="ms-formbody" width="450px" id="Td3">
<asp:DropDownList ID="SiteCategory" runat="server"
Width="300">
</asp:DropDownList>
</td>
</tr>
- To handle the selected feature options we will use a standard ASP.NET
CheckBoxcontrol for each of the features available. The form row is shown as follows:<tr> <td nowrap="true" valign="top" width="165px" class="ms-formlabel"><h3 class="ms-standardheader"> <a name="SPBookmark_URL"></a>Document ID Service</h3> </td> <td valign="top" class="ms-formbody" width="450px" id="Td6"> <asp:CheckBox ID="SiteFeatureDocID" runat="server"/> </td> </tr>
- To submit the form we have included a standard ASP.NET button.
<tr>
<td colspan="2" align="right">
<asp:Button ID="Save" runat="server" Text="Save"/>
</td>
</tr>
</table>
</asp:Content>
The code behind this application page is used to handle the form processing during the Page_Load() method:
- We will start by checking to see if the form was posted, and if it was, we will reset the status control and then move into determining some of the configuration settings based on the
SiteCategoryform input field.if (Page.IsPostBack) { this.Status.Text = ""; try { // Site Categorization string quotaTemplate = ""; string managedPath = ""; string siteTemplate = ""; switch (this.SiteCategory.SelectedValue) { case"Project Site": quotaTemplate = "Project Collab"; siteTemplate = "Project Site"; managedPath = "projects/"; break; case"Extranet Site": quotaTemplate = "Extranet Collab"; siteTemplate = "Extranet Site"; managedPath = "extranet/"; break; default: quotaTemplate = "Team Collab"; siteTemplate = "Team Site"; managedPath = "sites/"; break; } - Next we need to connect to the list, which requires that we load the two properties stored in the web application's property bag. With those properties we can establish the required connections.
string listName = this.Web.Site.WebApplication.Properties["SiteRequestList"]. ToString(); string listPath = this.Web.Site.WebApplication.Properties["SiteRequestSite"]. ToString(); using (SPSite site = newSPSite(listPath)) { using (SPWeb web = site.RootWeb) { - When using a
PersonorGroupfield in a SharePoint list, it is necessary to pass in anSPUserobject when updating the list item. Before we can set the list value we will need to define anSPUserobject and set it to the form value if one was provided.SPUser userPriOwner = null; if (this.PriOwner.Accounts.Count > 0) { userPriOwner = web.EnsureUser(this.PriOwner.Accounts[0].ToString()); } - We can now add our list item and set the appropriate field values based on a mixture of our input form and the values that were determined based on internal decisions. For example, the
SiteCategoryselection box drives the field values for the managed path, site template, and quota template. We are also setting the request's status toPending Approval, which is what we have determined is the starting status for our requests. After all of the desired fields are set, we need to call theUpdate()method so that they are saved back to the list.SPListItem newEntry = web.Lists[listName].Items.Add(); newEntry["Title"] = this.Title.Text; newEntry["Description"] = this.Description.Text; newEntry["PriOwner"] = userPriOwner; newEntry["Path"] = managedPath; newEntry["URLName"] = this.URLName.Text; newEntry["Template"] = siteTemplate; newEntry["Quota"] = quotaTemplate; newEntry["Status"] = "Pending Approval"; newEntry["SiteFeatureDocID"] = this.SiteFeatureDocID.Checked; newEntry["SiteFeaturePub"] = this.SiteFeaturesPub.Checked; newEntry["SiteFeatureActions"] = this.SiteFeaturesActions.Checked; newEntry["SiteFeaturesWebParts"] = this.SiteFeaturesWebParts.Checked; newEntry["WebFeaturesContentOrg"] = this.WebFeaturesContentOrg.Checked; newEntry["WebFeaturesMetaNav"] = this.WebFeaturesMetaNav.Checked; newEntry["WebFeaturesPub"] = this.WebFeaturesPub.Checked; newEntry["WebFeaturesWikiPage"] = this.WebFeaturesWikiPage.Checked; newEntry.Update();
- We can now close out the top of our
ifblock. - If the form was not posted then we need to process the form within the
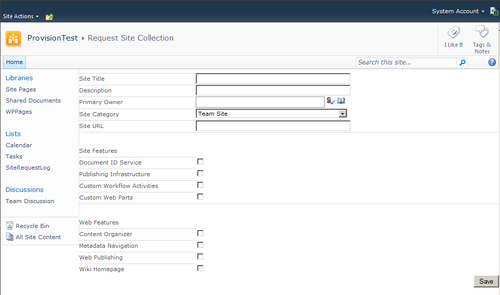
elseblock.else { this.SiteCategory.Items.Add("Team Site"); this.SiteCategory.Items.Add("Project Site"); this.SiteCategory.Items.Add("Extranet Site"); } - Once deployed, the rendered version of the Request Site Collection page is displayed as follows: