
Chapter 5
DHCP
IN THIS CHAPTER
![]() Discovering the basics of DHCP
Discovering the basics of DHCP
![]() Exploring scopes
Exploring scopes
![]() Configuring a DHCP server
Configuring a DHCP server
![]() Setting up a DHCP client
Setting up a DHCP client
Every host on a Transmission Control Protocol/Internet Protocol (TCP/IP) network must have a unique IP address. Each host must be properly configured so that it knows its IP address. When a new host comes online, it must be assigned an IP address that’s within the correct range of addresses for the subnet but not already in use. Although you can manually assign IP addresses to each computer on your network, that task quickly becomes overwhelming if the network has more than a few computers.
That’s where Dynamic Host Configuration Protocol (DHCP) comes into play. DHCP automatically configures the IP address for every host on a network, thus assuring that each host has a valid, unique IP address. DHCP even automatically reconfigures IP addresses as hosts come and go. As you can imagine, DHCP can save a network administrator many hours of tedious configuration work.
In this chapter, you discover the ins and outs of DHCP: what it is, how it works, and how to set it up.
Understanding DHCP
DHCP allows individual computers on a TCP/IP network to obtain their configuration information — in particular, their IP address — from a server. The DHCP server keeps track of which IP addresses are already assigned so that when a computer requests an IP address, the DHCP server offers it an IP address that’s not already in use.
Configuration information provided by DHCP
Although the primary job of DHCP is to dole out IP addresses and subnet masks, DHCP actually provides more configuration information than just the IP address to its clients. The additional configuration information consists of DHCP options. The following is a list of some common DHCP options that can be configured by the server:
- The router address, also known as the Default Gateway address
- The expiration time for the configuration information
- Domain name
- Domain Name Server (DNS) server address
- Windows Internet Name Service (WINS) server address
DHCP servers
A DHCP server can be a server computer located on the TCP/IP network. All modern server operating systems have a built-in DHCP server. To set up DHCP on a network server, all you have to do is enable the server’s DHCP function and configure its settings. In the upcoming section, “Working with a DHCP Server,” I show you how to configure a DHCP server for Windows Server 2019. (The procedure for previous versions of Windows Server is similar.)
A server computer running DHCP doesn’t have to be devoted entirely to DHCP unless the network is very large. For smaller networks, a file server can share duty as a DHCP server. This is especially true if you provide long leases for your IP addresses. (Lease is the term used by DHCP to indicate that an IP address has been temporarily given out to a particular computer or other device.)
Many multifunction routers also have built-in DHCP servers. If you don’t want to burden one of your network servers with the DHCP function, you can enable the router’s built-in DHCP server. An advantage of allowing the router to be your network’s DHCP server is that you rarely need to power-down a router. In contrast, you occasionally need to restart or power-down a file server to perform system maintenance, apply upgrades, or perform troubleshooting.
 Most networks require only one DHCP server. Setting up two or more servers on the same network requires that you carefully coordinate the IP address ranges (known as scopes) for which each server is responsible. If you accidentally set up two DHCP servers for the same scope, you may end up with duplicate address assignments if the servers attempt to assign the same IP address to two different hosts. To prevent this from happening, just set up one DHCP server unless your network is so large that one server can’t handle the workload.
How DHCP actually works
You can configure and use DHCP without knowing the details of how DHCP client configuration actually works. However, a basic understanding of the process can help you to understand what DHCP is actually doing. Not only is this understanding enlightening, but it can also help when you’re troubleshooting DHCP problems.
The following paragraphs contain a blow-by-blow account of how DHCP configures TCP/IP hosts. This procedure happens every time you boot up a host computer. It also happens when you release an IP lease and request a fresh lease.
When a host computer starts up, the DHCP client software sends a special broadcast packet, known as a DHCP Discover message.
This message uses the subnet’s broadcast address (all host ID bits set to one) as the destination address and 0.0.0.0 as the source address.
The client has to specify 0.0.0.0 as the source address because it doesn't yet have an IP address, and it specifies the broadcast address as the destination address because it doesn’t know the address of any DHCP servers. In effect, the DHCP Discover message is saying, “Hey! I’m new here. Are there any DHCP servers out there?”The DHCP server receives the broadcast DHCP Discover message and responds by sending a DHCP Offer message.
The DHCP Offer message includes an IP address that the client can use.
Like the DHCP Discover message, the DHCP Offer message is sent to the broadcast address. This makes sense because the client to which the message is being sent doesn’t yet have an IP address and won’t have one until it accepts the offer. In effect, the DHCP Offer message is saying, “Hello there, whoever you are. Here’s an IP address you can use, if you want it. Let me know.”
What if the client never receives a DHCP Offer message from a DHCP server? In that case, the client waits for a few seconds and tries again. The client will try four times — at 2, 4, 8, and 16 seconds. If it still doesn’t get an offer, it will try again after five minutes.
The client receives the DHCP Offer message and sends back a message known as a DHCP Request message.
At this point, the client doesn’t actually own the IP address: It’s simply indicating that it’s ready to accept the IP address that was offered by the server. In effect, the DHCP Request message says, “Yes, that IP address would be good for me. Can I have it, please?”
When the server receives the DHCP Request message, it marks the IP address as assigned to the client and broadcasts a DHCP Ack message.
The DHCP Ack message says, in effect, “Okay, it’s all yours. Here’s the rest of the information you need to use it.”
- When the client receives the DHCP Ack message, it configures its TCP/IP stack by using the address it accepted from the server.
Understanding Scopes
A scope is simply a range of IP addresses that a DHCP server is configured to distribute. In the simplest case, where a single DHCP server oversees IP configuration for an entire subnet, the scope corresponds to the subnet. However, if you set up two DHCP servers for a subnet, you can configure each with a scope that allocates only one part of the complete subnet range. In addition, a single DHCP server can serve more than one scope, and a DHCP server can (and typically does) serve more than one subnet.
You must create a scope before you can enable a DHCP server. When you create a scope, you can provide it with the following properties:
- A scope name, which helps you to identify the scope and its purpose
- A scope description, which lets you provide additional details about the scope and its purpose
- A starting IP address for the scope
- An ending IP address for the scope
A subnet mask for the scope
You can specify the subnet mask with dotted-decimal notation or with network prefix notation.
One or more ranges of excluded addresses
These addresses won’t be assigned to clients. For more information, see the section “Feeling excluded?” later in this chapter.
One or more reserved addresses
These are addresses that will always be assigned to particular host devices. For more information, see the section “Reservations suggested” later in this chapter.
The lease duration, which indicates how long the host will be allowed to use the IP address
The client will attempt to renew the lease when half of the lease duration has elapsed. For example, if you specify a lease duration of eight days, the client will attempt to renew the lease after four days. This allows the host plenty of time to renew the lease before the address is reassigned to some other host.
The router address for the subnet
This value is also known as the Default Gateway address.- The domain name and the IP address of the network’s DNS servers and WINS servers
Scopes, subnets, and VLANs
You might be wondering just how DHCP works in a network with several virtual local area networks (VLANs). Because each VLAN in a network is a separate broadcast domain, a DHCP request from one computer can’t cross over to other VLANs on the network.
There are two basic ways to solve this problem. The first is to put a separate DHCP server on each VLAN. On very large networks, that’s a sensible solution. But for most networks, there’s an easier way, called DHCP relay, also known as IP Helper.
DHCP relay is a routing function that forwards DHCP traffic across VLANs. Most routers can provide for DHCP routing, and many switches can do it as well. (DHCP relay is a layer 3 function, so switches that provide this feature are considered to be layer 3 switches.)
To configure a router (or switch) for DHCP relay, you simply associate a VLAN with a DHCP router that’s in a different VLAN. For example, suppose you have two VLANs — VLAN 20 on subnet 10.0.100.x and VLAN 30 on subnet 10.0.200.x — and your DHCP server is at 10.0.100.15 on VLAN 20. The router or switch would be configured to forward all DHCP traffic for VLAN 30 to 10.0.100.15. That way, both VLANs get DHCP from the same server.
In this case, you’d also need to ensure that the DHCP server has a scope for the subnets that correspond to the two VLANs. For example, you could set up a scope named VLAN 20 that serves IP addresses in the range 10.0.100.10 to 10.0.
Feeling excluded?
Everyone feels excluded once in awhile. But sometimes being excluded is a good thing. In the case of DHCP scopes, exclusions can help you to prevent IP address conflicts and can enable you to divide the DHCP workload for a single subnet among two or more DHCP servers.
An exclusion is a range of addresses that are not included in a scope. The exclusion range falls within the range of the scope’s starting and ending addresses. In effect, an exclusion range lets you punch a hole in a scope. The IP addresses that fall within the hole won’t be assigned.
Here are a few reasons for excluding IP addresses from a scope:
- The computer that runs the DHCP service itself must usually have a static IP address assignment. As a result, the address of the DHCP server should be listed as an exclusion.
- Some hosts, such as a server or a printer, may need to have a predictable IP address. In that case, the host will require a static IP address. By excluding its IP address from the scope, you can prevent that address from being assigned to any other host on the network.
Holding back some IP addresses at the bottom and top of a subnet is always a good idea. After all, the future is hard to predict. Even though you may not need the static IP space now, things change fast in our business. Here’s a typical configuration for a subnet that allows for this breathing room:
Start Address |
End Address |
Description |
|---|---|---|
10.0.100.1 |
10.0.100.254 |
Address range for distribution |
10.0.100.1 |
10.0.100.19 |
Excluded from distribution |
10.0.100.220 |
10.0.100.254 |
Excluded from distribution |
Here, the two exclusion ranges mean that the scope will distribute addresses from 10.0.101.20 to 10.0.101.219.
You could achieve the same thing without the exclusions — just list 10.0.101.20 as the start of the scope and 10.0.101.219 as the end of the scope. But it’s a common practice to start by specifying the entire subnet as the address range for the scope, and then exclude parts of the subnet as needed.
Reservations suggested
In some cases, you may want to assign a particular IP address to a particular host. One way to do this is to configure the host with a static IP address so that the host doesn’t use DHCP to obtain its IP configuration. However, here are two major disadvantages to that approach:
- TCP/IP configuration supplies more than just the IP address. If you use static configuration, you must manually specify the subnet mask, the Default Gateway address, the DNS server address, and other configuration information required by the host. If this information changes, you have to change it not only at the DHCP server, but also at each host that you configured statically.
- You must remember to exclude the static IP address from the DHCP server’s scope. Otherwise, the DHCP server won’t know about the static address and may assign it to another host. Then, you’ll have two hosts with the same address on your network.
A better way to assign a fixed IP address to a particular host is to create a DHCP reservation. A reservation simply indicates that whenever a particular host requests an IP address from the DHCP server, the server should provide it the address that you specify in the reservation. The host won’t receive the IP address until the host requests it from the DHCP server, but whenever the host does request IP configuration, it will always receive the same address.
To create a reservation, you associate the IP address that you want assigned to the host with the host’s Media Access Control (MAC) address. As a result, you need to get the MAC address from the host before you create the reservation. You can get the MAC address by running the command ipconfig /all from a command prompt.
 If you set up more than one DHCP server, each should be configured to serve a different range of IP addresses. Otherwise, the servers might assign the same address to two different hosts.
How long to lease?
One of the most important decisions that you'll make when you configure a DHCP server is the length of time to specify for the lease duration. The default value is eight days, which is appropriate in many cases. However, you may encounter situations in which a longer or shorter interval may be appropriate:
- The more stable your network, the longer the lease duration can safely exist. If you only periodically add new computers to the network or replace existing computers, you can safely increase the lease duration past eight days.
- The more volatile the network, the shorter the lease duration should be. For example, a wireless network in a university library is used by students who bring their laptop computers into the library to work for a few hours at a time. For this network, a duration such as one hour may be appropriate.
 Don’t configure your network to allow infinite duration leases. Some administrators feel that this cuts down the workload for the DHCP server on stable networks. However, no network is permanently stable. Whenever you find a DHCP server that’s configured with infinite leases, look at the active leases. I guarantee you’ll find IP leases assigned to computers that no longer exist.
Working with a DHCP Server
Usually, the best way to understand abstract concepts is to see how they work in the real world. To that end, the next few sections show you a brief overview of how DHCP is managed in a Windows network. First, you see how a DHCP server is installed in Windows Server 2019. Then you see how a DHCP server is configured.
Installing a Windows Server 2019 DHCP server
To install the DHCP server role on Windows Server 2019, follow these steps:
Click Server Manager in the Start menu.
The Server Manager application appears.
From the menu near the upper-right, choose Manage ⇒ Add Roles & Features.
The Before You Begin screen of the Add Roles and Features Wizard appears.
Click Next.
The Installation Type screen appears.
Choose Role-Based or Feature-Based Installation and then click Next.
The wizard displays a list of available servers.
Select the server on which you want to install the DHCP role on; then click Next.
The wizard displays a list of available server roles.
Select DHCP Server from the list of roles and then click Next.
The wizard displays a list of required features that must also be installed to support DHCP.
Click Add Features, and then click Next.
The wizard displays a screen describing what the DHCP role entails.
Click Next.
The wizard displays a list of features that are required to support DCHP and offers to install them.
Click Add Features.
The wizard returns you to the Select Server Roles screen in case you want to add other roles. I recommend you add roles one at a time.
Click Next.
The wizard now displays a list of features you can add. The features required to support DHCP are already selected, so you can skip over this screen.
Click Next.
The wizard now displays an informational screen that tells you what DHCP does and advises you that the server should have a static IP address and you should do a bit of planning before you set up a DHCP server. Duh!
Click Next.
The wizard displays a confirmation screen.
Click Install.
The wizard installs the DHCP role, which may take a few minutes. When the installation completes, a results screen is displayed to summarize the results of the installation.
Click Close.
You’re done!
Configuring a new scope
After you install the DHCP role on Windows Server 2019, you’ll need to create at least one scope so the server can start handing out IP addresses. Here are the steps:
In Server Manager, choose Tools ⇒ DHCP
This brings up the DHCP management console, shown in Figure 5-1.
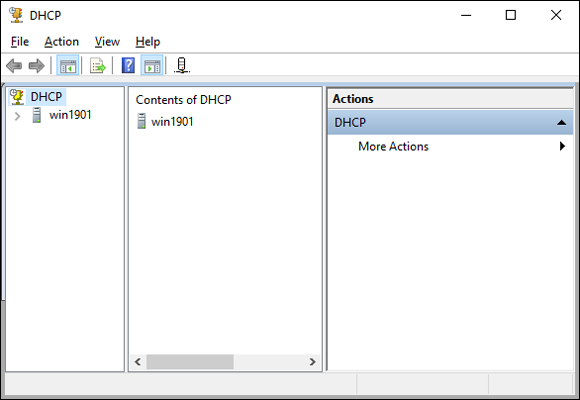
FIGURE 5-1: The DHCP management console.
Select the DHCP server you want to define the scope for, click IPv4, and then click the New Scope button on the toolbar.
This brings up the New Scope Wizard dialog box, as shown in Figure 5-2.
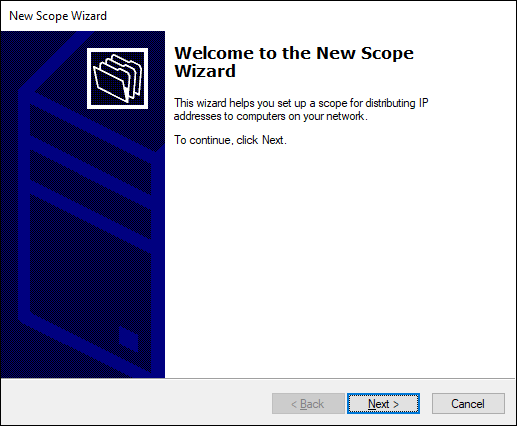
FIGURE 5-2: The New Scope Wizard comes to life.
Click Next.
You’re prompted for the name of the scope, as shown in Figure 5-3.
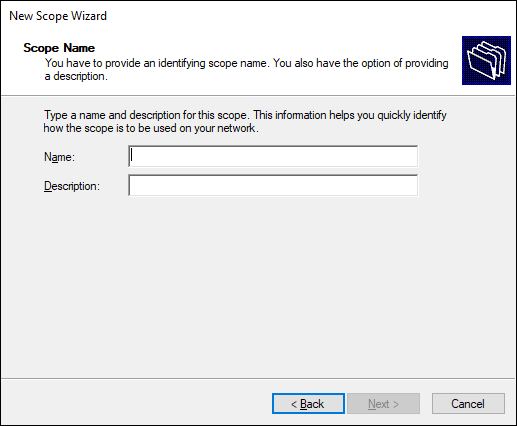
FIGURE 5-3: The wizard asks for a name for the new scope.
Enter a name and optional description, and then click Next.
The wizard asks for information required to create the scope, as shown in Figure 5-4.
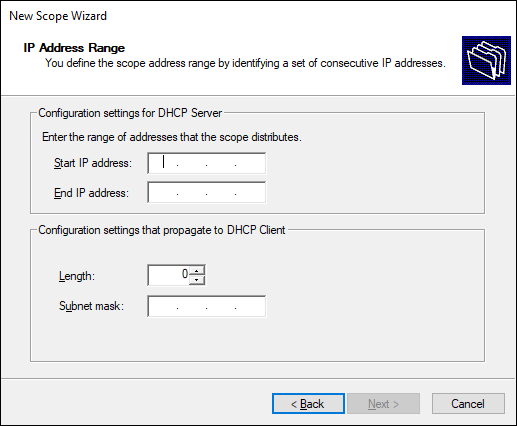
FIGURE 5-4: The wizard asks for scope information.
Enter the information for the new scope.
You must enter the following information:
- Start IP Address: This is the lowest IP address that will be issued for this scope.
- End IP Address: This is the highest IP address that will be issued for this scope.
- Subnet Mask: This is the subnet mask issued for IP addresses in this scope.
Click Next.
The wizard asks whether you want to exclude any ranges from the scope range, as shown in Figure 5-5.
(Optional) To create an exclusion, enter the IP address range to exclude and then click Add.
You can repeat this step as many times as necessary to add any excluded addresses.
Click Next.
The wizard asks for the lease duration, as shown in Figure 5-6.

FIGURE 5-5: Do you want to create exclusions?

FIGURE 5-6: Set the lease duration.
(Optional) Change the lease duration; then click Next.
When the wizard asks whether you want to configure additional DHCP options, leave this option set to Yes to complete your DHCP configuration now.
Click Next.
The wizard asks if you’d like to change DHCP options such as the default gateway and DNS servers.
Select Yes; then click Next.
The wizard asks for the default gateway information, as shown in Figure 5-7.
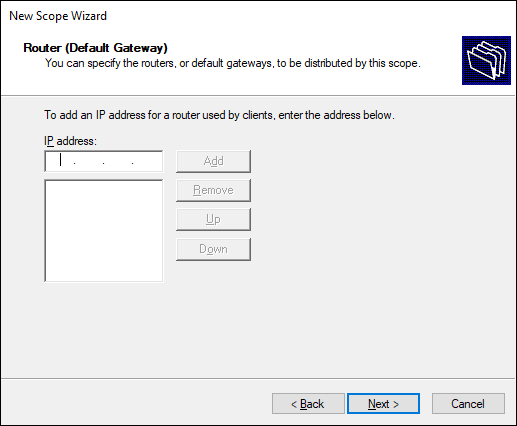
FIGURE 5-7: Provide the Default Gateway address.
Enter the address of your network’s gateway and click Add; then click Next.
The wizard now asks for additional DNS information, as shown in Figure 5-8.
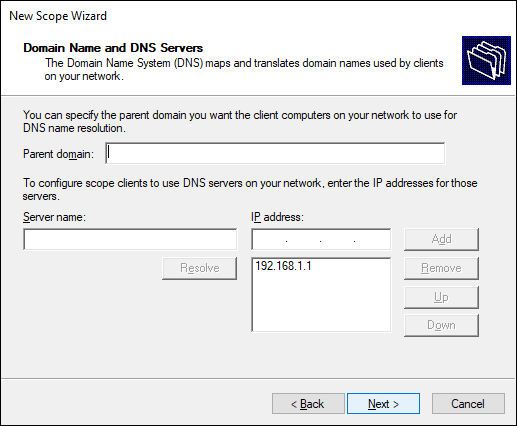
FIGURE 5-8: Provide additional DNS information.
(Optional) If you want to add a DNS server, enter its address and then click Add.
Repeat this step as many times as necessary to add any additional DNS servers.
Click Next.
The wizard next asks for WINS configuration information.
(Optional) If you want to enable WINS, enter the WINS server configuration.
WINS isn’t required for most modern networks, so you can usually just leave this screen blank.
Click Next.
The wizard now asks whether you want to activate the scope.
Select Yes, I Want to Activate This Scope and then click Next.
A final confirmation screen is displayed.
Click Finish.
The scope is created and you’re returned to the DHCP Management Console.
You can confirm that the scope was set up properly by navigating through the DHCP Management Console to the scope you just created and selecting Address Pool. The IP distribution range and any exclusions will be displayed, as shown in Figure 5-9.
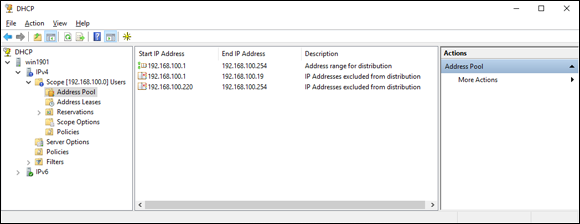
FIGURE 5-9: Viewing the address pool of a DHCP scope.
How to Configure a Windows DHCP Client
Configuring a Windows client for DHCP is easy. The DHCP client is automatically included when you install the TCP/IP protocol, so all you have to do is configure TCP/IP to use DHCP. And in nearly all cases, DHCP is configured automatically when you install Windows.
If you must configure DHCP manually, follow these steps:
Open the Control Panel.
If you haven’t already, switch to Small Icons view.
- Open Network and Sharing Center.
Click the link for your wired or wireless network adapter.
The adapter’s Status dialog box shows useful information about the adapter, as shown in Figure 5-10.
If you just want to find out your IP address, click the Details button.

FIGURE 5-10: The adapter’s Status dialog box.
Click Properties.
This brings up the adapter’s Properties dialog box, shown in Figure 5-11.

FIGURE 5-11: The adapter’s Properties dialog box.
Select Internet Protocol Version 4; then click Properties.
The Internet Protocol Version 4 (TCP/IPv4) Properties dialog box, shown in Figure 5-12, appears.

FIGURE 5-12: Enabling DHCP in the Internet Protocol Version 4 (TCP/IPv4) Properties dialog box.
- Select Obtain an IP Address Automatically and Obtain DNS Server Address Automatically.
- Click OK to apply the changes and dismiss the Internet Protocol Version 4 (TCP/IPv4) Properties dialog box.
- Keep clicking OK to close all the other dialog boxes you’ve opened.
Automatic private IP addressing
If a Windows computer is configured to use DHCP but the computer can’t obtain an IP address from a DHCP server, the computer automatically assigns itself a private address by using a feature called Automatic Private IP Addressing (APIPA). APIPA assigns a private address from the 169.254.x.x range and uses a special algorithm to ensure that the address is unique on the network. As soon as the DHCP server becomes available, the computer requests a new address, so the APIPA address is used only while the DHCP server is unavailable.
Renewing and releasing leases
Normally, a DHCP client attempts to renew its lease when the lease is halfway to the point of being expired. For example, if a client obtains an eight-day lease, it attempts to renew the lease after four days. However, you can renew a lease sooner by issuing the ipconfig /renew command at a command prompt. You may want to do this if you changed the scope's configuration or if the client’s IP configuration isn’t working correctly.
You can also release a DHCP lease by issuing the ipconfig /release command at a command prompt. When you release a lease, the client computer no longer has a valid IP address. When you release an IP lease, you can't communicate with the network by using TCP/IP until you issue an ipconfig /renew command to renew the IP configuration or restart the computer.