Chapter 3
Administering Teams
IN THIS CHAPTER
![]() Looking at Teams
Looking at Teams
![]() Understanding how Teams works
Understanding how Teams works
![]() Exploring the Teams admin center
Exploring the Teams admin center
![]() Setting restrictions on Teams features
Setting restrictions on Teams features
This chapter covers the basics of administering Microsoft Teams. If you’ve worked with Teams as an end user, you may not be aware that there’s an administrative side to Teams. After all, most Teams environments are set up so that users can create and fully customize new teams, adding public and private channels, building out a channel with new tabs and apps, and admitting members.
All of that’s true when Teams is left in its default configuration, wide open so that anyone who uses Teams is sort of his own Teams administrator. But there’s a lot going on behind the scenes with Teams. And many organizations have discovered that leaving it wide open creates an environment like the Wild West. It won’t take long before you have hundreds or even thousands of teams, with no consistency in naming standards and little concern for security.
That’s where the Teams Admin Center comes in. This chapter is a brief introduction to this helpful administration tool. I start with a bird’s-eye view of how Teams works behind the curtain so you’ll understand what really happens when you (or a user) creates a team. Then I show you how to tame your Teams environment so that it doesn’t become the Wild West.
What Is Teams?
In short, Teams is a chat-based online collaboration platform that is designed for people who work together on a common project.
Teams has two distinct modes of operation. The first is ad-hoc chat, in which two or more people connect for a brief conversation. In an ad-hoc chat, users can exchange files, start an audio call or an online meeting, and invite other people into the chat. Ad-hoc chats are by nature ephemeral; when the topic of the chat has been resolved, the chat comes to an end. Figure 3-1 shows an ad-hoc chat in progress.
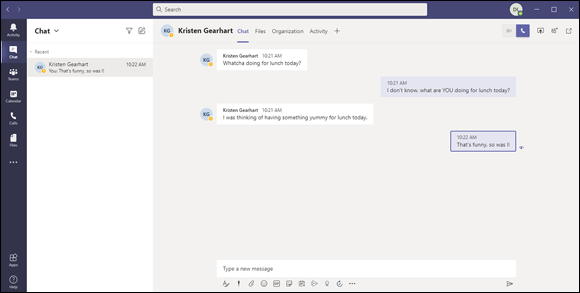
FIGURE 3-1: An ad-hoc chat in Teams.
The second mode for Teams is working in organized teams. In Microsoft Teams, a team is a designated space where a group of users come together for ongoing work. Figure 3-2 shows a team named Super Important Project.
Teams are organized around three basic concepts:
- Team: A team is a virtual workspace where a group of people gather to collaborate and communicate. Some teams are organization-wide, so the entire company participates in them. Other teams are group-specific, so membership is limited to specific people. Each of our production groups (Land Services, ExpandEV, Education & Healthcare, and so on) has its own team.
Channel: A channel is an organized topic within a team. All activities within a team take place in a channel. The most noticeable activity in a channel is chatting, which provides a way to have online conversations about the channel’s topic. But that’s not all that can happen in a channel — you can use channel tabs to access other channel features as well (see the next bullet point).
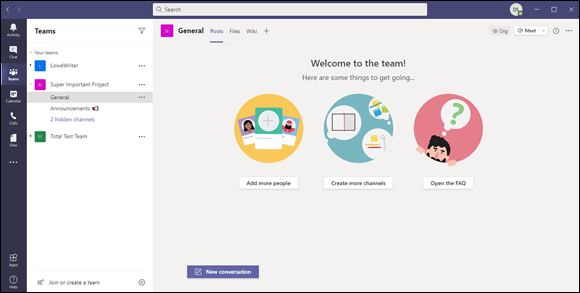
FIGURE 3-2: A typical team.
All teams have a top-level channel called General, which is where conversations about the team itself occur. For example, messages are automatically generated in the General channel when new people or features are added to a team.
Many teams also have a channel devoted to off-topic water-cooler-type conversations. This channel will often have a whimsical name like Fun or Water Cooler or Shoot the Breeze. This channel is for discussions that aren’t work-related, such as what happened at the big game the night before, or whether anyone wants to grab lunch today.
Beyond that, individual teams can have additional channels pertaining to specific topics. The team shown in Figure 3-2 has a an additional channel called Announcements, which will be used for announcements pertaining to the team.
Tabs: Each channel has a row of tabs that provide access to different features of the channel. All channels have a Posts tab, which is where chatting occurs, and a Files tab, which is a place to save files of interest to the channel. Other tabs may appear as well. For example, you may find a tab for OneNote, Wiki, Lists, and other useful ways to organize information and collaborate within a channel.
 Tabs are specific to channels. Each channel within a team has its own set of tabs.
Out of the gate, any user on Teams can create a new team and add channels to it. In Figure 3-2, you may have noticed the icon in the center of the page labeled Create More Channels. If you click that icon, you see the page shown in Figure 3-3.
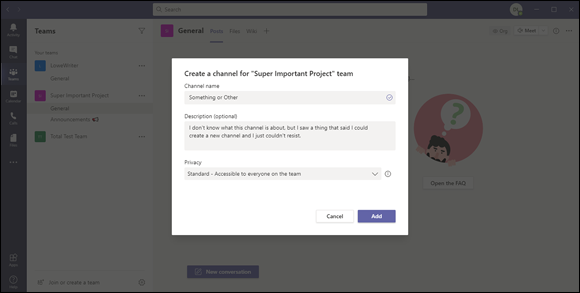
FIGURE 3-3: Anyone can create a new channel.
Anyone can create a new tab in a channel as well, simply by clicking the plus sign (+) to the right of the tabs. Clicking the plus sign brings up the page shown in Figure 3-4, which offers a plethora of choices for creating new tabs.
And finally, anyone can create an entirely new team by clicking the Join or Create a Team link at the bottom of the menu on the left side of the Teams window. Doing so leads you to a list of templates you can choose to act as a starting point for your new team.
This has been an incredibly simplified introduction to Teams, but it’s enough to understand the main problem with letting Teams go unmanaged: It won’t take long before your teams are overwhelmed with clutter. Too many teams, each having too many channels, each having too many tabs.
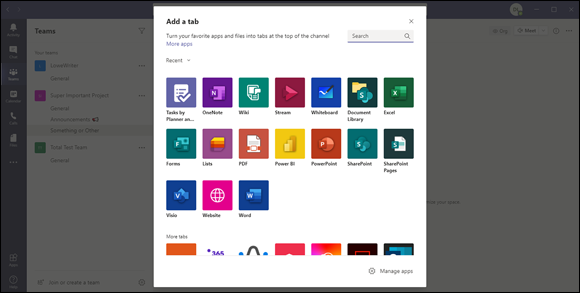
FIGURE 3-4: Anyone can add a tab to a channel.
Solid organization is essential to the success of Teams in your company, and to achieve that you’ll need to lock teams down a bit so that only designated people can manage the structure of your teams.
Before I delve into using the Teams Admin Center to add such controls, however, I want to make sure you have a solid understanding of what’s going on behind the scenes when someone creates a team, a channel, or a tab. The next section dives into the shallow end of the Teams architecture pool.
A Brief Look at How Teams Works
Teams is an exquisitely complicated product that is built on a solid layer of various features provided by Office 365 and Azure. It would take many pages — more than we have here — to give a complete explanation of how Teams works. But I want to give you a bird’s-eye view of the basic architecture of Teams. This information will help you better understand the administration tasks required to make Teams a success in your organization.
Figure 3-5 shows the components of Office 365 that are involved when you create a team.
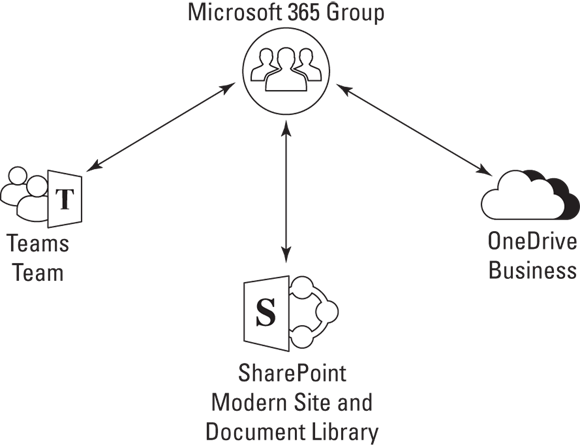
FIGURE 3-5: An overview of Microsoft Teams architecture.
The following sections describe the role each of these Office 365 components plays in Microsoft Teams.
Microsoft 365 Group
Contrary to what you may expect, Teams itself is not at the center of this hub: Microsoft 365 Groups are. A Microsoft 365 Group is the organizing principle around which teams are created.
So, to understand Teams, you need to first understand how Microsoft 365 Groups work. You’re probably familiar with standard Active Directory security and distribution groups. A Microsoft 365 Group is similar, but it provides additional capabilities.
With a Microsoft 365 Group, you can provide access to a collection of shared resources, including the following:
- A team in Microsoft Teams
- A modern SharePoint site in SharePoint
- The SharePoint Document Library
- A shared mailbox in Outlook
- A shared calendar
- A OneNote notebook
Other shared resources are available to a Microsoft 365 Group beyond these, but the ones in the preceding list are most relevant to Teams.
When you create a team in Microsoft Teams, a Microsoft 365 Group is automatically created, and the resources detailed in the preceding list are automatically provisioned for the group. As you can see, a lot of work goes on behind the scenes when you create a team!
Figure 3-6 shows a Microsoft 365 Group that was created for a team named Super Important Project. The team is selected and the Membership details are shown so you can see who the owner and members of the team are.
Note that if you create a Microsoft 365 Group directly from the Office 365 Admin Center, the corresponding resources are not automatically created. However, you can easily create a team from an existing Microsoft 365 Group, either in Teams or in the Teams Admin Center. I’ll show you how to do it from the Admin Center later in this chapter, in the “Managing Teams” section.
In addition to automatically provisioning all the services required to support Microsoft Teams, the Microsoft 365 Group automatically manages permissions for those services.
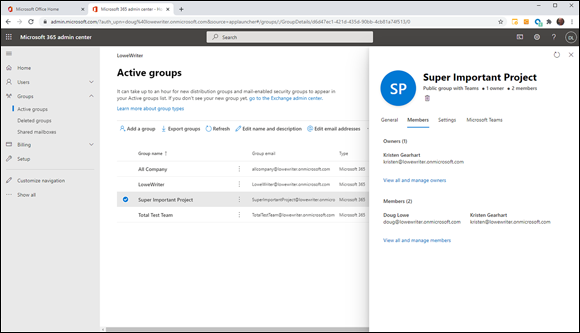
FIGURE 3-6: A Microsoft 365 Group created for a team.
The membership in Teams and the membership of its corresponding Microsoft 365 Group are automatically kept in sync with one another. So, if you add or remove members for the team, they’re added or removed for the Group, and vice versa.
SharePoint
When you create a team in Microsoft Teams, two critical components of SharePoint are also created:
- A modern SharePoint site, which provides a basic SharePoint page for the team
- The SharePoint Document Library, which provides a library for storing files related to the team
Users can access the SharePoint site for a team by clicking the ellipses (…) at the upper right of the team and choosing Open in SharePoint. For example, Figure 3-7 shows the modern SharePoint site that was created for the Super Important Project team. (When you click Open in SharePoint, you’re actually taken to the site’s Documents page. For this figure, I clicked Home to display the site’s home page, so you can see a few of the SharePoint features included in the site, such as News and Activity.)
The SharePoint Document Library plays a key role in the operation of Microsoft Teams, because it’s the repository used for all files stored for the team. Figure 3-8 shows the Document Library for the Super Important Project Team. As you can see, it includes a folder for each of the team’s two channels: General and Something or Other.
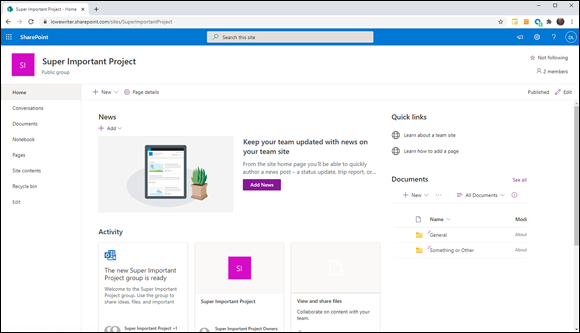
FIGURE 3-7: A modern SharePoint site is created for every team.
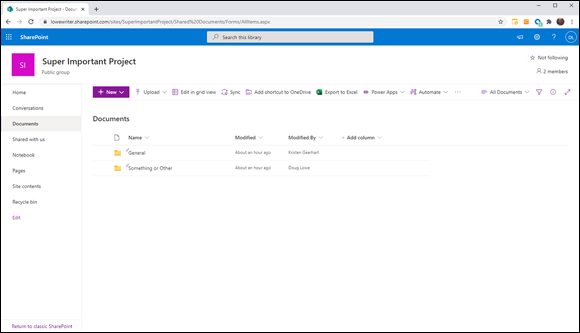
FIGURE 3-8: A SharePoint Document Library is created for every team.
When you create a new channel in a team, a new folder is automatically created in the Document Library. The Files tab in each channel points directly to the corresponding folders in the Document Library.
Note that creating a new folder in the Document Library by clicking +New on the SharePoint Documents page does not create a new channel in the team. This means that you can create folders that won’t be accessible from the Files tab of any team channel. However, you can provide access to these folders by adding the Document Library as a tab to any channel in the team, as shown in Figure 3-9.
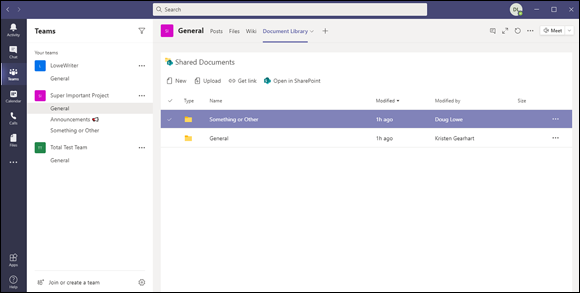
FIGURE 3-9: The SharePoint Document Library can be added as a tab to any team channel.
OneDrive for Business
The SharePoint Document Library provides file storage for teams in Microsoft Teams. But what about storage for files that are exchanged in an-hoc chats? That’s where OneDrive for Business comes in.
When a user posts a file to the Files tab in a chat, the file is uploaded to that user’s OneDrive for Business. Then, the file is shared with everyone else on the chat.
Figure 3-10 shows how this works. This figure shows the Files tab of a chat between two Teams users. As you can see, the file menu.png has been posted to the chat. The figure also shows the user's OneDrive for Business account in www.office.com. As you can see, Teams created a folder in OneDrive for Business named Microsoft Teams Chat Files and uploaded the menu.png file to that folder. The figure also shows that the file has been shared with the participants in the chat.
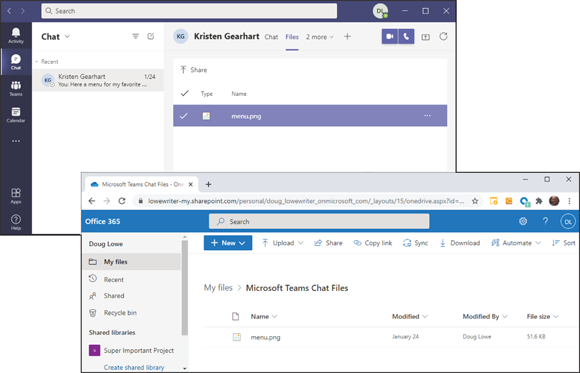
FIGURE 3-10: A file shared in a chat.
Using the Teams Admin Center
Although you can do a lot of Teams administration directly from Teams itself, many tasks can only be accomplished from the Teams Admin Center. To access it, sign in to www.office.com, click the Admin icon, click Show All, and then click Teams. Figure 3-11 shows the Teams Admin Center Dashboard.

FIGURE 3-11: The Teams Admin Center Dashboard.
As you can see, there are a slew of choices in the menu on the left side of the Admin Center:
- Dashboard: Displays a summary of Teams tasks to be done, as well as useful information about Teams activity.
- Teams: Manage individual teams, create and update policies, and create templates for new teams.
- Devices: Manage devices including phones, useful if you use Teams as your phone solution.
- Locations: Manage locations. This option is useful if you use Teams as your phone solution, allowing you to set Emergency 911 information.
- Users: Manage Teams users.
- Meetings: Manage meeting policies and settings.
- Messaging Policies: Manage policies for chat and channel messaging.
- Teams Apps: Manage apps that can be used in Teams.
- Voice: Manage voice settings. This option is useful if you use Teams as your phone solution.
- Policy Packages: Lets you manage packages of policies for various user types.
- Analytics & Reports: Access useful information about your organization’s utilization of Teams.
- Org-Wide Settings: Manage settings that apply throughout your organization, such as whether external and guest access are allowed.
- Planning: Helps you plan your Teams deployment.
- Call Quality Dashboard: Useful if you use Teams as your phone solution.
Managing Teams
Figure 3-12 shows the Manage Teams page, which you can reach by selecting Teams and then Manage Teams in the left menu pane. This page lists all the teams in your organization, along with useful information such as the number of standard and private channels, the number of members and owners, and so on.
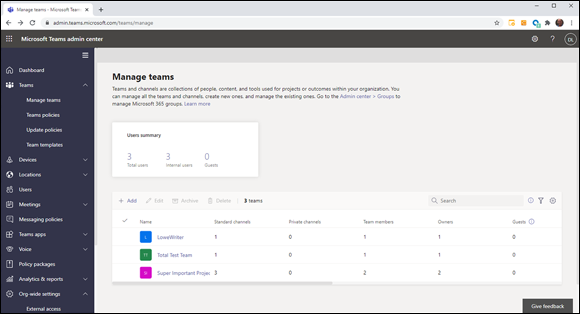
FIGURE 3-12: Managing teams.
![]() Note that you can change the columns that are displayed on this page by clicking the gear icon to the right of the list (shown in the margin). You can select from among the following columns:
Note that you can change the columns that are displayed on this page by clicking the gear icon to the right of the list (shown in the margin). You can select from among the following columns:
- Team name
- Standard channels
- Private channels
- Team members
- Owners
- Guests
- Privacy
- Status
- Description
- Sensitivity
- Classification
- Group ID
- Expiration date
![]() To create a new team, click the + Add button at the left side of the toolbar above the list of teams (shown in the margin). This brings up the panel shown in Figure 3-13, which allows you to enter the name and description for the new team. You can also specify team owners (you’ll be added as a team owner by default), and you can use the Privacy drop-down to specify whether the group is private or public. After you’ve entered this information, click Apply to create the team.
To create a new team, click the + Add button at the left side of the toolbar above the list of teams (shown in the margin). This brings up the panel shown in Figure 3-13, which allows you to enter the name and description for the new team. You can also specify team owners (you’ll be added as a team owner by default), and you can use the Privacy drop-down to specify whether the group is private or public. After you’ve entered this information, click Apply to create the team.
To see the details for a particular team, just click the team in the list. Figure 3-14 shows the detailed information for the Super Important Project team.
To change information for the team, click Edit on the right side of the screen. The Edit Team pane, shown in Figure 3-15, appears. This pane lets you change the name, description, and private settings for the team.
The Edit Team pane also includes Conversations and Channels groups you can expand to restrict certain features for the teams. Figure 3-16 shows these two groups expanded.
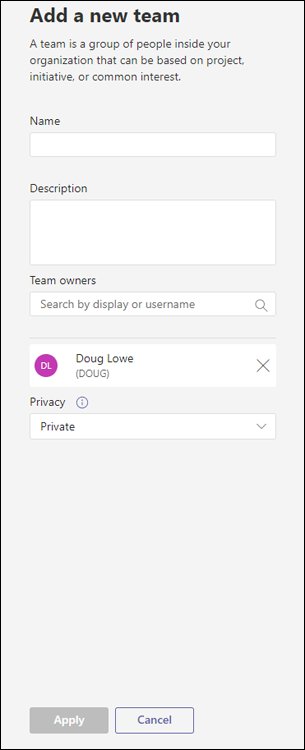
FIGURE 3-13: Creating a new team.
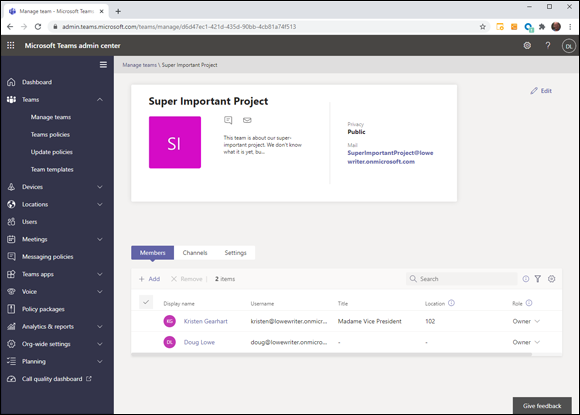
FIGURE 3-14: The Super Important Project team details.

FIGURE 3-15: Editing the Super Important Project team.

FIGURE 3-16: Restricting team features.
For conversations, the settings are:
- Team members can edit sent messages.
- Team members can delete sent messages.
For channels, more settings are available:
- Adding new channels and editing existing ones
- Adding, editing, and removing tabs
- Adding, editing, and removing connections
- Adding, editing, and removing apps
- Adding new private channels and editing existing ones
You can tailor these settings however you want to allow or restrict these features for team members. Note that these restrictions do not apply to team owners.